파일 내용 수정하기
gedit
- 런레벨 5에서 동작하는 애플리케이션
- 그래픽 환경이 없다면 동작하지 않는다.
- 편집 기능이 부족
편집기
- 행단위 편집기
-
프롬프트 상에서 파일을 편집하고 해당 내용을 파일로 전송하는 형태
-
sed
sed 사용
-
root로 시작하는 단어를 hello로 바꾸기
-
“g” : 전체에서 변경, gloabally
-
“g”가 없다면 : 첫번째만 변경
[root@srv7 0720]# sed -i 's/root/hello/g' anaconda-ks.cfg -
변수로 받은 hi를 hello로 바꾸기
-
변수 받아서 바꾸려면 “”사용
[root@srv7 0720]# edit=hi [root@srv7 0720]# sed -i "s/hello/$edit/g" anaconda-ks.cfg -
특정 변수 아래 행에 문장 넣기
-
[database]라는 문장 밑에 5.5.5.5 문장을 추가
-
-e : 정규표현식 사용 가능
[root@srv7 0721]# sed -i'' -r -e "/\[database\]/a\5.5.5.5" test.txt
-
- 화면단위 편집기
-
직접 파일을 화면에 모두 열어두고 편집하는 형태
-
emacs : 전문가용, vi(m) : 일반적으로 널리 사용
-
vi(m)은 내부적으로 sed가 내장되어 있다.
-
다른 배포판에서는 vim이 설치되어있지 않은 경우가 있다. 이 경우에는 vim을 설치하고 .bashrc에서 alias로 vi=’vim’ 으로 되도록 설정하는 것이 좋다.
vi(m) 사용
[root@srv7 0720]# vi [편집할파일이름]
-
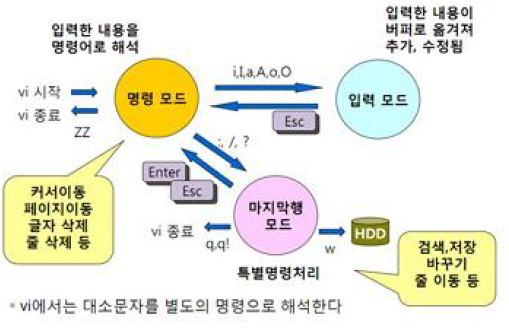
명령모드(ESC)

방향키 사용 가능

$ : 한 행에서 맨뒤로 이동 = end키

^ : 한 행에서 가장앞으로 이동 = Home키

gg : 전체 화면에서 첫번째 행으로 이동

G :  전체 화면에서 마지막으로 이동

10G : 10번째 행으로 이동

dd : 한 행 지우기

2dd : 2행 지우기

u : 직전으로 돌리기

d G : 현재 행 밑 모두 지우기

yy : 한 행 복사

2yy : 두 줄 복사

p : 현재 행 밑에 붙여넣기

입력모드

i : 해당커서에서 입력모드로

o : 한줄을 비우고 입력모드로

입력한 내용은 휘발성 메모리 버퍼로 옮겨지기 때문에 저장하지 않으면 모두 날아감

마지막행모드

:w : 저장

:q : 종료 (만약 작업내용이 있다면 해당 내용을 처리한 뒤 나가야 함)

:q! : 저장하지 않고 강제 종료

:wq : 저장 후 종료

:set nu : 번호 보이게 함

:set nonu : 번호 보이지 않게 함

/단어이름 : 해당 단어를 검색

n : 두번째 결과로 이동

N : 직전 결과로 이동

:s/문자열1/문자열2 : 문자열1을 문자열2로 변경(해당행)

:%s/문자열1/문자열2/g: 파일 전체 모든 문자열1을 문자열2로 변경

간혹 퍼미션 문제로 wq를 하더라도 종료가 되지 않는 경우가 있다. 이 경우에는 :wq!를 해야 한다.

vi test.txt 후 그냥 종료하고 ls -al로 확인하면 test.txt.swp파일이 있음(가상메모리를 사옹)
sed를 이용해 웹서버 포트번호 변경
- /etc/httpd/conf/httpd.conf파일에서 Listen 8888로 변경
[root@srv7 0720]# sed -i 's/Listen 80/Listen 8888/' /etc/httpd/conf/httpd.conf
[root@srv7 0720]# grep Listen /etc/httpd/conf/httpd.conf
# Listen: Allows you to bind Apache to specific IP addresses and/or
# Change this to Listen on specific IP addresses as shown below to
#Listen 12.34.56.78:80
Listen 8888- SELINUX 설정
[root@srv7 0720]# setenforce 0
[root@srv7 0720]# sed -i 's/SELINUX=enforcing/SELINUX=disabled/' /etc/selinux/config
[root@srv7 0720]# cat /etc/selinux/config

# This file controls the state of SELinux on the system.
# SELINUX= can take one of these three values:
#     enforcing - SELinux security policy is enforced.
#     permissive - SELinux prints warnings instead of enforcing.
#     disabled - No SELinux policy is loaded.
SELINUX=disabled
# SELINUXTYPE= can take one of three values:
#     targeted - Targeted processes are protected,
#     minimum - Modification of targeted policy. Only selected processes are protected.
#     mls - Multi Level Security protection.
SELINUXTYPE=targeted- httpd 재시작
[root@srv7 0720]# systemctl restart httpd- 211.183.3.201:8888로 접속해 확인
vi 편집기를 이용해 웹서버 설정 변경하기
-
vi로 파일 열기
[root@srv7 0720]# vi /etc/httpd/conf/httpd.conf -
파일 편집
/8888로 찾기
Listen 80으로 변경
/index.html으로 찾기
DirectoryIndex index.jsp index.html main.html으로 변경하여index.jsp 실행 →없다면 index.html → 없다면 main.html로 가도록
/var/www/html으로 찾으면
첫번째 슬래시인 var만 찾음
-
/var/www/html/index.html을 main.html로 이름 변경
[root@srv7 0720]# mv /var/www/html/index.html /var/www/html/main.html [root@srv7 0720]# ls -
httpd 재시작
systemctl restart httpd -
211.183.3.201로 접속하면 main.html 파일이 보이게 됨
[root@srv7 0720]# curl http://localhost/index.html
<!DOCTYPE HTML PUBLIC "-//IETF//DTD HTML 2.0//EN">
<html><head>
<title>404 Not Found</title>
</head><body>
<h1>Not Found</h1>
<p>The requested URL /index.html was not found on this server.</p>
</body></html>
[root@srv7 0720]# curl http://localhost/main.html
<center><h2>YEON SOO YEON</h2></center>
[root@srv7 0720]# grep index.html /etc/httpd/conf/httpd.conf
    DirectoryIndex index.jsp index.html main.html
[root@srv7 0720]# curl http://localhost
<center><h2>YEON SOO YEON</h2></center>
