Daily Issue #1
데일리 이슈의 첫 포스트입니다 !!
한달에 한번 포스팅하는 공부하는 스토리와 다르게 여기에서는 매일 개발하면서 생긴 작은 이슈들을 기록하고, 어떻게 해결 했는지 공유하려고 합니다. 😎
무엇이 문제입니까?
오늘은 UIStackView에 Background Color를 적용하려다가 생각처럼 잘 되지 않아서 해결방법을 찾아보았습니다.
customStackView.axis = .vertical
customStackView.backgroundColor = .blue // 실제로 이렇게 작성했었습니다 ^^;
위와 같이 작성하고 잘 되겠지~ 하고 런 해보니까 두둥... 먹질않네요 ...
이상하다 싶어서 이번엔 layer에 컬러를 넣어보았습니다.
customStackView.axis = .vertical
customStackView.layer.background = UIColor.black.cgColor
하지만 역시 동작하지않습니다 ... ㅠㅠㅠ 뭐지 왜지.. 왤까 ...
고민하지말고 찾아보자~!!
You can't do this – UIStackView is a non-drawing view, meaning that drawRect() is never called and its background color is ignored. If you desperately want a background color, consider placing the stack view inside another UIView and giving that view a background color.
출처: https://www.hackingwithswift.com/example-code/uikit/how-to-give-a-uistackview-a-background-color
아하~!! UIStackView는 UIView와 다르게 drawRect()를 호출하지 않아 background color를 설정해도 무시 되는구나!
그렇다면 어떻게 해결할 수 있을까....
색이 있는 뷰를 스택뷰의 크기에 맞게 삽입하면 되면 되지않을까?
let customStackView = UIStackView(frame: CGRect(x: 0, y: 0, width: 200, height: 60)) // 재현을 위해 임의로 사이즈를 주었습니다.
customStackView.axis = .vertical

let backgroundColorView = UIView(frame: .zero)
backgroundColorView.backgroundColor = .blue
backgroundColorView.autoresizingMask = [.flexibleWidth, .flexibleHeight]
customStackView.addSubview(backgroundColorView)

// SnapKit을 사용하지 않을 경우
backgroundColorView.translatesAutoresizingMaskIntoConstraints = false
backgroundColorView.leadingAnchor.constraint(equalTo: customStackView.leadingAnchor).isActive = true
backgroundColorView.topAnchor.constraint(equalTo: customStackView.topAnchor).isActive = true
backgroundColorView.trailingAnchor.constraint(equalTo: customStackView.trailingAnchor).isActive = true
backgroundColorView.bottomAnchor.constraint(equalTo: customStackView.bottomAnchor).isActive = true

// SnapKit을 사용하는 경우
// backgroundColorView.snp.makeConstraint {
//	$0.edges.equalTo(customStackView)
// }
결과는 ????
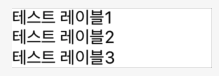
백그라운드 뷰 미삽입
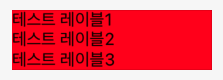
백그라운드 뷰 삽입
깔끔하게 잘 됐네요 !!
++ 추가
iOS 14 이상부터 UIStackView가 CATransformLayer가 CALayer로 변경 되어 backgroundcolor가 작동한다고 합니다 !!
출처: https://useyourloaf.com/blog/stack-view-background-color-in-ios-14/
따라서 위에서 적용했던 아래 코드가 정상적으로 작동할것 같네요 !!
customStackView.axis = .vertical
customStackView.backgroundColor = .blue
다만, iOS 14 이상 부터이니 분기처리를 해야겠죠??
let customStackView = UIStackView(frame: CGRect(x: 0, y: 0, width: 200, height: 60)) // 재현을 위해 임의로 사이즈를 주었습니다.
customStackView.axis = .vertical

if #available(iOS 14.0, *) {
	customStackView.backgroundColor = .blue
} else {
	let backgroundColorView = UIView(frame: .zero)
	backgroundColorView.backgroundColor = .blue
	backgroundColorView.autoresizingMask = [.flexibleWidth, .flexibleHeight]
	customStackView.addSubview(backgroundColorView)

	// SnapKit을 사용하지 않을 경우
	backgroundColorView.translatesAutoresizingMaskIntoConstraints = false
	backgroundColorView.leadingAnchor.constraint(equalTo: customStackView.leadingAnchor).isActive = true
	backgroundColorView.topAnchor.constraint(equalTo: customStackView.topAnchor).isActive = true
	backgroundColorView.trailingAnchor.constraint(equalTo: customStackView.trailingAnchor).isActive = true
	backgroundColorView.bottomAnchor.constraint(equalTo: customStackView.bottomAnchor).isActive = true

	// SnapKit을 사용하는 경우
	// backgroundColorView.snp.makeConstraint {
	//    $0.edges.equalTo(customStackView)
	// }
}
StackView를 자주 사용하니까 Extension으로 만들어서 활용하면 중복코드를 줄이고, 편리하게 사용 할 수 있을 것 같습니다!
이상으로 데일리 이슈 첫 포스팅을 마치겠습니다.
읽어주셔서 감사합니다. 🙇♂️