
안녕하세요 !!
낮에는 덥고~🥵 밤에는 쌀쌀하고🥶
감기걸리기 딱 좋은 날씨네요ㅎ..
모두 건강 조심하세요~
오늘은 관심있게 보고있던 라이브러리를 직접 적용해 보려고합니다.
바로바로 SkeletonView !!
물론 SkeletonView Git에 Example Project가 있지만, 직접 만들면서 이해해보려고 합니다.
평소에 관심 있었던 라이브러리인데 .. ㅎ 좀 처럼 시간이 없어서 미루고 미뤄두었던 라이브러리인데
이제야 맛을보네요 ㅎㅎㅎㅎㅎㅎ
이번에는 가볍게 힘 풀고 들어가보실까요~~~ 🕶
작성했던 모든 코드는 GitHub에 있습니다!🙇🏻
What is Skeleton View
당근마켓이나, 원티드의 서비스를 이용하시다 보면 데이터를 불러오는 동안
일반적인 Loading Indicator와는 다르게 미리 어떤 내용들이 있는지 대략적인 형태를 보여줍니다.
원티드 iOS 앱의 SkeletonView
SkeletonView의 ReadMe에서는 다음과 같이 소개 하고 있습니다.
오늘날 거의 대부분의 앱들은 비동기 방식의 API 호출을 사용하는 프로세스를 가지고 있습니다. 프로세스가 작동하는동안 개발자들은 작업이 실행되고 있다는것을 사용자들에게 보여주기 위해서 로딩 뷰를 배치합니다.
SkeletonView는 이러한 필요에 의해 고안되었고, 사용자들에게 무엇인가 로딩이 되고 있다는것을 보여주면서 기다리는 콘텐츠에 대해서도 미리 준비할 수 있게 해주는 우아하게 표현할수 있는 방법입니다.
일반적인 로딩 인디케이터의 경우에는 placeHolder를 보여주기 때문에 어떤 콘텐츠가 나타날지 예상하지 못하는 경우가 많습니다.
Hotels 앱의 검색 후 로딩 화면
잡코리아 앱의 검색 후 로딩 화면
미리 유저들에게 콘텐츠를 예상할 수 있게 하는것이 유저에게 많은 도움이 될 것 이라고는 생각하지 않지만,
조금의 편의는 제공 할 수 있을 것 같다고 생각합니다.
How to Use Skeleton View
Install
CocoaPods과 Carthage, SPM을 지원합니다.
저는 CocoaPods을 주로 사용하기 때문에 Pod을 기준으로 설치하여 사용해보겠습니다.
기타 설치방법은 여기를 참조해주세요!
Pod file에 다음과 같이 입력한 후 pod install을 진행해주세요!
pod 설치후에는 xcworkspace를 실행하는 것 잊지 마세요!🤓
pod "SkeletonView"Useage
pod 설치를 한 후, UI를 구성하는 방법에 따라서 사용법이 나누어 집니다.
InterfaceBuilder / StoryBoard를 사용하여 UI를 구성하는 경우
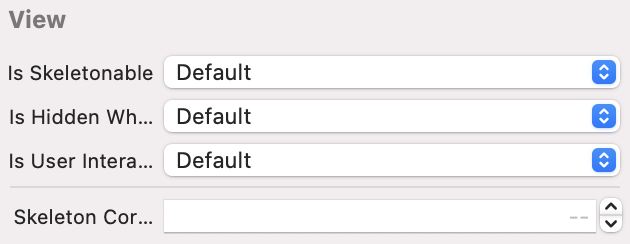
UI Inspector에서 is Skeletonable을 On 하면 SkeletonView를 사용할 수 있습니다.
Code를 통해 UI를 구성하는 경우
스켈레톤은 사용하려는 모듈에서 한번만 import 하면됩니다. (SnapKit도 마찬가지)
그래서 저는 Appdelegate에서 import 해주었습니다.
그후, SkeletonView를 적용하고 싶은 View에 마찬가지로 isSkeletonable을 true로 설정해 주시면 됩니다!
import SkeletonView
import SnapKit

...
...

// ViewController.swift
view.isSkeletonable = true
그러면 isSkeletonable만 설정해주면 끝인가?!
물론 아니죠, isSkeletonable은 스켈레톤 사용할래? 라는 값이고,
스켈레톤을 표시해줘! 라는 실행을 해야합니다.
SkeletonView는 다음과 같은 스켈레톤 표시 메소드를 제공합니다.
showSkeleton()                  // Solid
showGradientSkeleton()          // Gradient
showAnimatedSkeleton()          // SolidAnimated
showAnimatedGradientSkeleton()  // GradientAnimated
또한 각각의 미리보기도 제공합니다.
(이미지 업로드가 어렵네요 ㅠㅠㅠㅠㅠㅠ README를 참고해주세요)
스켈레톤을 표시하는 메소드를 사용할 때 가장 중요한점이 한가지 있습니다!
바로 SkeletonView는 재귀적으로 되어있기 때문에 최상위 View에서 showSkeleton을 사용한다면,
isSkeletonable이 true인 모든 뷰가 showSkeleton이 적용되게 됩니다.
private func recursiveShowSkeleton(skeletonConfig config: SkeletonConfig, root: UIView? = nil) {
    if isHiddenWhenSkeletonIsActive {
        isHidden = true
    }
    guard isSkeletonable && !isSkeletonActive else { return }
    currentSkeletonConfig = config
    swizzleLayoutSubviews()
    swizzleTraitCollectionDidChange()
    addDummyDataSourceIfNeeded()
    subviewsSkeletonables.recursiveSearch(leafBlock: {
        showSkeletonIfNotActive(skeletonConfig: config)
    }) { subview in
        subview.recursiveShowSkeleton(skeletonConfig: config)
    }

    if let root = root {
        flowDelegate?.didShowSkeletons(rootView: root)
    }
}
위 코드에서 확인 할 수 있듯이, isSkeletonable이 false인 view를 만나게 되면 재귀가 종료됩니다.
Example
살펴본 사용법은 정말 간단한데요, 제가 직접 적용을 해보겠습니다 ! 으아아아ㅏㅇㄱ
InterfaceBuilder / StoryBoard
우선 만들고 싶은 UI를 슬쩍 골라보자면,
위에 예시를 들었던 원티드의 UI를 참고하려고 합니다 !
배너가 있고, 배너위에 텍스트, 아래에는 콜렉션 뷰가 있는듯 하군요!
여러가지 UI가 있어서 직접 만들어보기에 너무 좋은 예시 같네요 😃
먼저 배너와 배너에 있는 텍스트를 먼저 만들어 보겠습니다.
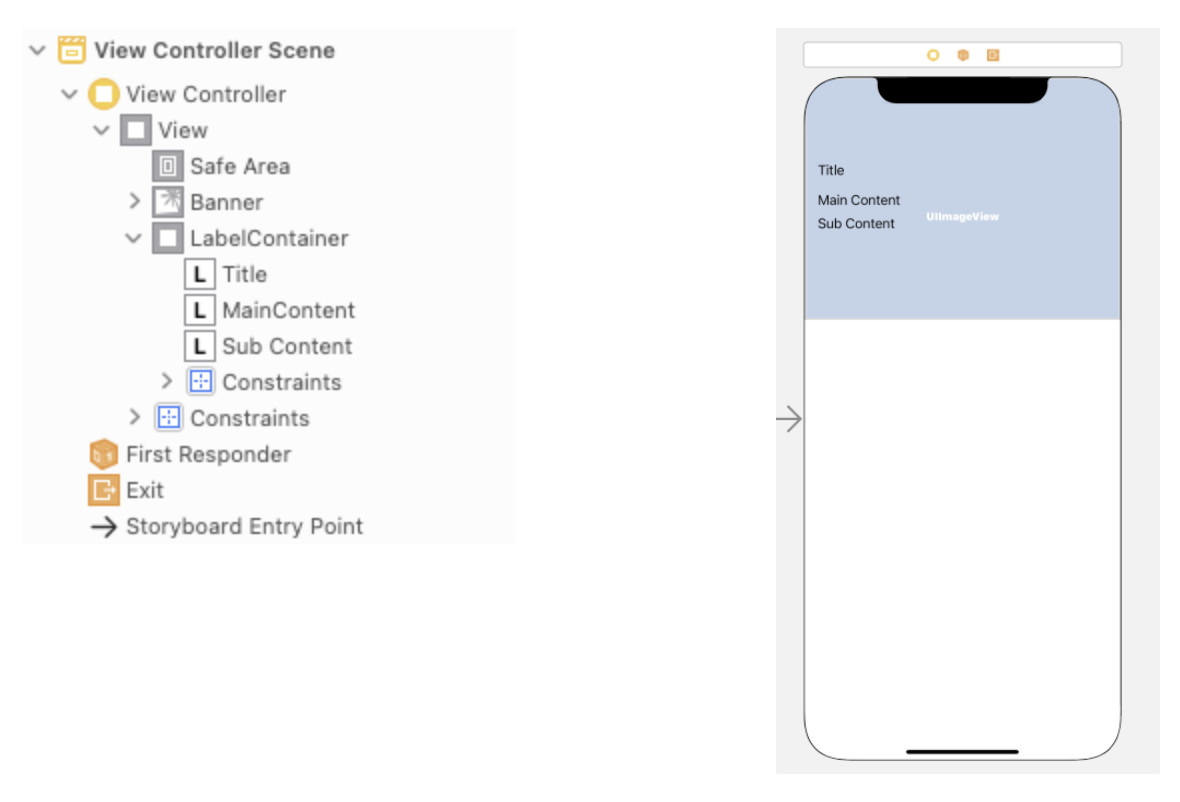
hierarchy와 뷰를 위와 같이 구성하였습니다.
먼저 스켈레톤을 적용할 UILabel은 Title, Main, Sub 세 가지 입니다.
따라서 inspector에서 isSkeletonable을 on해주시면 됩니다.
잠깐!!! 🖐
아까 위에서 Skeleton은 재귀적으로 적용된다고 하였습니다.
그러니까 Skeleton을 적용할 Label 뿐만 아니라, Label을 감싸고있는 LabelContainer에도 isSkeletonable을 on으로 설정 해주어야 합니다!
뷰와 속성을 설정했으니 이제 어떻게 사용할지 한번 생각해 봅시다.🤔
일반적으로 데이터를 가져올 때 까지 스켈레톤을 표시해줘야 합니다.
그렇다면 데이터를 가져오기 시작할 때 스켈레톤을 보여주고,
데이터를 가져오면 스켈레톤을 사라지게 하면 될 것 같습니다.
예시에서는 화면이 보여질 때 부터 데이터를 로딩한다고 가정해보겠습니다!
(개발하시는 프로젝트의 데이터 로딩 환경을 생각해서 반영해주시면 좋을 것 같습니다 🙂)
그렇다면 화면이 보여질 때(viewWillAppear) 스켈레톤을 보여주고,
로딩이 3초후에 끝나는것을 가정하고 타이머를 통해 스켈레톤을 사라지게 해보겠습니다!!
override func viewWillAppear(_ animated: Bool) {
    super.viewWillAppear(animated)

    view.showSkeleton() // Show Skeleton

		// Hide Skeleton after 3seconds
    DispatchQueue.main.asyncAfter(deadline: .now() + 3) { [weak self] in
        self?.view.hideSkeleton() // Hide Skeleton
    }
}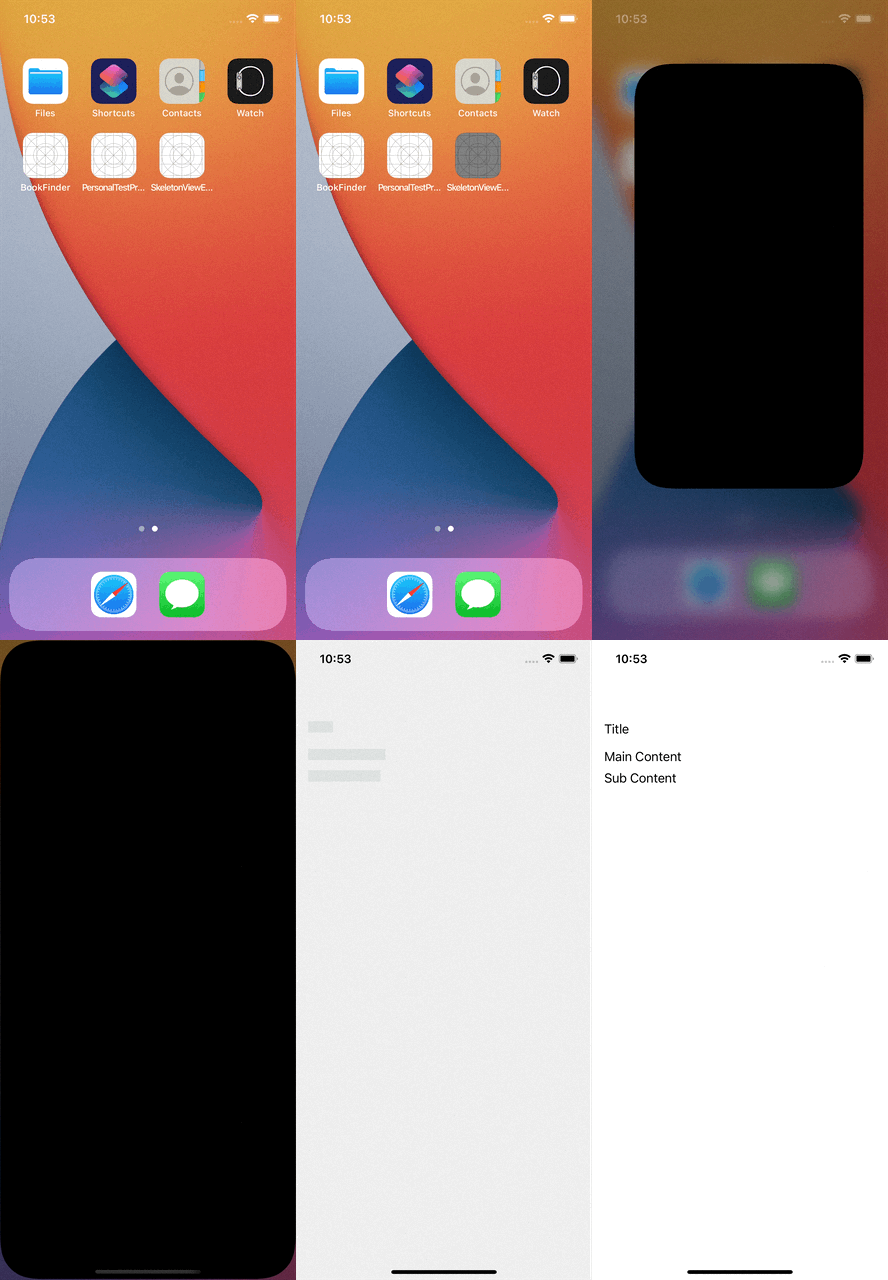
예상한대로 잘 동작하는군요~
그러면 궁금해지는게 있는데, LabelContainer의 isSkeletonable을 off 해버리면 어떻게 될까요 !?
view 하위에 isSkeletonable이 flase인 LabelContainer를 만났으니 view에만 Skeleton이 적용될 것 같습니다.
결과를 확인해보면
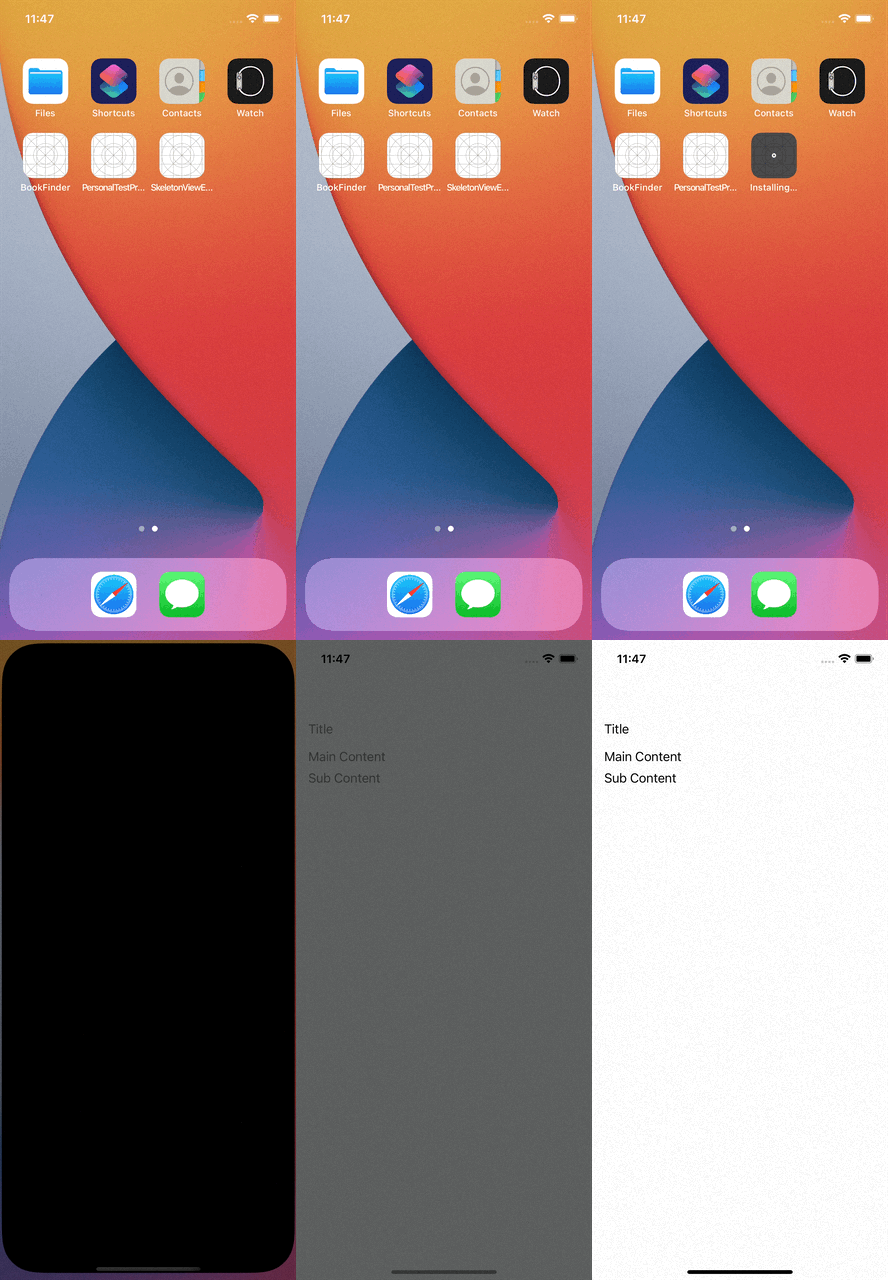
예상했던대로 view에만 Skeleton이 적용된 모습입니다.
이제 Label에 적용하는건 적응한것 같으니, CollectionView에 적용해보겠습니다.
간단하게 CollectionView Layout을 구성하고, Cell 까지 구성해보겠습니다.
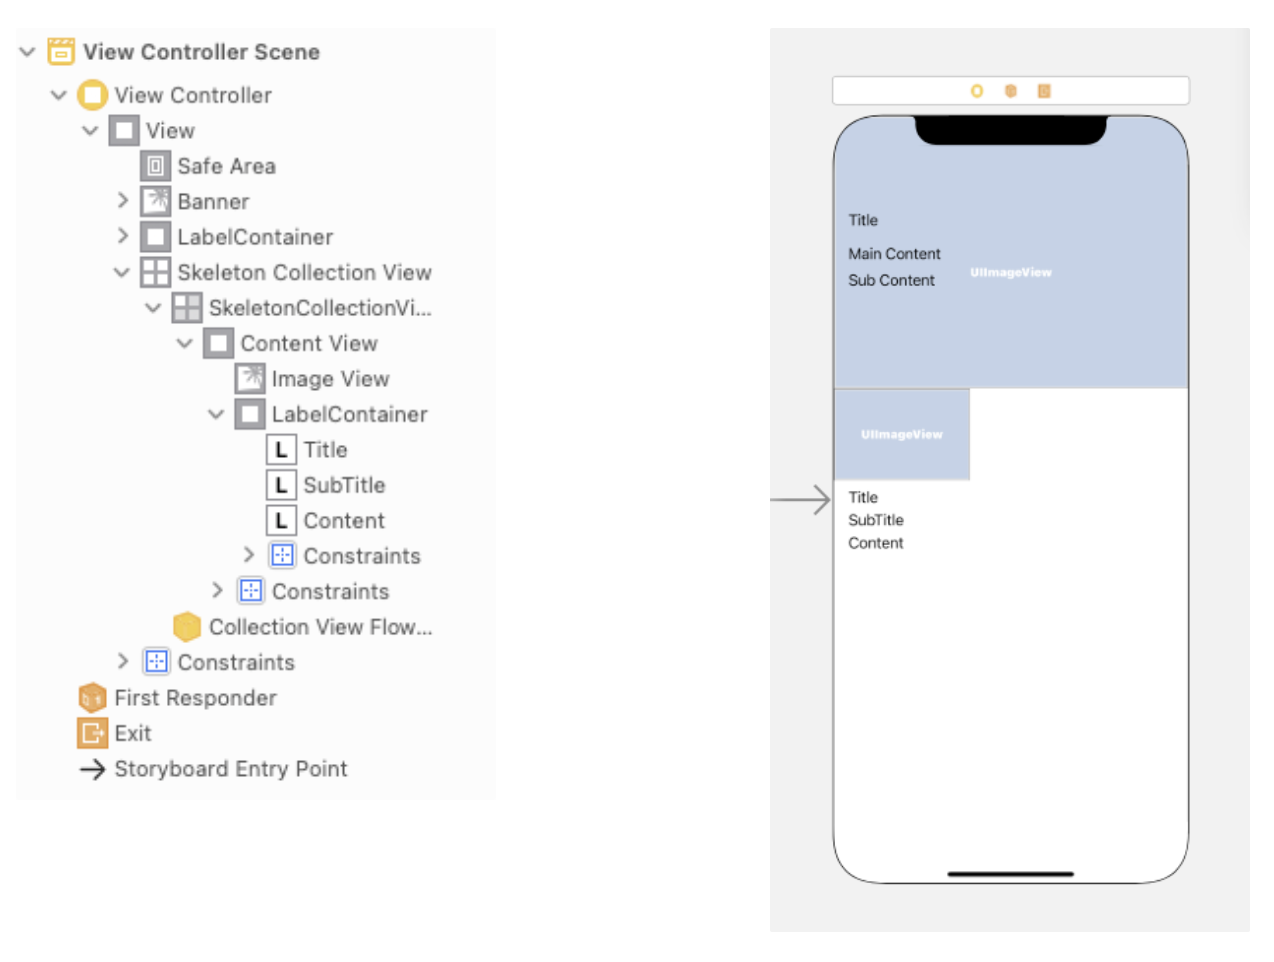
UI 구성은 끝났으니, Skeleton을 적용해보겠습니다.
imageView와 label에 적용을 해야합니다.
또한 imageView와 label을 감싸고 있는 ContentView, LabelContainer, SkeletonCollectionViewCell, SkeletonCollectionView 모두 isSkeletonable을 true로 주어야 하겠죠?
하지만 공식 문서에서는 생각과는 다르게 적용합니다.
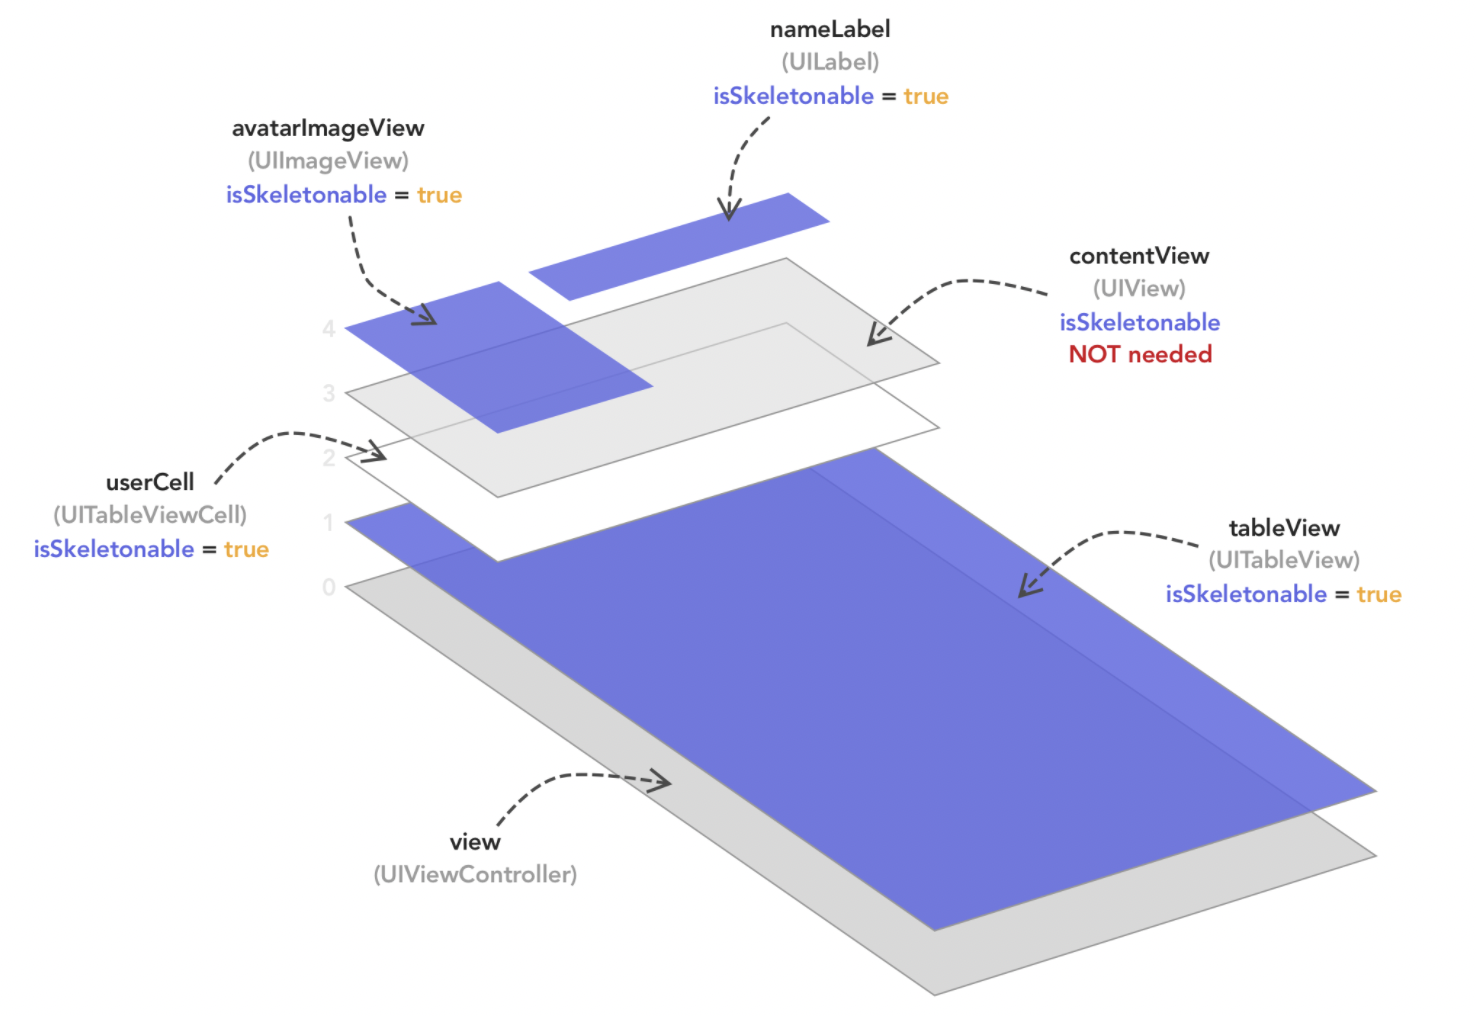
contentView에는 isSkeletonable을 적용하지 않습니다.
예상하건데,
// SkeletonCollectionDataSource.swift

func collectionView(_ collectionView: UICollectionView, cellForItemAt indexPath: IndexPath) -> UICollectionViewCell {
    guard let cell = originalCollectionViewDataSource?.collectionSkeletonView(collectionView, skeletonCellForItemAt: indexPath) else {
        let cellIdentifier = originalCollectionViewDataSource?.collectionSkeletonView(collectionView, cellIdentifierForItemAt: indexPath) ?? ""
        let fakeCell = collectionView.dequeueReusableCell(withReuseIdentifier: cellIdentifier, for: indexPath)

        originalCollectionViewDataSource?.collectionSkeletonView(collectionView, prepareCellForSkeleton: fakeCell, at: indexPath)
				// A
        skeletonViewIfContainerSkeletonIsActive(container: collectionView, view: fakeCell)

        return fakeCell
    }

    originalCollectionViewDataSource?.collectionSkeletonView(collectionView, prepareCellForSkeleton: cell, at: indexPath)
    skeletonViewIfContainerSkeletonIsActive(container: collectionView, view: cell)
    return cell
}

private func skeletonViewIfContainerSkeletonIsActive(container: UIView, view: UIView) {
		// B
    guard container.isSkeletonActive,
          let skeletonConfig = container.currentSkeletonConfig else {
        return
    }

    view.showSkeleton(skeletonConfig: skeletonConfig)
}
위 코드에서 A, B 라인을 봐주세요!!
skeletonViewIfContainerSkeletonIsActive(container:view:)메소드에서
container는 collectionView이며, 저희가 collectionView의 isSkeletonable을 true로 설정해주었기 때문에 container.isSkeletonActive 조건과 container.currentSkeletonConfig의 조건을 만족하여 동작한다고 생각합니다.
그러니까, ContentView를 제외한 component들의 inspector에서 true만 해주면 끝?! 나면 좋겠지만
UITableView와 UICollectionView의 Skeleton 사용법은 조금 다릅니다.
먼저 UICollectionView를 기준으로 적용 해보겠습니다!
extension ViewController: UICollectionViewDelegate {

}

extension ViewController: UICollectionViewDataSource {
  func collectionView(_ collectionView: UICollectionView, numberOfItemsInSection section: Int) -> Int {
      return 10
  }

  func collectionView(_ collectionView: UICollectionView, cellForItemAt indexPath: IndexPath) -> UICollectionViewCell {
      return collectionView.dequeueReusableCell(withReuseIdentifier: "SkeletonCollectionViewCell", for: indexPath)
  }
}

extension ViewController: UICollectionViewDelegateFlowLayout {
  func collectionView(_ collectionView: UICollectionView, layout collectionViewLayout: UICollectionViewLayout, sizeForItemAt indexPath: IndexPath) -> CGSize {
      return CGSize(width: 150, height: 180)
  }
}
먼저 일반적인 CollectionView의 Delegate, DataSource, FlowLayout 메소드들을 구현해줍니다.
여기에 추가적으로 "SkeletonCollectionViewDataSource" Protocol을 채택해서 구현해야합니다.
public protocol SkeletonCollectionViewDataSource: UICollectionViewDataSource {
    func numSections(in collectionSkeletonView: UICollectionView) -> Int
    func collectionSkeletonView(_ skeletonView: UICollectionView, numberOfItemsInSection section: Int) -> Int
    func collectionSkeletonView(_ skeletonView: UICollectionView, cellIdentifierForItemAt indexPath: IndexPath) -> ReusableCellIdentifier
    func collectionSkeletonView(_ skeletonView: UICollectionView, supplementaryViewIdentifierOfKind: String, at indexPath: IndexPath) -> ReusableCellIdentifier?
    func collectionSkeletonView(_ skeletonView: UICollectionView, skeletonCellForItemAt indexPath: IndexPath) -> UICollectionViewCell?
    func collectionSkeletonView(_ skeletonView: UICollectionView, prepareCellForSkeleton cell: UICollectionViewCell, at indexPath: IndexPath)
}

public extension SkeletonCollectionViewDataSource {
    func collectionSkeletonView(_ skeletonView: UICollectionView, numberOfItemsInSection section: Int) -> Int {
        UICollectionView.automaticNumberOfSkeletonItems
    }

    func collectionSkeletonView(_ skeletonView: UICollectionView, supplementaryViewIdentifierOfKind: String, at indexPath: IndexPath) -> ReusableCellIdentifier? {
        nil
    }

    func numSections(in collectionSkeletonView: UICollectionView) -> Int {
        1
    }

    func collectionSkeletonView(_ skeletonView: UICollectionView, skeletonCellForItemAt indexPath: IndexPath) -> UICollectionViewCell? {
        nil
    }

    func collectionSkeletonView(_ skeletonView: UICollectionView, prepareCellForSkeleton cell: UICollectionViewCell, at indexPath: IndexPath) { }
}
extensionl에서 구현 하지 않은 collectionSkeletonView(_ :cellIdentifierForItemAt:) 메소드만 구현 해주면 됩니다.
collectionSkeletonView(_ :cellIdentifierForItemAt:) 메소드는 Skeleton이 적용된 UICollectionViewCell의 ReusableCellIdentifier를 return 해주시면 됩니다!!
위에서 ReuseIdentifier를 "SkeletonCollectionViewCell"로 사용하고 있으니,
extension ViewController: SkeletonCollectionViewDataSource {
    func collectionSkeletonView(_ skeletonView: UICollectionView, cellIdentifierForItemAt indexPath: IndexPath) -> ReusableCellIdentifier {
        return "SkeletonCollectionViewCell"
    }
}
위와 같이 작성할 수 있습니다!!
이제 빌드를 해보면!!
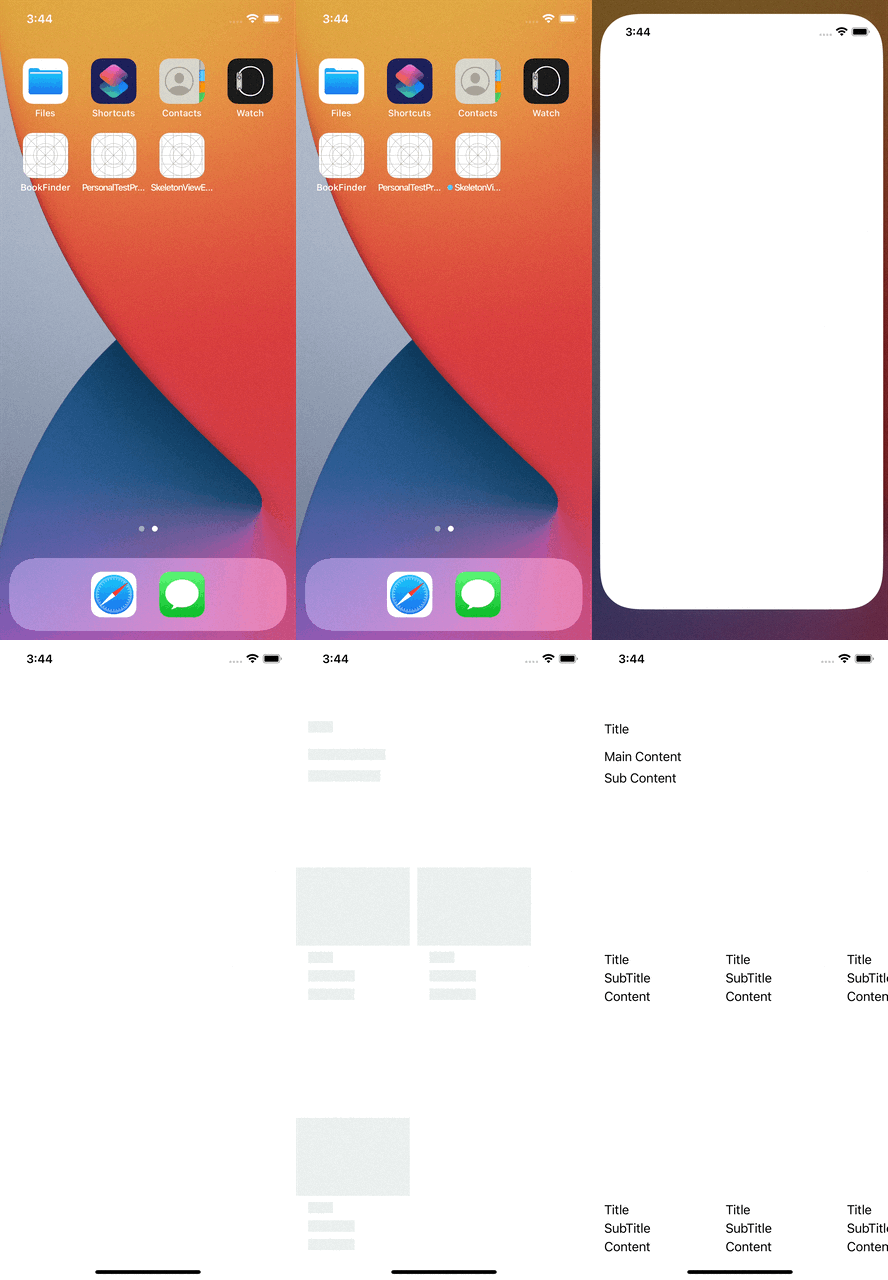
예상과는 다르게 Skeleton Cell이 numberOfItemsInSection의 갯수와 다르게 적용되어 있습니다.
이는 collectionSkeletonView(_:numberOfItemsInSection:) 메소드를 구현 하지 않았기 때문에
기본값으로 collectionView를 채우기 위한 최소의 cell 갯수를 계산하여 반영합니다.
저희의 원했던 10개의 Skeleton이 나오려면,
extension ViewController: SkeletonCollectionViewDataSource {
  func collectionSkeletonView(_ skeletonView: UICollectionView, numberOfItemsInSection section: Int) -> Int {
      return 10
  }

  func collectionSkeletonView(_ skeletonView: UICollectionView, cellIdentifierForItemAt indexPath: IndexPath) -> ReusableCellIdentifier {
      return "SkeletonCollectionViewCell"
  }
}
위와 같이 코드를 추가해주시면 됩니다!
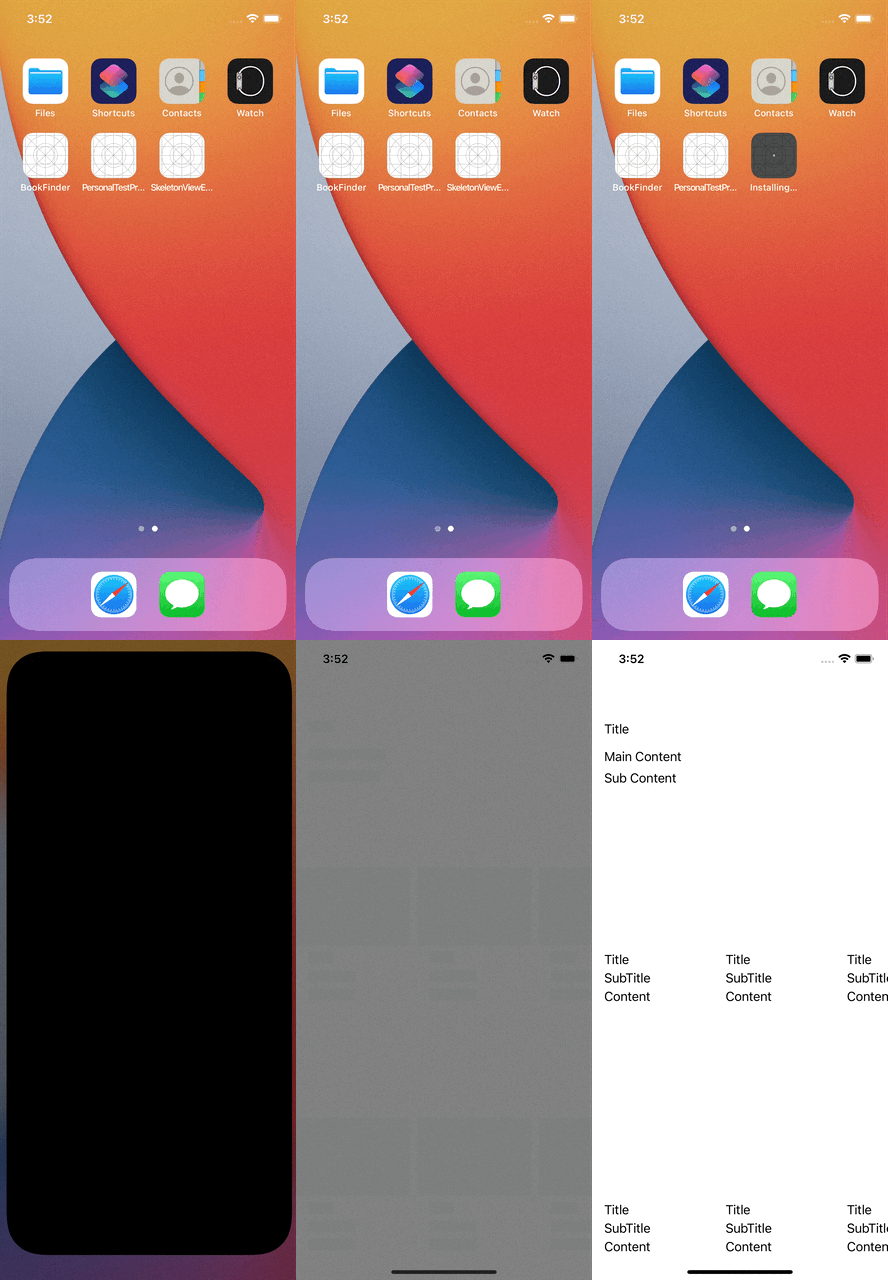
원하는대로 여러개의 Skeleton이 나타났습니다!👏👏👏
UITableView의 경우 문서에서 자세하게 설명 하고 있으니 참조하시면 좋을것 같습니다!!
(귀찮아서 안하는거 아닙니다 ㅠ)
CodeBasedUI
자, StoryBoard를 통해 Skeleton을 적용해 보았으니 Code로도 맛을 보아야겠죠?!
전체 코드는 깃허브에서 확인 하실 수 있습니다!!
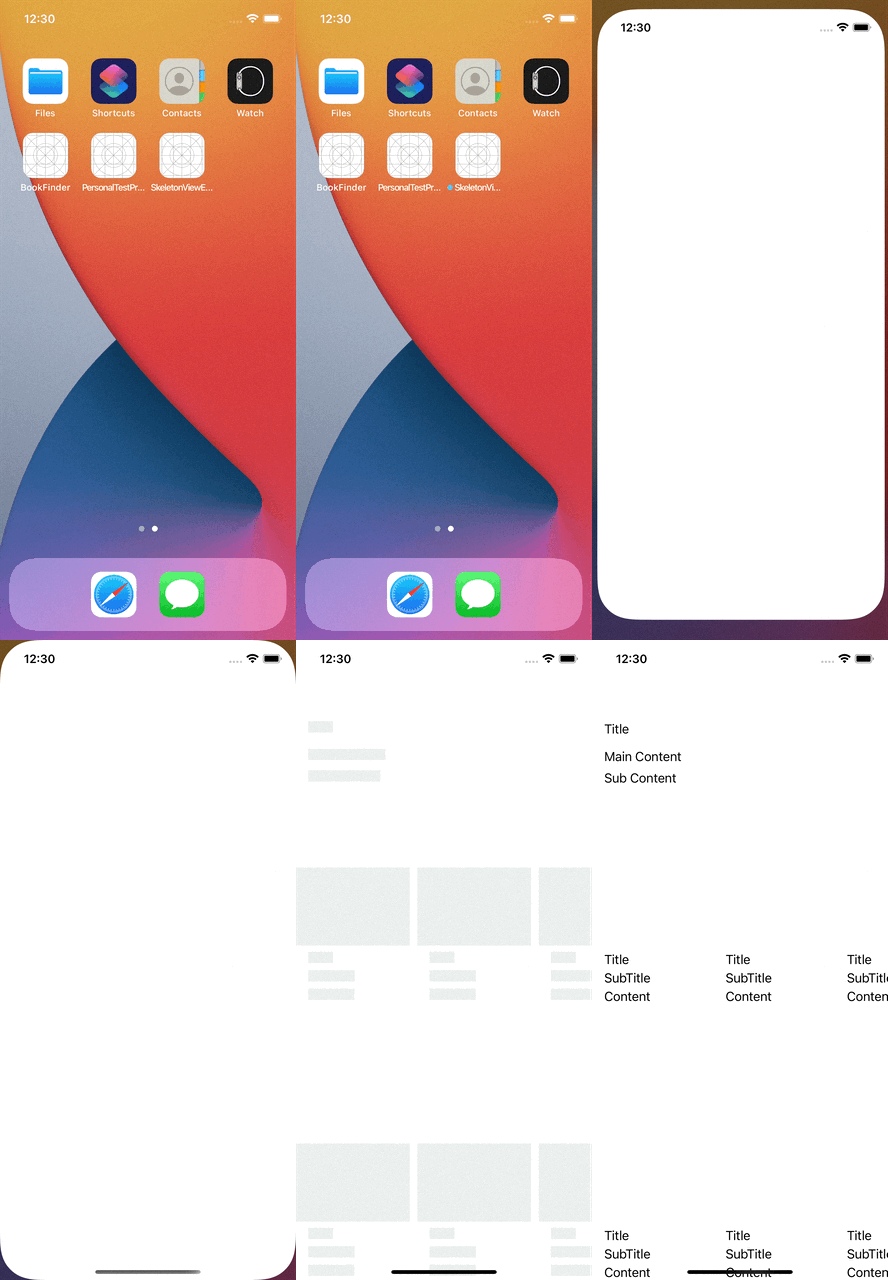
코드로 완성한 Skeleton인데 !! 어딘가 좀 어색하죠?!
Skeleton이 펼쳐지는듯한 애니메이션이 있습니다 !!
이것은 Skeleton에서 애니메이션을 준게 아니라 바로 코드로 작성한 UI의 특성 때문에 그렇습니다.
일반적으로 StoryBoard를 통한 Layout은 미리 Layout이 잡혀있기 때문에 문제가 없지만,
Code로 Layout을 잡는경우, view를 생성 한 뒤에 Constraint를 잡기 때문에 펼쳐지는듯한 애니메이션이 있는것 처럼 보이는것입니다.
CGRect(x: 0, y:0, width: 0, height:0) 이였던 view가 Constraint로 인해
CGRect(x: 0, y:0, width: 375, height: 50)이 된다면, 상하좌우로 늘어나면서 Skeleton이 늘어나는 것 처럼 보입니다.
따라서 모든 하위뷰가 레이아웃 완료된 시점에 스켈레톤을 보여줘야 하는데요,
정확하게 캐치할 수 있는 방법을 모르겠습니다.. ㅠ (알고계신분은 제발 알려주세요 !! 😭)
그래서 저는 subView가 레이아웃 된것을 나타내는 property를 만들고, viewDidLayoutSubviews에서 체크했습니다.
fileprivate class BannerLabelView: UIView {
  var isLaidOut: Bool = false
	...
	...
	override func layoutSubviews() {
	    super.layoutSubviews()
	    isLaidOut = true
	}
	...
	...
}

class CodeBasedViewController: UIViewController {
	private let bannerLabelView = BannerLabelView()
	...
	...
	override func viewDidLayoutSubviews() {
	    super.viewDidLayoutSubviews()

	    if bannerLabelView.isLaidOut {
	        view.showSkeleton()

	        DispatchQueue.main.asyncAfter(deadline: .now() + 3) { [weak self] in
	            self?.view.hideSkeleton()
	        }
	    }
	}
	...
	...
}
빌드를 해보면!!
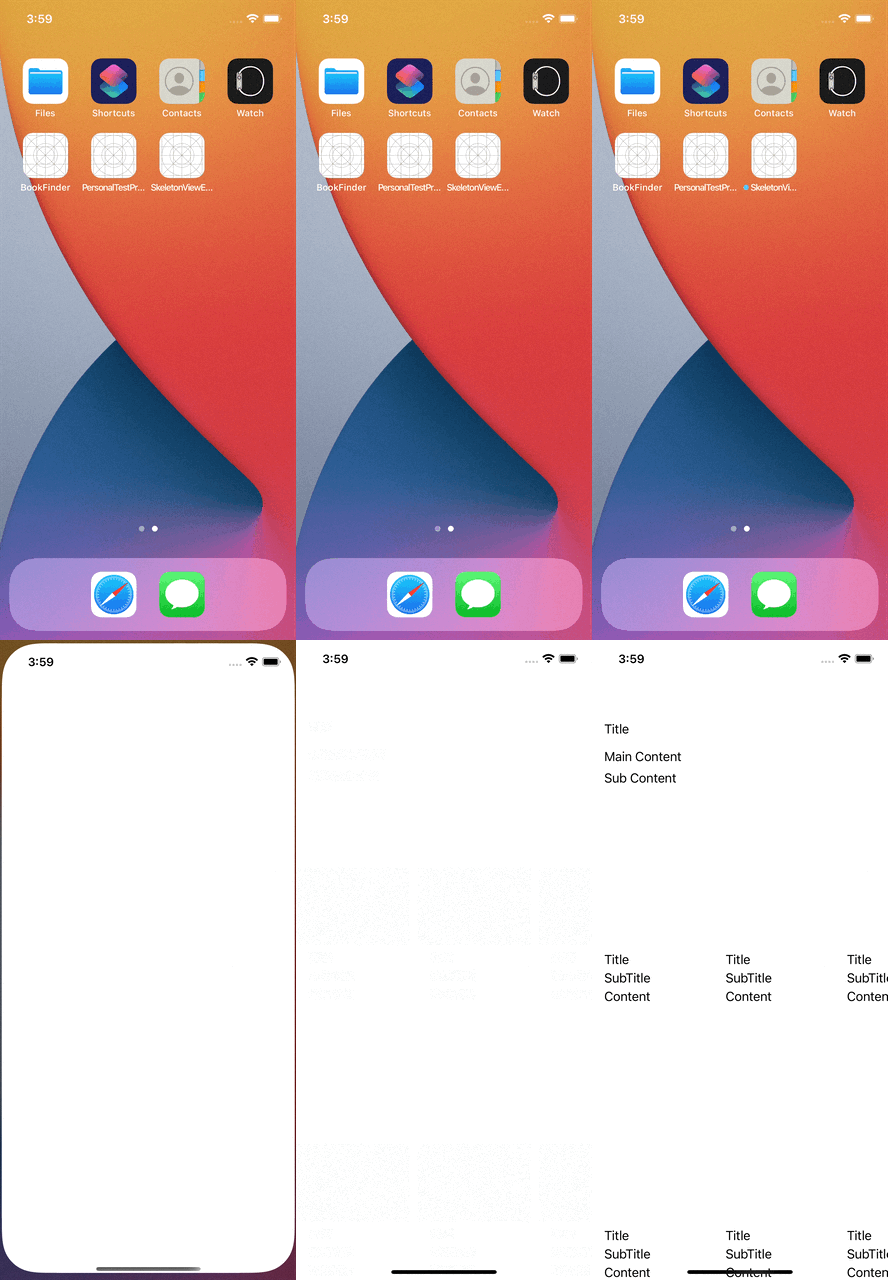
이전과 다른점이 느껴지시나요 ?! 펼쳐지는 느낌이 사라졌어요!!
뭔가 완벽하게 해결된 것 같진 않아서 .. 조금 슬프네요.. 정답을 알려줘
아!! 그리고, 위에서 보았던 SkeletonCollectionViewDataSource는 UICollectionViewDataSource를 채택하고있습니다!
따라서 SkeletonCollectionViewDataSource만 채택해도, UICollectionViewDataSource의 메소드를 작성 할 수 있습니다!!
CodeBasedViewController.swift

extension CodeBasedViewController: SkeletonCollectionViewDataSource {
		// UICollectionViewDataSource
    func collectionView(_ collectionView: UICollectionView, numberOfItemsInSection section: Int) -> Int {
        return 10
    }
		// UICollectionViewDataSource
    func collectionView(_ collectionView: UICollectionView, cellForItemAt indexPath: IndexPath) -> UICollectionViewCell {
        return collectionView.dequeueReusableCell(withReuseIdentifier: SkeletonCollectionViewCell.description(), for: indexPath)
    }
		// SkeletonCollectionViewDataSource
    func collectionSkeletonView(_ skeletonView: UICollectionView, cellIdentifierForItemAt indexPath: IndexPath) -> ReusableCellIdentifier {
        return SkeletonCollectionViewCell.description()
    }
}
Animation
원티드의 Skeleton UI를 따라서 만들어봤는데요,
원티드 앱은 Skeleton에 Animation이 적용되어 있습니다! (원티드 광고 아닙니다 😵)
Skeleton도 적용해봤는데, Animation도 적용해보아야겠죠 ?!
위에서 보았던 메소드 중, Animation을 포함한 showAnimatedGradientSkeleton 메소드를 적용해보겠습니다!
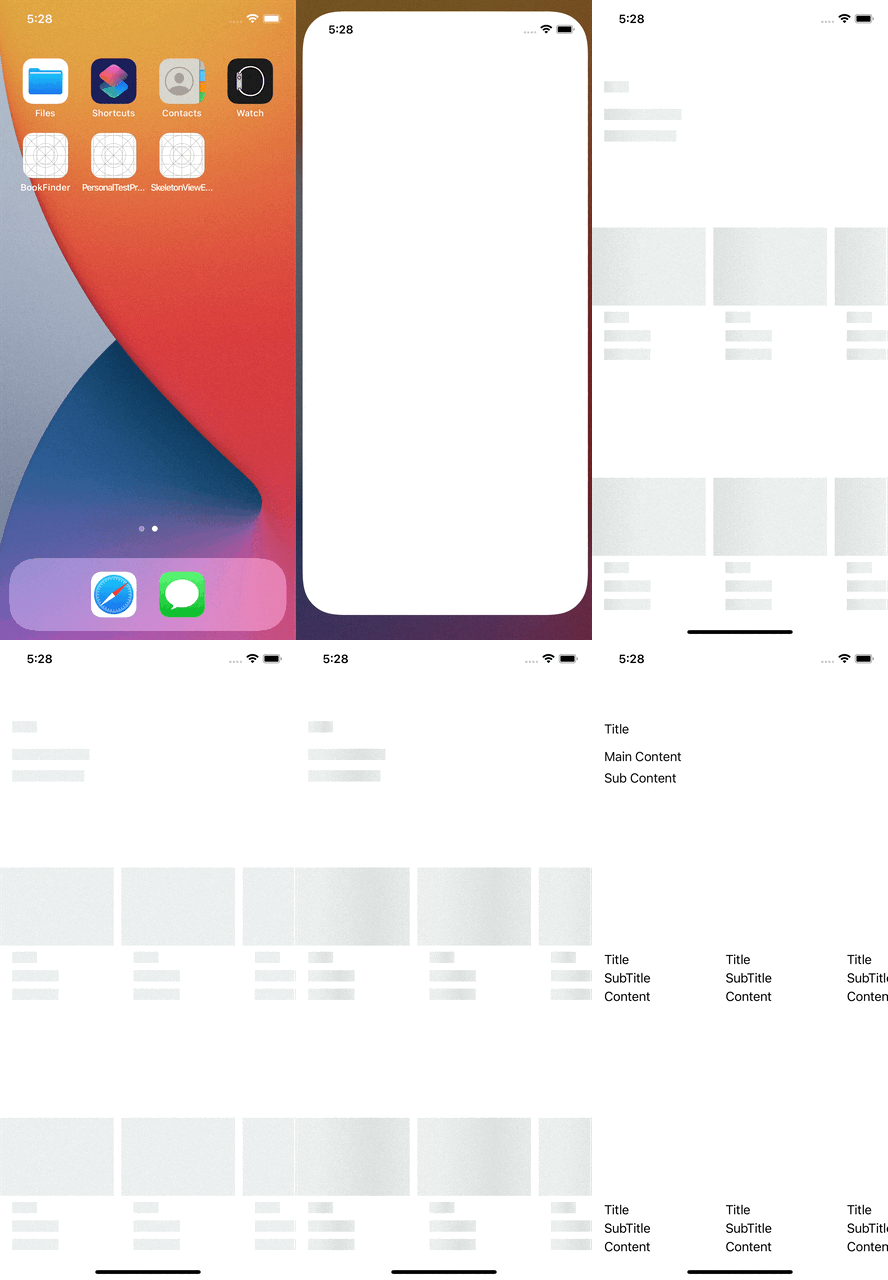
크으 ㅠ 멋있네요 ...
근데 앱과 조금 다른게.. collectionView에만 Animation이 적용되어있습니다.
그러면 위쪽과 분리해서 showSkeleton 메소드를 적용해야겠네요!
override func viewWillAppear(_ animated: Bool) {
    super.viewWillAppear(animated)

    // view.showAnimatedGradientSkeleton()  기존 코드

    // 개별 적용
    labelContainer.showSkeleton()
    skeletonCollectionView.showAnimatedGradientSkeleton()

    DispatchQueue.main.asyncAfter(deadline: .now() + 3) { [weak self] in
        self?.view.hideSkeleton()
    }
}
결과는 ...
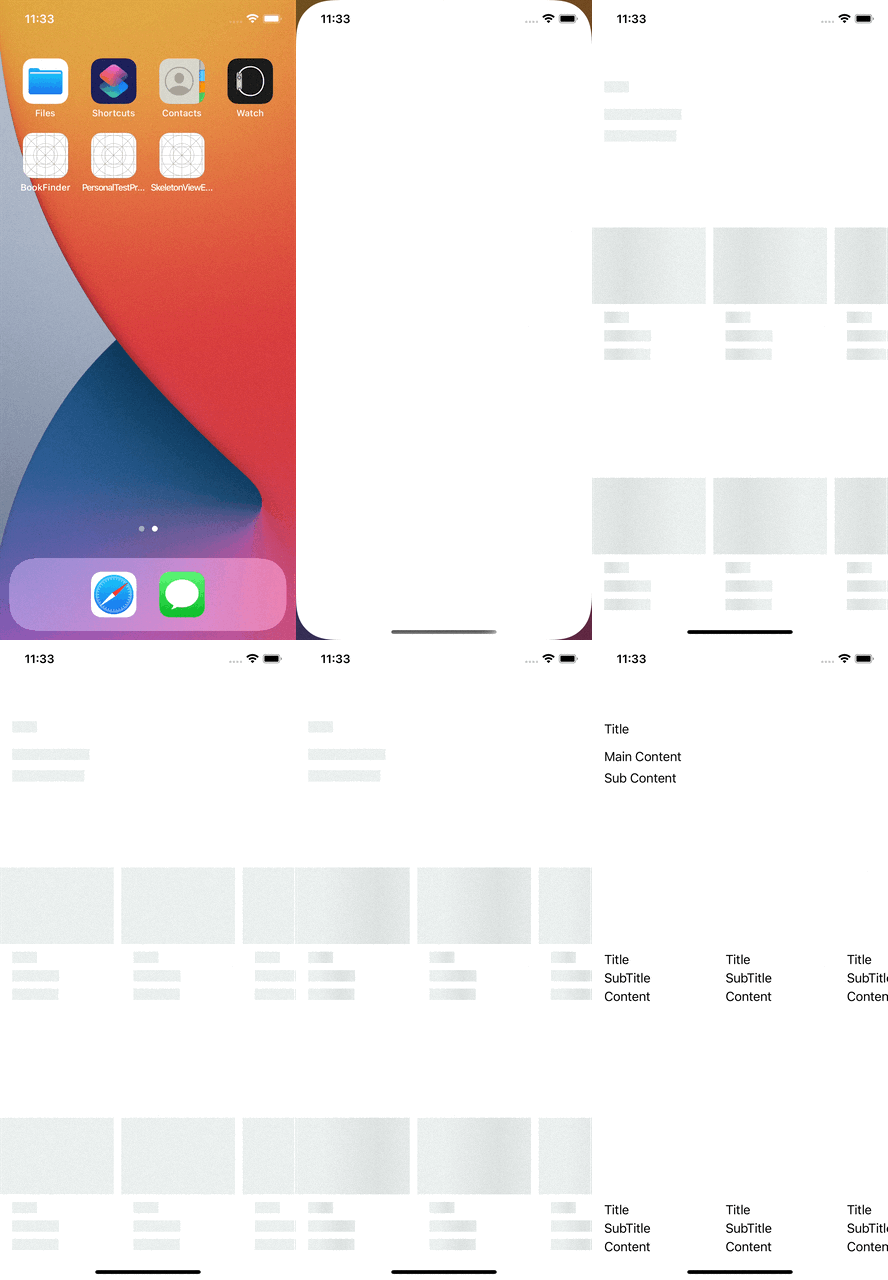
완벽합니다~!! 👏👏👏👏
지정된 Animation을 사용하는 방법도 있고,
코드로 직접 Animation을 구현하여 사용 할 수도 있습니다!
// #1 With Return CAAnimation
view.showAnimatedSkeleton { layer -> CAAnimation in
    let animation = CAAnimation()
    // Customize Animation
    return animation
}

// #2 Use SkeletonAnimationBuilder
let animation = SkeletonAnimationBuilder().makeSlidingAnimation(withDirection: .topLeftBottomRight)
view.showAnimatedSkeleton(usingColor: .skeletonDefault, animation: animation)
마무리하며...
오늘은 평소에 관심있었던 라이브러리를 직접 적용해보고, 문제를 해결해보았는데요..
관심있었던 라이브러리라서 그런지 상당히 재미있었습니다!! 😆
종종 재미있어 보이는 라이브러리가 보이면 메모 해두고 꼭 공부해 보도록 해야겠습니다 .. ㅎㅎㅎ
저는 주로 코드로 Layout을 작성하기 때문에 모든 뷰가 Layout되는 시점을 알아내는게 중요한데..
올바른 방법을 꼭 찾아서.. 업데이트 해보도록 하겠습니다!! 😮💨
다시한번 작성했던 모든 코드는 GitHub에 있습니다!!!
읽어주셔서 감사합니다!! 🙇♂️
그럼 다음 포스팅에서 만나요 !! 안녕 👋
참조 : https://github.com/Juanpe/SkeletonView/blob/main/Translations/README_ko.md
