Chapter 11. Client Identification and Cookies
(해석 또는 이해가 잘못된 부분이 있다면 댓글로 편하게 알려주세요.)
✏️ 원문 번역
Client IP Address
Early web pioneers tried using the IP address of the client as a form of identification. This scheme works if each user has a distinct IP address, if the IP address seldom (if ever) changes, and if the web server can determine the client IP address for each request. While the client IP address typically is not present in the HTTP headers, web servers can find the IP address of the other side of the TCP connection carrying the HTTP request. For example, on Unix systems, the getpeername function call returns the client IP address of the sending machine:
status = getpeername(tcp_connection_socket,...);
-
초기 웹 선구자들은 클라이언트의 IP 주소를 신원 확인 용도로 사용하고자 하였습니다.
-
이 기술은 각각의 사용자마다 서로 다른 IP 주소를 가지고 있고 IP 주소가 변화할 일이 거의 없으며 웹 서버가 각 요청에 대한 클라이언트의 IP 주소를 확인할 수 있는 상황에서 동작합니다.
-
일반적으로 클라이언트의 IP 주소는 HTTP 헤더에서 나타나지 않습니다.
-
하지만 웹 서버는 HTTP 요청을 실어나르는 TCP 연결의 상대 IP 주소를 얻을 수 있습니다.
-
예를 들어 유닉스 시스템에서는 getpeername 함수를 통해 송신중인 컴퓨터의 클라이언트 IP 주소를 반환할 수 있습니다.
Unfortunately, using the client IP address to identify the user has numerous weaknesses that limit its effectiveness as a user-identification technology:
- 안타깝게도 사용자 식별을 위해 클라이언트의 IP 주소를 사용하는 것은 사용자 식별 기술로써의 효율성을 제한한다는 여러 가지 결함이 있습니다.
• Client IP addresses describe only the computer being used, not the user. If multiple users share the same computer, they will be indistinguishable.
-
클라이언트 IP 주소는 사용되는 컴퓨터를 나타낼 뿐, 사용자를 지칭하지 않습니다.
-
다수의 사용자가 같은 컴퓨터를 공유하는 경우 서로 다른 사용자를 구별할 수 없습니다.
• Many Internet service providers dynamically assign IP addresses to users when they log in. Each time they log in, they get a different address, so web servers can’t assume that IP addresses will identify a user across login sessions.
-
많은 인터넷 서비스 제공업체들은 로그인 시 동적으로 IP 주소를 할당합니다.
-
로그인이 발생할 때마다 다른 주소를 부여하므로 웹 서버는 IP 주소가 로그인 세션에서 사용자를 식별한다고 가정할 수 없습니다.
• To enhance security and manage scarce addresses, many users browse the Internet through Network Address Translation (NAT) firewalls. These NAT devices obscure the IP addresses of the real clients behind the firewall, converting the actual client IP address into a single, shared firewall IP address (and different port numbers).
-
보안을 개선하고 적은 양의 주소를 관리하기 위해 많은 사용자들이 Network Address Translation (NAT) 방화벽을 통해 브라우징을 수행합니다.
-
NAT 장치는 방화벽 뒤의 실제 클라이언트의 IP 주소를 가려 이 주소를 하나의 공유된 방화벽 IP 주소 (및 다른 포트번호)로 변환합니다.
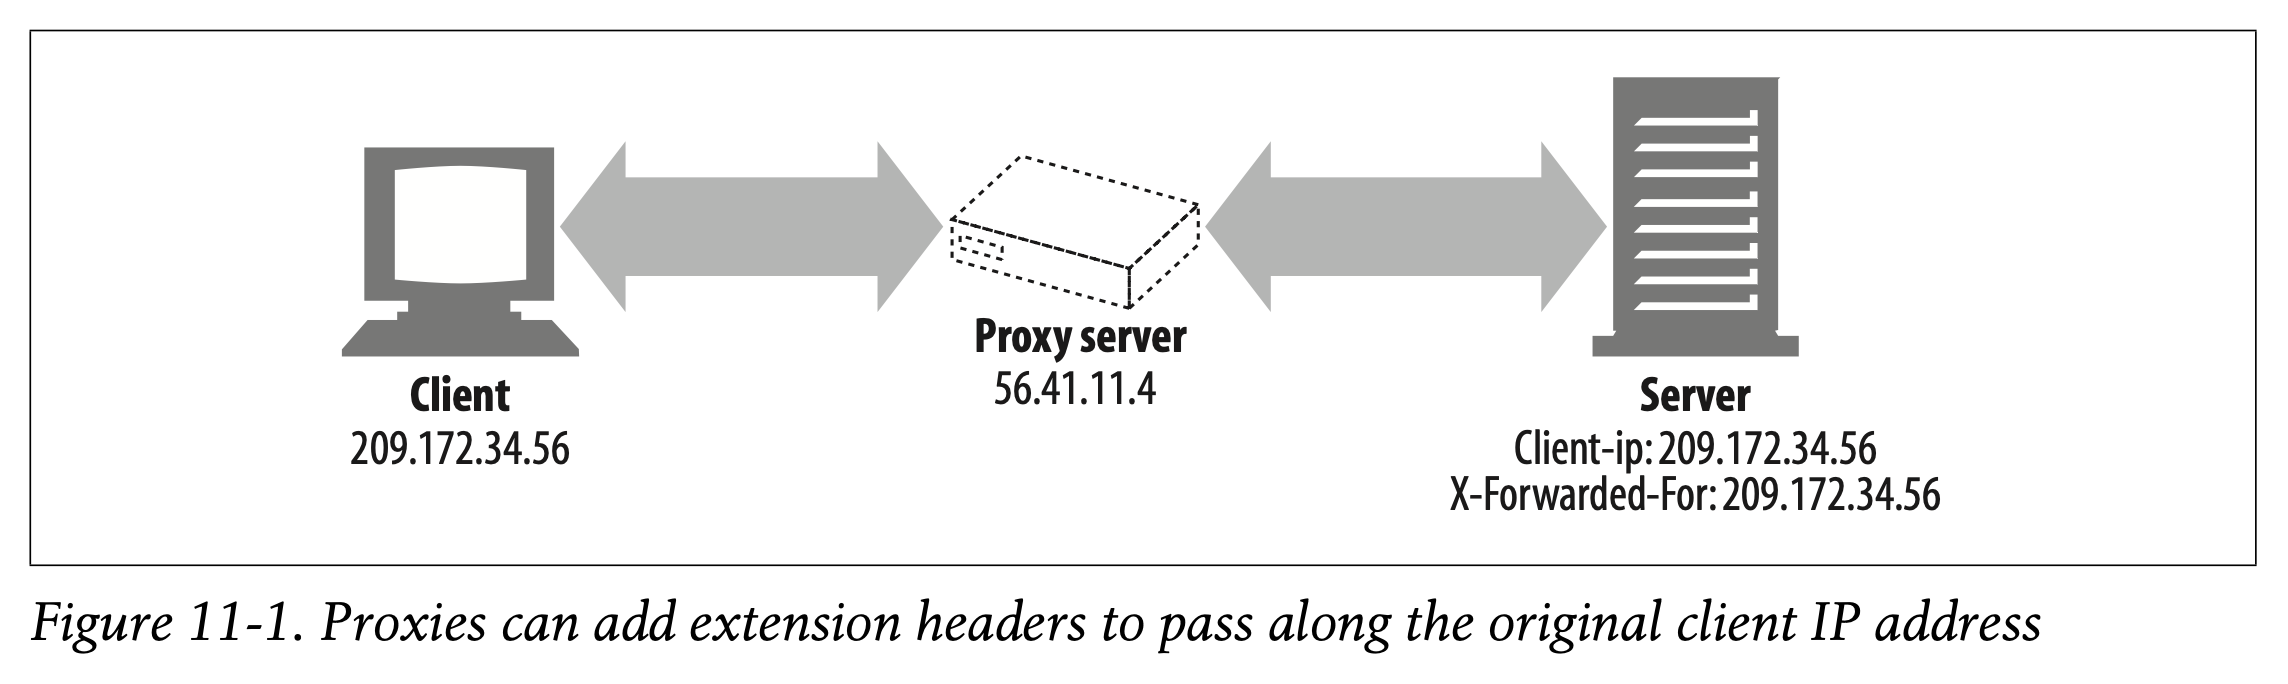
• HTTP proxies and gateways typically open new TCP connections to the origin server. The web server will see the IP address of the proxy server instead of that of the client. Some proxies attempt to work around this problem by adding special Client-ip or X-Forwarded-For HTTP extension headers to preserve the original IP address (Figure 11-1). But not all proxies support this behavior.
-
일반적으로 HTTP 프록시와 게이트웨이는 원본 서버에 대해 새로운 TCP 연결을 생성합니다.
-
웹 서버는 클라이언트의 IP 주소 대신 프록시 서버의 IP 주소를 확인합니다.
-
일부 프록시는 원본 IP 주소를 보존하기 위해 특수한 Client-ip나 X-Forwarded-For HTTP 확장 헤더를 추가하여 이 문제를 해결하고자 합니다. (Figure 11-1)
-
하지만 모든 프록시가 이 기능을 지원하는 것은 아닙니다.
Some web sites still use client IP addresses to keep track of the users between sessions, but not many. There are too many places where IP address targeting doesn’t work well.
-
많지는 않지만 여전히 일부 웹 사이트들이 클라이언트의 IP 주소를 사용하여 세션 간의 사용자들을 추적하려고 시도합니다.
-
IP 주소 타겟팅이 제대로 이루어지지 않는 경우가 너무나도 많습니다.
A few sites even use client IP addresses as a security feature, serving documents only to users from a particular IP address. While this may be adequate within the confines of an intranet, it breaks down in the Internet, primarily because of the ease with which IP addresses are spoofed (forged). The presence of intercepting proxies in the path also breaks this scheme. Chapter14 discusses much stronger schemes for controlling access to privileged documents.
-
심지어 어떤 사이트들은 클라이언트의 IP 주소를 보안 특성으로 활용하여 특정 IP 주소에 해당하는 사용자에게만 문서를 제공하기도 합니다.
-
인트라넷 내에서는 적절한 방식일 수 있지만 인터넷에서는 IP 주소가 쉽게 스푸핑당할 수 있기 때문에 사용하기 좋지 않습니다.
-
경로에 Intercepting 프록시가 존재하는 경우에도 해당 기법이 통하지 않습니다.
-
Chapter 14에서는 특수 권한이 필요한 문서의 접근을 제어하는 훨씬 강력한 기법에 대해 논의합니다.
User Login
Rather than passively trying to guess the identity of a user from his IP address, a web server can explicitly ask the user who he is by requiring him to authenticate (log in) with a username and password.
- IP 주소로부터 수동적으로 사용자의 신원을 추측하는 대신 웹 서버는 username과 password를 사용해 인증을 요청하여 어떤 사용자인지를 명시적으로 확인할 수 있습니다.
To help make web site logins easier, HTTP includes a built-in mechanism to pass username information to web sites, using the WWW-Authenticate and Authorization headers. Once logged in, the browsers continually send this login information with each request to the site, so the information is always available. We’ll discuss this HTTP authentication in much more detail in Chapter12, but let’s take a quick look at it now.
-
웹 사이트 로그인을 간편하게 하기 위해 HTTP는 username 정보를 웹 사이트에 전달하기 위한 매커니즘을 내부적으로 포함하고 있습니다.
-
WWW-Authenticate와 Authorization 헤더가 그 예시입니다.
-
한 번 로그인을 하고 나면 브라우저는 지속적으로 각 요청에 로그인 정보를 전송하여 항상 이용할 수 있게 합니다.
-
HTTP의 인증 방식에 대해서는 Chapter 12에서 상세히 설명하고 있지만 먼저 간단하게 살펴봅시다.
If a server wants a user to register before providing access to the site, it can send back an HTTP 401 Login Required response code to the browser. The browser will then display a login dialog box and supply the information in the next request to the browser, using the Authorization header. This is depicted in Figure 11-2.
-
유저가 사이트에 접근하기 전 가입을 진행하기를 희망하는 경우 서버는 HTTP 401 Login Required 응답 코드를 브라우저를 반환할 수 있습니다.
-
브라우저는 로그인 다이얼로그 박스를 보여주며 다음 요청에서 Authorization 헤더를 사용해 브라우저에게 정보를 제공합니다.
-
이 과정은 Figure 11-2에 나타나 있습니다.
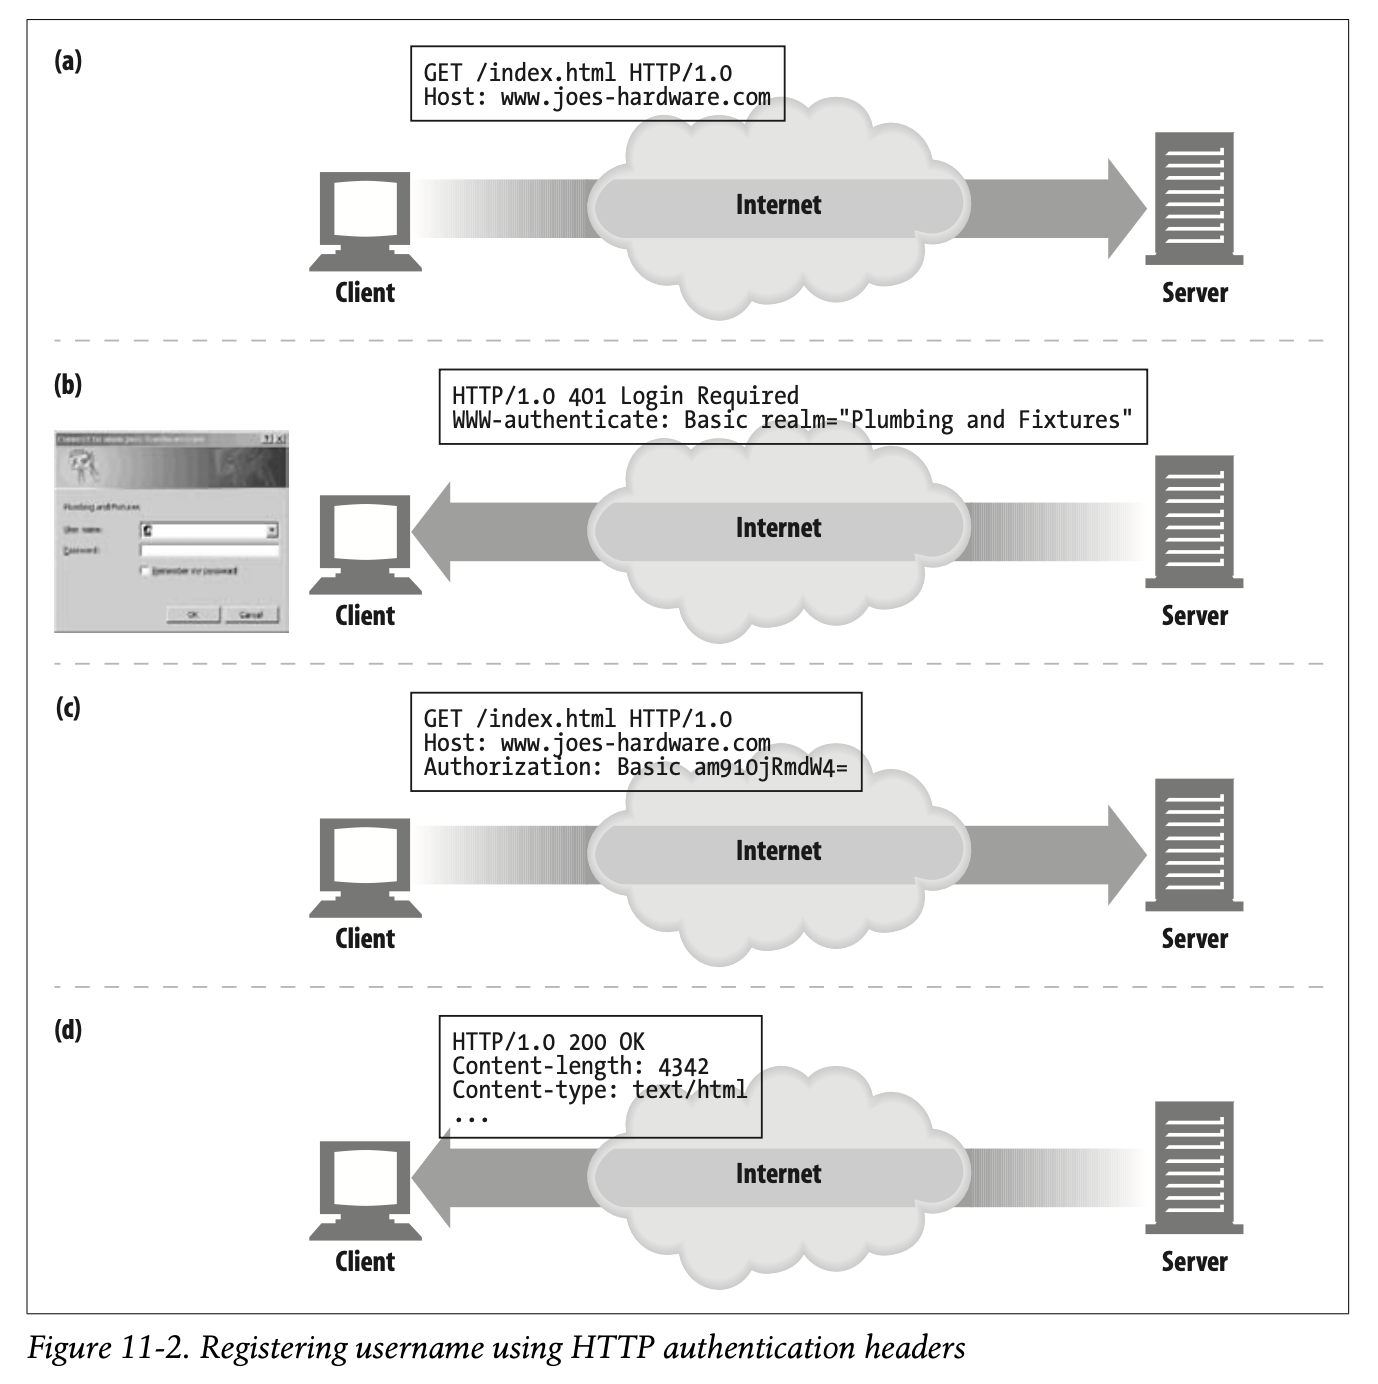
Here’s what’s happening in this figure:
- 위의 예시가 진행되는 과정은 다음과 같습니다.
• In Figure 11-2a, a browser makes a request from the www.joes-hardware.com site.
- Figure 11-2a에서 브라우저는 www.joes-hardware.com 에 대한 요청을 생성합니다.
• The site doesn’t know the identity of the user, so in Figure 11-2b, the server requests a login by returning the 401 Login Required HTTP response code and adds the WWW-Authenticate header. This causes the browser to pop up a login dialog box.
-
사이트는 사용자의 신원을 확인할 수 없으므로 Figure 11-2b와 같이 401 Login Require HTTP 응답 코드를 반환하여 로그인을 요청하고 WWW-Authenticate 헤더를 추가합니다.
-
이 응답은 브라우저가 로그인 다이얼로그 박스를 팝업시키도록 합니다.
• Once the user enters a username and a password (to sanity check his identity), the browser repeats the original request. This time it adds an Authorization header, specifying the username and password. The username and password are scrambled, to hide them from casual or accidental network observers.
-
사용자가 본인 확인을 위해 username과 password를 입력하고 나면 브라우저는 원본 요청을 다시 시도합니다.
-
이때 Authorization 헤더를 추가하여 username과 password를 지정합니다.
-
username과 password는 우연히 혹은 우발적으로 네트워크를 관찰하는 사람으로부터 숨기기 위해 뒤섞습니다.
• Now, the server is aware of the user’s identity.
- 이제 서버는 사용자의 신원에 대해 파악하고 있습니다.
• For future requests, the browser will automatically issue the stored username and password when asked and will often even send it to the site when not asked. This makes it possible to log in once to a site and have your identity maintained through the session, by having the browser send the Authorization header as a token of your identity on each request to the server.
-
추후에 요청을 전송할 때 브라우저는 필요한 경우 자동으로 저장된 username과 password를 발행합니다.
-
심지어는 신원 정보가 필요하지 않은 경우에도 전송할 수 있습니다.
-
브라우저가 서버에 각 요청을 전송할 때 Authorization 헤더를 신원 확인을 위한 토큰처럼 전송하게 함으로써, 사이트에 한 번 로그인하면 세션을 통해 신원이 유지되도록 만들 수 있습니다.
However, logging in to web sites is tedious. As Fred browses from site to site, he’ll need to log in for each site. To make matters worse, it is likely that poor Fred will need to remember different usernames and passwords for different sites. His favorite username, “fred,” will already have been chosen by someone else by the time he visits many sites, and some sites will have different rules about the length and composition of usernames and passwords. Pretty soon, Fred will give up on the Internet and go back to watching Oprah. The next section discusses a solution to this problem.
-
그러나 웹 사이트에 로그인하는 것은 지루한 일입니다.
-
Fred는 여러 사이트를 탐색하면서 각각의 사이트마다 로그인을 해야 합니다.
-
더 심각한 것은 Fred가 여러 개의 username과 password를 기억해야 할 가능성이 높다는 점입니다.
-
Fred가 여러 사이트를 방문할 때쯤이면 그가 가장 선호하는 username인 "fred"는 이미 다른 누군가에 의해 사용중일 수 있습니다.
-
어떤 사이트들은 길이와 username의 구성에 대해 다른 규칙을 가질 수 있습니다.
-
곧 Fred는 인터넷을 포기하고 Oprah를 다시 보게 될 것입니다.
-
다음 섹션에서 문제를 해결하기 위한 방안을 논의해봅시다.
✏️ 요약
Client IP Address
: 사용자의 신원을 확인하기 위해 클라이언트의 IP 주소를 활용하는 기법
- 사용자마다 서로 다른 IP 주소를 가지고 있고, IP 주소가 변화할 일이 없는 경우 유용하게 동작
- NAT 환경에서는 공유된 방화벽 IP 주소를 보게 됨
- 프록시가 존재하는 경우 프록시의 IP 주소를 보게 됨 (문제를 해결하기 위해 Client-ip, X-Forwarded-For HTTP 확장 헤더를 사용하기도 함)
- IP 주소는 컴퓨터를 나타낼 뿐 특정 사용자를 지칭하지 않음
- 다수의 사용자가 같은 컴퓨터를 공유하는 경우 서로 다른 사용자를 구별할 수 없음
- 인터넷 환경에서는 IP 스푸핑 위험이 있으므로 좋은 방법이 아님
User Login
: username 및 password를 통한 인증을 요청하여 어떤 사용자인지 명시적으로 확인하는 기법
- WWW-Authenticate : 401 응답과 함께 서버 측에서 로그인을 요청하는 헤더
- Authorization : username 및 password를 서버에 전달하기 위한 헤더 (scrambled)
- 사이트에 한 번 로그인하면 세션을 통해 신원 정보 유지
✏️ 감상
오늘날의 Authorization
액세스 토큰과 리프레시 토큰을 관리하다 보면 심심치않게 다루게 되는 것이 바로 요 Authorization 헤더다. 이 책에서는 Basic 인증 방식을 언급하고 있지만 오늘날에는 보안상 문제로 인해 Bearer 인증 방식을 많이 사용하고 있다.
Basic 인증은 단순히 패스워드를 Base64로 인코딩하여 서버에 전송하는 방식이다. 패킷이 탈취당하는 경우 노출 위험이 있어 반드시 HTTPS 환경에서만 사용해야 한다. 하지만 굳이 더 좋은 인증 방식을 두고 Basic 인증을 고수할 필요는 없다. Bearer 인증은 OAuth 2.0 환경에서 서버가 발급한 토큰을 클라이언트에게 부여하고 검증하는 방식으로 동작한다. Basic 방식에 비해 사용자의 정보가 토큰에 담기지 않기 때문에 정보를 안전하게 보호할 수 있다는 장점이 있다. 특히 Bearer 인증 토큰으로 JWT를 많이 활용하고 있으니 시간이 날 때 JWT에 대해 자세히 알아보는 것도 좋겠다.