Summary
설계도 없기 건물을 지을 수는 없다.
웹, 앱을 만들기 전에 와이어프레임과 목업을 만들어야 한다.
더 중요한 것은,
설계도를 만들 때도 설계가 필요하다.
전체를 그리고 기준에 따라 분할하고,
첫 단계부터 목업이 완성되는 단계까지 과정을 그려야 한다.
이 과정은 프로그래밍을 단순화 할 것이다.
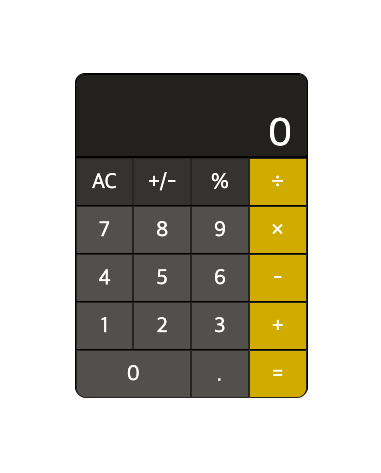
계산기 목업 만들기
내가 HTML, CSS를 활용해 만든 첫 번째 작품이다.
맥에 있는 계산기를 만들었다.
와이어 프레임
이 계산기를 만들기 위해, Figma 툴을 이용해 계산기를 분해했다.
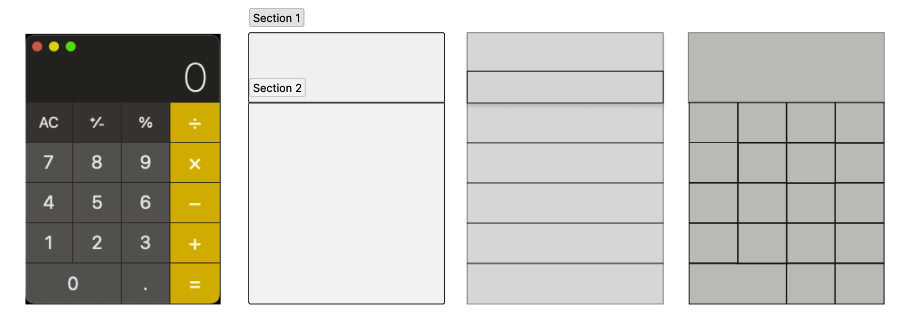
왼쪽부터 그림 1~4라고 하자.
그림 1은 계산기 인터페이스에서 기능별로 2개로 구분.
그림 2는 기능별로 구분된 사진. Section1: display / Section 2: button
그림 3은 display 영역을 숫자(number)가 계산되는 화면과 여백 화면 2개로 분할.
button 영역은 위에서 아래로 5분할
그림 4는 분할된 버튼 영역 5개를 다시 4개의 소버튼으로 분할.
이렇게 전체를 그리고, 부분으로 나눈 후, 가장 작은 단위까지 분류 과정을 거치게 되면, 코드 밑그림을 그릴 수 있다.
HTML 작성
<link rel="stylesheet" href="style.css">
=> html 파일을 style.css 파일에 링크

<div class="calculator">              => 그림 1(전체)
    <div class="display">             => 그림 2의 section 1
        <div class="number"></div>    => 그림 3의 숫자 화면
    </div>


    <div class="button">              => 그림 2의 section 2
        <div class="section-a">       => 그림 3의 영역 1
            <div class="a1">AC</div>  => 그림 4의 소버튼
            <div class="a2">+/-</div> => 그림 4의 소버튼
            <div class="a3">%</div>   => 그림 4의 소버튼
            <div class="a4">÷</div>   => 그림 4의 소버튼
        </div>

        <div class="section-b">       => 그림 3의 영역 2
            <div class="b1">7</div>   => 그림 4의 소버튼
            <div class="b2">8</div>   => 그림 4의 소버튼
            <div class="b3">9</div>   => 그림 4의 소버튼
            <div class="b4">×</div>   => 그림 4의 소버튼
        </div>

        <div class="section-c">       => 그림 3의 영역 3
            <div class="c1">4</div>   => 그림 4의 소버튼
            <div class="c2">5</div>   => 그림 4의 소버튼
            <div class="c3">6</div>   => 그림 4의 소버튼
            <div class="c4">-</div>   => 그림 4의 소버튼
        </div>

        <div class="section-d">       => 그림 3의 영역 4
            <div class="d1">1</div>   => 그림 4의 소버튼
            <div class="d2">2</div>   => 그림 4의 소버튼
            <div class="d3">3</div>   => 그림 4의 소버튼
            <div class="d4">+</div>   => 그림 4의 소버튼
        </div>

        <div class="section-e">       => 그림 3의 영역 5
            <div class="e1">0</div>   => 그림 4의 소버튼
            <div class="e2">.</div>   => 그림 4의 소버튼
            <div class="e3">=</div>   => 그림 4의 소버튼
        </div>

    </div>
</div>
CSS 작성
body {
display: flex;
justify-content: center;
align-items: center;
height: 95vh;
}
.calculator {
border: 1px solid black;
border-radius: 10px 10px 10px 10px;
width: 233px;
height: 323px;
display: flex;
flex-direction: column;
align-items: center;
}
.display {
border: 1px solid black;
border-top-left-radius: 10px;
border-top-right-radius: 10px;
background-color: #292420;
width: 233px;
height: 83px;
display: flex;
}
.number {
border: 1px solid #292420;
width: 233px;
height: 37px;
margin-top: 35px;
margin-bottom: 11px;
color: white;
text-align: right;
font-size: 2.5rem;
margin-right: 0.8rem;
}
.button {
width: 233px;
height: 240px;
display: flex;
flex-direction: column;
color: white;
text-align: center;
line-height: 48px;
font-size: 1.35rem;
}
.section-a {
border: 1px solid black;
width: 233px;
height: 48px;
display: flex;
}
.section-b {
border: 1px solid black;
width: 233px;
height: 48px;
display: flex;
}
.section-c {
border: 1px solid black;
width: 233px;
height: 48px;
display: flex;
}
.section-d {
border: 1px solid black;
width: 233px;
height: 48px;
display: flex;
}
.section-e {
border: 1px solid black;
border-bottom-left-radius: 10px;
border-bottom-right-radius: 10px;
width: 233px;
height: 48px;
display: flex;
}
.a1{
background-color: #3e3936;
border: 1px solid #2D2824;
width: 57.75px;
height: 48px;
}
.a2{
background-color: #3e3936;
border: 1px solid #2D2824;
width: 57.75px;
height: 48px;
}
.a3{
background-color: #3e3936;
border: 1px solid #2D2824;
width: 57.75px;
height: 48px;
}
.a4{
background-color: #E7A507;
border: 1px solid #2D2824;
width: 57.75px;
height: 48px;
}
.b1{
background-color: #5E5A57;
border: 1px solid #2D2824;
width: 57.75px;
height: 48px;
}
.b2{
background-color: #5E5A57;
border: 1px solid #2D2824;
width: 57.75px;
height: 48px;
}
.b3{
background-color: #5E5A57;
border: 1px solid #2D2824;
width: 57.75px;
height: 48px;
}
.b4{
background-color: #E7A507;
border: 1px solid #2D2824;
width: 57.75px;
height: 48px;
}
.c1{
background-color: #5E5A57;
border: 1px solid #2D2824;
width: 57.75px;
height: 48px;
}
.c2{
background-color: #5E5A57;
border: 1px solid #2D2824;
width: 57.75px;
height: 48px;
}
.c3{
background-color: #5E5A57;
border: 1px solid #2D2824;
width: 57.75px;
height: 48px;
}
.c4{
background-color: #E7A507;
border: 1px solid #2D2824;
width: 57.75px;
height: 48px;
}
.d1{
background-color: #5E5A57;
border: 1px solid #2D2824;
width: 57.75px;
height: 48px;
}
.d2{
background-color: #5E5A57;
border: 1px solid #2D2824;
width: 57.75px;
height: 48px;
}
.d3{
background-color: #5E5A57;
border: 1px solid #2D2824;
width: 57.75px;
height: 48px;
}
.d4{
background-color: #E7A507;
border: 1px solid #2D2824;
width: 57.75px;
height: 48px;
}
.e1{
background-color: #5E5A57;
border: 1px solid #2D2824;
border-bottom-left-radius: 10px;
width: 115.5px;
height: 48px;
}
.e2{
background-color: #5E5A57;
border: 1px solid #2D2824;
width: 57.75px;
height: 48px;
}
.e3{
background-color: #E7A507;
border: 1px solid #2D2824;
border-bottom-right-radius: 10px;
width: 57.75px;
height: 48px;
}
- {
margin: 0px;
padding: 0px;
box-sizing: border-box;
}
복기
완성 후에, 이 부분을 실수했다고 느꼈다. 다시 만든다면 button을 3개의 영역으로 다음과 같이 나눌 것이다. [(AC,+/-,%), (1~9,.), (÷,x,-,+,=)]
이유는 아래와 같다.
1. 기능 요소이다.
유사한 기능끼리 묶는 것이 추후 앱을 업데이트 할 때, 코드 수정 시 유리하다고 생각한다.
-
색깔이다.
위에서 나눈 3개의 영역의 버튼들은 같은 색을 띄고 있다. 코드를 작성할 때, 일일이 버튼 별로 써주지 않고, 부모 요소에 color를 적용하면 낭비를 줄일 수 있다. -
더 단순화 할 수 있다.
실시간 세션 시간에 엔지니어님이 계산기를 만드는 코드를 봤는데 엄청 단순했다.
그 코드에 대해서는 다음에 리뷰해보자.
한 줄 요약
Simplicity is the ultimate sophistication. - Leonardo da Vinci
단순함이란 궁극의 정교함이다.
