개요
입사 지원을 위해 사람인을 뒤지던 중 마음에 드는 회사가 있어서 회사 정보를 보기 위해 들어갔는데, 오.... 이게 뭐지.. 난 아직 이런 거 할 줄 모르는데.. 하는 메인 페이지가 보였다. 나같은 하꼬 프론트엔드 개발자(지망생)은 하나 하나 알아갈때마다 감히 개발자를 하려고 해도 되나 싶어진다 흑흑
그래도 멈출 수는 없으니 뒷북이지만, 이전에 유행하던 수박게임이 생각나서 그것을 만들어 보기로 했다.
시작
준비
아래 유튜브를 통해 진행했으며, 기능 몇개를 추가했다.
빵형의 개발도상국 1시간만에 수박 게임 만들기
vite를 이용해보기로 했으니 vite를 사용하자.
npm create vite@latest
그리고 javascript만 이용해볼 것이니 Vanilla를 선택하고, Javascript를 선택해주었다.
프로젝트 이름은 watermelon으로 해주고,
만들어진 watermelon 프로젝트로 들어가서
cd watermelon
npm install
이제 matter.js를 사용해야 하니
npm install matter-js
실행은
npm run dev
명령어를 입력하면 된다.
코드
물리엔진 적용시키기
matter-js를 사용하기 위해 import를 하고, FRUIT_BASE라는 이미지 위치와 이름이 담긴 js파일을 import 하기로 했다.
그리고 const
import { Bodies, Body, Engine, Events, Render, Runner, World } from "matter-js"
import { FRUITS_BASE } from "../fruits"

const engine = Engine.create()
const render = Render.create({
  engine,
  element: document.body,
  options: {
    wireframes: false,
    background: "#F7F4C8",
    width: 620,
    height: 850,
  }
})

const world = engine.world
Enfgine.create()를 통해서 물리엔진을 작동시키도록 하고, Render.create()를 통해서 물리엔진이 동작할 공간을 만들어준다.
이 때 doptions에서
wireframes: false
는 true로 하면, 와이어프레임을 보여준다. 개발자 모드라고 생각하면 된다. false로 하면 실제 사용자에게 보이는 모습을 볼 수 있다.
fruits.js는 아래와 같다.
const FRUITS_BASE = [
  {
    name: "base/00_cherry",
    radius: 33 / 2,
  },
  {
    name: "base/01_strawberry",
    radius: 48 / 2,
  },
  {
    name: "base/02_grape",
    radius: 61 / 2,
  },
  {
    name: "base/03_gyool",
    radius: 69 / 2,
  },
  {
    name: "base/04_orange",
    radius: 89 / 2,
  },
  {
    name: "base/05_apple",
    radius: 114 / 2,
  },
  {
    name: "base/06_pear",
    radius: 129 / 2,
  },
  {
    name: "base/07_peach",
    radius: 156 / 2,
  },
  {
    name: "base/08_pineapple",
    radius: 177 / 2,
  },
  {
    name: "base/09_melon",
    radius: 220 / 2,
  },
  {
    name: "base/10_watermelon",
    radius: 259 / 2,
  },
];

const FRUITS_HLW = [
  {
    name: "halloween/00_cherry",
    radius: 46 / 2,
  },
  {
    name: "halloween/01_strawberry",
    radius: 55 / 2,
  },
  {
    name: "halloween/02_grape",
    radius: 67 / 2,
  },
  {
    name: "halloween/03_gyool",
    radius: 81 / 2,
  },
  {
    name: "halloween/04_orange",
    radius: 97 / 2,
  },
  {
    name: "halloween/05_apple",
    radius: 117 / 2,
  },
  {
    name: "halloween/06_pear",
    radius: 142 / 2,
  },
  {
    name: "halloween/07_peach",
    radius: 171 / 2,
  },
  {
    name: "halloween/08_pineapple",
    radius: 206 / 2,
  },
  {
    name: "halloween/09_melon",
    radius: 249 / 2,
  },
  {
    name: "halloween/10_watermelon",
    radius: 300 / 2,
  },
];

export { FRUITS_BASE, FRUITS_HLW };
벽 만들기
그리고 아래 코드를 통해 틀을 만들어준다. 물리 엔진이 작동되는 공간에서 여러 과일들이 밑으로 계속 떨어져 없어지는 것을 방지하기위해 벽과 바닥 그리고 제한선을 만들어준다.
// 위치(15, 395), 너비 30, 높이 790
const leftWall = Bodies.rectangle(15, 395, 30, 790, {
  isStatic: true, // isStatic: false로 되어있으면 얘도 떨어짐
  render: { fillStyle: "#E6B143"}
})
const rightWall = Bodies.rectangle(605, 395, 30, 790, {
  isStatic: true,
  render: { fillStyle: "#E6B143"}
})
const ground = Bodies.rectangle(310, 820, 620, 60, {
  isStatic: true,
  render: { fillStyle: "#E6B143"}
})
const topLine = Bodies.rectangle(310, 150, 620, 2, {
  name : "topLine",
  isStatic: true,
  isSensor: true, // 부딪히지 않고 감지만 함.
  render: { fillStyle: "#E6B143"}
})

const positionLine = Bodies.rectangle(310, 500, 0.5, 700, {
  name : "positionLine",
  isStatic: true,
  isSensor: true, // 부딪히지 않고 감지만 함.
  render: { fillStyle: "#E6B143"}
})

World.add(world, [leftWall, rightWall, ground, topLine, positionLine])

Render.run(render)
// Runner.run(engine)  // 이렇게 하니 작동을 하지 않아서, 아래 두 줄로 해결
const runner = Runner.create()
Runner.run(runner, engine)
Bodies.rectangle(x위치, y위치, 너비, 높이, 옵션)
인데 여기서 x위치와 y위치는 위치 시킬 곳 좌상을 0으로 보고 더해주는데 이때, 너비와 높이의 값 중간 값만큼 더 더해주면 위치할 것이다.
isStatic : true
을 통해서 계속 아래로 떨어지는 현상을 방지할 수 있다.
topLine과 positionLine의
isSensor: true
를 통해서 라인을 벽이 아닌 감지용으로 쓰겠음을 말해준다. false로 바꾸면 벽으로 사용되는 것을 확인 가능하다.
그리고
Render.run(render)
Runner.run(engine)
유튜브에서는 이렇게 사용을 했지만, 이렇게 하니 작동이 제대로 되지를 않아서 다음처럼 하니 제대로 작동을 했다.
Render.run(render)
const runner = Runner.create()
Runner.run(runner, engine)
변수 추가
let currentBody = null
let currentFruit = null
let disableAction = false

let interval = null // 부드럽게 좌우로 움직이게 하기 위함

let num_suika = 0
그리고 위와 같이 5개의 변수를 추가해줬다.
currentBody : 현재 놓게 될 과일 matter.js를 통한 body
currentFruit : 현재 놓게 될 과일 fruits.js에서 가져온 과일
disableAction : body의 isSleeping을 컨트롤 할 변수
interval : 키보드를 통해서 작동 시 부드럽게 움직이게 하도록 통제하는 변수
num_suika : 만들어진 수박 갯수
과일 생성
function addFruit(){

  const index = Math.floor(Math.random() * 7)
  const fruit = FRUITS_BASE[index]
  const body = Bodies.circle(310, 50, fruit.radius, {
    isSleeping: true, // isSleeping: true 로 하면 떨어지지 않는 대기 상태
    index: index,
    render: {
      sprite: { texture: `${fruit.name}.png`}
    },
    restitution: 0.3,
  })
  currentBody = body
  currentFruit = fruit

  World.add(world, body)
}
Bodies.circle(x좌표, y좌표, 옵션)을 통해서 원형 프레임을 생성시키고, isSleeping: true로 떨어지지 않도록 한다.
restitution운 0~1 사이의 숫자로 1에 가까울 수록 통통 튀는 효과가 커진다.
World.add(world, body)
를 통해서 물리엔진이 작동하는 세계인 world에 정의한 body를 추가한다.
마우스로 조작
render.canvas.addEventListener('mousemove', (event) => {
  if (currentBody && !disableAction) {
    const canvasBounds = render.canvas.getBoundingClientRect()
    const mouseX = event.clientX - canvasBounds.left

    // 마우스 위치를 currentBody의 위치로 설정
    if (30 < mouseX - currentFruit.radius && mouseX + currentFruit.radius < 590) {
      Body.setPosition(currentBody, {
        x: mouseX,
        y: currentBody.position.y,
      })

      // positionLine의 x 좌표를 mouseX로 설정
      Body.setPosition(positionLine, {
        x: mouseX,
        y: positionLine.position.y,
      })
    }
  }
})
render.canvas.addEventListener('click', (event) => {
  if (disableAction) {
    return
  }
  currentBody.isSleeping = false
  disableAction = true
  setTimeout(() => {
    addFruit()
    // positionLine의 x 좌표를 기본 좌표로 설정
    Body.setPosition(positionLine, {
      x: 310,
      y: positionLine.position.y,
    })
    disableAction = false
  }, 1000)
})
마우스를 통해서 왼쪽 오른 쪽으로 과일을 이동시키며 또한 과일이 떨어질 위치 표시선도 움직이도록 해준다.
키보드로 조작
window.onkeydown = (event) => {
  if(disableAction){
    return
  }
  switch(event.code){
    case "KeyA":
      if(interval){
        return
      }
      interval = setInterval(() => {
        if(currentBody.position.x - currentFruit.radius > 30){
          Body.setPosition(currentBody, {
            x: currentBody.position.x - 1,
            y: currentBody.position.y,
          })
          // positionLine의 x 좌표를 조정
          Body.setPosition(positionLine, {
            x: currentBody.position.x - 1,
            y: positionLine.position.y,
          })
        }
      }, 5)
      break
    case "KeyD":
      if(interval){
        return
      }
      interval = setInterval(() => {
        if(currentBody.position.x + currentFruit.radius < 590){
          Body.setPosition(currentBody, {
            x: currentBody.position.x + 1,
            y: currentBody.position.y,
          })
          // positionLine의 x 좌표를 조정
          Body.setPosition(positionLine, {
            x: currentBody.position.x - 1,
            y: positionLine.position.y,
          })
        }
      }, 5)
      break
    case "KeyS":
      currentBody.isSleeping = false
      disableAction = true
      setTimeout(() => {
        addFruit()
        // positionLine의 x 좌표를 기본 좌표로 설정
        Body.setPosition(positionLine, {
          x: 310,
          y: positionLine.position.y,
        })
        disableAction = false
      }, 1000)
      break
  }
}

window.onkeyup = (event) => {
  switch (event.code){
    case "KeyA":
    case "KeyD":
      clearInterval(interval)
      interval = null
  }
}
키보드 wasd 중 asd를 통해서 조작을 해주도록 하고, 이 때, setInterval을 통해서 좌우로 부드럽게 작동하도록 만들어준다. 0.005초마다 움직임이 지속되도록 하고, keyup이 일어나면 작동하고 있던 interval을 종료시키는 코드로 키보드로 좌우로 움직이는데 이상이 없도록 만들어주었다.
게임 작동
Events.on(engine, "collisionStart", (event) => {
  event.pairs.forEach((collision) => {
    if(collision.bodyA.index == collision.bodyB.index){
      const index = collision.bodyA.index
      if(index === FRUITS_BASE.length - 1){
        return
      }
      World.remove(world, [collision.bodyA, collision.bodyB])

      const newFruit = FRUITS_BASE[index + 1]

      const newBody = Bodies.circle(
        collision.collision.supports[0].x,
        collision.collision.supports[0].y,
        newFruit.radius,
        {
          render: {
            sprite: { texture: `${newFruit.name}.png`}
          },
          index: index + 1
        }
      )
      if(index + 1 === FRUITS_BASE.length - 1){
        console.log('수박')
        num_suika += 1
      }

      World.add(world, newBody)

      if(num_suika >= 2){
        setTimeout(() => {
          alert('WIN!!!!!')
        }, 100)
      }
    }

    if (!disableAction && (collision.bodyA.name === "topLine" || collision.bodyB.name === "topLine")){
      alert("Game over")
    }
  });
})

addFruit()
게임이 작동될 수 있도록, 충돌효과를 내주었다. matter.js에서 제공하는 충돌효과를 이용해서 2개의 index(그러니까 같은 과일인지)가 같다면 없애고, 한 단계 상승한 과일을 제공한다.
요녀석이 한단계 높은 과일을 제공하는 녀석임
const newBody = Bodies.circle(
        collision.collision.supports[0].x,
        collision.collision.supports[0].y,
        newFruit.radius,
        {
          render: {
            sprite: { texture: `${newFruit.name}.png`}
          },
          index: index + 1
        }
      )
그리고 수박이 만들어지면 num_suika에 +1 을 해주고 수박이 2개 이상이면, 완성!!! 그런데, setTimeout()을 사용한 이유는 이렇게 안하면 수박이 rendering되기도 전에 알람이 발생해버려서 수박을 보여주고 알람을 띄우기 위해서 setTimeout()을 사용했다.
또한 종료선에 닿으면 게임이 종료될 수 있도록 아래처럼 코드를 작성했다.
if (!disableAction && (collision.bodyA.name === "topLine" || collision.bodyB.name === "topLine")){
      alert("Game over")
    }
마지막으로 코드의 끝에 addFruit()을 작성함으로 최초 과일 준비를 진행한다.
addFruit()전체 코드
import { Bodies, Body, Engine, Events, Render, Runner, World } from "matter-js"
import { FRUITS_BASE } from "../fruits"
const engine = Engine.create()
const render = Render.create({
engine,
element: document.body,
options: {
wireframes: false,
background: "#F7F4C8",
width: 620,
height: 850,
}
})
const world = engine.world
// 위치(15, 395), 너비 30, 높이 790
const leftWall = Bodies.rectangle(15, 395, 30, 790, {
isStatic: true, // isStatic: false로 되어있으면 얘도 떨어짐
render: { fillStyle: "#E6B143"}
})
const rightWall = Bodies.rectangle(605, 395, 30, 790, {
isStatic: true,
render: { fillStyle: "#E6B143"}
})
const ground = Bodies.rectangle(310, 820, 620, 60, {
isStatic: true,
render: { fillStyle: "#E6B143"}
})
const topLine = Bodies.rectangle(310, 150, 620, 2, {
name : "topLine",
isStatic: true,
isSensor: true, // 부딪히지 않고 감지만 함.
render: { fillStyle: "#E6B143"}
})
const positionLine = Bodies.rectangle(310, 500, 0.5, 700, {
name : "positionLine",
isStatic: true,
isSensor: true, // 부딪히지 않고 감지만 함.
render: { fillStyle: "#E6B143"}
})
World.add(world, [leftWall, rightWall, ground, topLine, positionLine])
Render.run(render)
// Runner.run(engine); // 이렇게 하니 작동을 하지 않아서, 아래 두 줄로 해결
const runner = Runner.create()
Runner.run(runner, engine)
let currentBody = null
let currentFruit = null
let disableAction = false
let interval = null // 부드럽게 좌우로 움직이게 하기 위함
let num_suika = 0
function addFruit(){
const index = Math.floor(Math.random() * 7)
const fruit = FRUITS_BASE[index]
const body = Bodies.circle(310, 50, fruit.radius, {
isSleeping: true, // isSleeping: true 로 하면 떨어지지 않는 대기 상태
index: index,
render: {
sprite: { texture: `${fruit.name}.png`}
},
restitution: 0.3,
})
currentBody = body
currentFruit = fruit
World.add(world, body)
}
render.canvas.addEventListener('mousemove', (event) => {
if (currentBody && !disableAction) {
const canvasBounds = render.canvas.getBoundingClientRect()
const mouseX = event.clientX - canvasBounds.left
// 마우스 위치를 currentBody의 위치로 설정
if (30 < mouseX - currentFruit.radius && mouseX + currentFruit.radius < 590) {
Body.setPosition(currentBody, {
x: mouseX,
y: currentBody.position.y,
})
// positionLine의 x 좌표를 mouseX로 설정
Body.setPosition(positionLine, {
x: mouseX,
y: positionLine.position.y,
})
}
}
})
render.canvas.addEventListener('click', (event) => {
if (disableAction) {
return
}
currentBody.isSleeping = false
disableAction = true
setTimeout(() => {
addFruit()
// positionLine의 x 좌표를 기본 좌표로 설정
Body.setPosition(positionLine, {
x: 310,
y: positionLine.position.y,
})
disableAction = false
}, 1000)
})
window.onkeydown = (event) => {
if(disableAction){
return
}
switch(event.code){
case "KeyA":
if(interval){
return
}
interval = setInterval(() => {
if(currentBody.position.x - currentFruit.radius > 30){
Body.setPosition(currentBody, {
x: currentBody.position.x - 1,
y: currentBody.position.y,
})
// positionLine의 x 좌표를 조정
Body.setPosition(positionLine, {
x: currentBody.position.x - 1,
y: positionLine.position.y,
})
}
}, 5)
break
case "KeyD":
if(interval){
return
}
interval = setInterval(() => {
if(currentBody.position.x + currentFruit.radius < 590){
Body.setPosition(currentBody, {
x: currentBody.position.x + 1,
y: currentBody.position.y,
})
// positionLine의 x 좌표를 조정
Body.setPosition(positionLine, {
x: currentBody.position.x - 1,
y: positionLine.position.y,
})
}
}, 5)
break
case "KeyS":
currentBody.isSleeping = false
disableAction = true
setTimeout(() => {
addFruit()
// positionLine의 x 좌표를 기본 좌표로 설정
Body.setPosition(positionLine, {
x: 310,
y: positionLine.position.y,
})
disableAction = false
}, 1000)
break
}
}
window.onkeyup = (event) => {
switch (event.code){
case "KeyA":
case "KeyD":
clearInterval(interval)
interval = null
}
}
Events.on(engine, "collisionStart", (event) => {
event.pairs.forEach((collision) => {
if(collision.bodyA.index == collision.bodyB.index){
const index = collision.bodyA.index
if(index === FRUITS_BASE.length - 1){
return
}
World.remove(world, [collision.bodyA, collision.bodyB])
const newFruit = FRUITS_BASE[index + 1]
const newBody = Bodies.circle(
collision.collision.supports[0].x,
collision.collision.supports[0].y,
newFruit.radius,
{
render: {
sprite: { texture: `${newFruit.name}.png`}
},
index: index + 1
}
)
if(index + 1 === FRUITS_BASE.length - 1){
console.log('수박')
num_suika += 1
}
World.add(world, newBody)
if(num_suika >= 2){
setTimeout(() => {
alert('WIN!!!!!')
}, 100)
}
}
if (!disableAction && (collision.bodyA.name === "topLine" || collision.bodyB.name === "topLine")){
alert("Game over")
}
});
})
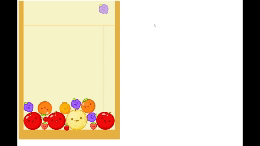
addFruit()작동모습
음 잘 작동하는군
다음번에는 리액트나 뷰 프로젝트에도 적용시켜봐야겠다.