View에 데이터를 지정해줄 때 지금까진 .setText() 와 같은 메소드를 사용해 설정해주었다.
하지만 데이터 바인딩을 사용하면 이러한 코드를 사용하지 않고, layout 파일에서 View에 변수를 설정해주어 변수가 변하면 View의 데이터도 변하는 방식으로 구현해줄 수 있다.
build.gradle 에 다음과 같은 코드를 추가한다.
android {

    ...

    buildFeatures {
        dataBinding = true
    }
}
데이터 바인딩을 사용할 layout 파일을 다음처럼 수정해줘야 한다.
layout 파일의 코드에서 해당 코드 전체를 <layout> 태그로 감싸줘야 한다.
기존 최상위 layout 태그에 ALT + ENTER 단축키를 사용해 쉽게 만들어줄 수 있다.
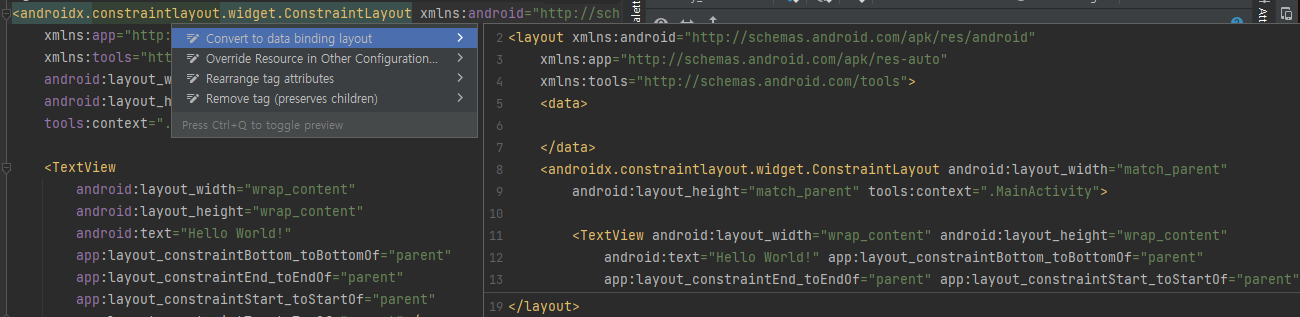
<?xml version="1.0" encoding="utf-8"?>
<layout xmlns:android="http://schemas.android.com/apk/res/android"
    xmlns:app="http://schemas.android.com/apk/res-auto"
    xmlns:tools="http://schemas.android.com/tools">

    <data>

    </data>

    <androidx.constraintlayout.widget.ConstraintLayout
        android:layout_width="match_parent"
        android:layout_height="match_parent"
        tools:context=".MainActivity">

        <TextView
            android:layout_width="wrap_content"
            android:layout_height="wrap_content"
            android:text="Hello World!"
            app:layout_constraintBottom_toBottomOf="parent"
            app:layout_constraintEnd_toEndOf="parent"
            app:layout_constraintStart_toStartOf="parent"
            app:layout_constraintTop_toTopOf="parent" />

    </androidx.constraintlayout.widget.ConstraintLayout>
</layout>
다음으로 바인딩할 변수를 가진 클래스를 만들어주었다.
public class User {

    String name;
    int age;
    boolean fav;

    public User(String name, int age, boolean fav){
        this.name = name;
        this.age = age;
        this.fav = fav;
    }

    public String getName(){
        return name;
    }

    public int getAge(){
        return age;
    }

    public boolean getFav(){
        return fav;
    }
}
<data> 태그안에 <variable> 태그로 바인딩할 변수를 지정해준다.
    <data>

        <variable
            name="user"
            type="com.example.databinding.User" />

    </data>
name 속성에는 type에 지정한 객체를 사용할 이름을
type 속성에는 이 layout과 연결될 데이터를 가지고 있을 클래스를 지정해준다.
다음으로 layout에 TextView 두개와 CheckBox 하나를 추가했다.
    <androidx.constraintlayout.widget.ConstraintLayout
        android:layout_width="match_parent"
        android:layout_height="match_parent"
        tools:context=".MainActivity">

        <TextView
            android:id="@+id/textName"
            android:layout_width="wrap_content"
            android:layout_height="wrap_content"
            android:text="@{user.name}"
            app:layout_constraintBottom_toBottomOf="parent"
            app:layout_constraintEnd_toEndOf="parent"
            app:layout_constraintStart_toStartOf="parent"
            app:layout_constraintTop_toTopOf="parent" />

        <TextView
            android:id="@+id/textAge"
            android:layout_width="wrap_content"
            android:layout_height="wrap_content"
            android:layout_marginTop="16dp"
            android:text="@{String.valueOf(user.age)}"
            app:layout_constraintEnd_toEndOf="parent"
            app:layout_constraintStart_toStartOf="parent"
            app:layout_constraintTop_toBottomOf="@+id/textName" />

        <CheckBox
            android:id="@+id/checkFav"
            android:layout_width="wrap_content"
            android:layout_height="wrap_content"
            android:layout_marginTop="16dp"
            android:text="좋아요"
            android:checked="@{user.fav}"
            app:layout_constraintEnd_toEndOf="parent"
            app:layout_constraintStart_toStartOf="parent"
            app:layout_constraintTop_toBottomOf="@+id/textAge" />

    </androidx.constraintlayout.widget.ConstraintLayout>
각 View 들에 다음과 같이 Data Binding을 적용하였다.
        <TextView
            ...
            android:text="@{user.name}"
            ...
            />

        <TextView
            ...
            android:text="@{String.valueOf(user.age)}"
            ...
            />

        <CheckBox
            ...
            android:checked="@{user.fav}"
            ...
            />
MainActivity.java 에서 다음과 같이 데이터 바인딩을 적용해주었다.
public class MainActivity extends AppCompatActivity {
private ActivityMainBinding binding;
@Override
protected void onCreate(Bundle savedInstanceState) {
super.onCreate(savedInstanceState);
//setContentView(R.layout.activity_main);
binding = DataBindingUtil.setContentView(this, R.layout.activity_main);
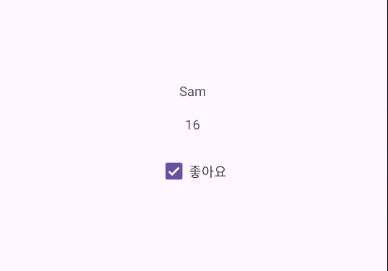
binding.setUser(new User("Sam", 16, true));
}
}Binding Class의 이름은 Activity의 이름에 따라 달라진다.
- XXXActivity : ActivityXXXBinding
private ActivityMainBinding binding;DataBindingUtil클래스를 통해 이 MainActivity에게 activity_main.xml 레이아웃을 ContentView()로 설정하고 연결하여 제어하는 클래스객체를 리턴하였다.
binding = DataBindingUtil.setContentView(this, R.layout.activity_main);다음으로 layout 파일의 <data> 태그 안의 <variable>의 type에 지정한 클래스 객체를 만들어 set() 해주었다.
binding.setUser(new User("Sam", 16, true));이렇게 하면 바인딩해준 layout의 View들에 설정한 객체의 값들이 반영된다.
앱을 실행해보면 TextView와 CheckBox에 넣어준 데이터가 표시된다.