이전 프로젝트에서 데이토베이스를 사용할 준비를 마쳤다.
이번에는 데이터베이스의 데이터를 다루는 기능들을 사용해보았다.
이전 프로젝트에 이어서 작성하였다.
데이터 입력하기
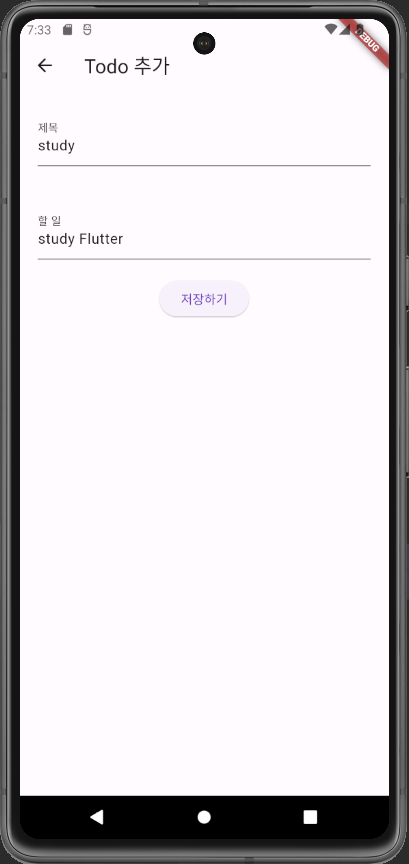
메인 화면에서 플로팅 버튼을 누르면 데이터를 입력하는 화면으로 이동해, 여기서 데이터를 입력 후 <저장하기> 버튼을 누르면 데이터베이스에 데이터를 저장하는 기능을 만들어보았다.
데이터베이스 입력 화면인 _AddTodoApp 클래스에 데이터를 입력하기 위한 텍스트필드를 추가하였다.
class _AddTodoApp extends State<StatefulWidget> {
TextEditingController? titleController;
TextEditingController? contentController;
void initState() {
super.initState();
titleController = new TextEditingController();
contentController = new TextEditingController();
}
Widget build(BuildContext context) {
return Scaffold(
appBar: AppBar(
title: Text('Todo 추가'),
),
body: Container(
child: Center(
child: Column(
children: <Widget>[
Padding(
padding: EdgeInsets.all(20),
child: TextField(
controller: titleController,
decoration: InputDecoration(labelText: '제목'),
),
),
Padding(
padding: EdgeInsets.all(20),
child: TextField(
controller: contentController,
decoration: InputDecoration(labelText: '할 일'),
),
),
ElevatedButton(
onPressed: () {
Todo todo = Todo(
title: titleController!.value.text,
content: contentController!.value.text,
active: 0);
Navigator.of(context).pop(todo);
},
child: Text('저장하기'))
],
),
),
),
);
}
}두 개의 텍스트필드에 제목과 내용을 입력하고
버튼을 누르면 pop() 함수를 통해 Todo데이터를 메인 화면(DatabaseApp)으로 전달한다.
이렇게 전달받은 Todo 데이터를 _DatabaseApp클래스에서 데이터베이스에 입력하는 기능을 만들었다.
_DatabaseApp클래스에 데이터를 추가하는 _insertTodo() 함수를 만들었다.
또한 todo.dart, addTodo.dart 파일들을 import 하였다.
import 'todo.dart';
import 'addTodo.dart';

...

class _DatabaseApp extends State<DatabaseApp>{

  ...

  void _insertTodo(Todo todo) async {
    final Database database = await widget.db;
    await database.insert('todos', todo.toMap(), conflictAlgorithm: ConflictAlgorithm.replace);
  }
}
_insertTodo() 함수는 widget.db를 통해 데이터베이스 객체를 선언하고 (widget을 이용하면 현재 State 상위에 있는 StatefulWidget에 있는 db 변수를 사용할 수 있다.)
insert() 함수를 이용해 데이터를 입력한다.
첫 번째 인자로 전달한 todos는 테이블의 이름
두 번째 인자인 todo.toMap()은 전달받은 Todo 데이터를 Map 형태로 바꿔서 저장될 데이터를 전달하였다.
세 번째 인자인 conflictAlgorithm은 충돌이 발생할 때를 대비한 것이다. 테이블의 데이터를 입력하는 과정에서 충돌이 발생하면 새 데이터로 교체하도록 replace를 선언하였다.
FloatingButton을 누르면 todo 데이터를 전달받고 전달받은 데이터로 _insertTodo() 함수로 전달받은 데이터를 데이터베이스에 저장하도록 만들었다.
      floatingActionButton: FloatingActionButton(
        onPressed: () async {
          final todo = await Navigator.of(context).pushNamed('/add');
          if(todo != null){
            _insertTodo(todo as Todo);
          }
        },
        child: Icon(Icons.add),
      ),
데이터 검색하기
데이터베이스에 저장된 데이터를 찾아 표시해주는 데이터 검색 기능을 만들어보았다.
_DatabaseApp 클래스에 데이터베이스에서 데이터를 가져오는 getTodos() 함수를 작성하였다.
  Future<List<Todo>> getTodos() async {
    final Database database = await widget.db;
    final List<Map<String, dynamic>> maps = await database.query('todos');

    return List.generate(maps.length, (index) {
      int active = maps[index]['active'] == 1 ? 1 : 0;
      return Todo(
        title: maps[index]['title'].toString(),
        content: maps[index]['content'].toString(),
        active: active,
        id : maps[index]['id']
      );
    });
  }
getTodos() 함수는 widget.db를 가져와 데이터베이스를 선언한다.
그리고 query('todos') 함수로 todos 테이블을 가져와 maps 리스트에 넣는다.
List.generate() 함수로 maps 리스트의 내용물로 Todo 데이터를 만들어 List<Todo> 형태로 반환하도록 만들었다.
List<Todo> 변수를 선언해
initState() 함수에 getTodos() 함수를 사용해 할 일 목록을 갱신하도록 만들었고
_insertTodo() 함수에 getTodos() 함수를 사용해 값이 변경되면 변경점이 반영되도록 만들었다..
class _DatabaseApp extends State<DatabaseApp>{
Future<List<Todo>>? todoList;
void initState() {
super.initState();
todoList = getTodos();
}
...
void _insertTodo(Todo todo) async {
final Database database = await widget.db;
await database.insert('todos', todo.toMap(), conflictAlgorithm: ConflictAlgorithm.replace);
setState(() {
todoList = getTodos();
});
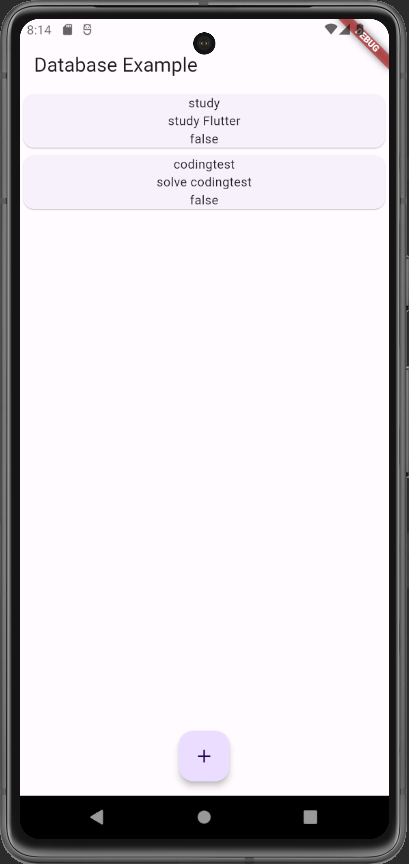
}build() 함수의 body에 데이터베이스의 데이터를 표시하도록 만들었다.
      body: Container(
        child: Center(
          child: FutureBuilder(
              builder: (context, snapshot) {
                switch (snapshot.connectionState) {
                  case ConnectionState.none:
                    return CircularProgressIndicator();
                  case ConnectionState.waiting:
                    return CircularProgressIndicator();
                  case ConnectionState.active:
                    return CircularProgressIndicator();
                  case ConnectionState.done:
                    if (snapshot.hasData) {
                      return ListView.builder(
                        itemBuilder: (context, index) {
                          Todo todo = (snapshot.data as List<Todo>)[index];
                          return Card(
                            child: Column(
                              children: <Widget>[
                                Text(todo.title!),
                                Text(todo.content!),
                                Text('${todo.active == 1 ? 'true' : 'false'}')
                              ],
                            ),
                          );
                        },
                        itemCount: (snapshot.data as List<Todo>).length,
                      );
                    } else {
                      return Text('No data');
                    }
                }
                return CircularProgressIndicator();
              },
              future: todoList),
        ),
      ),
FutureBuilder 위젯은 서버에서 데이터를 받거나 파일에 데이터를 가져올 때 사용한다.
데이터를 가져오는 동안 시간이 걸리기 때문에 그 사이에 표시할 위젯을 만들기 위해 switch 문으로 snapshot.connectionState를 이용해 상태를 확인하고 상태가 done이 되면 가져온 데이터를 ListView.builder를 이용해 화면에 표시한다.
데이터 수정하기
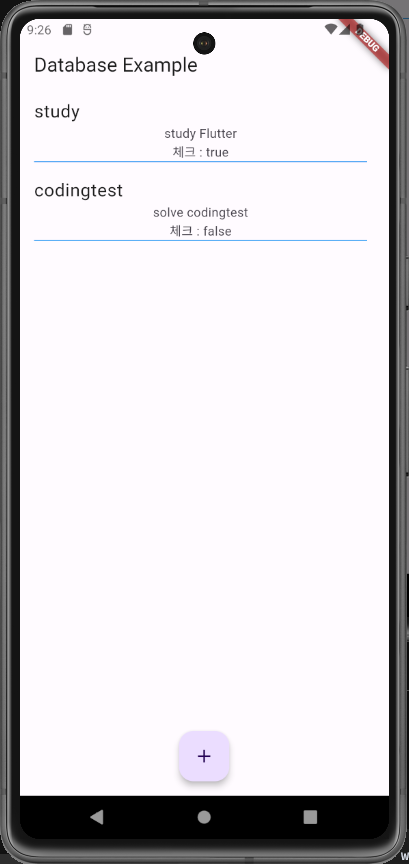
ListView의 아이템을 클릭하여 데이터를 수정하는 기능을 만들어 보았다.
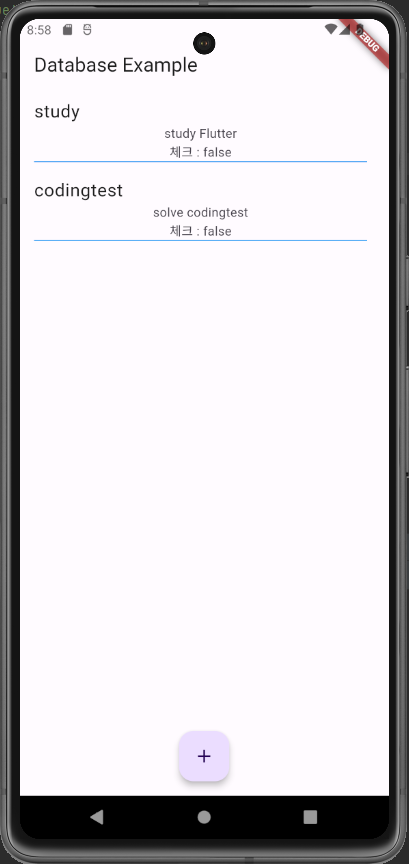
main.dart 파일의 _DatabaseApp 클래스의 build() 함수에서 할 일 목록을 표시하는 ListView.builder의 내용을 수정하였다.
                      return ListView.builder(
                        itemBuilder: (context, index) {
                          Todo todo = (snapshot.data as List<Todo>)[index];
                          return ListTile(
                            title: Text(todo.title!, style: TextStyle(fontSize: 20),),
                            subtitle: Container(
                              child: Column(
                                children: <Widget>[
                                  Text(todo.content!),
                                  Text('체크 : ${todo.active == 1 ? 'true' : 'false'}'),
                                  Container(
                                    height: 1,
                                    color: Colors.blue,
                                  )
                                ],
                              ),
                            ),
                          );
                        },
                        itemCount: (snapshot.data as List<Todo>).length,
                      );
기존 Card 위젯을 ListTile 위젯으로 바꾸었다.
ListTile 위젯은 title, subtitle, leading, trailing 옵션으로 위젯의 위치를 지정할 수 있는 위젯이다.
또한 onTap 이벤트로 클릭했을 때의 이벤트를 만들어줄 수 있다.
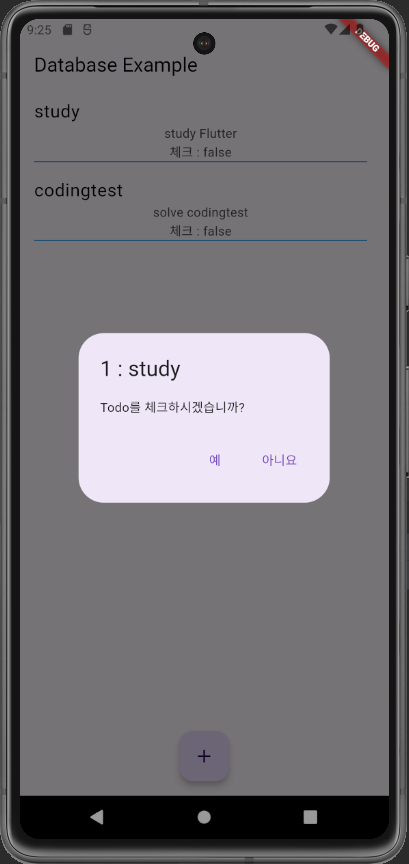
ListTile 위젯의 onTap 이벤트를 작성하였다.
                          return ListTile(

                            title: ... ,

                            subtitle: ... ,

                            onTap: () async {
                              Todo result = await showDialog(
                                  context: context,
                                  builder: (BuildContext context) {
                                    return AlertDialog(
                                      title: Text('${todo.id} : ${todo.title}'),
                                      content: Text('Todo를 체크하시겠습니까?'),
                                      actions: <Widget>[
                                        TextButton(
                                            onPressed: () {
                                              setState(() {
                                                todo.active == 1 ? todo.active = 0 : todo.active = 1;
                                              });
                                              Navigator.of(context).pop(todo);
                                            },
                                            child: Text('예')),
                                        TextButton(
                                            onPressed: () {
                                              Navigator.of(context).pop(todo);
                                            },
                                            child: Text('아니요'))
                                      ],
                                    );
                              });
                              _updateTodo(result);
                            },
                          );
먼저 비동기로 showDialog() 함수를 사용해 알림 창을 호출한다.
AlertDialog로 만든 알림 창에 title과 content를 설정하였다.
action을 이용해 이벤트를 설정하였다. TextButton으로 예/아니요 버튼을 만들었고
아니요 버튼을 누르면 알림 창을 종료하고
예 버튼을 누르면 todo값을 변경한 후 pop() 함수로 데이터를 전달한다.
전달받은 데이터는 다음에 정의할 _updateTodo() 함수에 넣어준다.
_updateTodo() 함수는 데이터베이스의 데이터를 수정하는 함수이다.
  void _updateTodo(Todo todo) async {
    final Database database = await widget.db;

    await database.update('todos', todo.toMap(), where: 'id = ?', whereArgs: [todo.id]);

    setState(() {
      todoList = getTodos();
    });
  }
데이터베이스의 데이터를 수정할 때는 database.update() 함수를 이용한다.
인자로 테이블 이름, where, whereArgs 를 전달해주었다.
where 인자는 어떤 데이터를 수정할 것인지를 나타낸다. 여기서는 id를 이용해 수정할 데이터를 찾았다(id = ?).
whereArgs 인자는 where 인자의 ? 에 대응할 값이 된다.
데이터 삭제하기
마지막으로 데이터를 삭제하는 기능을 만들어보았다.
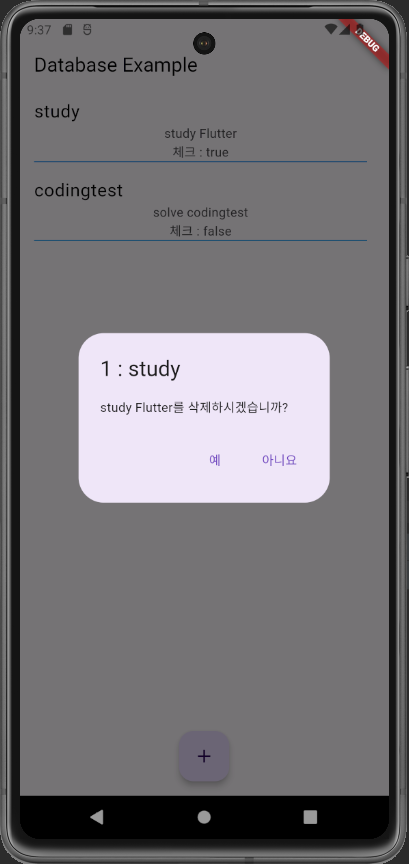
ListTile 위젯에는 길게 터치할 때 발생하는 onLongPress 이벤트를 제공한다.
이 이벤트를 이용해 삭제 기능을 만들어보았다.
                          return ListTile(
                            title: ... ,

                            subtitle: ... ,

                            onTap: ... ,

                            onLongPress: () async {
                              Todo result = await showDialog(
                                  context: context,
                                  builder: (BuildContext context) {
                                    return AlertDialog(
                                      title: Text('${todo.id} : ${todo.title}'),
                                      content: Text('${todo.content}를 삭제하시겠습니까?'),
                                      actions: <Widget>[
                                        TextButton(
                                            onPressed: () {
                                              Navigator.of(context).pop(todo);
                                            },
                                            child: Text('예')),
                                        TextButton(
                                            onPressed: () {
                                              Navigator.of(context).pop();
                                            },
                                            child: Text('아니요'))
                                      ],
                                    );
                                  });
                              _deleteTodo(result);
                            },
                          );
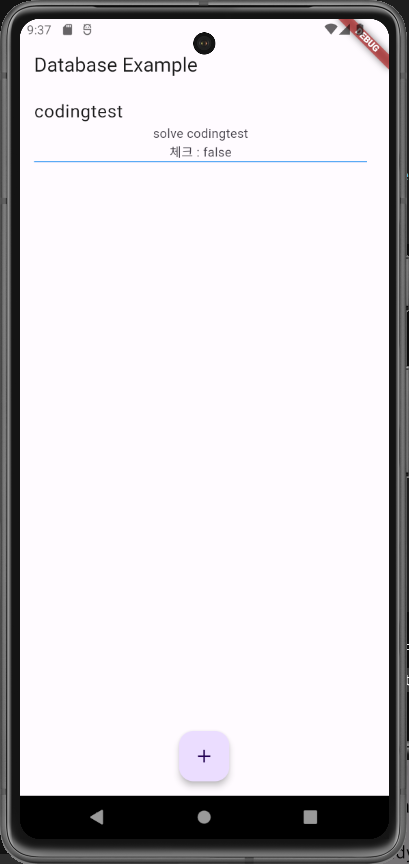
onTap 이벤트 처리와 같이 알림 창이 뜨고, 예 버튼을 누르면 다음에 작성할 _deleteTodo() 함수에 Todo 아이템을 전달한다.
_deleteTodo() 함수는 매개변수로 전달받은 아이템을 데이터베이스에서 삭제한다.
  void _deleteTodo(Todo todo) async {
    final Database database = await widget.db;

    await database.delete('todos', where: 'id = ?', whereArgs: [todo.id]);

    setState(() {
      todoList = getTodos();
    });
  }
database.delete() 함수는 데이터베이스에서 데이터를 삭제한다.
받는 인자와 내용은 database.update() 함수와 같다.
요약
widget을 이용하면 현재 State 상위에 있는 StatefulWidget에 있는 db 변수를 사용할 수 있다.
final Database database = await widget.db;insert()함수를 통해 데이터베이스에 데이터를 추가할 수 있다.
첫 번째 인자는 테이블, 두 번째 인자는 입력할 데이터, 세 번째 인자는 충돌 발생 처리이다.
await database.insert('todos', todo.toMap(), conflictAlgorithm: ConflictAlgorithm.replace);query(table_name)함수로 table_name 테이블의 데이터를 가져올 수 있다.
final List<Map<String, dynamic>> maps = await database.query('todos');updata(table_name, where, whereArgs)함수로table_name테이블의 데이터를 수정할 수 있다.
await database.update('todos', todo.toMap(), where: 'id = ?', whereArgs: [todo.id]);delete(table_name, where, whereArgs)함수로table_name테이블의 데이터를 삭제할 수 있다.
await database.delete('todos', where: 'id = ?', whereArgs: [todo.id]);