
미루고 미뤄두던 초기 세팅 이제는 슬슬 정리해보려 합니다.
점점 방대해져가는 프론트엔드 초기 세팅..
매번 글을 찾아가며 시간을 날리지 말고,
나만의 세팅 하나 만들어두고 필요할 때 가져다 써봅시당
에디터는 VsCode로 진행하며, yarn, node.js가 설치되어 있어야합니다. yarn이 없을 경우 yarn add를 npm i로 바꿔서 진행하여도 무방합니다.
❗ 리액트, 웹팩, 바벨 설치
-
우선 프로젝트용 폴더를 하나 만들어줍니다. 저는 ts_project 폴더로 이름지었습니다.
-
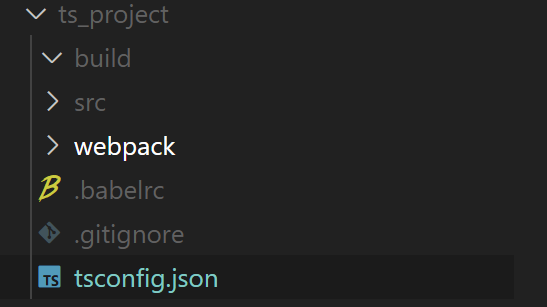
폴더 안에 build, src, webpack 폴더, .gitignore, .babelrc, tsconfig,json 파일을 만들어줍니다.
-
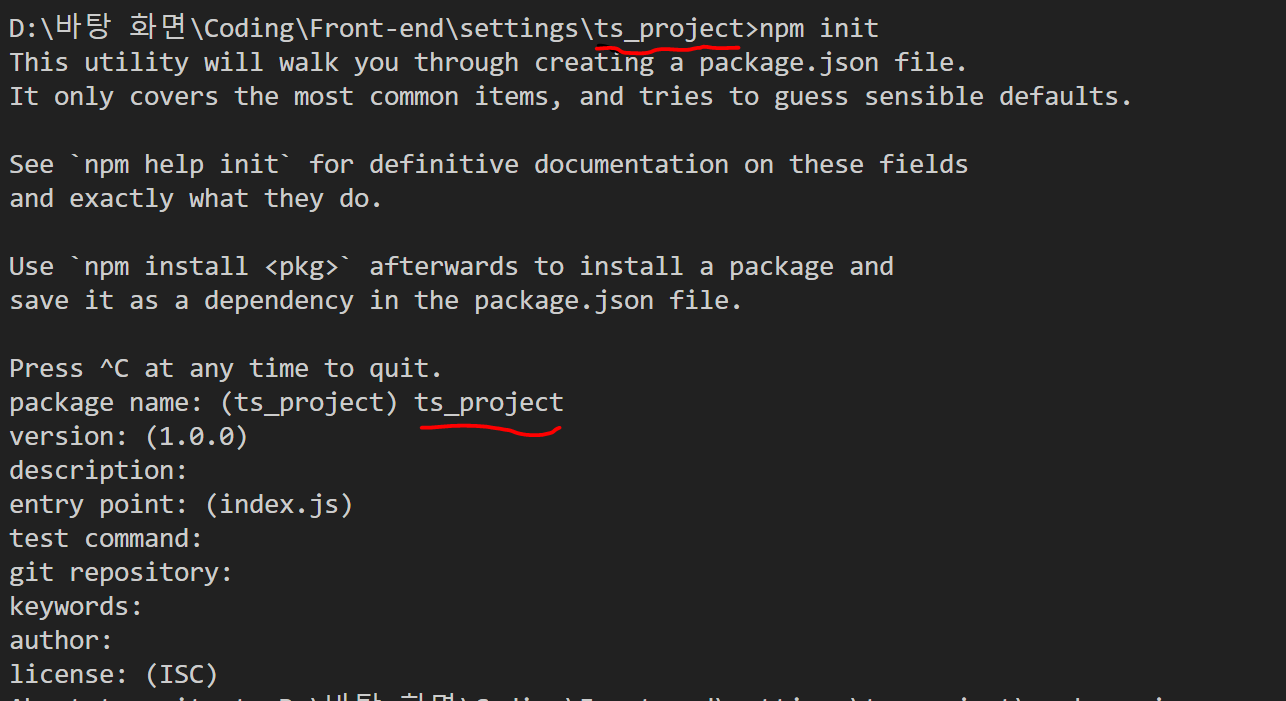
터미널을 연 뒤 npm init을 입력합니다.
이 때 프로젝트 폴더에 위치해 있는지 주의해주세요.3-1. 첫 번째로 나오는 package name에만 프로젝트 폴더 이름(ex. ts_project)을 입력
3-2. 나머지는 엔터키로 넘어가준 뒤
3-3. 마지막에 yes 입력해주세요.
-
이후 터미널에
yarn add react react-dom
- 타입스크립트를 위해
yarn add -D typescript @types/react @types/react-dom
- Babel 설치를 위해
yarn add -D @babel/core @babel/preset-env @babel/preset-react @babel/preset-typescript
- Webpack 설치를 위해
yarn add -D webpack webpack-cli webpack-dev-server html-webpack-plugin
- babel-loader는 webpack이 js 파일을 번들링할 때 Babel을 사용해 트랜스파일링하도록 도와주는 패키지입니다. 추가해줍니다.
yarn add -D babel-loader
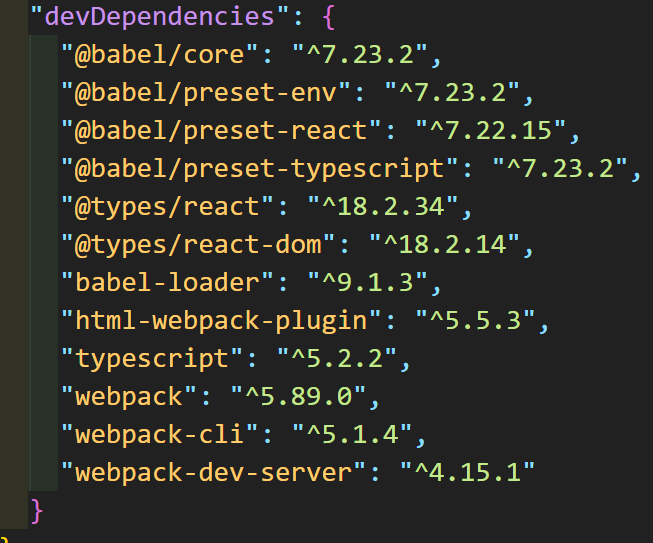
앞서 추가해준 내용들이 package.json에 잘 나타나 있습니다.
- tsconfig.json 파일에 다음과 같이 적어줍니다.
// tsconfig.json

{
  "compilerOptions": {
    "target": "ES5" /* Specify ECMAScript target version: 'ES3' (default), 'ES5', 'ES2015', 'ES2016', 'ES2017', 'ES2018', 'ES2019', 'ES2020', or 'ESNEXT'. */,

    "module": "ESNext" /* Specify module code generation: 'none', 'commonjs', 'amd', 'system', 'umd', 'es2015', 'es2020', or 'ESNext'. */,

    "moduleResolution": "node" /* Specify module resolution strategy: 'node' (Node.js) or 'classic' (TypeScript pre-1.6). */ /* Type declaration files to be included in compilation. */,

    "lib": ["DOM", "ESNext"] /* Specify library files to be included in the compilation. */,

    "jsx": "react-jsx" /* Specify JSX code generation: 'preserve', 'react-native', 'react' or 'react-jsx'. */,

    "noEmit": true /* Do not emit outputs. */,

    "isolatedModules": true /* Transpile each file as a separate module (similar to 'ts.transpileModule'). */,

    "esModuleInterop": true /* Enables emit interoperability between CommonJS and ES Modules via creation of namespace objects for all imports. Implies 'allowSyntheticDefaultImports'. */,

    "strict": true /* Enable all strict type-checking options. */,

    "skipLibCheck": true /* Skip type checking of declaration files. */,

    "forceConsistentCasingInFileNames": true /* Disallow inconsistently-cased references to the same file. */,

    "resolveJsonModule": true

    // "allowJs": true /* Allow javascript files to be compiled. Useful when migrating JS to TS */,

    // "checkJs": true /* Report errors in .js files. Works in tandem with allowJs. */,
  },

  "include": ["src/**/*"]
}
- webpack 폴터 안에 webpack.config.js 파일을 생성 후 다음과 같이 입력합니다.
// webpack.config.js

const path = require("path");

const HtmlWebpackPlugin = require("html-webpack-plugin");

module.exports = {
  mode: "development",

  entry: path.resolve(__dirname, "..", "./src/index.tsx"),

  resolve: {
    extensions: [".tsx", ".ts", ".js"],
  },

  module: {
    rules: [
      {
        test: /\.(ts|js)x?$/,

        exclude: /node_modules/,

        use: [
          {
            loader: "babel-loader",
          },
        ],
      },
    ],
  },

  output: {
    path: path.resolve(__dirname, "..", "./build"),

    filename: "bundle.js",
  },

  plugins: [
    new HtmlWebpackPlugin({
      template: path.resolve(__dirname, "..", "./src/index.html"),
    }),
  ],
};
이 파일 내에서 다양한 속성들을 추가 가능한데, (ex. 중복 경로 설정, 프록시 설정)
그 부분은 다음에 라우터 설정과 함께 정리하여 올리도록 하겠습니다.
- .babelrc 파일에 다음과 같이 입력합니다.
// .babelrc

{

  "presets": [

    "@babel/preset-env",

    [

      "@babel/preset-react",

      {

        "runtime": "automatic"

      }

    ],

    "@babel/preset-typescript"

  ],

  "plugins": [

    [

      "@babel/plugin-transform-runtime",

      {

        "regenerator": true

      }

    ]

  ]

}- src 폴더에 App.tsx, index.html, index.tsx 파일을 생성해줍니다.
// App.tsx
import React from 'react';

export const App = () => {
  return <h1>React</h1>;
};
<!-- index.html -->

<!doctype html>
<html lang="en">
  <head>
    <meta charset="UTF-8" />
    <meta http-equiv="X-UA-Compatible" content="IE=edge" />
    <meta name="viewport" content="width=device-width, initial-scale=1.0" />
    <title>React App</title>
  </head>
  <body>
    <div id="root"></div>
  </body>
</html>
// index.tsx
import ReactDOM from 'react-dom/client';
import React from 'react';
import { App } from './App';
const root = ReactDOM.createRoot(document.getElementById('root') as HTMLElement);
root.render(
<React.StrictMode>
<App />
</React.StrictMode>,
);
- 터미널에 다음과 같이 입력합니다.
yarn add -D @babel/plugin-transform-runtime
- package.json 파일 scripts에
"start": "webpack server --config webpack/webpack.config.js --open"
를 추가합니다.
터미널에 yarn start 입력 시 webpack 개발 서버를 시작하기 위해 추가하는 부분입니다.

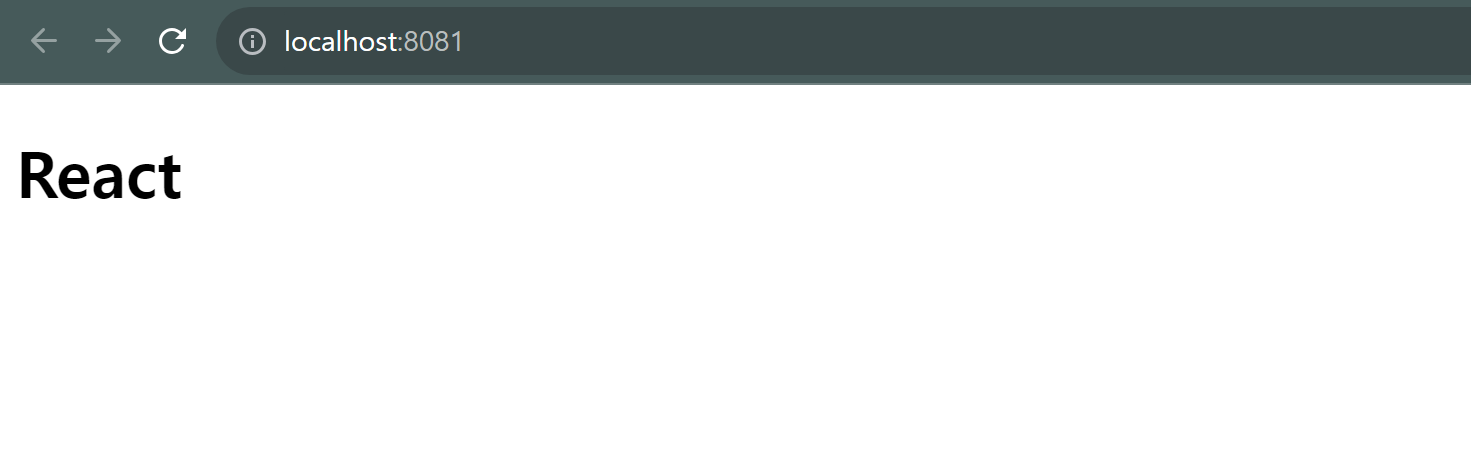
- 터미널에 yarn start를 입력하여 화면이 잘 뜨는지 확인해줍시다. 잘 뜨면 성공입니다.
❗ ESLint, Prettier 설정
이제 eslint, prettier를 적용해봅시다.
vscode extension에서 ESLint, Prettier Extension이 설치되어 있지 않다면 설치해주세요.
- eslint에서 typescript를 활용하기 위한 플러그인, ESLint와 Prettier를 함께 사용하기 위한 플러그인을 설치합니다.
yarn add @typescript-eslint/eslint-plugin @typescript-eslint/parser --dev
yarn add eslint-config-prettier eslint-plugin-prettier --dev
- airbnb 규칙을 설정해줍니다.
yarn add -D eslint-config-airbnb
- 리액트 관련 플러그인을 설치합니다.
yarn add eslint-plugin-react eslint-plugin-react-hooks eslint-plugin-jsx-a11y eslint-plugin-import --dev
- .eslintrc.json 파일을 프로젝트 루트 위치에 만들고 다음과 같이 입력합니다.
// .eslintrc.json
{
  "parser": "@typescript-eslint/parser",
  "plugins": ["react", "@typescript-eslint"],
  "extends": [
      "eslint:recommended",
      "plugin:react/recommended",
      "plugin:prettier/recommended"
  ],
  "rules": {
      "@typescript-eslint/explicit-module-boundary-types": "off",
      "prettier/prettier": ["error", { "endOfLine": "auto" }]
  },
  "settings": {
      "react": {
          "version": "detect"
      }
  },
  "env": {
      "browser": true,
      "node": true,
      "jasmine": true
  }
}- 프로젝트 루트 위치에 .prettierrc 파일을 만들고, 필요한 규칙을 입력합니다.
{
  "printWidth": 100,
  "tabWidth": 2,
  "singleQuote": true,
  "trailingComma": "all",
  "semi": true
}
저는 위와 같이 작성했습니다.
