이전 포스팅에서 GraphQL의 개념에 대해 알아봤다. 이번엔 서버와 클라이언트 코드를 간단히 살펴볼 것이다.
간단히 살펴볼 예정으로 설정하는 과정에 대한 구체적인 설명은 생략한다.
기술 스택
Client: Next 15 + typescript + Apollo Client
Server: Nest 10 + @nestjs/apollo
구현할 기능
- 블로그 리스트 조회
- 블로그 id 조회
- 블로그 생성
Server
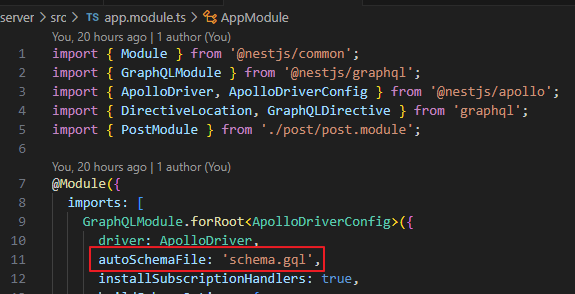
스키마 생성
next에서 쿼리 호출을 위해선 스키마가 필요하다. 그리고 이 스키마는 서버에서 정의된다.
서버는 nestjs와 Apollo를 사용했고 공식 문서에 설명이 잘 나와있다.
npm i @nestjs/graphql @nestjs/apollo @apollo/server graphql작성하는 방식은 code first, schema first이 존재한다.
code first
code first는 schema에 익숙치 않은 사람들을 위해 @nest/graphql에서 제공하는 decorator를 사용하여 기존 REST의 controller와 유사하게 작성한 후 서버를 실행하면 자동으로 스키마를 만들어준다.
schema first
schema first는 정석대로 스키마를 생성해서 resolver를 사용하여 맵핑하는 방식이다.
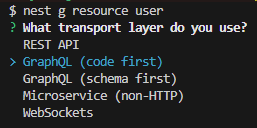
나는 빠르게 만들기 위해 code first를 사용했고, nest-cli 설치해서
nest g resource [어플리케이션 이름]하면 기본 CRUD 셋팅이 다 된다.
스키마 생성
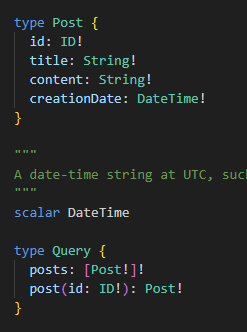
공식 문서를 참고하여 빠르게 resolver와 service를 채워넣고 서버를 실행하면
저 이름의 schema가 자동 생성된다.
schema.gql
# ------------------------------------------------------
# THIS FILE WAS AUTOMATICALLY GENERATED (DO NOT MODIFY)
# ------------------------------------------------------
directive @upper on FIELD_DEFINITION
type Post {
id: ID!
title: String!
content: String!
creationDate: DateTime!
}
"""
A date-time string at UTC, such as 2019-12-03T09:54:33Z, compliant with the date-time format.
"""
scalar DateTime
type Query {
posts: [Post!]!
post(id: ID!): Post!
}
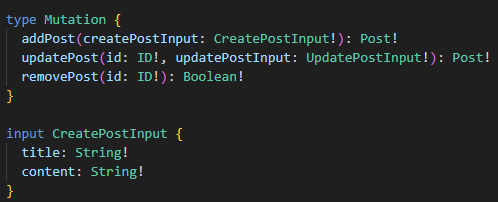
type Mutation {
addPost(createPostInput: CreatePostInput!): Post!
updatePost(id: ID!, updatePostInput: UpdatePostInput!): Post!
removePost(id: ID!): Boolean!
}
input CreatePostInput {
title: String!
content: String!
}
input UpdatePostInput {
title: String
content: String
}Client
이제 next에서 본격적으로 사용해보자
예시에서는 가장 많이 사용하는 ApolloClient를 사용해서 연동했다.
라이브러리 설치
apollo를 next15에서 사용하기 위해선 @apollo/experimental-nextjs-app-support 설치가 필요하다.
어떻게 설치하고 사용하는지는 여기에 잘 나와있다.
기본 설정
'use client';

import { HttpLink } from '@apollo/client';
import {
  ApolloNextAppProvider,
  ApolloClient,
  InMemoryCache,
} from '@apollo/experimental-nextjs-app-support';

const client = () => {
  const httpLink = new HttpLink({
    uri: process.env.NEXT_PUBLIC_BASE_URL,
    fetchOptions: { cache: 'no-store' },
  });

  return new ApolloClient({
    cache: new InMemoryCache(),
    link: httpLink,
  });
};

export function ApolloWrapper({ children }: React.PropsWithChildren) {
  return (
    <ApolloNextAppProvider makeClient={client}>
      {children}
    </ApolloNextAppProvider>
  );
}
// app/layout.tsx
export default function RootLayout({
children,
}: Readonly<{
children: React.ReactNode;
}>) {
return (
<html lang='en'>
<body
className={`${geistSans.variable} ${geistMono.variable} antialiased`}
>
<ApolloWrapper>{children}</ApolloWrapper>
</body>
</html>
);
}
추가 설정
그리고 server component에서 사용하기 위해선 별도의 ApolloClient 설정을 해줘야된다.
// lib/apollo/ApolloClient
import { HttpLink } from '@apollo/client';
import {
  InMemoryCache,
  ApolloClient,
  registerApolloClient,
} from '@apollo/experimental-nextjs-app-support';

export const { getClient, query, PreloadQuery } = registerApolloClient(() => {
  return new ApolloClient({
    cache: new InMemoryCache(),
    link: new HttpLink({
      uri: process.env.BASE_URL,
    }),
  });
});
query는 getClient().query()와 동일하다.
블로그 리스트 조회
스키마를 토대로 post를 가져오는 쿼리를 작성한다. 리스트에서는 id랑 title만 필요하므로 필드 두 개만 추가한다.
import { gql } from '@apollo/client';

export const GET_POST_LIST = gql`
  {
    posts {
      id
      title
    }
  }
`;
서버 컴포넌트에서 apollo 쿼리를 사용해야 하므로 위에서 별도로 선언한 client의 query함수를 가져다 사용한다.
query함수의 첫 번째 Generic은 리턴 타입이고 두 번째 Generic은 변수 타입에 해당한다.
리턴 타입은
{
	data: {
    	요청한 쿼리 형태
    }
}
이 된다.
// app/blog/page.tsx
import { query } from '@/lib/apllo/ApolloClient';
import { GET_POST_LIST } from '@/lib/queries';
import { Post } from '@/types/post';
import Link from 'next/link';

export default async function Page() {
  const { data } = await query<{ posts: Post[] }>({ query: GET_POST_LIST });
  return (
    <div>
      <ul>
        {data.posts.map((el) => (
          <li key={el.id}>
            <Link href={`/blog/${el.id}`}>{el.title}</Link>
          </li>
        ))}
      </ul>
    </div>
  );
}
블로그 id 조회
마찬가지로 스키마를 참조하여 쿼리를 생성한다. 여기서도 필요한 필드만 선언한다.
export const GET_POST = gql`
  query GetPost($id: ID!) {
    post(id: $id) {
      title
      content
    }
  }
`;
서버 컴포넌트
마찬가지로 서버 컴포넌트이기 때문에 별도의 query를 사용한다.
// app/blog/[id]/page.tsx
import { query } from '@/lib/apllo/ApolloClient';
import { GET_POST } from '@/lib/queries';
import { Post } from '@/types/post';

type Props = {
  id: string;
};

export default async function Page({ params }: { params: Promise<Props> }) {
  const { id } = await params;
  const { data, loading, error } = await query<{ post: Post }, { id: string }>({
    query: GET_POST,
    variables: { id },
  });

  if (loading) return <p>Loading...</p>;
  if (error) return <p> Error: {error.message}</p>;

  const { post } = data!;

  return (
    <div>
      <h1>Post</h1>
      <div>
        <h2>{post.title}</h2>
        <p>{post.content}</p>
      </div>
    </div>
  );
}
클라이언트 컴포넌트
만약 클라이언트 컴포넌트로 만들고 싶다면 기존 apollo의 client에서 제공하는 useQuery를 사용해도 된다.
// client component에서 graphql 사용 예시입니다.

'use client';

import { GET_POST } from '@/lib/queries';
import { Post } from '@/types/post';
import { useQuery } from '@apollo/client';
import { useParams } from 'next/navigation';

export default function PostDetail() {
  const { id } = useParams() as { id: string };
  const { data, loading, error } = useQuery<
    {
      post: Post;
    },
    { id: string }
  >(GET_POST, { variables: { id } });

  if (loading) return <p>Loading...</p>;
  if (error) return <p> Error: {error.message}</p>;

  const { post } = data!;

  return (
    <div>
      <h2>{post.title}</h2>
      <p>{post.content}</p>
    </div>
  );
}
블로그 생성
스키마 참조
쿼리 생성
export const CREATE_POST = gql`
  mutation CreatePost($post: CreatePostInput!) {
    addPost(createPostInput: $post) {
      id
    }
  }
`;
적용
여기는 클라이언트 컴포넌트이기 때문에 기존 apollo의 client에서 제공하는 useMutation을 사용해도 된다.
// app/blog/create/form
'use client';

import { CREATE_POST } from '@/lib/queries';
import { CreatePostInput, Post } from '@/types/post';
import { useMutation } from '@apollo/client';
import { redirect } from 'next/navigation';
import { ChangeEventHandler, FormEventHandler, useState } from 'react';

export function Form() {
  const [createPost, { loading, error }] = useMutation<
    { addPost: Post },
    CreatePostInput
  >(CREATE_POST);

  const [input, setInput] = useState<{ title: string; content: string }>({
    title: '',
    content: '',
  });

  const saveData = async (input: { title: string; content: string }) => {
    const { data } = await createPost({
      variables: {
        post: {
          ...input,
        },
      },
    });

    redirect(`/blog/${data?.addPost.id}`);
  };

  const handleChange: ChangeEventHandler<HTMLInputElement> = (e) => {
    const target = e.currentTarget;
    setInput({
      ...input,
      [target.id]: target.value,
    });
  };

  const handleSubmit: FormEventHandler<HTMLFormElement> = async (e) => {
    e.preventDefault();
    await saveData({ ...input });
  };

  if (loading) return <div>Saving...</div>;
  if (error) return <div>Save error! {error.message}</div>;

  return (
    <div>
      <form onSubmit={handleSubmit}>
        <div>
          <label htmlFor='title'>title</label>
          <input type='text' name='title' id='title' onChange={handleChange} />
        </div>
        <div>
          <label htmlFor='content'>content</label>
          <input
            type='text'
            name='content'
            id='content'
            onChange={handleChange}
          />
        </div>
        <button type='submit'>Save</button>
      </form>
    </div>
  );
}
전체 코드는 여기를 참고하면 된다.