[react] 리스트 순서 수정, 삭제 구현하기 (드래그 & 드롭 기능 with react-beautiful-dnd) + typescript 추가
프로젝트에서 리스트를 수정하는 기능을 맡았습니다. 리스트의 순서를 변경하고 삭제할 수 있어야합니다.
이때, 리스트의 순서를 변경하기위해서 드래그 앤 드롭을 사용해야 합니다.
순서 수정
드래그 & 드롭 기능을 구현할 수 있는 방법들
HTML5 드래그앤드롭
웹 브라우저에서 기본적으로 제공되는 드래그앤드롭 기능입니다.
별도의 라이브러리가 필요하지 않으며, 간단한 드래그앤드롭 기능을 구현할 때 유용합니다.
다만, 커스터마이징이 제한적이고, 복잡한 상호작용이 필요한 경우에는 다른 방법이 더 적합할 수 있습니다.
react-dnd
리액트용 드래그앤드롭 라이브러리 중 하나로, 공식적으로 제공되는 라이브러리입니다.
드래그앤드롭 기능을 구현하기 위해 필요한 컴포넌트와 훅을 제공합니다.
다양한 컴포넌트와 API를 통해 드래그앤드롭 기능을 구현할 수 있습니다.
커스터마이징이 용이하고, 다양한 기능을 제공하지만, 상대적으로 학습 곡선이 높을 수 있습니다.
✔️ react-beautiful-dnd
리액트용 드래그앤드롭 라이브러리 중 하나로, react-dnd를 기반으로 개발된 라이브러리입니다.
react-dnd보다 더욱 간편한 API와 사용법을 제공하여, 초보자에게도 친숙하게 다가갈 수 있습니다.
성능 최적화와 애니메이션 효과를 고려한 설계로 유명합니다.
커뮤니티의 활발한 지원과 예제 코드가 많아 개발 속도를 높일 수 있습니다.
react-beautiful-dnd는 초보자에게 추천되는 라이브러리이며, 성능과 애니메이션 효과에 더욱 신경쓰고 싶을 때 유용합니다.
드래그 앤 드롭으로 순서만 변경하면 되었기에 사용하는 방법도 쉽고, 애니메이션 효과가 예쁜 react-beautiful-dnd 사용하여 구현하기로 결정했습니다.
react-beautiful-dnd 사용법
설치
npm install react-beautiful-dnd --save
컴포넌트 구성
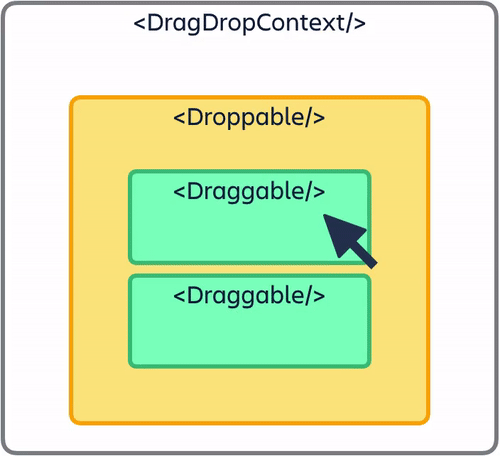
<DragDropContext />: 드래그 앤 드롭 기능을 활성화하려는 애플리케이션의 일부를 감싸는 컴포넌트입니다. 이 컴포넌트를 사용해서 드래그 앤 드롭이 가능한 영역을 설정할 수 있습니다.<Droppable />: 드롭이 가능한 영역을 나타내는 컴포넌트입니다. 하나 이상의 컴포넌트를 포함할 수 있습니다.<Draggable />: 드래그할 수 있는 항목을 나타내는 컴포넌트입니다.
프로젝트에 적용하기
PlayListModifyList
import {
  DragDropContext,
  Draggable,
  Droppable,
} from 'react-beautiful-dnd';

export default function PlayListModifyList({ playlistDesc }) {
  const navigate = useNavigate();
  const [playlistInfo, setPlayListInfo] = useRecoilState(PlayListAtom);
  const [music, setMusic] = useState(playlistInfo.music || []);
  const { mutate: modifyPlaylist } = useModifyPlaylist(
    playlistInfo.playlist.id,
  ); // modify api
  const [changedOrder, setChangedOrder] = useState([]);
  const [toast, setToast] = useRecoilState(toastAtom);

  // 수정하기
  const handleModifyClick = (e) => {
    const reqData = {
      del_music_list: delMusic.join(','),
      move_music: changedOrder.join(','),
    };
    modifyPlaylist(reqData, {
      onSuccess: () => {
        setToast({ content: '수정에 성공하였습니다.', type: 'success' });
        navigate(-1);
      },
      onError: (error) => {
        setToast({ content: '수정에 실패하였습니다.', type: 'warning' });
      },
    });
  };

  // 드래그 가능한 요소의 드래그가 종료될 때 호출되는 이벤트
  const onDragEnd = ({ source, destination }) => {
    if (!destination) return; // destination이 없다면 return

    const items = JSON.parse(JSON.stringify(music));
    const [targetItem] = items.splice(source.index, 1);
    items.splice(destination.index, 0, targetItem);
    setMusic(items);

    // 변경된 순서를 문자열로 변환하여 저장
    const newOrder = items.map((item) => item.id);
    setChangedOrder(newOrder);
  };

  return (
    <PlayListModifyWrap>
      <DragDropContext onDragEnd={onDragEnd}> // 드래그, 드롭을 할 전체 영역
        <Droppable droppableId='droppable'> // 드롭 가능한 영역
          {(provided) => (
            <PlayList
              innerRef={provided.innerRef}
              droppableProps={provided.droppableProps}
            >
              {music.map((item, index) => (
                <Draggable // 드래그 영역
                  draggableId={`${item.id}`}
                  index={index}
                  key={item.id}
                  disableInteractiveElementBlocking //❗️상호작용 가능한 요소에서의 드래그를 차단하지 않도록 함
				>
                  {(provided) => (
                    <PlayListItem
                      innerRef={provided.innerRef}
                      dragHandleProps={provided.dragHandleProps}
                      draggableProps={provided.draggableProps}
                      modify={true}
					  ...
                    >
                      <DelBtn
                        type='button'
                        name='삭제'
                        onClick={() => handleDelBtn(item.id)}
                      >
                        <img src={CloseIcon} alt='삭제' />
                      </DelBtn>
                    </PlayListItem>
                  )}
                </Draggable>
              ))}
              {provided.placeholder}
            </PlayList>
          )}
        </Droppable>
      </DragDropContext>
      <SaveBtn onClick={handleModifyClick}>저장</SaveBtn>
    </PlayListModifyWrap>
  );
}
⬇️ 필수로 설정해줘야 하는 것들입니다.
DragDropContext
*onDragEnd : 드래그 가능한 요소의 드래그가 종료될 때 호출되는 콜백 함수입니다.
result: 드래그 종료 결과를 나타내는 객체입니다. 이 객체는 드래그된 요소와 관련된 정보를 포함하고 있습니다.source: 드래그된 요소의 출발지 정보를 나타내는 객체. 이 객체에는 droppableId (출발지 Droppable 컴포넌트의 식별자)와 index (출발지에서의 순서)가 포함됩니다.destination: 드롭된 요소의 목적지 정보를 나타내는 객체. 이 객체는 드롭된 요소의 목적지 Droppable 컴포넌트와 인덱스를 포함하거나, 드롭되지 않은 경우 null일 수도 있습니다.
  const onDragEnd = ({ source, destination }) => {
    if (!destination) return; // destination이 없다면 return
    const items = JSON.parse(JSON.stringify(music));
    const [targetItem] = items.splice(source.index, 1);
    items.splice(destination.index, 0, targetItem);
    setMusic(items);
    // 변경된 순서 업데이트
    const newOrder = items.map((item) => item.id);
    setChangedOrder(newOrder);
  };
- destination이 있는 경우 기존의 아이템(targetItem)을 splice를 사용해서 드롭할 위치에 삽입하고, 이를 setMusic을 통해 state를 업데이트 해주었습니다.
- 순서 업데이트시 id를 배열에 담아 업데이트해줘야 해서 item.id만 따로 담아 setChangedOrder를 통해 state를 업데이트 해주었습니다.
Droppable
*droppableId
- 문자열로 unique한 id를 전달해주어야 합니다.
- id 설정 가이드
*provided
provided.innerRef: DOM 조작을 위해 꼭 설정해주어야 합니다.provided.droppableProps: Droppable 컴포넌트의 드롭 영역에 대한 속성을 설정하는 데 사용됩니다.provided.placeholder: 드래그 가능한 요소가 Droppable 영역에 들어왔을 때의 임시적인 placeholder 역할을 합니다. placeholder는 드래그 가능한 요소가 드롭될 위치를 표시하는 데 사용됩니다. Droppable 영역에 드래그 가능한 요소가 들어오면 provided.placeholder을 렌더링하여 해당 위치에 플레이스홀더를 표시할 수 있습니다.
Draggable
*draggableId
- 위의
droppableId설명과 동일합니다.
*index
*provided
provided.innerRef: 위의 Droppable의 설명과 동일합니다.provided.draggableProps: Draggable 컴포넌트의 드래그 속성을 설정하는 데 사용됩니다. 이 속성에는 드래그 가능한 요소에 대한 이벤트 리스너와 스타일 등이 포함됩니다. 예를 들어, onDragStart, onDragEnd, style 등을 설정할 수 있습니다.provided.dragHandleProps: 드래그 가능한 요소의 핸들(드래그를 시작할 수 있는 영역)에 대한 속성을 설정하는 데 사용됩니다. 이를 통해 드래그 가능한 요소를 특정 영역에서만 드래그할 수 있도록 제한할 수 있습니다.
PlayList와 PlayListItem이 컴포넌트로 되어있어 전달해줘야할 것들을 props로 보내주었고, 아래의 코드처럼 받은 props를 적용해주었습니다.
PlayList
export default function PlayList(props) {
  const { children, innerRef, droppableProps } = props;
  return (
    <PlayListWrap ref={innerRef} {...droppableProps}>
      {children}
    </PlayListWrap>
  );
}
PlayListItem
export default function PlayListItem(props) {
  const {
    innerRef,
    dragHandleProps,
    draggableProps,
    modify,
    children,
    ...
  } = props;
  return (
    <PlayListItemWrap ref={innerRef} {...draggableProps}>
      <PlayListItemBox>
    	// 순서 수정 시 드래그할 버튼
        {modify && (
          <button type='button' {...dragHandleProps}>
            <img src={OrderChangeIcon} alt='플레이 리스트 순서 변경 아이콘' />
          </button>
        )}
        <PlayListItemInfo>
          ...
        </PlayListItemInfo>
      </PlayListItemBox>
      {children} {/* 버튼 삽입 */}
    </PlayListItemWrap>
  );
}
버튼을 드래그 영역으로 만들기

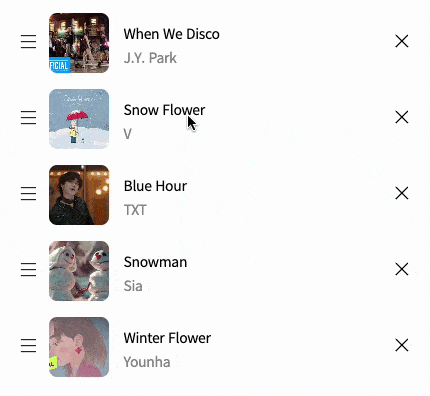
위의 사진처럼 전체가 아닌 왼쪽의 햄버거 버튼을 눌러서 드래그가 가능하도록 구현하고자 했습니다.
⚠️ 하지만 컴포넌트 내부에 있는 상호작용 가능한 요소(ex. 버튼, 링크 등)에서 드래그를 시도하면 드래그 액션이 차단됩니다. 사용자가 버튼이나 링크와 같은 상호작용 가능한 요소를 클릭할 때 의도치 않게 드래그 액션이 발생하는 것을 방지하기 위한 기능입니다.
이러한 기능을 사용하지 않으려면
disableInteractiveElementBlocking을 컴포넌트에 추가해주면 됩니다.
disableInteractiveElementBlocking은 상호작용 가능한 요소에서의 드래그를 차단하지 않도록 하는 플래그입니다. 이 플래그를 사용하면 컴포넌트 내부에 있는 상호작용 가능한 자식 요소에서의 드래그를 차단하지 않을 수 있습니다.
만난 에러

<Draggable /> 컴포넌트에 draggableId={item.id}를 설정하게 되면 타입이 숫자여서 에러가 발생해 draggableId={`${item.id}`}로 설정해주었습니다.
삭제
PlayListModify
export default function PlayListModify({ playlistDesc }) {
  ...
  const [delMusic, setDelMusic] = useState([]);
  ...

  // 음악 삭제 handler
  const handleDelBtn = (itemId) => {
    const newMusic = music.filter((item) => item.id !== itemId);
    setMusic(newMusic);
    const newOrder = changedOrder.filter((item) => item !== itemId);
    setChangedOrder(newOrder);
    setDelMusic([...delMusic, itemId]);
  };
  ...
}- 삭제할 리스트를 담을 delMusic을 useState를 통해 관리해주고, 삭제할 아이템의 id를 제외한 나머지 리스트를 setMusic를 사용해 업데이트 해주었고, setDelMusic 또한 업데이트 해주었습니다. 그리고 이를 변경할 순서 리스트에도 반영해주었습니다.
구현 모습
타입스크립트로 변경시
저처럼 하위 컴포넌트로 props를 전달하는 경우 참고하면 좋을 것 같습니다.
PlayList.tsx
import type { DroppableProvidedProps } from 'react-beautiful-dnd';

interface Props {
  children: React.ReactNode;
  innerRef?: (element: HTMLElement | null) => void;
  droppableProps?: DroppableProvidedProps;
}

export default function PlayList(props: Props) {
  ...
}
PlayListItem.tsx
import type {
  DraggableProvidedDraggableProps,
  DraggableProvidedDragHandleProps,
} from 'react-beautiful-dnd';

interface Props {
  innerRef?: (element: HTMLElement | null) => void;
  draggableProps?: DraggableProvidedDraggableProps;
  dragHandleProps?: DraggableProvidedDragHandleProps | null | undefined;
  modify?: boolean;
  children?: React.ReactNode;
  ...
}
  export default function PlayListItem(props: Props) {
    ...
  }
추가적으로 다른 타입이 필요하다면 react-beautiful-dnd의 index.d.ts 파일에서 확인할 수 있습니다.
(react-beautiful-dnd에 마우스 커서를 가져다 놓고 cmd+click 시 index.d.ts로 이동)
import type { ... } from 'react-beautiful-dnd';
index.d.ts 파일에서 이런 식으로 필요한 타입을 가져올 수 있습니다.
참고 사이트
https://bepyan.github.io/blog/dnd-master/6-react-beautiful-dnd
-> react-beautiful-dnd에 대해 정말 잘 설명되어있는 블로그 글입니다.
https://github.com/atlassian/react-beautiful-dnd/blob/master/docs/guides/types.md
-> react-beautiful-dnd 타입 관련 문서