
왜 굳이 React, Vue를 안쓰고 Vanilla JS를...
다른 라이브러리나 프레임워크를 사용하지 않고 직접 DOM에 접근하여 렌더링하고 React의 컴포넌트 흐름을 이해면서 Vanilla JS 컴포넌트를 개발하는 방법을 공유한다.
시작하기
패키지 설치하기
가장 먼저 폴더를 하나 만들고 yarn(npm)을 통해서 webpack을 설정한다. 전부 엔터를 눌러 스킵 해주자.
yarn init다음으로 필요한 패키지를 설치한다.
yarn add -D webpack webpack-cli webpack-dev-server html-webpack-plugin mini-css-extract-plugin css-loader webpack-dev-server세팅하기
./src/index.html
가장 상위에 div를 만든뒤 JS를 통해 여러개의 컴포넌트들을 넣을 수 있다.
<!DOCTYPE html>
<html lang="ko">

<head>
  <meta charset="UTF-8">
  <title>Test</title>
</head>

<body>
  <div class="App" />
</body>

</html>
./src/js/index.js
HTML에서 App을 선택하여 App.js에게 넘겨준다.
import App from './App';

new App(document.querySelector('.App'));
./src/js/App.js
가장 먼저 App에서 상태를 관리하고, 사용할 컴포넌트들을 변수로 등록해준다. 상태를 변경할때는 React의 useState처럼 this.setState를 이용하여 상태를 변경한다.
import HelloWorld from "./components/HelloWorld";

export default function App(app) {
	this.state = {
    	name: 'eFFx'
    };

  	const helloWorld = new HelloWorld({
    	app,
      	state: this.state,
    });

    this.setState = (nextState) => {
    	this.state = nextState;

      	helloWorld.setState({
        	name: this.state.name,
        });
    }

	this.init = () => {
    }

    this.init();
}
./src/js/components/HelloWorld.js
this.target에 div를 생성후 this.render를 통해 데이터를 렌더링한다. 또한 상태가 변할때 this.setState로 재렌더링 하게된다.
export default function HelloWorld({app, state}) {
	this.state = this.state;
 	this.target = document.createElement('div');

	app.append(this.target);

    this.setState = (nextState) => {
    	this.state = nextState;
    	this.render();
  	};

	this.componentDidMount = () => {
    };

  	this.render = () => {
		this.target.innerHTML = `
          <div>
              Hello, ${this.state.name}
          </div>
		`
        this.componentDidMount();
    };

  	this.render();
}
Webpack 설정하기
webpack.config.js에 파일을 만들고 다음을 작성한다.
const path = require('path');
const HtmlWebpackPlugin = require('html-webpack-plugin');
const MiniCssExtractPlugin = require('mini-css-extract-plugin');

module.exports = {
  devServer: {
    open: true,
    port: 'auto',
    allowedHosts: 'all',
  },
  entry: {
    index: './src/js/index.js',
  },
  output: {
    path: path.resolve(__dirname, 'build'),
    filename: '[name].bundle.js',
    clean: true,
  },
  mode: 'none',
  module: {
    rules: [
      {
        test: /\.css$/,
        use: [MiniCssExtractPlugin.loader, 'css-loader'],
      },
    ],
  },
  plugins: [
    new HtmlWebpackPlugin({
      template: './src/index.html',
      chunks: ['index'],
      filename: 'index.html',
    }),
    new MiniCssExtractPlugin({
      filename: '[name].bundle.css',
    }),
  ],
};package.json에서 Webpack 빌드와 Dev서버를 설정해준다.
{
  ...
  "scripts": {
    "build": "webpack",
    "dev": "webpack-dev-server --hot"
  },
  ...
결과
이제 yarn dev를 실행하면
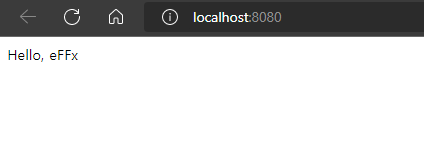
제대로 나오는 것을 확인할 수 있다.
버튼 추가하기
이번에는 버튼을 누르면 숫자가 증가하는 간단한 사이트를 제작해보자.
버튼 컴포넌트
./src/components/IncreaseButton.js
버튼을 렌더링 후 this.componentDidMount에서 클릭 이벤트를 등록하고, 클릭했을 때의 행동은 밖(App)에서 정할 수 있도록 선언적으로 프로그래밍하였다. 이렇게 하면 해당 컴포넌트를 다시 재사용하기 용이하고, 해당 컴포넌트가 무슨 역할을 하는지 알기 편해진다.
export default function IncreaseButton({ app, state, onClick }) {
  this.state = state;
  this.target = document.createElement("div");

  app.append(this.target);

  this.setState = (nextState) => {
    this.state = nextState;
    this.render();
  };

  this.componentDidMount = () => {
    this.target.addEventListener("click", () => {
      onClick();
    });
  };

  this.render = () => {
    this.target.innerHTML = `
		<button>
      +1
    </button>
		`;
    this.componentDidMount();
  };

  this.render();
}
카운트 컴포넌트
./src/components/Count.js
위의 HelloWorld 컴포넌트처럼 state를 가져와 렌더링한다.
export default function Count({ app, state }) {
  this.state = state;
  this.target = document.createElement("div");

  app.append(this.target);

  this.setState = (nextState) => {
    this.state = nextState;
    this.render();
  };

  this.componentDidMount = () => {};

  this.render = () => {
    this.target.innerHTML = `
		  <div>
        Count: ${this.state.count}
      </div>
		`;
    this.componentDidMount();
  };

  this.render();
}
App.js
./src/App.js
this.state에 count를 추가하고, count 컴포넌트와, increaseButton 컴포넌트를 추가하고, 버튼이 클릭됐을 때, this.state.count를 1씩 증가시켜준다.
import HelloWorld from "./components/HelloWorld";
import Count from "./components/Count";
import IncreaseButton from "./components/IncreaseButton";

export default function App(app) {
  this.state = {
    name: "eFFx",
    count: 0,
  };

  const helloWorld = new HelloWorld({
    app,
    state: this.state,
  });

  const count = new Count({
    app,
    state: this.state,
  });

  const increaseButton = new IncreaseButton({
    app,
    state: this.state,
    onClick: () => {
      this.setState({
        ...this.state,
        count: this.state.count + 1,
      });
    },
  });

  ...

  this.setState = (nextState) => {
    this.state = nextState;
    count.setState({
      ...count.state,
      count: this.state.count,
    });
  };

  ...
결과
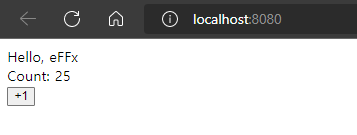
버튼이 제대로 동작하는 것을 확인할 수 있다.
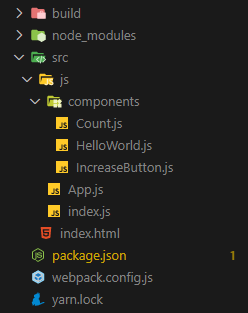
폴더 구조
장단점
장점
- React나 Vue같은 라이브러리나 프레임워크를 사용하지 않고도 가볍게 DOM을 조작하고 컴포넌트로 분리하여 개발할 수 있습니다.
- 선언적으로 컴포넌트를 개발하여 재사용성을 늘릴 수 있습니다.
단점
- state 변경시 모든 컴포넌트들이 재렌더링되어 규모가 큰 사이트에서는 무리가 갈 수 있습니다.
- innerHTML을 사용하게 되면 성능상 불리한 부분이 많고 XSS 공격에 취약해질 수 있습니다.
마치며
간단하게 Vanilla JS를 이용해 컴포넌트 개발 하는 방법을 공부하게 되었는데, React의 JSX를 사용하지 못하니 개발상 힘든 부분이 많이 있었습니다. 또한 DOM을 직접 조작하면서 React가 어떻게 작동하고 구현이 되는지 알아볼 수 있었습니다.
