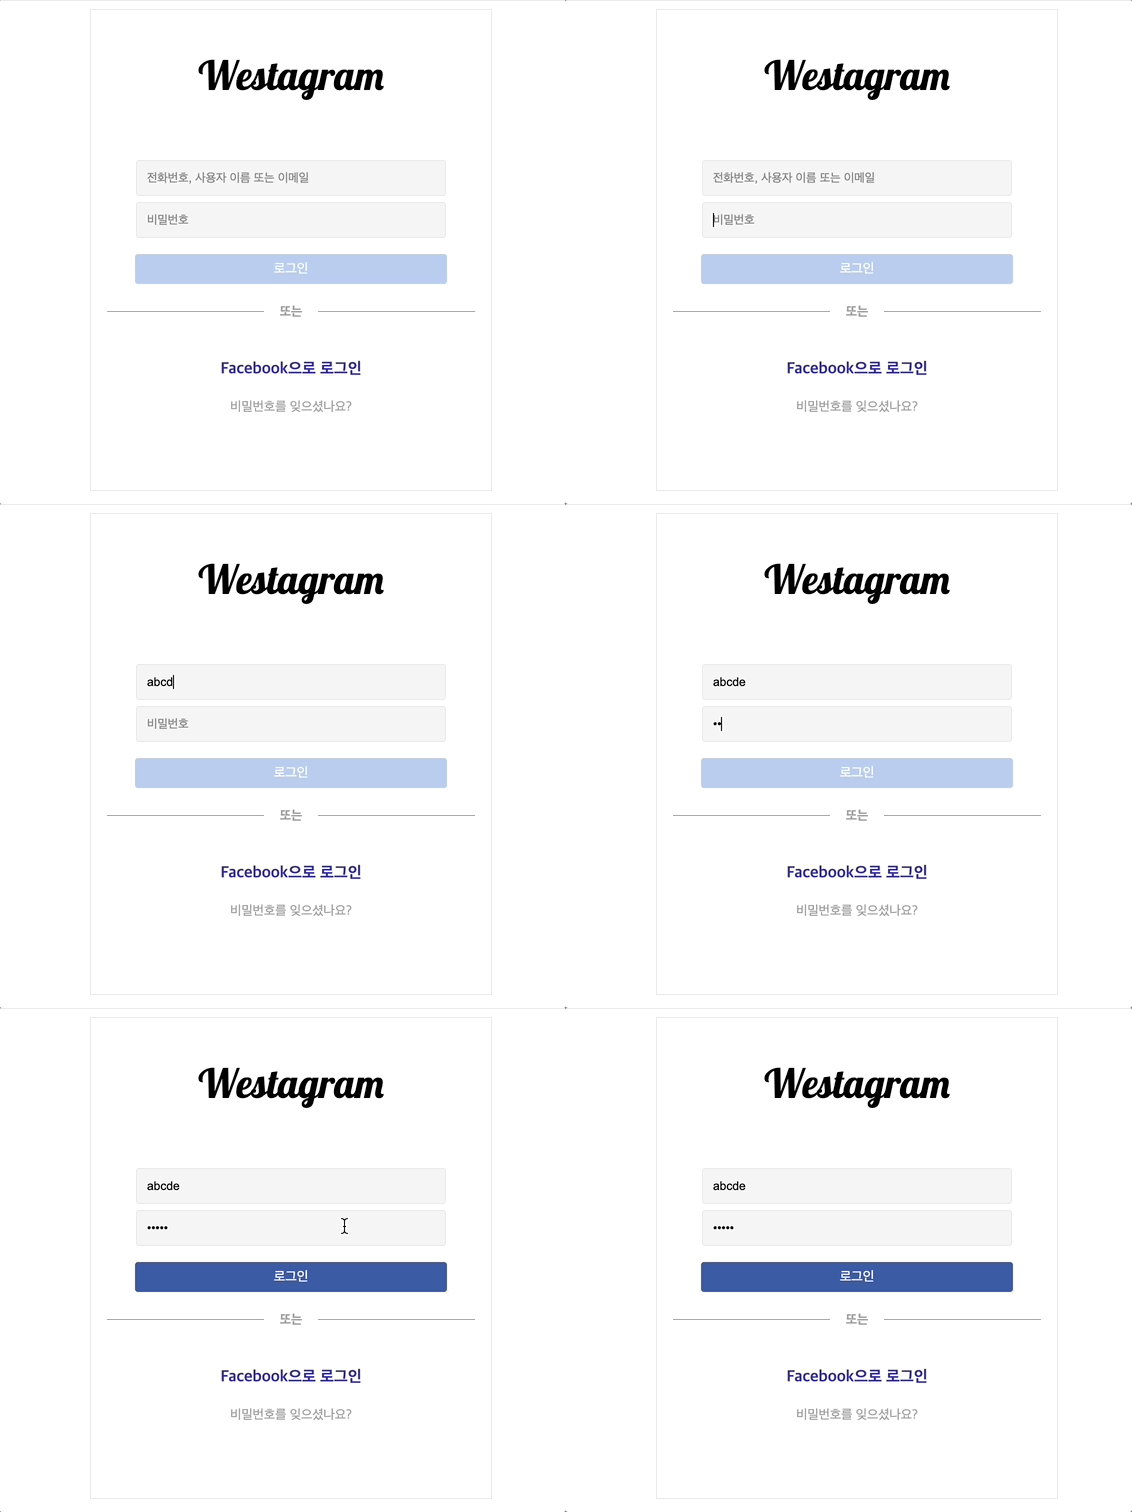
Log-in Page
‼️ 구현 사항‼️
[JS] ID, Password 각각 한 글자 이상 입력 시 로그인 버튼 활성화 되면서 색상 변화
[React] ID 입력창에는 @ 이가 입력되고, Password 입력창에는 5글자 이상 입력 시 로그인 버튼 활성화

[JS]
const inputId = document.querySelector(".login-id");
const inputPassword = document.querySelector(".login-password");
const button = document.querySelector(".login-btn");

function loginBtn() {
  let idValue = inputId.value;
  let passwordValue = inputPassword.value;

  if (idValue.length > 0 && passwordValue.length > 0) {
    button.disabled = false;
    button.style.cursor = "pointer";
  } else {
    button.disabled = true;
    button.style.cursor = "default";
  }
}

inputId.addEventListener("keyup", loginBtn);
inputPassword.addEventListener("keyup", loginBtn);
🔆🔅🔆🔅🔆
1. DOM 에 있는 Input 태그를 inputId, inputPassword 라는 변수로 선언
2. DOM 에 있는 button 태그를 button 이라는 변수로 선언
🔆🔅🔆🔅🔆
3. inputId 라는 변수의 값을 idValue 라는 변수로 선언하고, inputPassword 라는 변수의 값을 passwordValue 라는 변수로 선언
🔆🔅🔆🔅🔆
4. 만약 idValue 의 길이가 1개 이상, passwordValue의 길이가 1개 이상이면
5. button 은 활성화 되고(default = disabled), cursor 스타일은 pointer 로 바꿔준다
🔆🔅🔆🔅🔆
6. 그게 아니라면, button 은 비활성화 되고, cursor 스타일은 기본값이 된다
[React]
function Login() {
  const [inputId, SetInputId] = useState(false);
  const [inputPassword, SetInputPassword] = useState(false);

  const navigate = useNavigate();
  const goToMain = () => {
    navigate("/Main");
  };

          <input
            type="text"
            className="loginId"
            placeholder="전화번호, 사용자 이름 또는 이메일"
            onChange={(e) => SetInputId(e.target.value.includes("@"))}
          />
          <input
            type="password"
            className="loginPassword"
            placeholder="비밀번호"
            onChange={(e) => SetInputPassword(e.target.value.length > 5)}
          />
          <button
            className="loginBtn"
            disabled={!inputId || !inputPassword}
            onClick={goToMain}
           />
☑️ useState hook 를 사용하여
input 의 value 에 "@" 이 들어갈 때, input 의 value 의 길이가 5 이상일 때 버튼을 활성화 시키는 기능 구현
☑️ useNavigate hook 사용하여
button 을 클릭했을 때, </ Main> 으로 이동하는 기능 구현

🔆🔅🔆🔅🔆 button 활성화 🔆🔅🔆🔅🔆
- const [inputId, setInputId] = useState(false);, const [inputPassword, setInputPassword] = useState(false);
: 현재 state 를 false 라고 초기값을 정한다.
- onChange={(e) => SetInputId(e.target.value.includes("@"))}
: ID 를 입력할 input 태그 속성에 onChage 이벤트를 추가하는데, setInputId 는 현재 state 인 inputId 를 업데이트 시켜줄 함수다. e.target.value (이벤트를 접목시킬 ID input 의 value) 안에 includes("@") @가 포함되어있을 때 현재 state 를 업데이트 시켜준다.
- onChage={(e) => SetInputPassword(e.target.value.length > 5)}
: Password 를 입력할 input 태그 속성에 onChange 이벤트를 추가하는데, setInputPassword 는 현재 state 인 inputPassword 를 업데이트 시켜줄 함수다. e,target.value (이벤트를 접목시킬 Password input 의 value). length > 5 (value 의 길이가 5 이상일 때) 현재 state 를 업데이트 시켜준다.
- button 의 속성 disabled = {!inputId || !inputPassword}
: button은 iputId 와 inputPassword 가 false 일 때, 비활성화 된다.
- button 의 onClick = { goToMain }
: button 이 활성화되서 클릭하게 되면 Main 페이지로 이동
import React from "react";
import { BrowserRouter, Routes, Route } from "react-router-dom";
import Login from "./pages/Login/Login";
import Main from "./pages/Main/Main";

function Router() {
  return (
    <BrowserRouter>
      <Routes>
        <Route path="/" element={<Login />} />
        <Route path="/main" element={<Main />} />
      </Routes>
    </BrowserRouter>
  );
}

export default Router;
🔆🔅🔆🔅🔆 Main Page 로 이동 (Router) 🔆🔅🔆🔅🔆
} />
<Route path="/" element={} />
<Route path="/main" element={
- <Route path ="/" element ={ } /> , <Route path="/main" element={} />
: Login 컴포넌트와 Main 컴포넌트를 Route 할 것이기 때문에 두 요소를 Routes 태그 안에 넣는다.
🔹Revision🔹
const handleKeyPress = (e) => {
	if (e.key === "Enter") {
		goToMain();
	}
};
- input 과 button 태그를 div 로 묶은 상태에서는 이렇게 따로 변수를 선언해서 button 태그에 onKeypress = { handleKeyPress } 함수를 넣어 Enter 를 치면 다음 페이지로 넘어가게 했었다.
- div 대신 form 태그로 묶어, 굳이 필요하지 않은 함수를 만들지 않고, 위의 onChange 이벤트로 버튼이 활성화 되면 별도의 이벤트 없이 Enter 키를 누르면 메인 페이지로 이동할 수 있다.

