legend, label, input
기본형
        <legend>sample</legend>
    	<label for="sp">레이블명 <input id="sp"></label>
실행 결과
sample 레이블명
-
legend : 그룹으로 묶는 구역에 제목을 붙인다.
-
label : input과 같은 폼 요소에 레이블을 붙일 때 사용함.
-
input : 사용자로부터 정보를 입력받는다.
-
위에선 label 안에 input을 썼지만, label의 for과 input의 id를 사용하여 따로 쓰고 연결할 수 있다. (아래 참고)
form, fieldset, input-type
예제 코드
<form action="https://youtu.be/GBbUG3R96lM" method="post">
<fieldset>
<legend>회원가입</legend>
<ul>
<li>
<label for="id">아이디</label>
<input type="text" id="id" maxlength="10" size="20" required readonly value="thisIsId">
</li>
<li>
<label for="pw">비밀번호</label>
<input type="password" id="pw" maxlength="10" size="20" required>
</li>
<li>
<label for="s1">검색</label>
<input type="search" id="s1" autofocus>
</li>
<li>
<label for="page">홈페이지</label>
<input type="url" id="page" placeholder="http://">
</li>
<li>
<label for="number">전화번호</label>
<input type="tel" id="number" placeholder="010-0000-0000">
</li>
<li>
<label for="mail">이메일</label>
<input type="email" id="mail">
</li>
</ul>
</fieldset>
<input type="submit" value="보내기">
<input type="image" src="01.PNG" width="100px">
<input type="reset" value="전체 초기화">
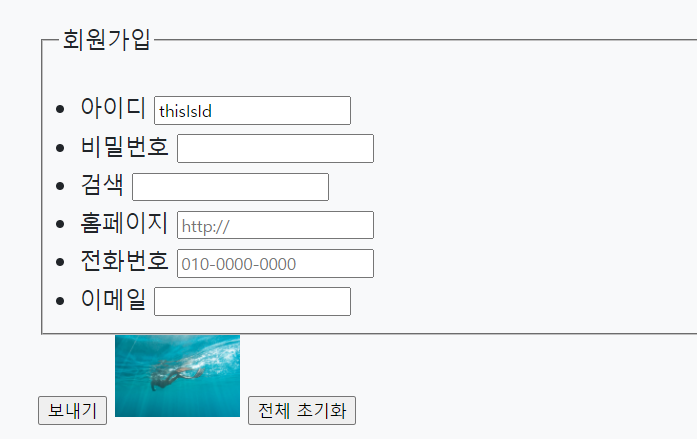
</form>실행 결과
회원가입
- 아이디
- 비밀번호
- 검색
- 홈페이지
- 전화번호
- 이메일
-
form : 폼을 만든다.
- action : 폼이 제출될 때 수행할 행동을 정의한다.
- method : get/post 중 하나이다.
get : url에 폼 데이터를 추가하여 서버로 전달.
post : 폼 데이터를 별도로 첨부하여 서버로 전달. get보다 보안성이 높다.
자세한 내용은 이곳에서 확인!
-
fieldset : 폼 요소를 그룹으로 묶는다. 네모칸이다.
-
input type
- text : 텍스트를 입력받는다. type의 기본값이다.
- password : 입력값이 가려진다.
- search : 삭제 버튼이 있어 검색어 삭제에 용이하다.
- url : 주소 입력. http://형식인지 확인한다.
- tel : 전화번호 입력.
- email : 메일 주소 입력. 올바른 이메일 형식인지 확인해준다.
- submit : 제출 버튼. form 내부에는 필수로 submit이 있어야 한다.
- image : 제출버튼으로 사용될 이미지를 정의한다. src, width, height를 사용할 수 있다.
- reset : form의 내용을 초기화하는 버튼.
- 모든 속성값은 이곳에서 확인!
-
maxlength : 입력 가능한 텍스트의 최대 길이.
-
size : 입력 필드의 길이를 지정한다.
-
required : 필수 입력값을 지정한다.
-
readonly : 읽기 전용 필드로 만든다.
-
autofocus : 자동으로 커서가 해당 필드로 이동하게 한다.
-
placeholder : 입력을 돕기 위한 문장이다.
-
value
- hidden, password, text인 경우 : 입력 필드의 초기값을 지정한다.
- checkbox, image, radio인 경우 : 해당 필드를 선택 시 서버로 전달되는 값을 지정한다.
- button, reset, submit인 경우 : 버튼 내의 텍스트를 정의한다.
radio, checkbox
예제 코드
<form action="https://youtu.be/9peBS0mpObE">

  <fieldset>
    <legend>input - radio</legend>
    <label>혈액형 조사</label><br>
    A형<input type="radio" name="bltype" value="a">
    B형<input type="radio" name="bltype" value="b">
    AB형<input type="radio" name="bltype" value="ab">
    O형<input type="radio" name="bltype" value="o">
  </fieldset>
  <br>

  <fieldset>
    <legend>input - checkbox</legend>
    <label>취미 조사</label><br>
    <input type="checkbox" name="hobby" value="movie">영화 감상<br>
    <input type="checkbox" name="hobby" value="exercise" checked>운동하기<br>
    <input type="checkbox" name="hobby" value="music">음악 감상<br>
    <input type="checkbox" name="hobby" value="travel">여행하기<br>
  </fieldset>
  <br>

  <input type="submit" value="제출!!">
</form>
실행 결과
input - radio 혈액형 조사
A형 B형 AB형 O형
input - checkbox 취미 조사
영화 감상
운동하기
음악 감상
여행하기
-
radio : radio버튼을 만든다. 여러 개 중 한 개만 선택 가능하다.
-
checkbox : checkbox를 만든다. 여러 개 선택 가능하다.
-
name : 값을 서버에 전달할 바구니이다.
radio나 checkbox가 여러 개 있을 경우, 이를 구분하기 위해 이름을 지정한다. radio 버튼은 여러 개 중 하나만 선택하는 것이므로 같은 그룹끼리는 name 속성을 똑같게 만든다. -
value : 서버에게 넘길 값을 지정한다. 필수값이다.
-
checked : 기본값으로 항목을 선택되게 한다.
-
type="submit"에서의 value는 버튼의 텍스트를 의미한다. -
제출 버튼을 클릭하면 주소창에서
/form.html?bltype=b&hobby=exercise&hobby=music이런 형태로 값이 넘어가는 것을 확인할 수 있다.
<input type="hidden" name="hid" value="hidden값">을 폼에 넣으면&hid=hidden값형태로 hidden값이 넘어간다.
date, month, week, time, datetime-local
예제 코드
<form action="velog.io/@eldeoddt">
  <fieldset>
    <legend>날짜 연습!!</legend>

    <ol style="list-style-type:lower-greek;">
      <li><input type="date"> - - - - - - - - date</li>
      <li><input type="month"> - - - - - - - month</li>
      <li><input type="week"> - - - - - - week</li>
      <li><input type="time"> - - - - - - - - - time</li>
      <li><input type="datetime-local"> - - - datetime-local </li>
    </ol>

  </fieldset>
  <input type="submit">
</form>
실행 결과
날짜 연습!!
- - - - - - - - - date
- - - - - - - - month
- - - - - - - week
- - - - - - - - - - time
- - - - datetime-local
button
예제 코드
<form>
  <fieldset>
    <legend>input - button</legend>
    <label for="pop1">팝업 버튼</label>
    <input type="button" id="pop1" value="popup page.. click" onclick="window.open('https://youtu.be/9peBS0mpObE', 'popup1', 'width = 300, height = 300')"><br>
    <label for="pop2">마우스오버 팝업 버튼</label>
    <input type="button" id="pop2" value="popup page.. mouseover" onmouseover="window.open('01.PNG', 'popup2', 'width = 300, height = 300')">
  </fieldset>
</form>
실행 결과
input - button 팝업 버튼
마우스오버 팝업 버튼
-
button : 기능 없이 버튼 형태만 삽입.
주로 버튼 클릭해서 js실행할 때 사용한다. -
value : 버튼이 표시할 내용을 지정한다.