torch.no_grad(), to('cpu'), cuda, detach()

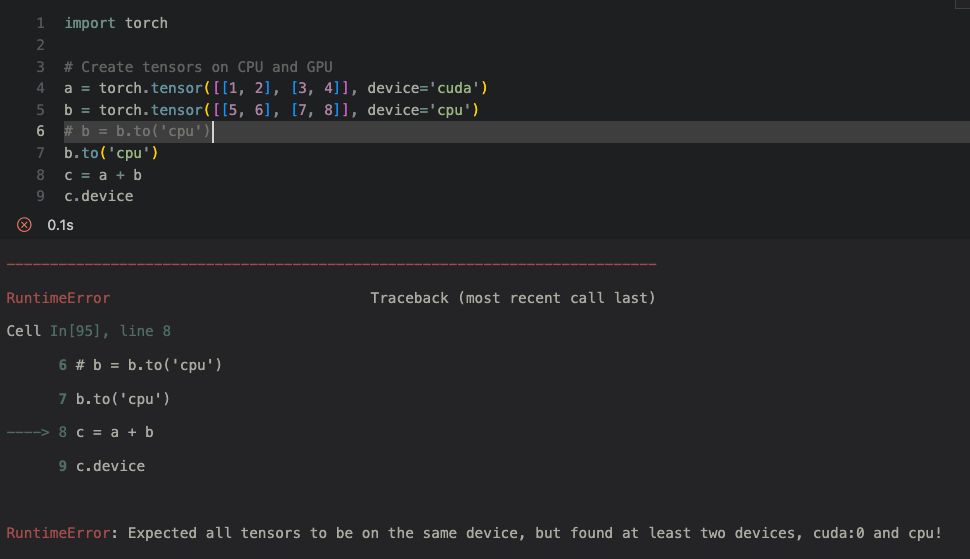
import torch

# Create tensors on CPU and GPU
a = torch.tensor([[1, 2], [3, 4]], device='cuda')
b = torch.tensor([[5, 6], [7, 8]], device='cpu')
b.to('cpu')
c = a + b
c.device
두개의 device가 다른경우 이렇게 연산이 불가능하다.
PyTorch를 사용하다보면, Module을 통해 나온 Tensor을 후처리에 사용하거나, 계산된 loss Tensor을 logging 하는 일이 많다.
embeddings = model(x)이때 embeddings는 GPU에 올라가있는 Tensor 이기 때문에 numpy 혹은 list로의 변환이 필요하다. 오픈소스를 보면 detach(), cpu(), data, numpy(), tolist() 등을 조합해서 변환을 한다.
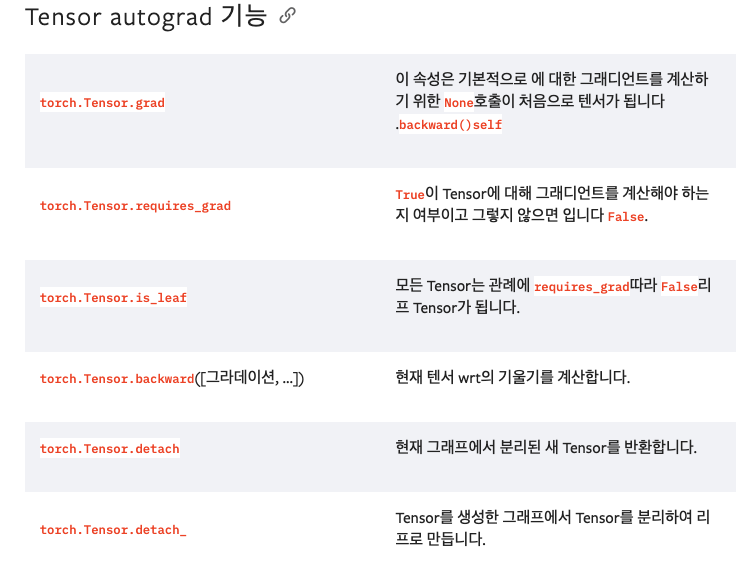
https://pytorch.org/docs/stable/autograd.html#torch.Tensor.detach
위 파이토치 docs읽어보면 알아야 할것이있는데, PyTorch docs에 따르면 "Returns a new Tensor, detached from the current graph. The result will never require gradient." 즉 graph에서 분리한 새로운 tensor를 리턴한다. 파이토치는 tensor에서 이루어진 모든 연산을 추적해서 기록해놓는다(graph). 이 연산 기록으로 부터 도함수가 계산되고 역전파가 이루어지게 된다. detach()는 이 연산 기록으로 부터 분리한 tensor을 반환하는 method이다.
with torch.no_grad():
  x_t = torch.rand(3,4)
  y_np = np.ones((4, 2), dtype=np.float32)
  x_t @ torch.from_numpy(y_np)  # dot product in torch
  np.dot(x_t.numpy(), y_np)  # the same dot product in numpy
어떤 이유로 역전파 없이 수학적 연산에만 pytorch를 사용하려는 경우 with torch.no_grad()컨텍스트 관리자를 사용할 수 있습니다. 이 경우 계산 그래프가 생성되지 않고 torch.tensors와 np.ndarrays를 서로 바꿔서 사용할 수 있습니다. 그렇지 않다면 detach()를 통해서 바꿔야 한다.
import torch

tensor1 = torch.tensor([1.0,2.0],requires_grad=True,device='cuda')

print(tensor1) # tensor([1., 2.], device='cuda:0', grad_fn=<CopyBackwards>)
print(type(tensor1)) # <class 'torch.Tensor'>
print(tensor1.device) # cuda:0

tensor1 = tensor1.detach().to('cpu')
print(tensor1.device) # cpu
print(tensor1) #tensor([1., 2.])
tensor1 = tensor1.numpy() # tensor를 numpy로 바꿔준다.

print(tensor1) # [1. 2.]
print(type(tensor1)) # <class 'numpy.ndarray'>
마지막으로 이것을 보면 이해가 빠를것이다. tensor1은 device가 cuda로 설정되어 cuda gpu 메모리에 올라가져있다. 그래서 device를 찍어보면 cuda에 올라가져있고, 그것을 to('cpu')를 통해 바꾸었다. 또한, requires_grad 도 true로 되어있어서, 미분 값이 올라가져 있는것을 .detach() 해야한다. 그래야 numpy로 바꿀 수 있다.
summary
- pytorch tensor는 autograd에 자동으로 미분값이 저장되어있으므로, 쓰지 않을거라면 with torch.no_grad()사용 추천.
- cuda와 cpu의 연산이 호환되지 않으므로, 둘의 device를 맞춰줘야한다.
- tensor와 numpy 의 연산은 자유롭다.
