현재 오즈코딩스쿨 강의를 통해 프론트엔드를 학습하고 있습니다.
본 포스트는 해당 강의에 대한 내용 정리를 목적으로 합니다.
1. 트윗 폼 만들기
html
<!DOCTYPE html>
<html lang="en">
  <head>
    <meta charset="UTF-8" />
    <title>Simple Twitter Clone</title>
    <link rel="stylesheet" href="styles.css" />
  </head>
  <body>
    <div id="input_container">
      <input type="text" id="tweetInput" placeholder="메시지를 입력하세요." />
      <button id="postTweet">게시</button>
    </div>
    <div id="tweets_container"></div>
    <script src="script.js"></script>
  </body>
</html>
javascript
// 트윗 게시 버튼 요소
const postTweet = document.querySelector('#postTweet');
postTweet.addEventListener('click', function () {
  // 트윗을 입력할 input 요소
  const tweetInput = document.querySelector('#tweetInput');
  // 트윗이 게시될 컨테이너
  const tweetsContainer = document.querySelector('#tweets_container');
  // 여기에 코드를 입력하세요.

  if (tweetInput.value) {
    // 트윗 요소 생성
    const tweet = document.createElement('div');
    tweet.classList.add('tweet');

    // 트윗 내용 요소 생성
    const tweetContent = document.createElement('p');
    tweetContent.classList.add('tweet-text');
    tweetContent.textContent = tweetInput.value;

    // 좋아요 버튼 요소 생성
    const likeButton = document.createElement('button');
    likeButton.classList.add('like-button');
    likeButton.textContent = '♥️';

    // 좋아요 카운트 요소 생성
    const likeCount = document.createElement('span');
    likeCount.classList.add('like-count');
    likeCount.textContent = '0';

    // 트윗 요소에 내용, 버튼, 카운트 추가
    tweet.appendChild(tweetContent);
    tweet.appendChild(likeButton);
    tweet.appendChild(likeCount);

    // 트윗 컨테이너에 트윗 추가
    // tweetsContainer.prepend(tweet);
    tweetsContainer.appendChild(tweet);

    // 입력창 초기화
    tweetInput.value = '';

    // 좋아요 버튼 클릭 이벤트
    likeButton.addEventListener('click', function () {
      let count = parseInt(likeCount.textContent);
      count++;
      likeCount.textContent = count();
    });
  }
});
2. 트윗 폼 만들기
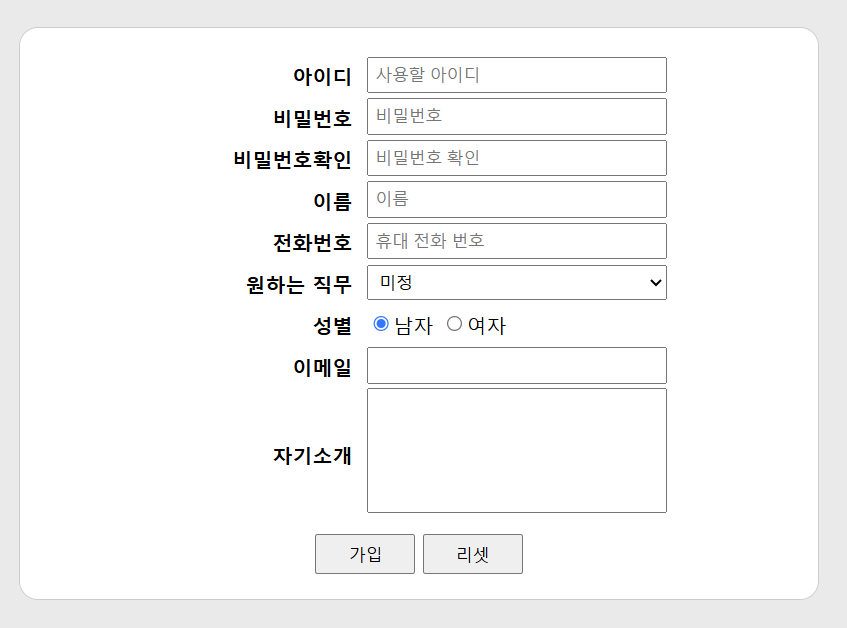
html
<!DOCTYPE html>
<html lang="ko">
<head>
  <meta charset="UTF-8">
  <meta http-equiv="X-UA-Compatible" content="IE=edge">
  <meta name="viewport" content="width=device-width, initial-scale=1.0">
  <title>회원가입 양식</title>
  <link href="join.css" rel="stylesheet">
</head>
<body>
  <div id="container">
    <form action="#" id="form">
      <table class="table">
        <tr>
          <th>아이디</th>
          <td><input type="text" name="id" placeholder="사용할 아이디" autocomplete="off" ></td>
        </tr>
        <tr>
          <th>비밀번호</th>
          <td><input type="password" name="pw1" placeholder="비밀번호" ></td>
        </tr>
        <tr>
          <th>비밀번호확인</th>
          <td><input type="password" name="pw2" placeholder="비밀번호 확인" ></td>
        </tr>
        <tr>
          <th>이름</th>
          <td><input type="text" name="name" placeholder="이름" autocomplete="off" ></td>
        </tr>
        <tr>
          <th>전화번호</th>
          <td>
            <input type="text" name="phone" placeholder="휴대 전화 번호" autocomplete="off" required>
          </td>
        </tr>
        <tr>
          <th>원하는 직무</th>
          <td>
            <select name="position">
              <option value="developer">개발자</option>
              <option value="designer">웹디자이너</option>
              <option value="manager">기획자</option>
              <option value="undetermined" selected>미정</option>
            </select>
          </td>
        </tr>
        <tr>
          <th>성별</th>
          <td>
            <label>
              <input type="radio" name="gender" value="male" checked>남자
            </label>
            <label>
              <input type="radio" name="gender" value="female">여자
            </label>
          </td>
        </tr>
        <tr>
          <th>이메일</th>
          <td>
            <input title="정확한 메일 주소를 작성해주세요" type="email" name="email" autocomplete="off">
          </td>
        </tr>
        <tr>
          <th>자기소개</th>
          <td>
            <textarea name="intro"></textarea>
          </td>
        </tr>
      </table>
      <div class="buttons">
        <input title="가입하기" type="submit" class="btn" value="가입">
        <input title="처음 상태로" type="reset" class="btn" value="리셋">
      </div>
    </form>
  </div>

  <script src="join.js"></script>
</body>
</html>
javascript
// 1. 가입 버튼을 눌렀을 때 유저에게 환영인사 메시지를 보여주어야 합니다.
// 2. 환영인사 메시지에는 아이디, 이름, 전화번호, 원하는 직무가 포함되어야 합니다.
// 3. join.css에 작성된 스타일은 마음껏 수정해도 좋습니다.

const form = document.getElementById('form');

// function(){} 익명 함수
form.addEventListener('submit', function (event) {
  event.preventDefault(); // 기존 기능 차단

  let userId = event.target.id.value;
  let userPw1 = event.target.pw1.value;
  let userPw2 = event.target.pw2.value;
  let userName = event.target.name.value;
  let userPhone = event.target.phone.value;
  let userPosition = event.target.position.value;
  let userGender = event.target.gender.value;
  let userEmail = event.target.email.value;
  let userIntro = event.target.intro.value;

  console.log(
    userId,
    userPw1,
    userPw2,
    userName,
    userPhone,
    userPosition,
    userGender,
    userEmail,
    userIntro
  );

  if (userId.length < 6) {
    alert('아이디가 너무 짧습니다. 6자 이상 입력해주세요.');
    return;
  }

  if (userPw1 !== userPw2) {
    alert('비밀번호가 일치하지 않습니다.');
    return;
  }

  // 가입이 잘 되었습니다! 환영합니다!

  document.body.innerHTML = '';
  document.write(`<p>${userId}님 환영합니다</p>
  <p>회원 가입 시 입력하신 내역은 다음과 같습니다.</p>
  <p>아이디 : ${userId}</p>
  <p>이름: ${userName}</p>
  <p>전화번호: ${userPhone}</p>
  <p>원하는 직무: ${userPosition}</p>`);
});
끝맺음.
음....기본에 충실한..코드!
추후 CSS 코드 수정해서 디자인 수정 예정

UI/UX디자이너의 코딩 공부