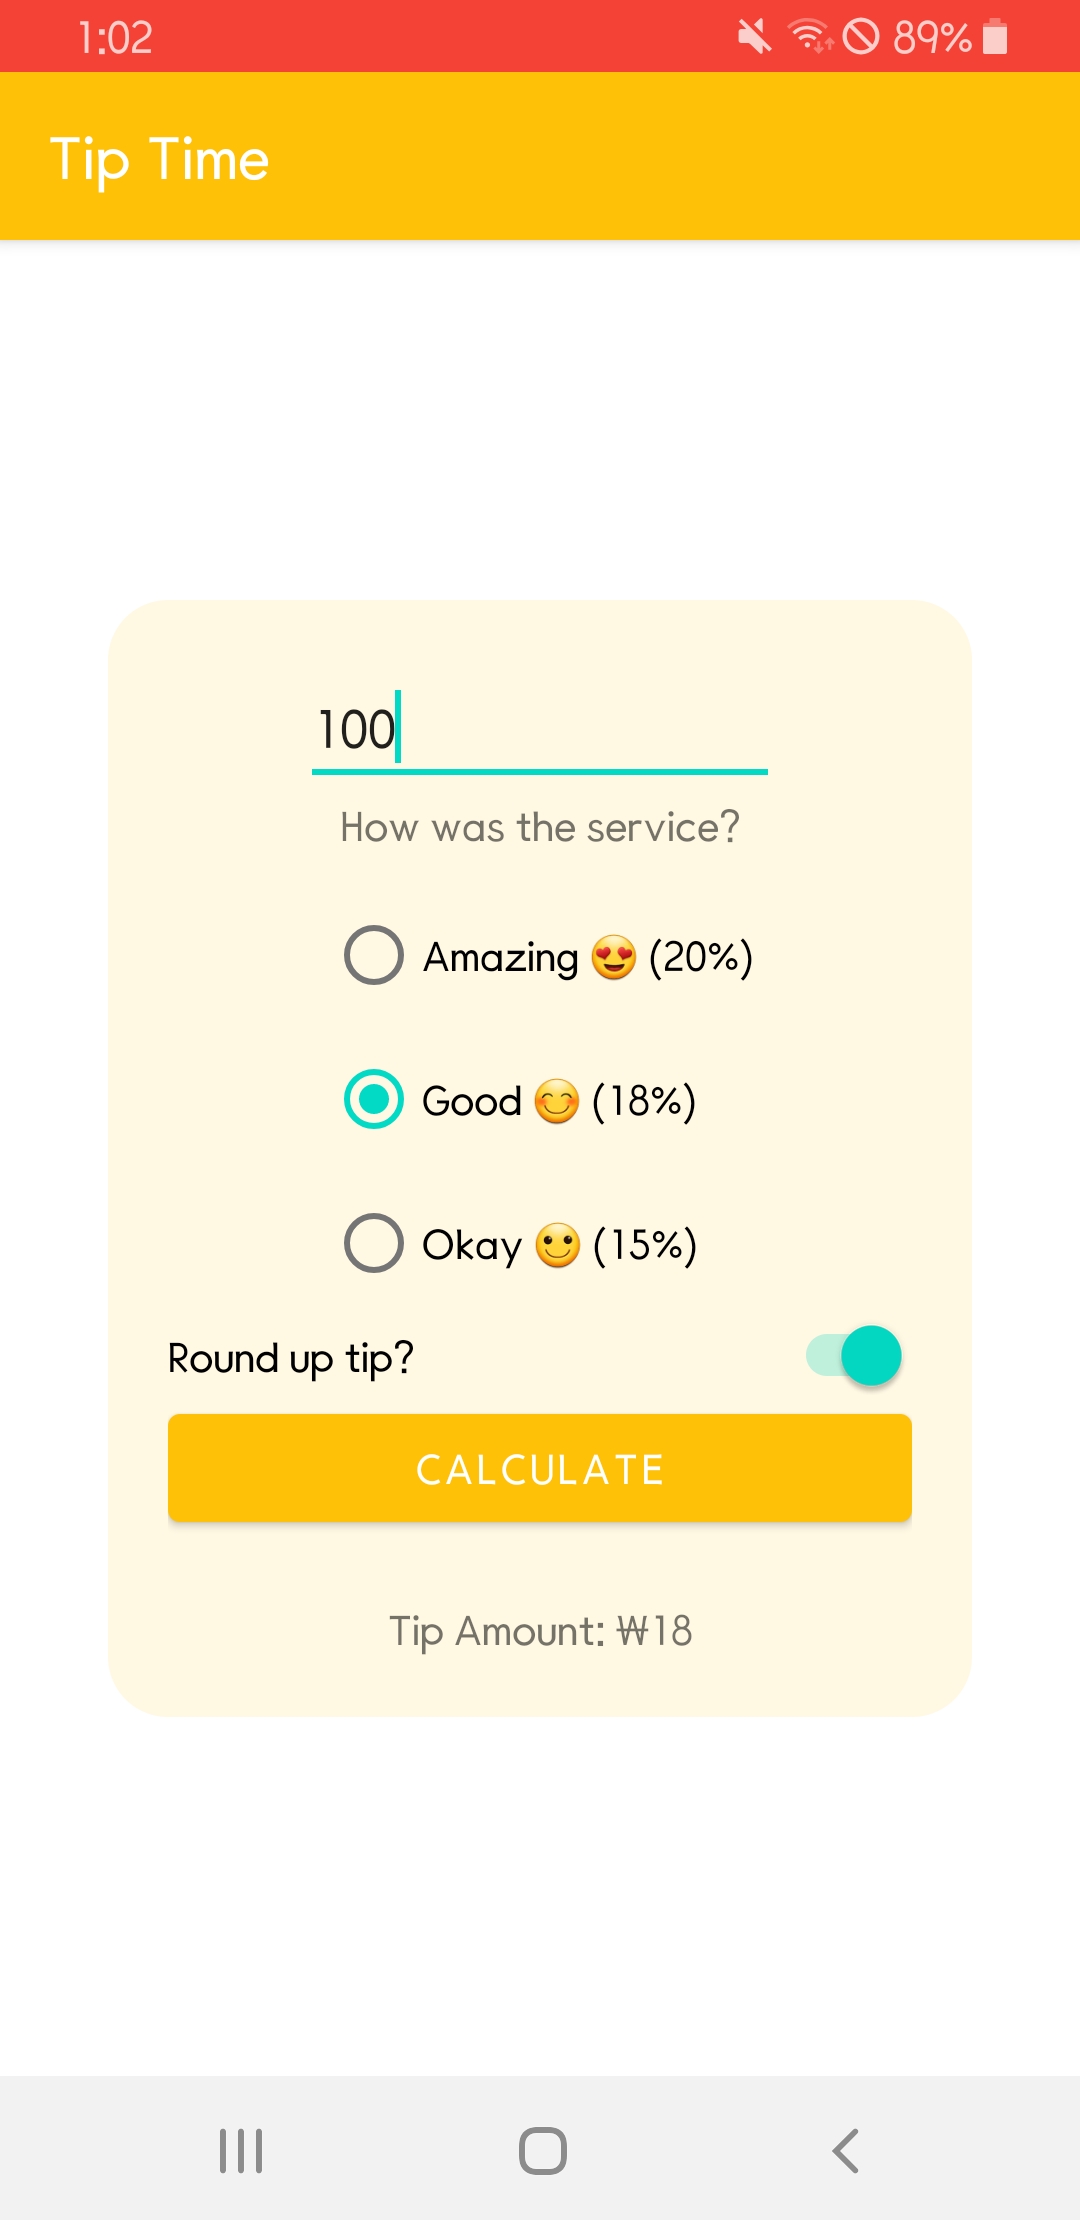
pathway 1의 최종 목표는 금액과 서비스 평가에 따라 팁을 계산해 주는 TIP TIME 어플이다. 하지만 어플에 대한 내용을 살펴보기 전에 코틀린 클래스와 상속에 대해 알아보자.
Kotlin의 클래스 및 상속
Class hierarchy
-
클래스 계층 구조: 클래스가 상위 요소와 하위 요소의 계층 구조로 구성된 배열이다.- Child or subclass, 하위 클래스 or 서브 클래스: 계층 구조에서 다른 클래스 아래에 있는 클래스
- Parent or superclass or base class, 상위 클래스 or 슈퍼 클래스 or 기본 클래스: 하위 클래스가 하나 이상 있는 클래스
- Root or top-level class, 루트 or 최상위 클래스: 계층 구조의 최상위에 있는 클래스
-
상속: 하위 클래스가 상위 클래스의 모든 속성과 메서드를 포함하여 상속받는다.

-
TextView는View의 서브클래스이고,EditText는TextView의 서브클래스이다. -
EditText는TextView와View클래스의 모든 속성과 메서드를 상속받고, 화면에서 텍스트를 수정할 수 있는 자체 기능에 대한 로직을 추가적으로 가진다. -
모든 코틀린 클래스는 공통 superclass가
Any다.
    Kotlin.Any
        ↳ android.view.View
            ↳ android.widget.TextView
↳ android.widget.Button- 클래스 간 상속을 활용하는 방법을 학습하면 코드를 더 쉽게 작성할 수 있고, 읽기에도 재사용하기에도 더 편하다.
추상 클래스
- 추상 클래스를 사용해 클래스를 만들고, 클래스를 통해 객체 인스턴스를 빌드한다. 즉 추상 클래스는 인스턴스화 할 수 없다.
- 슈퍼클래스는 서브클래스의 공통적인 속성과 함수를 포함하는데, 속성값과 함수 구현을 알 수 없으면 클래스를 추상으로 만들어 구체적인 세부정보의 결정은 서브클래스에 맡긴다.
- 추상 클래스 선언은
abstract키워드로 시작
Dwelling 추상 클래스
abstract class Dwelling(private var residents: Int){
    abstract val buildingMaterial: String
    abstract val capacity: Int

    fun hasRoom(): Boolean{
        return residents < capacity
    }
}Dwelling클래스에는buildingMaterial,capacity속성이 있다. 속성 값이 없기 때문에abstract로 선언해야 한다.
Private 속성
- 거주자 수에 해당하는
residents는private속성이다. 또한 거주자 수는 변경될 수 있으므로var다. - 비공개 속성은 이 클래스 내부에서만 사용할 수 있다.
- 속성과 메서드는 설정하지 않았다면 기본적으로
public이다.
서브 클래스
Dwelling의 서브 클래스 SquareCabin 클래스를 만들자.
fun main() {
	val squareCabin = SquareCabin(6)
    println("Square Cabin")
    println("Capacity: ${squareCabin.capacity}")
    println("Material: ${squareCabin.buildingMaterial}")
    println("Has room? ${squareCabin.hasRoom()}")
}
abstract class Dwelling(private var residents: Int){
    abstract val buildingMaterial: String
    abstract val capacity: Int
    fun hasRoom(): Boolean{
        return residents < capacity
    }
}
class SquareCabin(residents: Int) : Dwelling(residents){
    override val buildingMaterial = "Wood"
    override val capacity = 6
}
class SquareCabin : Dwelling(3)이렇게 슈퍼클래스인 Dwelling에서 확장한다는 것을 표기하고, 파라미터를 전달한다.class SquareCabin(residents: Int) : Dwelling(residents)이 코드처럼 거주자 수를 가변적으로 설정할 수 있도록 하는게 더 좋다.
- 추상 클래스의 추상 함수와 변수는 서브클래스에서 반드시 값을 제공해야 한다. 즉 SquareCabin에
buildingMaterial과capacity를overide하고 값을 선언해야 한다.
with문 사용하여 코드 단순화
특정 인스턴스의 여러 속성과 함수에 액세스해야 한다면 with문을 사용할 수 있다.
with (instanceName) {
    // instanceName을 필요로하는 작업 실행
}
위에서 작업한 코드 중 main()의 코드를 다음과 같이 수정할 수 있다.
fun main() {
    val squareCabin = SquareCabin(6)
    with(squareCabin){
      println("Square Cabin")
    	println("Capacity: ${capacity}")
    	println("Material: ${buildingMaterial}")
    	println("Has room? ${hasRoom()}")
    }
}
RoundHut, RoundTower 서브 클래스
Dwelling클래스 아래 RoundHut 클래스를 추가하고 RoundHut의 서브 클래스 RoundTower를 추가했다.
// 잘못된 코드
class RoundHut(residents: Int) : Dwelling(residents) {
    override val buildingMaterial = "Straw"
    override val capacity = 4
}
class RoundTower(residents: Int) : RoundHut(residents){
    override val buildingMaterial = "Stone"
    override val capacity = 4
}- 클래스는 기본적으로
final이기 때문에 RoundHut 클래스를 서브클래스로 분류하거나 상속할 수 없다. abstract클래스나open키워드를 사용한 클래스에서만 상속 가능하다. →open class RoundHut으로 수정!
RoundTower에 층을 추가한다. 층수에 따라 한 층에 4명씩 수용할 수 있다.
class RoundTower(residents: Int, val floors: Int) : RoundHut(residents){
    override val buildingMaterial = "Stone"
    override val capacity = 4*floors
}
abstract 함수
다음과 같이 면적을 구하는 floorArea() 함수를 추가했다.
abstract class Dwelling(private var residents: Int){
    abstract val buildingMaterial: String
    abstract val capacity: Int
    fun hasRoom(): Boolean{
        return residents < capacity
    }
    abstract fun floorArea(): Double
}
서브 클래스에서 이 추상 함수에 대한 내용을 정의하고, 함수에 필요한 파라미터를 입력 받아야한다.
open class RoundHut(residents: Int,
                    val radius: Double) : Dwelling(residents) {
    override val buildingMaterial = "Straw"
    override val capacity = 4
    override fun floorArea(): Double{
        return radius*radius*PI
    }
}
class RoundTower(residents: Int,
                 radius: Double,
                 val floors: Int) : RoundHut(residents, radius){
    override val buildingMaterial = "Stone"
    override val capacity = 4*floors
    override fun floorArea(): Double{
        return super.floorArea()*floors
    }
}
SquareCabin은 RoundHut와 유사하니까 넘어가고, RoundHut, RoundTower 클래스를 보자.
override fun floorArea()로 함수의 내용을 작성한다.- PI는
import kotlin.math.PI를 추가해 사용할 수 있다. - RoundTower 클래스를 보면 RoundHut으로 부터 상속 받는 변수들은
val이나var를 사용하지 않고, 뒤에 RoundHut()에 작성해야 한다. super.floorArea()로 상위 클래스의 함수 내용을 가져다 쓸 수 있다.
소숫점 두자리로 제한하기
println("Floor area: %.2f".format(floorArea()))
공통으로 사용하는 getRoom() 함수
getRoom() 함수는 Dwelling의 서브 클래스 모두가 똑같이 사용할 수 있다.
Dwelling 클래스에 다음 코드를 추가했다.
fun getRoom(){
    if(capacity>residents){
        residents++
        println("You got a room!")
    }else{
        println("Sorry, no vacancy :(")
    }
}
RoundHut과 RoundTower만 사용하는 calculateMaxCarpetSize()
카펫 크기를 계산하는 calculateMaxCarpetSize() 함수를 만든다. RoundHut, RoundTower 두 클래스 모두에 작성할 필요없이 상위 클래스인 RoundHut 클래스에 다음 코드를 추가하면 된다.
fun calculateMaxCarpetSize(): Double {
val diameter = 2 * radius
return sqrt(diameter * diameter / 2)
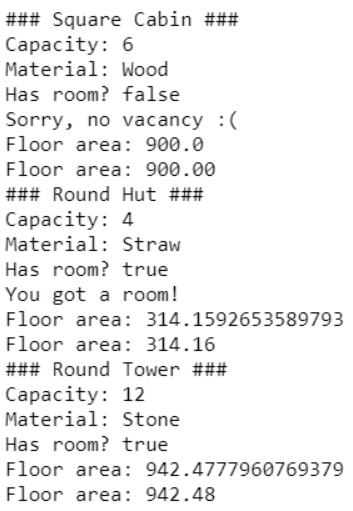
}전체 코드와 출력 결과
import kotlin.math.PI
import kotlin.math.sqrt
fun main() {
	val squareCabin = SquareCabin(6, 30.0)
    with(squareCabin){
        println("### Square Cabin ###")
    	println("Capacity: ${capacity}")
    	println("Material: ${buildingMaterial}")
    	println("Has room? ${hasRoom()}")
        getRoom()
        println("Floor area: ${floorArea()}")
        println("Floor area: %.2f".format(floorArea()))
    }
    val roundHut = RoundHut(3, 10.0)
    with(roundHut){
        println("### Round Hut ###")
    	println("Capacity: ${capacity}")
    	println("Material: ${buildingMaterial}")
    	println("Has room? ${hasRoom()}")
        getRoom()
        println("Floor area: ${floorArea()}")
        println("Floor area: %.2f".format(floorArea()))
    }
    val roundTower = RoundTower(2, 10.0, 3)
    with(roundTower){
        println("### Round Tower ###")
    	println("Capacity: ${capacity}")
    	println("Material: ${buildingMaterial}")
    	println("Has room? ${hasRoom()}")
        println("Floor area: ${floorArea()}")
        println("Floor area: %.2f".format(floorArea()))
    }
}
abstract class Dwelling(private var residents: Int){
    abstract val buildingMaterial: String
    abstract val capacity: Int
    fun hasRoom(): Boolean{
        return residents < capacity
    }
    abstract fun floorArea(): Double
    fun getRoom(){
        if(capacity>residents){
            residents++
            println("You got a room!")
        }else{
            println("Sorry, no vacancy :(")
        }
    }
}
class SquareCabin(residents: Int,
                  val length: Double) : Dwelling(residents){
    override val buildingMaterial = "Wood"
    override val capacity = 6
    override fun floorArea(): Double{
        return length*length
    }
}
open class RoundHut(residents: Int,
                    val radius: Double) : Dwelling(residents) {
    override val buildingMaterial = "Straw"
    override val capacity = 4
    override fun floorArea(): Double{
        return radius*radius*PI
    }
    fun calculateMaxCarpetSize(): Double {
    	val diameter = 2 * radius
    	return sqrt(diameter * diameter / 2)
	}
}
class RoundTower(residents: Int,
                 radius: Double,
                 val floors: Int) : RoundHut(residents, radius){
    override val buildingMaterial = "Stone"
    override val capacity = 4*floors
    override fun floorArea(): Double{
        return super.floorArea()*floors
    }
}
Android의 XML
CounstraintLayout태그를 보면androidx.constraintlayout.widget.ConstraintLayout라고 표시된다. 'androidx'로 시작한다는 것은 추가 기능을 제공하는 라이브러디가 포함된 Android Jetpack의 일부라는 것이다.
xmlns:android="http://schemas.android.com/apk/res/android"
xmlns:app="http://schemas.android.com/apk/res-auto"
xmlns:tools="http://schemas.android.com/tools"xmlns는 XML 네임스페이스를 나타내고 각 줄은 스키마나 이러한 단어와 관련된 속성의 어휘를 정의합니다. 예를 들어android:네임스페이스는 Android 시스템에서 정의한 속성을 표시합니다. 레이아웃 XML의 속성은 모두 이러한 네임스페이스 중 하나로 시작합니다.- xml에서 주석은
<!-- 주석 --> <?xml version="1.0" encoding="utf-8"?>→ 파일이 XML 파일이지만 모든 XML 파일에 이 내용이 포함되는 것은 아님을 나타낸다.
EditText inputType
EditText의 inputType을 지정할 수 있다. 사용자가 숫자만 입력하도록 하려면 android:inputType="numberDecimal" 를 EditText에 추가한다.
RadioButton
<RadioGroup
        android:id="@+id/tip_options"
        android:checkedButton="@id/option_amazing"
        android:layout_width="wrap_content"
        android:layout_height="wrap_content"
        android:orientation="vertical">
        <RadioButton
            android:id="@+id/option_amazing"
            android:layout_width="wrap_content"
            android:layout_height="wrap_content"
            android:text="Amazing 😍 (20%)"/>
        <RadioButton
            android:id="@+id/option_good"
            android:layout_width="wrap_content"
            android:layout_height="wrap_content"
            android:text="Good 😊 (18%)"/>
        <RadioButton
            android:id="@+id/option_okay"
            android:layout_width="wrap_content"
            android:layout_height="wrap_content"
            android:text="Okay 🙂 (15%)"/>
</RadioGroup>android:checkedButton="@id/option_amazing"미리 체크되어 있는 버튼 만들기
Switch
ConstraintLayout에서 match_parent 사용할 수 없다. 대신 너비를 0dp로 설정한다.라고 강의에 쓰여있는데 나는 그냥 match_parent로 설정해도 똑같은 결과가 나온다. 🤔
<Switch
      android:id="@+id/round_up_switch"
      android:layout_width="0dp"
      android:layout_height="wrap_content"
      android:checked="true"
      android:text="Round up tip?"
      app:layout_constraintEnd_toEndOf="parent"
      app:layout_constraintStart_toStartOf="parent"
      app:layout_constraintTop_toBottomOf="@+id/tip_options" />
switch는 이렇게 추가할 수 있다.
- checked로 기본 값 설정
문자열 추출과 reformat code
노랑 형광펜으로 경고가 표시되어 있는 string 문자열들을 모두 strings.xml로 추출한다.
<!-- strings.xml -->
<resources>
    <string name="app_name">Tip Time</string>
    <string name="cost_of_service">Cost of Service</string>
    <string name="how_was_the_service">How was the service?</string>
    <string name="amazing_service">Amazing 😍 (20%)</string>
    <string name="good_service">Good 😊 (18%)</string>
    <string name="okay_service">Okay 🙂 (15%)</string>
    <string name="calculate">Calculate</string>
</resources>
그리고 전체 코드를 Code>Reformat Code 로 정리해준다.
디자인 추가하기
지금까지 작성한 것들을 담을 노란색 둥근 사각형을 만들었다.
<?xml version="1.0" encoding="utf-8"?>
<shape xmlns:android="http://schemas.android.com/apk/res/android"
    android:shape="rectangle">
    <corners android:radius="20dp"/>
    <solid android:color="#33FFDC73"/>
</shape>
Tip Time 기능
View Binding
지금까지 뷰에 대해 참조를 하려면 findViewById() 를 사용해왔다. view binding을 사용하면 매번 번거롭게 findViewById()하지 않아도 된다.
build.gradle파일(Gradle Scripts > build.gradle (Module: Tip_Time.app))에서android섹션에 다음 코드를 추가하고 sync한다.
buildFeatures {
    viewBinding = true
}- MainActivity의 코드를 다음과 같이 변경한다.
class MainActivity : AppCompatActivity() {

    lateinit var binding: ActivityMainBinding

    override fun onCreate(savedInstanceState: Bundle?) {
        super.onCreate(savedInstanceState)
        binding = ActivityMainBinding.inflate(layoutInflater)
        setContentView(binding.root)
    }
}
lateinit var binding: ActivityMainBinding결합 객체의 최상위 변수를 선언한다.lateinit키워드는 코드가 변수를 사용하기 전에 초기화한 것을 확인한다. 초기화하지 않으면 앱이 비정상 종료된다.binding = ActivityMainBinding.inflate(layoutInflater)activity_main.xml 레이아웃에서Views에 액세스하는 데 사용할binding객체를 초기화한다.setContentView(binding.root)Activity의 컨텐츠 뷰를 설정한다.
// Old way with findViewById()
val myButton: Button = findViewById(R.id.my_button)
myButton.text = "A button"

// Better way with view binding
val myButton: Button = binding.myButton
myButton.text = "A button"

// Best way with view binding and no extra variable
binding.myButton.text = "A button"
팁 계산하기
- 사용자가 입력한 숫자를 가져올 때는
val stringInTextField = binding.costOfService.text.toString()toString()으로 변환한다. val selectedId = binding.tipOptions.checkedRadioButtonId사용자가 선택한 옵션의 ID를 가져올 수 있다.val roundUp = binding.roundUpSwitch.isChecked사용자가 switch를 클릭했는지 여부를 boolean형태로 가져올 수 있다.kotlin.math를 import 하지 않고tip = kotlin.math.ceil(tip)이렇게 사용할 수 있다.
NumberFormat
국가마다 금액을 표시하는 형식이 다르다. 안드로이드에서는 숫자를 통화 형식으로 지정하는 메서드를 제공한다.
val formattedTip = NumberFormat.getCurrencyInstance().format(tip)
테스트 및 디버그
비정상 종료 디버그 - 어플이 튕겨서 종료되는 경우
Logcat에서 FATAL EXCEPTION을 찾는다.
null
아무 입력이 없는 상태로 버튼을 클릭하면 비정상 종료가 발생한다. Kotlin에서 제공하는 toDoubleOrNull() 함수를 이용해 비정상 종료를 방지한다.
// 기존 코드
val cost = stringInTextField.toDouble()

// 수정 후
val cost = stringInTextField.toDoubleOrNull()
if(cost==null){
    binding.tipResult.text = ""
    return
}
그냥 return만 작성해도 되지만 binding.tipResult.*text* = "" 를 추가해서 calculateTip()에서 반환되기 전에 팁 금액이 삭제되도록 한다.
추가
MainActivity외부의 코드가calculateTip()을 호출할 일리 없으므로 이 메서드는private으로 하는게 좋다.
Inspect Code
Analyze > Inspect Code
private 설정하기
inline variable
불필요한 변수는 제거한다.
// 기존 코드
val selectedId = binding.tipOptions.checkedRadioButtonId
val tipPercentage = when (selectedId){
    R.id.option_amazing -> 0.20
    R.id.option_good -> 0.18
    else -> 0.15
}
// inline variable 수정후
val tipPercentage = when (binding.tipOptions.checkedRadioButtonId){
    R.id.option_amazing -> 0.20
    R.id.option_good -> 0.18
    else -> 0.15
}