이전 게시글에서는 웹 터미널을 위한 UI 및 간단한 socket.io 클라이언트를 구성해보았습니다.
이번에는 웹 터미널 구현을 위한 중개 서버를 구현해보겠습니다!
서버 개발 환경 구축
- Spring Boot 3.3.4
- Kotlin 1.9.25
요즘 Kotlin을 활용한 스프링부트 개발을 공부하고 있어서 저는 코프링으로 개발해보겠습니다!
자바 환경이 편하신 분은 자바로 구축하셔도 무방합니다! (필자는 자바로 최초 구현한 뒤 코틀린으로 리팩토링하였음)
필요 라이브러리 설치
SSH 중개 서버를 구축하기 위해 아래와 같은 라이브러리가 필요합니다!
-
netty-socketio
socket.io 서버 구축을 위한 라이브러리 -
JSch
Java로 SSH 접속을 구현하기 위한 라이브러리A/S
JSch 라이브러리가 더 이상 유지보수 되고 있지 않아 포크 프로젝트인 mwiede/jsch 라이브러리를 사용해주세요! -
caffeine
SSH 세션 캐싱을 위한 라이브러리 -
kotlinx-couroutines-core
SSH 비동기 처리를 위한 코루틴 라이브러리
아래와 같이 build.gradle.kts에 라이브러리 의존성을 추가해주세요.
// socket.io
implementation("com.corundumstudio.socketio:netty-socketio:2.0.11")

// jsch
implementation("com.jcraft:jsch:0.1.55")

// logging
implementation("io.github.oshai:kotlin-logging-jvm:5.1.4")
implementation("org.slf4j:slf4j-api:2.0.16")

// cache
implementation("com.github.ben-manes.caffeine:caffeine:3.1.8")

// coroutines
implementation("org.jetbrains.kotlinx:kotlinx-coroutines-core:1.8.1")
저는 코틀린에서 로깅을 편하게 하기 위해 kotlin-logging 라이브러리를 추가했습니다!
전반적인 플로우
우선 서버를 개발하기 전 어떤 식으로 중개가 이루어지는 지 알아보겠습니다!
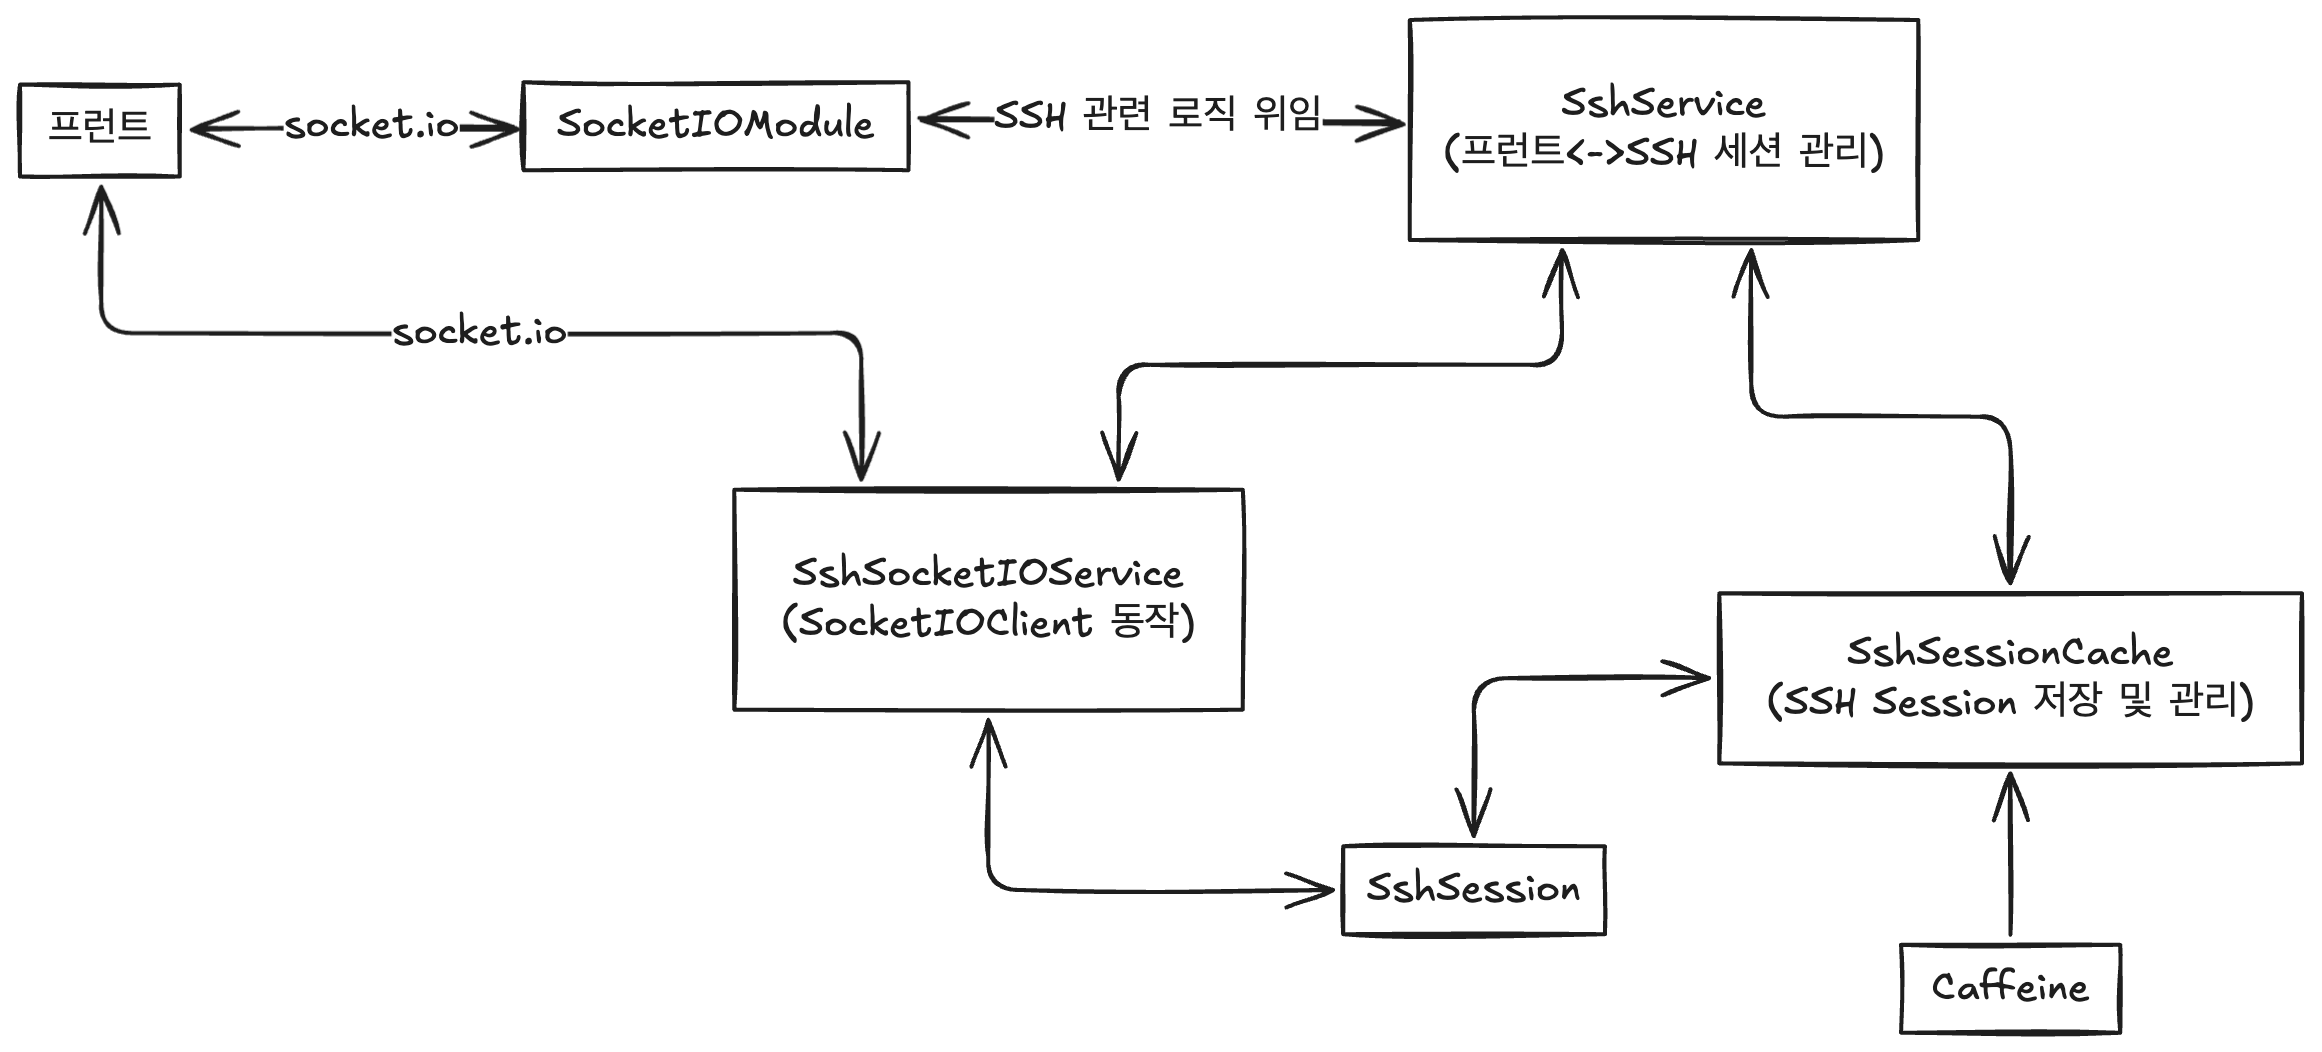
프런트에서 socket.io를 이용하여 서버에 접속하면 SocketIOModule이 해당 요청을 받아 SshService로 관련 처리를 위임합니다.
SshService는 SSH 세션을 생성 및 관리하며, SSH로 원격지에 데이터를 쓰거나, 세션을 종료하는 역할을 담당하게 됩니다.
SSH 세션은 SshSessionCache에서 관리하며 SshSession 클라이언트 별로 저장하고 생명 주기를 관리합니다. 이 때 실제 캐시는 Caffeine 라이브러리가 담당하게 됩니다.
SshSession은 실제로 원격 컴퓨터와 세션을 수립하고 프런트에서의 입력과 원격 컴퓨터로부터 오는 SSH 데이터를 중개하게 됩니다.
이 때, 프런트와의 중개는 SshSocketIOService가 담당하게 되며 SshService로 전달한 핸들러 함수를 통해 관련 로직이 실행되게 됩니다.
SocketIOModule: 프런트 요청 최초 수신SshService: SSH 세션 생성 및 관리, SSH 데이터 송수신SshSessionCache: SSH 세션 저장, 생명주기 관리 (Caffeine라이브러리를 통해 구현)SshSession: 원격 컴퓨터와 실제 SSH 통신 중개SshSocketIOService:SocketIOClient관련 동작 정의
socket.io 서버 구동시키기
socket.io 설정
우선 프런트와 실시간으로 통신하기 위한 socket.io 서버를 구축해보겠습니다.
먼저 서버 구축을 위한 SocketIOConfig 클래스를 만들어주세요.
import com.corundumstudio.socketio.SocketConfig
import com.corundumstudio.socketio.SocketIOServer
import org.springframework.context.annotation.Bean
import org.springframework.context.annotation.Configuration

@Configuration
class SocketIOConfig {
    @Bean
    fun socketIOServer(): SocketIOServer {
        return com.corundumstudio.socketio.Configuration().apply {
            hostname = "localhost"
            port = 8081
            socketConfig = SocketConfig().apply {
                isReuseAddress = true
            }
        }.let { SocketIOServer(it) }
    }
}
해당 클래스는 SocketIOServer를 생성한 후 빈으로 등록합니다.
이후 SocketIOServerRunner 클래스를 작성해주세요.
import com.corundumstudio.socketio.SocketIOServer
import org.springframework.boot.CommandLineRunner
import org.springframework.stereotype.Component

@Component
class SocketIOServerRunner(private val socketIOServer: SocketIOServer) : CommandLineRunner{
    override fun run(vararg args: String?) {
        socketIOServer.start()
    }
}
이 클래스는 CommandLineRunner 인터페이스를 구체화하여 빈으로 등록된 SocketIOServer를 주입받아 실행하는 역할을 합니다.
이제 스프링 부트 앱을 실행시켜볼까요?

설정했던 8081번 포트로 socket.io 서버가 정상적으로 실행되었습니다.
socket.io 모듈
socket.io 서버를 실행은 했지만 아직 통신을 위한 리스너들을 구성하지 않았습니다.
SSHSocketIOModule 클래스를 작성해주세요.
import com.corundumstudio.socketio.SocketIOClient
import com.corundumstudio.socketio.SocketIOServer
import com.corundumstudio.socketio.listener.ConnectListener
import com.corundumstudio.socketio.listener.DisconnectListener
import io.github.oshai.kotlinlogging.KotlinLogging
import org.springframework.stereotype.Component

private val log = KotlinLogging.logger {} // kotlin-logging

@Component
class SshSocketIOModule(socketIOServer: SocketIOServer) {

    init {
        socketIOServer.addNamespace("/ssh").apply { // /ssh 네임스페이스 추가
            addConnectListener(onConnectListener()) // 해당 네임스페이스에 connect 이벤트 리스너 추가
            addDisconnectListener(onDisconnectListener()) // disconnect 이벤트 리스너 추가
        }
    }

    private fun onConnectListener(): ConnectListener {
        return ConnectListener { client ->
            log.info { "Client Connected: ${client.sessionId}" }
        }
    }

    private fun onDisconnectListener(): DisconnectListener {
        return DisconnectListener { client ->
            log.info { "Client Disconnected: ${client.sessionId}" }
        }
    }
}
해당 클래스에서는 /ssh라는 네임스페이스를 만들어 클라이언트 접속 이벤트 리스너와 접속 종료 이벤트 리스너를 정의하여 추가하였습니다.
각각 리스너는 UUID로 구성된 클라이언트 세션 아이디를 로깅하도록 했습니다.
이제 실제로 저 네임스페이스에 socket.io로 접속해볼까요?
우선 프런트 앱과 실제로 연결하기 전 Postman으로 접속 테스를 해보겠습니다.
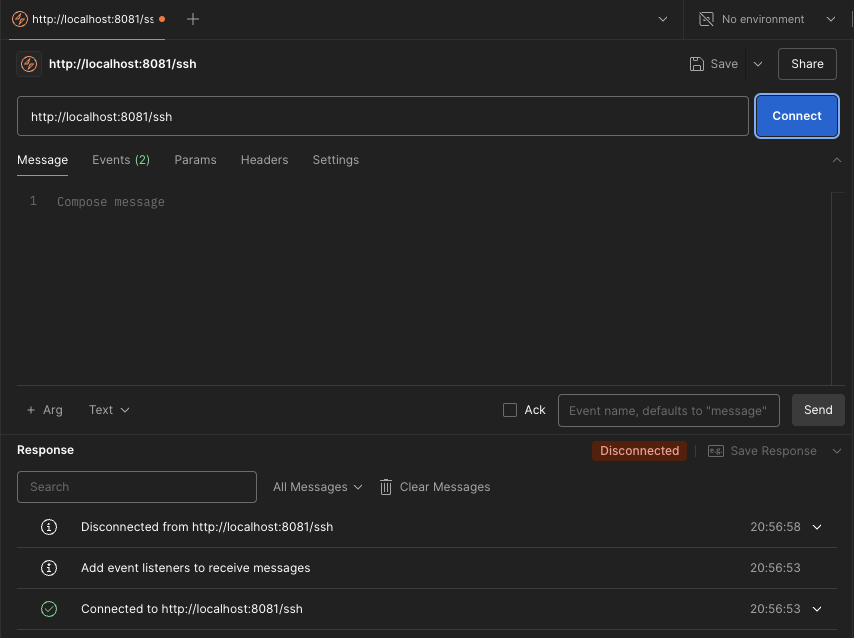

정상적으로 접속이 이루어지고 종료되어 로깅이 된 것을 확인할 수 있습니다!
SSH 관련 클래스 구현
SshSession
이제 실제로 SSH 연결을 중개하는 SshSession 클래스를 구현해보겠습니다.
import com.jcraft.jsch.ChannelShell
import com.jcraft.jsch.JSch
import com.jcraft.jsch.Session
import kotlinx.coroutines.CoroutineScope
import kotlinx.coroutines.Dispatchers
import kotlinx.coroutines.launch
import java.io.InputStream
import java.io.OutputStream
import java.util.*

class SshSession(
    private val remoteUser: String,
    private val remoteHost: String,
    private val remotePassword: String,
    private val remotePort: Int = 22,
    val sessionId: UUID,
    private val onByteArrayEvent: (ByteArray) -> Unit,
    private val onEofEvent: () -> Unit
) {
    private val jSch: JSch = JSch()

    private lateinit var remoteSession: Session
    private lateinit var channel: ChannelShell
    private lateinit var out: OutputStream

    init {
        createSession()
        connect()
    }

    private fun createSession() {
        remoteSession = jSch.getSession(remoteUser, remoteHost, remotePort)
    }

    private fun connect() {
        remoteSession.run {
            setPassword(remotePassword)
			setConfig("StrictHostKeyChecking", "no")
            connect()
        }

        channel = remoteSession.openChannel("shell") as ChannelShell
        out = channel.outputStream

        channel.connect()

        write("/bin/bash\n")
        startChannel(channel.inputStream)
    }

    private fun startChannel(out: InputStream) {
        CoroutineScope(Dispatchers.IO).launch {
            val buffer = ByteArray(1024)
            try {
                while (true) {
                    val bufferSize = out.read(buffer)
                    if (bufferSize < 0) {
                        break
                    } else {
                        onByteArrayEvent(buffer.copyOf(bufferSize))
                    }
                }
            } finally {
                onEofEvent()
            }
        }
    }

    fun write(data: String) {
        val bytes = data.toByteArray(Charsets.UTF_8)
        out.write(bytes)
        out.flush()
    }

    fun disconnect() {
        channel.disconnect()
        remoteSession.disconnect()
    }

    fun isSessionAlive(): Boolean {
        return remoteSession.isConnected && channel.isConnected
    }
}
먼저 init 절에서는 세션을 수립하고, 연결합니다.
private fun createSession() {
	remoteSession = jSch.getSession(remoteUser, remoteHost, remotePort)
}
createSession 메소드는 JSch 인스턴스를 통하여 새로운 세션을 수립합니다.
private fun connect() {
	remoteSession.run {
		setPassword(remotePassword)
		setConfig("StrictHostKeyChecking", "no")
		connect()
	}

	channel = remoteSession.openChannel("shell") as ChannelShell
    out = channel.outputStream

	channel.connect()

	write("/bin/bash\n")
	startChannel(channel.inputStream)
}
connect 메소드에서는 SSH 연결을 위한 패스워드를 설정하고 SSH와 연결합니다.
이 때,
setConfig메소드를 통해 StrictHostKeyChecking을 비활성화하고 있는데요.
이 설정을 해주지 않으면 SSH로 연결할 때 UnkonwHostKey 예외가 발생하여 SSH 접속에 실패합니다.
물론 이 설정은 보안에 취약하므로 추후에는 해당 설정을 킨 후 Known Host 파일에 추가하는 등 추가적인 처리를 해주어야합니다.
다음으로 shell 채널을 생성하고 채널의 OutputStream(SSH로 데이터 쓰기 스트림)을 할당하고, 연결합니다.
이후 write 메소드를 통해 SSH로 bash 쉘을 실행합니다.
마지막으로 InputStream(SSH로부터 데이터 읽기 스트림)을 통하여 데이터를 받아오고 처리하기 위해 startChannel 메소드를 실행합니다.
private fun startChannel(out: InputStream) {
	CoroutineScope(Dispatchers.IO).launch {
    	val buffer = ByteArray(1024)
		try {
        	while (true) {
            	val bufferSize = out.read(buffer)
                if (bufferSize < 0) {
                    break
				} else {
                    onByteArrayEvent(buffer.copyOf(bufferSize))
				}
			}
		} finally {
			onEofEvent()
		}
	}
}
startChannel 메소드는 채널의 InputStream을 통해 데이터를 읽어옵니다.
이 때 백그라운드에서 계속해서 실행되어야 하므로 코루틴을 이용해 구현하였습니다.
onByteArrayEvent를 통하여 실제 데이터를 처리하게됩니다.
만약 채널 연결이 종료되면 onEofEvent를 통해 이후 처리를 진행하게됩니다.
SshSessionCache
이제 각 세션을 관리할 캐시를 구현해보겠습니다.
import com.github.benmanes.caffeine.cache.Cache
import com.github.benmanes.caffeine.cache.Caffeine
import com.github.benmanes.caffeine.cache.RemovalListener
import io.github.oshai.kotlinlogging.KotlinLogging
import org.springframework.stereotype.Component
import java.util.*
import java.util.concurrent.TimeUnit

private val log = KotlinLogging.logger {}

@Component
class SshSessionCache {
    private val removalListener: RemovalListener<UUID, SshSession> =
        RemovalListener { uuid, sshSession, removalCause ->
            log.info { "Session removed: $uuid Cause: $removalCause" }
            sshSession?.disconnect()
        }

    private val sessionCache: Cache<UUID, SshSession> =
        Caffeine.newBuilder()
            .expireAfterAccess(1, TimeUnit.HOURS)
            .removalListener(removalListener)
            .build()

    fun add(sshSession: SshSession) {
        sessionCache.put(sshSession.sessionId, sshSession)
    }

    fun findByUUID(uuid: UUID): SshSession? {
        return sessionCache.getIfPresent(uuid)
    }

    fun destroyOne(uuid: UUID) {
        sessionCache.invalidate(uuid)
    }

    fun destroyAll() {
        sessionCache.invalidateAll()
        sessionCache.cleanUp()
    }
}
각 세션은 1시간 동안 유지되며 RemovalListener를 구체화하여 캐시에서 세션이 삭제될 때 SSH 세션이 종료되도록 구현하였습니다.
SshService
이제 SSH 세션을 생성하고 관리하는 서비스 클래스를 구현해볼까요?
import com.corundumstudio.socketio.SocketIOClient
import com.github.eomgerm.kopringsshtunnel.socketio.service.SshSocketIOService
import com.github.eomgerm.kopringsshtunnel.ssh.SshSession
import com.github.eomgerm.kopringsshtunnel.ssh.SshSessionCache
import jakarta.annotation.PreDestroy
import org.springframework.stereotype.Service

@Service
class SshService(
    private val sshSessionCache: SshSessionCache,
    private val sshSocketIOService: SshSocketIOService
) {

    fun createSshSession(socketIOClient: SocketIOClient) {
        (sshSessionCache.findByUUID(socketIOClient.sessionId)
            ?: SshSession(
                remoteUser = "{사용자 이름}",
                remoteHost = "localhost",
                remotePassword = "{사용자 패스워드}",
                onByteArrayEvent = {
                    sshSocketIOService.sendUpdateMessage(
                        socketIOClient,
                        it.toString(Charsets.UTF_8)
                    )
                },
                onEofEvent = {
                    sshSocketIOService.sendEofMessage(socketIOClient)
                    sshSocketIOService.disconnect(socketIOClient)
                },
                sessionId = socketIOClient.sessionId
            )).also { sshSessionCache.add(it) }
    }

    fun writeToSsh(socketIOClient: SocketIOClient, data: String) {
        val sshSession = sshSessionCache.findByUUID(socketIOClient.sessionId)

        if (sshSession == null) {
            sshSocketIOService.sendNoSessionMessage(socketIOClient)
        } else {
            if (sshSession.isSessionAlive()) {
                sshSession.write(data)
            } else {
                sshSocketIOService.sendSessionClosedMessage(socketIOClient)
            }
        }
    }

    fun disconnect(socketIOClient: SocketIOClient) {
        sshSessionCache.destroyOne(socketIOClient.sessionId)
    }

    @PreDestroy
    fun destroy() {
        sshSessionCache.destroyAll()
    }
}
fun createSshSession(socketIOClient: SocketIOClient) {
sshSessionCache.findByUUID(socketIOClient.sessionId)
?: SshSession(
remoteUser = "eomgerm",
remoteHost = "localhost",
remotePassword = "265518",
onByteArrayEvent = {
sshSocketIOService.sendUpdateMessage(
socketIOClient,
it.toString(Charsets.UTF_8)
)
},
onEofEvent = {
sshSocketIOService.sendEofMessage(socketIOClient)
sshSocketIOService.disconnect(socketIOClient)
},
sessionId = socketIOClient.sessionId
).apply { sshSessionCache.add(this) }
}creteSshSession 메소드는 세션 캐시에 SocketIOClient의 sessionId에 해당하는 세션이 존재하는지 확인하고, 만약 없다면 새로운 세션을 만들어 캐시에 할당하는 역할을 합니다.
이전에 SshSession 클래스를 구현하면서 onByteArrayEvent, onEofEvent의 구체적인 동작도 정의해줍니다.
onByteArrayEvent는 원격 컴퓨터로부터 데이터를 수신하면 해당 데이터를 String으로 변환한 뒤 클라이언트로 이벤트를 발생합니다.
onEofEvent는 원격 컴퓨터로부터 쉘이 종료되는 EOF 시그널을 받으면 클라이언트로 이벤트를 발생시킨 후, socket.io 통신을 종료시킵니다.
fun writeToSsh(socketIOClient: SocketIOClient, data: String) {
    val sshSession = sshSessionCache.findByUUID(socketIOClient.sessionId)

    if (sshSession == null) {
        sshSocketIOService.sendNoSessionMessage(socketIOClient)
    } else {
        if (sshSession.isSessionAlive()) {
            sshSession.write(data)
        } else {
            sshSocketIOService.sendSessionClosedMessage(socketIOClient)
        }
    }
}
writeToSsh 메소드는 사용자에게 할당된 SSH 세션을 캐시에서 찾고 null이 아닌 경우 세션이 살아있는지 확인한 뒤 실제로 데이터를 SshSession의 write 메소드를 통해 SSH로 데이터를 전송합니다.
socket.io 동작 추가
SshSocketIOService
해당 서비스 클래스는 SocketIOClient의 동작을 추상화한 클래스입니다.
import com.corundumstudio.socketio.SocketIOClient
import org.springframework.stereotype.Service

@Service
class SshSocketIOService {
    fun sendUpdateMessage(socketIOClient: SocketIOClient, message: String) {
        socketIOClient.sendEvent("update", message)
    }

    fun sendEofMessage(socketIOClient: SocketIOClient) {
        socketIOClient.sendEvent("eof")
    }

    fun sendNoSessionMessage(socketIOClient: SocketIOClient) {
        socketIOClient.sendEvent("error", "No session found")
    }

    fun sendSessionClosedMessage(socketIOClient: SocketIOClient) {
        socketIOClient.sendEvent("error", "Session closed")
    }

    fun disconnect(socketIOClient: SocketIOClient) {
        socketIOClient.disconnect()
    }
}
SshSocketIOModule 마무리
이제 모든 동작을 정의했으니, 마지막으로 이벤트 리스너와 연결하겠습니다.
SshSocketIOModule 클래스에 아래의 두 메소드를 추가해주세요.
...
    private fun onConnectTerminalListener(): DataListener<Void> {
        return DataListener { client, _, _ ->
            log.info { "SessionId: ${client.sessionId} Event: connectTerminal" }
            try {
                sshService.createSshSession(client)
            } catch (e: Exception) {
                log.error(e) { "Error creating SSH session" }
                sshSocketIOService.sendSessionCreateErrorMessage(client)
            }
        }
    }

    private fun onTypeListener(): DataListener<String> {
        return DataListener { client, data, _ ->
            log.info { "SessionId: ${client.sessionId} Event: type Data: $data" }
            sshService.writeToSsh(client, data)
        }
    }
...
두 메소드는 각각 사용자로부터 터미널 연결 이벤트(connectTerminal) 리스너, 터미널에 글자를 입력 이벤트(type) 리스너를 리턴하게됩니다.
이제 각 리스너를 namespace에 등록해주세요.
// 생략...
	init {
        socketIOServer.addNamespace("/ssh").apply {
            addConnectListener(onConnectListener())
            addDisconnectListener(onDisconnectListener())
            addEventListener("connectTerminal", Void::class.java, onConnectTerminalListener()) // 리스너 등록
            addEventListener("type", String::class.java, onTypeListener()) // 리스너 등록
        }
    }
// 생략...
테스트
여기까지 잘 따라오셨나요? 이제 Postman을 통해 실제로 SSH가 잘 동작하는지 확인해보겠습니다.
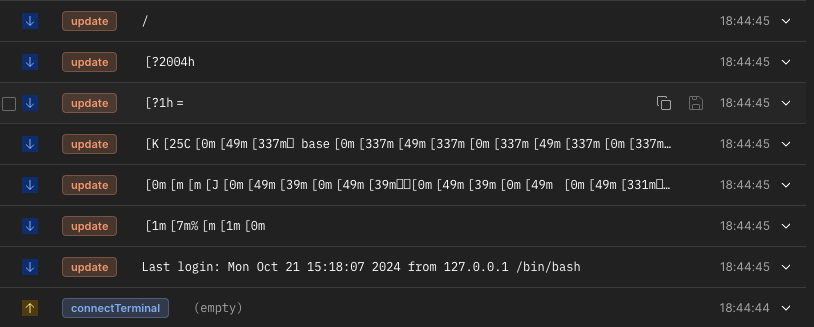

connectTerminal 이벤트를 발생시키니 저의 shell에 떠야하는 내용이 순차적으로 날아오고 있네요.
여기서 [1m[7m%~~~ 와 같은 문자열은 컨트롤 문자열입니다!
이제 type이벤트와 함께 메시지로 pwd(Enter를 눌러주세요)를 보내면 현재 접속한 사용자의 Home 경로가 정상적으로 수신되는 걸 볼 수 있습니다.
여기서 우리가 눈여겨 보아야 할점은 바로 명령어의 결과만 SSH로 타고 넘오는 게 아닌 shell에 뜨는 모든 내용이 그대로 날아오는 것인데요. 즉, 따로 프론트에서 어렵게 커서를 조작하거나 새로 프롬프트를 띄워줄 필요 없이 서버에서 날아오는 내용을 그대로 표시하면 됩니다.
이어서
다음 글에서는 프런트와 서버를 연동해보겠습니다!