SpringMVC 프로젝트 생성 및 구성하는 법에 대해 정리하며 복습해 보겠습니다.
SpringBoot와는 차이가 다소 있습니다.
InteliJ, Tomcat, maven, Java 11 기준입니다.
해당 코드들은 Github에 업로드해 두었습니다.
비즈니스 로직
이제부터는 요구사항에 맞게 개발해봅시다.
사용자
가장 먼저, 사용자 로직에 대해 구성해봅시다.
사용자 전체 목록 페이징
QueryDSL과 Thymeleaf를 세팅하며 해당하는 요구사항을 충족하였습니다.
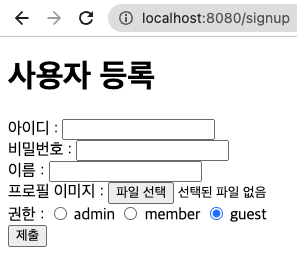
사용자 등록
사용자 등록은 Form을 이용하겠습니다.
<!DOCTYPE html>
<html lang="en">
<head>
    <meta charset="UTF-8">
    <title>UserForm</title>
</head>
<body>
<h1>사용자 등록</h1>
<form action="/user/signup" method="post" enctype="multipart/form-data">
    <label for="loginId"> 아이디 : </label>
    <input type="text" id="loginId" name="loginId" required>
    <br>
    <label for="password"> 비밀번호 : </label>
    <input type="password" id="password" name="password" required>
    <br>
    <label for="name"> 이름 : </label>
    <input type="text" id="name" name="name" required>
    <br>
    <label for="profileImage"> 프로필 이미지 : </label>
    <input type="file" id="profileImage" name="profileImage" accept="image/png, image/jpeg">
    <br>
    <span>권한 : </span>
    <span>
        <input type="radio" id="ROLE_ADMIN" name="roleName" value="ROLE_ADMIN">
        <label for="ROLE_ADMIN">admin</label>
        <input type="radio" id="ROLE_MEMBER" name="roleName" value="ROLE_MEMBER">
        <label for="ROLE_MEMBER">member</label>
        <input type="radio" id="ROLE_GUEST" name="roleName" value="ROLE_GUEST" checked>
        <label for="ROLE_GUEST">guest</label>
    </span>
    <br>
    <input type="submit" value="제출">
</form>
</body>
</html>
최대한 간소하게 만들었습니다.
다음은 컨트롤러를 작성해야 하는데, 잠시 생각해보면 해당 View는 단순한 화면일 뿐 그 어떠한 데이터도 필요하지 않습니다. 따라서 ViewResolver로 구현하도록 하겠습니다.
@EnableWebMvc
@Configuration
@ComponentScan(basePackages = "com.example.spring_mvc.domain.**.controller")
public class ServletWebAppConfig implements WebMvcConfigurer, ApplicationContextAware {
	...
    @Override
    public void addViewControllers(ViewControllerRegistry registry) {
        registry.addViewController("/signup").setViewName("userForm");
    }
    ...
이제 제출 버튼을 눌렀을 때 사용자를 등록할 수 있는 메서드를 만들어 보겠습니다.
먼저 Form data를 받아올 Dto부터 만듭시다.
@Getter
@AllArgsConstructor(access = AccessLevel.PROTECTED)
public class UserSignUpDto {
    String loginId;
    String password;
    String name;
    MultipartFile profileImage;
    Role.RoleName roleName;
}MultipartFile을 받아오려면 MultipartResolver를 등록해야 합니다. RootWebAppConfig에 등록해줍시다.
public class RootWebAppConfig {
    private static final long BYTE = 1L;
    private static final long KILOBYTE = BYTE * 1024;
    private static final long MEGABYTE = KILOBYTE * 1024;

    ...

    @Bean
    public MultipartResolver multipartResolver() {
        CommonsMultipartResolver resolver = new CommonsMultipartResolver();
        resolver.setMaxUploadSize(5 * MEGABYTE);
        return resolver;
    }
}
만약 이미지파일이 5MB가 넘으면 SizeLimitExceededException이 발생합니다.
준비가 다 되었으니, 컨트롤러를 만들어봅시다.
@RequestMapping("/user")
public class UserController {

    ...

    @PostMapping("signup")
    public String signUp(UserSignUpDto userSignUpDto) throws IOException {
        Long userId = userService.signUp(userSignUpDto);
        return "redirect:/user/" + userId;
    }
}
사용자가 생성된 후 조회를 위해 redirect를 미리 작성하였습니다.
사용자가 업로드한 이미지를 따로 저장해야 하므로, 저장을 도와주는 클래스를 하나 생성합시다.
@Component
public class ProfileImageHelper {
    private static final String RESOURCES_PATH = "images";

    private final String profileImageRealPath;

    public ProfileImageHelper(ResourceLoader resourceLoader) throws IOException {
        Resource resource = resourceLoader.getResource("classpath:" + RESOURCES_PATH);
        profileImageRealPath = resource.getURI().getPath();
    }

    public String uploadProfleImage(MultipartFile profileImage) throws IOException {
        if (Objects.isNull(profileImage) || profileImage.isEmpty()) {
            return null;
        }

        String fileName = UUID.randomUUID() + "." + FilenameUtils.getExtension(profileImage.getOriginalFilename());
        String filePath = profileImageRealPath + fileName;

        File file = new File(filePath);
        profileImage.transferTo(file);
        return fileName;
    }
}
파일 저장 위치는 resources/images로 하였습니다.
해당하는 실제 경로를 찾기 위해 생성 시 ResourceLoader를 DI받은 후 사용하였습니다.
사진을 선택하지 않았거나 파일이 비어있을 때는 저장 로직이 돌지 않게끔 작성했습니다.
저장할 때는 UUID를 통해 랜덤한 이름을 만들고 FilenameUtils를 사용하여 파일 확장자명을 획득했습니다.
해당 유틸을 사용하려면 xml 추가가 필요합니다(추가하지 않고 직접 파싱하셔도 무방합니다).
<dependency>
    <groupId>commons-fileupload</groupId>
    <artifactId>commons-fileupload</artifactId>
    <version>1.3.1</version>
</dependency>
서비스에서 이용해보도록 합시다.
@RequiredArgsConstructor
public class UserService {
    private final ProfileImageHelper profileImageHelper;
    private final UserRepository userRepository;
    private final RoleRepository roleRepository;

    ...

    @Transactional
    public Long signUp(UserSignUpDto userSignUpDto) throws IOException {
        String profileImageUrl = profileImageHelper.uploadProfileImage(userSignUpDto.getProfileImage());
        Role role = roleRepository.findByRoleName(userSignUpDto.getRoleName())
                .orElseThrow(NotFoundException::new);

        User user = User.builder()
                .loginId(userSignUpDto.getLoginId())
                .password(userSignUpDto.getPassword())
                .name(userSignUpDto.getName())
                .role(role)
                .profileImage(profileImageUrl)
                .build();

        return userRepository.save(user).getId();
    }
}roleName으로 Role을 찾을 수 있도록 JPA를 활용해봅시다.
public interface RoleRepository extends JpaRepository<Role, Integer> {
    Optional<Role> findByRoleName(Role.RoleName roleName);
}
데이터를 찾지 못 했을 때 예외를 던질 NotFoundException도 작성했습니다.
public class NotFoundException extends RuntimeException {
    public NotFoundException() {
        super("해당하는 데이터를 찾을 수 없습니다.");
    }
}
사용자를 생성하기 위해 빌더도 추가합니다.
@Table(name = "users")
@NoArgsConstructor(access = AccessLevel.PROTECTED)
public class User {

    ...

    @Builder
    private User(String loginId, String password, String name, String profileImage, Role role) {
        this.loginId = loginId;
        this.password = password;
        this.name = name;
        this.profileImage = profileImage;
        this.role = role;
    }
}
사용자 조회
사용자를 생성한 후에 바로 조회할 수 있도록 만들어봅시다.
조회용 Dto부터 생성하겠습니다.
@Getter
public class UserResponseDto {
    private final String name;

    @Setter
    private String profileImage;

    private final Role.RoleName roleName;

    @QueryProjection
    public UserResponseDto(String name, String profileImage, Role.RoleName roleName) {
        this.name = name;
        this.profileImage = profileImage;
        this.roleName = roleName;
    }
}
이름, 프로필사진, 역할을 받아올 수 있도록 하였습니다.
@GetMapping("{userId}")
public String userDetail(@PathVariable Long userId, Model model) {
    UserResponseDto user = userService.getUserDetail(userId);
    model.addAttribute("user", user);
    return "userDetail";
}
해당 Dto를 받아 View를 통해 보여주도록 하였습니다.
<!DOCTYPE html>
<html lang="en"
      xmlns:th="http://www.thymeleaf.org">
<head>
    <meta charset="UTF-8">
    <title>UserDetail</title>
</head>
<body>
<h1>사용자 세부정보</h1>
<p th:text="${user.name}"></p>
<p th:text="${user.roleName}"></p>
<img th:src="${user.profileImage}" alt="profileImage"/>
</body>
</html>
다음은 서비스를 작성해봅시다.
@Transactional(readOnly = true)
public UserResponseDto getUserDetail(long userId) {
    UserResponseDto userDetailDto = userRepository.getUserResponseDtoById(userId)
            .orElseThrow(NotFoundException::new);
    String profileImage = profileImageHelper.getProfileImage(userDetailDto.getProfileImage());
    userDetailDto.setProfileImage(profileImage);
    return userDetailDto;
}
리포지토리에서 해당 Dto에 맞게 값을 가져온 후 헬퍼를 통해 이미지를 가져오도록 하였습니다. QueryDSL로 작성해보도록 하겠습니다.
public interface UserRepositoryCustom {

    ...

    Optional<UserResponseDto> getUserResponseDtoById(long userId);
}
@RequiredArgsConstructor
public class UserRepositoryImpl implements UserRepositoryCustom {
private final JPAQueryFactory queryFactory;
...
@Override
public Optional<UserResponseDto> getUserResponseDtoById(long userId) {
return Optional.ofNullable(queryFactory
.select(new QUserResponseDto(
user.name,
user.profileImage,
role.roleName)
)
.from(user)
.innerJoin(user.role, role)
.where(user.id.eq(userId))
.fetchOne());
}
}그 후 헬퍼를 통해, 만약 지정된 프로필 이미지가 없다면 기본 이미지를 가져오도록 작성해 봅시다.
@Component
public class ProfileImageHelper {
    private static final String RESOURCES_PATH = "images";
    private static final String DEFAULT_PROFILE = "/no-image.png";

    ...

    public String getProfileImage(String profileImagePath) {
        String filePath = profileImageRealPath + profileImagePath;
        File file = new File(filePath);

        if (file.exists() && file.isFile()) {
            return "/" + RESOURCES_PATH + "/" + profileImagePath;
        }

        return "/" + RESOURCES_PATH + DEFAULT_PROFILE;
    }
}
등록된 파일이 존재하면 해당 파일을, 아니라면 기본 이미지를 반환하도록 하였습니다.
View에서 이미지 파일의 기본경로를 잘 잡을 수 있도록 addResourceHandlers도 정의해봅시다.
@ComponentScan(basePackages = "com.example.spring_mvc.domain.**.controller")
public class ServletWebAppConfig implements WebMvcConfigurer, ApplicationContextAware {

    @Override
    public void addResourceHandlers(ResourceHandlerRegistry registry) {
        registry.addResourceHandler("/images/**").addResourceLocations("classpath:/images/");
    }
}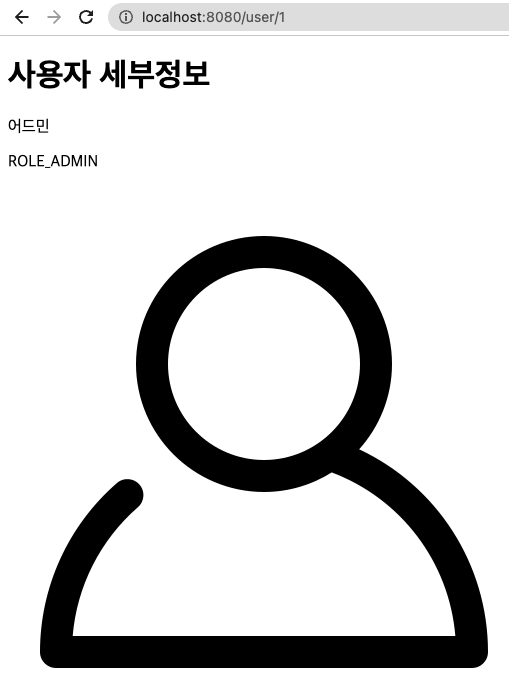

기존 이미지가 없는 사용자, 특정 이미지를 업로드한 사용자 모두 원하는대로 출력되는 것을 확인하였습니다.
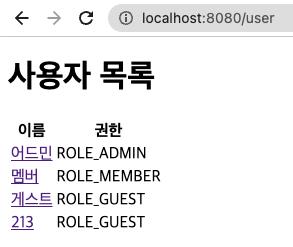
<tr th:each="user : ${usersPage.content}">
    <td><a th:href="@{|/user/${user.id}|}" th:text="${user.name}"></a></td>
    <td th:text="${user.roleName}"></td>
</tr>
이왕 하는김에 사용자 전체 목록에서도 조회를 손쉽게 할 수 있도록 링크를 만들었습니다.
사용자 역할 수정
사용자 필드 중 수정할 수 있는 항목은 비밀번호, 이름, 프로필 이미지, 역할입니다.
사용자가 직접 수정할 수 있는 부분은 비밀번호, 이름, 프로필 이미지입니다.
admin이 수정할 수 있는 부분은 역할입니다.
사용자가 직접 수정하는 부분은 추후 Spring Security를 붙인 이후 작성하도록 하겠습니다.
사용자의 역할만을 수정하는 Patch를 작성해봅시다.
@GetMapping("/{userId}/update/role")
public String roleUpdateView(@PathVariable Long userId, Model model) {
    model.addAttribute("userId", userId);
    return "userUpdateRoleForm";
}

@PatchMapping("update/{userId}/role")
public String roleUpdate(@PathVariable Long userId, @RequestParam Role.RoleName roleName) {
    userService.roleUpdate(userId, roleName);
    return "redirect:/user";
}
@Transactional
public void roleUpdate(Long userId, Role.RoleName roleName) {
User user = userRepository.findById(userId)
.orElseThrow(NotFoundException::new);
Role role = roleRepository.findByRoleName(roleName)
.orElseThrow(NotFoundException::new);
user.setRole(role);
}form에서 곧바로 Patch를 받아들일 수 있으려면 HiddenHttpMethodFilter를 추가해야 합니다. WebAppInitializer에 필터를 추가해줍시다.
@Override
protected Filter[] getServletFilters() {
    return new Filter[]{new HiddenHttpMethodFilter()};
}
form을 작성해봅시다.
<!DOCTYPE html>
<html lang="en"
      xmlns:th="http://www.thymeleaf.org">
<head>
    <meta charset="UTF-8">
    <title>UserForm</title>
</head>
<body>
<h1>사용자 등록</h1>
<form th:action="@{|/user/${userId}/update/role|}" th:method="PATCH">
    <span>권한 : </span>
    <span>
        <input type="radio" id="ROLE_ADMIN" name="roleName" value="ROLE_ADMIN">
        <label for="ROLE_ADMIN">admin</label>
        <input type="radio" id="ROLE_MEMBER" name="roleName" value="ROLE_MEMBER">
        <label for="ROLE_MEMBER">member</label>
        <input type="radio" id="ROLE_GUEST" name="roleName" value="ROLE_GUEST" checked>
        <label for="ROLE_GUEST">guest</label>
    </span>
    <br>
    <input type="submit" value="제출">
</form>
</body>
</html>userDetail.html에서 변경 링크를 제공하려면 기존의 UserResponseDto에서 id값을 넘겨줘야 합니다. 수정해보도록 합시다.
@Getter
public class UserResponseDto {
    private final Long id;
    private final String name;

    @Setter
    private String profileImage;

    private final Role.RoleName roleName;

    @QueryProjection
    public UserResponseDto(Long id, String name, String profileImage, Role.RoleName roleName) {
        this.id = id;
        this.name = name;
        this.profileImage = profileImage;
        this.roleName = roleName;
    }
}
QueryDSL 부분도 id를 넘기도록 변경합시다.
@Override
public Optional<UserResponseDto> getUserResponseDtoById(long userId) {
    return Optional.ofNullable(queryFactory
            .select(new QUserResponseDto(
                    user.id,
                    user.name,
                    user.profileImage,
                    role.roleName)
            )
            .from(user)
            .innerJoin(user.role, role)
            .where(user.id.eq(userId))
            .fetchOne());
}
사용자 세부정보에서 권한을 변경할 수 있는 링크를 제공해줍시다.
<!DOCTYPE html>
<html lang="en"
      xmlns:th="http://www.thymeleaf.org">
<head>
    <meta charset="UTF-8">
    <title>UserDetail</title>
</head>
<body>
<h1>사용자 세부정보</h1>
<p th:text="${user.name}"></p>
<p th:text="${user.roleName}"></p>
<a th:href="@{|/user/${user.id}/update/role|}">권한 변경</a>
<img th:src="${user.profileImage}" alt="profileImage"/>
</body>
</html>
사용자 삭제