[HTTP] 자격증명 헤더
자격 증명(credential)이란?
사용자를 식별하고 인증하기 위해 사용되는 정보
HTTP 인증
서버로 보내는 요청 헤더에 자신의 정보를 보냄
HTTP 인증 방식
- HTTP Basic Authentication
- HTTP Digest Authentication
HTTP Basic Authentication
사용자 정보를 Base64로 인코딩하여 HTTP 요청 헤더에 포함시킴
HTTP Basic auth 인증 4 단계

| 단계 | 헤더 | 설명 | method/status |
|---|---|---|---|
| 요청 | - 첫 번째 요청에는 인증 정보가 없음 | GET | |
| 인증 요구 | https://developer.mozilla.org/en-US/docs/Web/HTTP/Headers/WWW-Authenticate | - 서버는 사용자에게 사용자 이름과 비밀번호를 제공하라는 의미로 401 상태 정보와 함께 요청을 반려 - 서버는 WWW-Authenticate 헤더에 해당 영역을 설명해 놓음 | 401 Unauthorized |
| 인증 | https://developer.mozilla.org/ko/docs/Web/HTTP/Headers/Authorization | - 클라이언트는 요청을 다시 보냄 - 사용자 이름과 비밀번호를 나타낸 Authorization 헤더를 함께 보냄 | GET |
| 성공 | Authentication-Info | - 인증 정보가 정확하면 서버는 성공 응답 - Authentication-info 헤더에 추가 정보를 기술해서 응답하기도 함 | 200 OK |
Authorization 헤더 문법
Authorization: <type> <credentials>type
인증 타입을 의미, 보통 “Basic” 사용
- 다른 타입
Authenticating Requests: Using the Authorization Header (AWS Signature Version 4) - Amazon Simple Storage Service
Hypertext Transfer Protocol (HTTP) Authentication Scheme Registry
credentials
“Basic” 인증을 사용했다면 증명은 다음과 같이 만들어짐
if) 사용자명과 비밀번호를 사용한다면
- 사용자명과 비밀번호가 콜론을 이용하여 합쳐짐 ⇒
aladdin:opensesame - 그 결과에 대한 문자열을 base64 로 인코딩 ⇒
YWxhZGRpbjpvcGVuc2VzYW1l
웹 서버, 서버 설정
- 웹 서버
email과 password Base 64로 인코딩 → 인코딩 된 것을 header에 추가const email = document.getElementById("email").value; const password = document.getElementById("password").value; **//btoa: 문자열을 Base64로 인코딩** const basicAuth = `Basic ${btoa(email:password)}`; **//첫번째 GET** (async() => { const firstResponse = fetch("http://localhost:8000/api/user/login"); const firstData = await firstResponse.json(); })(); **//두번째 GET -> 이때 유저 정보가 포함됨** button.addEventListener("click", () => { const response = await fetch("http://localhost:80880/api/user/login", { headers: { 'Authorization': basicAuth } } const data= await logIn.json(); //이후 로직 //로그인 성공이면 화면 전환, 실패면 helper text or alert )
- 서버
요청 헤더에서 email, password 추출 → 추출한 값으로 해당 계정 존재하는지 확인//user-controller.js router.get("/login", (req, res) => { const authHeader = req.headers['authorization']; //authHeader = "Basic asdkjasdlkas=" const auth = auth.split(' ')[1]; //auth = 'asdkjasdlkas' //사용자가 처음 페이지를 들어와서 authHeader가 없는 경우 if(!authHeader) { res.set('WWW-Authenticate', 'Basic realm="Please enter your username and password"'); res.status(401).send('Authentication required'); } //로그인 버튼등을 클릭해서 사용자 정보가 authHeader에 있는 경우 if (authHeader) { const auth = authHeader.split(' ')[1] const [email, password] = Buffer.from(auth, 'base64).toString().split(':'); // 유저 찾기 const user = users.find(user => user.email=== email && user.password === password); //해당 유저가 없는 경우 if(!user) { res.set('WWW-Authenticate', 'Basic realm="Please enter your username and password"'); res.status(401).send('Authentication failed'); } //해당 유저가 있는 경우 res.status(200).json({status: 200, message: "", data: ~}); } })
HTTP Basic Authentication 취약점
- 사용자의 정보가 평문으로 네트워크를 통해 전달되기 때문에 안전하지 않음 Basic으로 인코딩 되어있으나 복호화 가능하기 때문에 ⇒ HTTPS/TLS와 함께 사용되어야 안전
HTTP Digest Authentication
💡 사용자 정보를 해시 값으로 전송하여 HTTP 요청 헤더에 포함시킴- Basic Authentication의 취약점인 보안적인 측면을 개선하기 위해 개발
- 비밀번호를 평문으로 전송하지 않음
- 수학적인 연산으로 데이터를 계산
- 잘 사용하지 않음
HTTP Digest auth 인증 단계
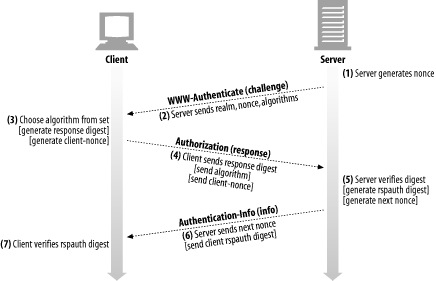
JWT (JSON Web Token)
웹 표준으로 정의된 액세스 토큰을 전송하기 위한 방식
⇒ 사용자의 세션 상태를 유지하거나 사용자 인증에 사용
JWT 인증 단계
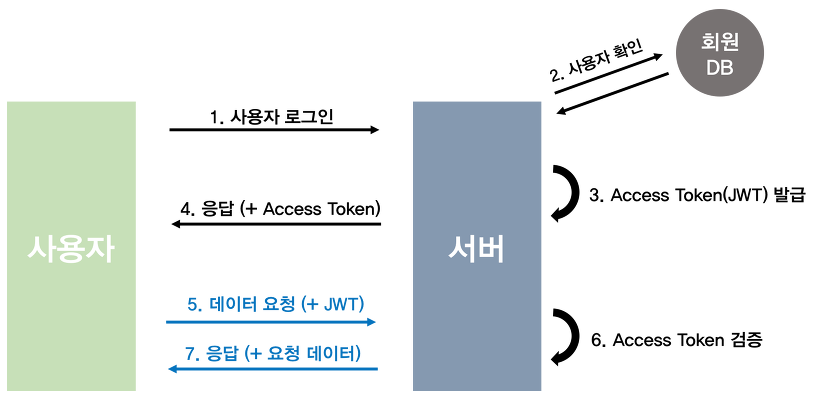
- 사용자 로그인
- 서버에서 토큰 생성
- 사용자 인증 성공 시, 서버는 사용자를 위한 JWT 생성
- 클라이언트에게 JWT 응답 전송
- 클라이언트 저장 서버에서 전송받은 JWT를 local storage나 session storage 저장
- 클라이언트가 요청 시 저장된 토큰 전송 HTTP 헤더에 저장된 JWT를 포함시켜 전송
- 서버에서 토큰 검증 JWT 유효성 검증
웹 서버, 서버 설정
- 웹 서버
자신의 token을 headers에 추가 → 서버로 요청- JWT 토큰이 있는 경우
const token = 'JWT 토큰'; fetch("주소", { headers: { 'Authorization': `Bearer ${token}` } }).then (responese => { //이후 로직 }) - JWT 없는 경우 토큰 없이 보낸 후, response로 받아온 토큰을 localStorage나 sessionStorage에 저장 이후 다시 요청을 보낼 때 storage에 꺼내서
- JWT 토큰이 있는 경우
- 서버
- JWT 토큰이 있는 경우’
//토큰 검증 jwt.verify(token.split(' ')[1], secretKey, (err, decoded) => { if (err) { res.sendStatus(403); else { req.decoded = decoded; next(); } }); - JWT 토큰이 없는 경우 req 헤더에 포함된 혹은 바디에 포함된 유저 정보로 유저가 있는지 확인 유저가 있다면 토큰 생성하여 웹 서버로 전송
//토큰 생성

const token = jwt.sign({ username }, secretKey, { expiresIn: '1h' });

res.json({ token });
- JWT 토큰이 있는 경우’
참고 문헌
- HTTP 인증 방식
[보안] 폼인증 vs Basic 인증 vs 다이제스트 인증

'◡'✿ 꿈을 찾아가보자고~ '◡'✿