ChatWindow MVVM 리팩토링 설명
ChatWindow MVVM 리팩토링 설명
이 문서는 ChatWindow와 관련된 코드들이 어떻게 MVVM(Model-View-ViewModel) 패턴을 사용하여 리팩토링되었는지 설명합니다. UI(View)와 로직(ViewModel)을 분리하여 코드의 재사용성, 테스트 용이성, 유지보수성을 높였습니다.
1. ChatWindowViewModel.cs - 뷰모델
ViewModel은 View(UI)가 표시할 데이터와 실행할 명령을 모두 가지고 있는 핵심 파트입니다. UI의 모든 로직은 이 파일에 구현됩니다.
// GVisionWpf.UIs.ViewModels/ChatWindowViewModel.cs

// CommunityToolkit.Mvvm 라이브러리를 사용하여 MVVM 패턴을 쉽게 구현
using CommunityToolkit.Mvvm.ComponentModel;
using CommunityToolkit.Mvvm.Input;


namespace GVisionWpf.UIs.ViewModels
{
    // ViewModelBase를 상속받아 Property 변경 알림 기능을 자동으로 구현(ObservableObject)
    public partial class ChatWindowViewModel : ViewModelBase
    {

        // [ObservableProperty]는 `_chatInput` 필드를 위한 `ChatInput` 프로퍼티를 자동으로 생성
        // 프로퍼티 값이 변경되면 UI에 자동으로 알려준다 (INotifyPropertyChanged)
        [ObservableProperty]
        private string _chatInput = string.Empty;

        [ObservableProperty]
        private string _statusText = string.Empty;

        // 채팅 로그를 담는 컬렉션 ObservableCollection은 아이템이 추가/삭제될 때 UI가 자동으로 갱신된다
        public ObservableCollection<string> ChatLog { get; } = new();

        // 채팅의 버튼에서 사용할 Command들
        public ICommand SendChatCommand { get; }
        public ICommand NewChatCommand { get; }
        public ICommand PreviousChatsCommand { get; }

        public ChatWindowViewModel()
        {
            InitChatActions(); // 채팅 명령에 따른 액션들을 초기화
            LogSystem("채팅창 준비 완료");

            // RelayCommand를 사용하여 ICommand를 구현, 버튼 클릭 시 ExecuteChatInput 메서드 실행
            SendChatCommand = new RelayCommand(ExecuteChatInput);
            NewChatCommand = new RelayCommand(() => MessageBox.Show("newChatButton_Click 버튼 클릭됨!"));
            PreviousChatsCommand = new RelayCommand(() => MessageBox.Show("previousChatsButton_Click 버튼 클릭됨!"));
        }

        // 사용자가 입력한 메시지를 로그에 추가하는 메서드
        private void LogUser(string message)
        {
            var line = $"[User] {DateTime.Now:HH:mm:ss}  {message}";
            ChatLog.Insert(0, line); // 리스트의 맨 앞에 추가하여 최신 메시지가 위로 오게 한다
            TrimChatLogIfNeeded();
        }

        // 시스템 메시지를 로그에 추가하는 메서드
        private void LogSystem(string message)
        {
            var line = $"[System] {DateTime.Now:HH:mm:ss}  {message}";
            ChatLog.Insert(0, line);
            TrimChatLogIfNeeded();
        }

        // 채팅 로그가 최대 개수(200)를 넘지 않도록 가장 오래된 로그를 삭제합
        private void TrimChatLogIfNeeded()
        {
            if (ChatLog.Count > ChatLogMax)
            {
                ChatLog.RemoveAt(ChatLog.Count - 1);
            }
        }

        // SendChatCommand가 실행될 때 호출되는 핵심 로직
        private void ExecuteChatInput()
        {


            ChatInput = string.Empty;
        }
    }
}
2. ChatWindow.xaml - 뷰(UI)
View는 사용자에게 보여지는 UI 요소를 정의합니다. XAML 코드는 ViewModel의 데이터와 '바인딩(Binding)'되어 동적으로 변화합니다.
<!-- GVisionWpf.UIs.Frames.Windows/ChatWindow.xaml -->

<Window x:Class="GVisionWpf.UIs.Frames.Windows.ChatWindow"
        xmlns:viewModels="clr-namespace:GVisionWpf.UIs.ViewModels"
        ...>


    <!-- ViewModel을 ChatWindowViewModel로 선정 Window 내부의 모든 UI 요소는 ChatWindowViewModel의 프로퍼티와 바인딩될 수 있다. -->
    <Window.DataContext>
        <viewModels:ChatWindowViewModel />
    </Window.DataContext>

    <Grid>

        <!-- 버튼을 클릭하면 ViewModel의 NewChatCommand가 실행된다 -->
        <Button Content="새 채팅"
                Command="{Binding NewChatCommand}"/>

        <!-- 채팅 기록을 보여주는 ListBox ->
<!-- ItemsSource가 ViewModel의 ChatLog 프로퍼티와 바인딩-->
<!-- ViewModel의 ChatLog 컬렉션에 아이템이 추가/삭제되면 ListBox가 자동으로 업데이트된다. -->
        <ListBox ItemsSource="{Binding ChatLog}">
        </ListBox>

        <!-- 사용자 입력을 받는 TextBox -->
        <!-- Text 속성이 ViewModel의 ChatInput 프로퍼티와 바인딩 -->
<!-- UpdateSourceTrigger=PropertyChanged는 텍스트를 입력할 때마다 ViewModel에 즉시 반영되도록 한다 -->
        <TextBox Text="{Binding ChatInput, UpdateSourceTrigger=PropertyChanged}">
            <TextBox.InputBindings>
                <!-- Enter 키를 누르면 SendChatCommand를 실행하도록 바인딩합니다. -->
                <KeyBinding Key="Enter" Command="{Binding SendChatCommand}" />
            </TextBox.InputBindings>
        </TextBox>

        <!-- 전송 버튼입니다. 클릭 시 SendChatCommand를 실행한다 -->
        <Button Command="{Binding SendChatCommand}">
            <!-- ... 버튼 아이콘 ... -->
        </Button>

        <!-- 상태 메시지를 표시하는 TextBlock -->
        <!-- Text 속성이 ViewModel의 StatusText 프로퍼티와 바인딩 -->
        <TextBlock Text="{Binding StatusText}" />
    </Grid>
</Window>
3. ChatWindow.xaml.cs - 코드 비하인드
MVVM 패턴에서 코드 비하인드 파일은 최소한의 역할만 수행합니다. 주로 UI 생성자만 남아있게 됩니다.
// GVisionWpf.UIs.Frames.Windows/ChatWindow.xaml.cs
using System.Windows;
namespace GVisionWpf.UIs.Frames.Windows
{
public partial class ChatWindow : Window
{
public ChatWindow()
{
InitializeComponent();
}
}
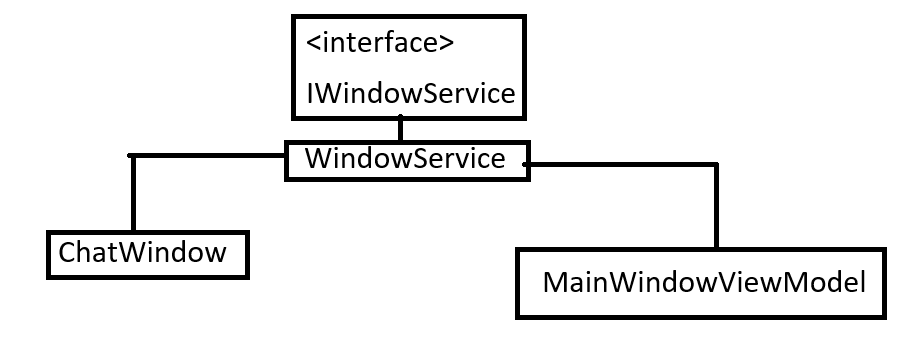
}4. 윈도우 생성 및 표시 (IWindowService, WindowService, MainWindowViewModel)

코딩하는 알파카