1. 프로젝트 개요
Django CRUD를 학습하면서, Dear 프로젝트를 만들어 볼 것이다.

1.1 Dear의 의미
Dear은 Daily Events and Affective Reactions의 약어다.
1.2 주요 특징
서비스의 주요 특징은 사용자가 오늘 하루 있었던 일과 관련된
경험 태그하나와 그로 인해 느낀감정 태그하나를 선택하여 글을 작성하고, 다른 사람들이 작성한 글 중, 태그가 일치하는 글을 볼 수 있는 것이다.
1.3 기대 효과
Dear은 일상의 사건과 감정을 중심으로 하는 소셜 네트워크로서, 사용자들이 자신의 경험을 기반으로 비슷한 경험을 한 사용자를 찾아 서로의 이야기에 공감하며 상호작용하는 공간을 제공할 수 있다.
2.프로젝트 생성 및 설정
2.1 가상환경 설정
Dear 프로젝트를 생성하기 전,
가상환경 설정을 위해 django 디렉토리를 하나 생성해준다.
mkdir djangodjango 디렉토리에 기존에 생성해둔
django-envs가상환경을 적용해준다
cd django
pyenv local django-envs
2.2 장고 프로젝트 생성
Dear 프로젝트를 생성한다.
django-admin startproject dear프로젝트 루트로 이동 후 vscode를 실행한다.
cd dear
code .
2.3 프로젝트 초기 설정
settings.py에서 타임존을 한국 시간으로 변경한다.
#settings.py

TIME_ZONE = 'Asia/Seoul'
2.4 앱 생성
posts 앱을 생성한다. 터미널에서 명령어를 입력한다.
python manage.py startapp posts앱을 생성한 뒤에는
settings.py에서 등록해야 한다.
#settings.py

INSTALLED_APPS = [
    'django.contrib.admin',
    'django.contrib.auth',
    'django.contrib.contenttypes',
    'django.contrib.sessions',
    'django.contrib.messages',
    'django.contrib.staticfiles',
    'posts'  #등록
]
위를 살펴보면 posts 말고도 장고가 기본적으로 제공하는 앱들이 있다. 해당 앱들이 필요로 하는 데이터 구조를 생성하기 위해서
migrate명령어를 입력한다.
python manage.py migrate명령어를 입력하면
db.sqlite3파일이 생성된 것을 확인할 수 있다.
2.5 개발서버 실행
개발 서버를 실행하고 서버가 정상적으로 동작하는지 확인한다.
python manage.py runserver아래와 같이 잘 동작하는 것을 알 수 있다.
3. URL 구조 작성
Dear의 url 구조는 다음과 같다.
- 홈페이지
- 내가 작성한 포스트 목록 (R)
- 오늘 내가 작성한 포스트와 태그가 일치하는 포스트 목록 (R)
- 포스트 상세 (R)
- 포스트 작성 (C)
- 포스트 수정 (U)
- 포스트 삭제 (D)
다만 현재 학습하는 토픽에서는 기본적인 포스팅 구조만을 배우고 있기에 하단의 url 구조를 따르고, 추후 변경하는 것을 목표로 한다.
- 홈페이지
- 전체 포스트 목록 (R)
- 포스트 상세 (R)
- 포스트 작성 (C)
- 포스트 수정 (U)
- 포스트 삭제 (D)
3.1 프로젝트 구성 디렉토리 URL 패턴 작성
프로젝트 구성 디렉토리의
urls.py를 작성한다.
#dear/urls.py

from django.contrib import admin
from django.urls import path, include  #include 추가

urlpatterns = [
    path('admin/', admin.site.urls),
    path('', include('posts.urls')),  #작성
]
이렇게 작성하면 로컬호스트:8000으로 접속하거나 로컬호스트:8000/빈url로 접속하면 가장 먼저
posts앱의urls를 확인하게 된다.
3.2 posts 앱 URL 패턴 작성
posts 앱에 urls가 없으니 새로 생성하고 코드를 작성해 준다.
#posts/urls.py

from django.urls import path  #작성
from . import views  #작성

urlpatterns = [
    path('', views.index),
    path('posts/', views.post_list),
    path('posts/new', views.post_create),
    path('posts/<int:post_id>', views.post_detail),
    path('posts/<int:post_id>/edit', views.post_update),
    path('posts/<int:post_id>/delete', views.post_delete),
]
3.2.1 각 코드의 의미
기본적으로 로컬호스트:8000/ 으로 접속하면 장고는 프로젝트 구성 디렉토리의 url 패턴에 따라 posts 앱의 url 패턴을 확인한다.
path('', views.index)는로컬호스트:8000/{빈 url}로 접속하면 views의 index 함수를 확인하라는 내용이다.
path('posts/', views.post_list)는로컬호스트:8000/posts로 접속하면 views의 post_list 함수를 확인하라는 내용이다.
path('posts/new', views.post_create)는로컬호스트:8000/posts/new로 접속하면 views의 post_create 함수를 확인하라는 내용이다.
path('posts/<int:post_id>', views.post_detail)는로컬호스트:8000/posts/{url}로 접속하면 {url}을 정수로 보고 post_id에 담아서 views의 post_detail 함수를 확인하라는 내용이다.
path('posts/<int:post_id>/edit', views.post_update)는로컬호스트:8000/posts/{url}/edit으로 접속하면 {url}을 정수로 보고 post_id에 담아서 views의 post_update 함수를 확인하라는 내용이다.
path('posts/<int:post_id>/delete', views.post_delete)는로컬호스트:8000/posts/{url}/delete로 접속하면 {url}을 정수로 보고 post_id에 담아서 views의 post_delete 함수를 확인하라는 내용이다.
3.2.2 URL 패턴 주석처리
현재는 각 url 패턴과 매칭되는 views가 정의되지 않았으니 개발 서버를 실행하면 에러가 날 것이다. 따라서 url 패턴을 주석처리 해둔다.
from django.urls import path
from . import views

urlpatterns = [
    # path('', views.index),
    # path('posts/', views.post_list),
    # path('posts/new', views.post_create),
    # path('posts/<int:post_id>', views.post_detail),
    # path('posts/<int:post_id>/edit', views.post_update),
    # path('posts/<int:post_id>/delete', views.post_delete),
]
4. model 정의
4.1 Post 모델 정의
데이터베이스에 접근하기 위해서는 model을 정의해줘야 한다. posts 앱 디렉토리의
models.py를 작성한다.
#posts/models.py

from django.db import models

class Post(models.Model):
    title = models.CharField(max_length=50)
    content = models.TextField()
    dt_created = models.DateTimeField(verbose_name="Date Created", auto_now_add=True)
    dt_modified = models.DateTimeField(verbose_name="Date Modified", auto_now=True)

    def __str__(self):
        return self.title
4.1.1 각 코드의 의미
from django.db import models
장고 프레임워크의 db 모듈에서 models 클래스를 불러온다
class Post(models.Model):
Post 라는 이름의 모델 클래스를 생성한다.
title = models.CharField(max_length=50)
Post 모델에 최대 길이가 50인 문자열 컬럼 title을 추가한다.
content = models.TextField()
Post 모델에 최대 길이 제한이 없는 문자열 컬럼 content를 추가한다.
dt_created = models.DateTimeField(verbose_name="Date Created", auto_now_add=True)
Post 모델에 Date Created라는 별명을 가졌으며 인스턴스 생성 시 생성 시간이 자동으로 입력되는 컬럼 dt_created를 추가한다.
dt_modified = models.DateTimeField(verbose_name="Date Modified", auto_now=True)
Post 모델에 Date Modified라는 별명을 가졌으며 인스턴스 변경 시 변경 시간이 자동으로 입력되는 컬럼 dt_modified를 추가한다.
마지막 던더 str 함수는 title을 문자열로 반환하는 역할을 한다.
shell 환경에서 데이터를 불러오면 각 데이터의 title을 표기한다.def __str__(self): return self.title
4.2 migration 생성 및 mirgrate
모델이 생성되거나 변경되면
makemigrations으로 새로운 migrations 파일을 생성하고migrate를 통해 실제 데이터베이스에 적용해야 한다. 터미널에서 아래의 명령어를 입력한다.
python manage.py makemigrations #migration 파일 생성
python manage.py migrate #데이터베이스에 적용
5. 더미데이터
5.1 더미데이터 생성
더미데이터를 생성하는 방법을 알아보자
shell환경을 불러온다.python manage.py shell #shell 환경을 불러오는 명령어
모델의
Post클래스를 불러온다.from posts.models import Post #posts 디렉토리의 모델 파일에서 Post 클래스를 불러온다
데이터가 있는지 확인하기 위해 모든 데이터를 불러온다.
Post.objects.all() #모든 데이터를 불러오는 명령어
아직 생성된 데이터가 없으니 데이터를 수동으로 생성해본다.
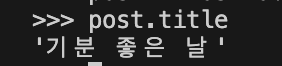
Post.objects.create(title = "기분 좋은 날",content = "오늘은 평소와 달리 기분 좋은 아침을 맞이했다.")
데이터가 생성 되었다면 다음과 같이 출력될 것이다.
출력 결과에 위처럼 데이터의
title이 호출되는 이유는던더 str함수에서 self.title을 반환하기 때문이다def __str__(self): return self.title

생성된 데이터를 자세히 살펴보기 위해 아래의 명령어를 실행하면
Post.objects.all().values() #모델의 모든 데이터를 모든 컬럼의 값을 포함하여 호출
다음과 같이 출력된다.
Post 클래스의
dt_created와dt_modified컬럼은auto_now와auto_now_add속성을 사용했기 때문에 직접 입력하지 않아도자동으로 생성되는 것을 확인할 수 있다.

5.2 더미데이터 수정
이번에는 더미데이터를 수정하는 방법을 알아보자.
데이터 수정을 위해서는 먼저 데이터를 불러와야 한다. 따라서 post라는 변수에 id가 1인 객체를 지정한다.
post = Post.objects.get(id=1) #id가 1인 객체를 post 변수에 삽입
post.title을 입력해 현재 title을 확인한다.
post.title #post변수의 안쪽 속성에 접근해 title 컬럼의 값을 확인
이제 post 변수에 담긴 데이터의 title을 변경해보자.
post.title = "기분이 너어무 좋은 날"
post.title로 확인해보니 변경이 완료됐다.

데이터베이스에서도 변경되었는지 확인해보자.
Post.objects.all()
변경되지 않았다. 여전히 "기분 좋은 날"로 나타난다.

그 이유는 저장을 하지 않았기 때문이다.
post.save() #데이터 변경내용 저장
저장하고 다시 확인해보면
title과dt_modified가 변경된 것을 확인할 수 있다.

5.2.1 dt_created와 dt_modified가 안맞는다?
분명
settings.py의 타임존을 Asia/Seoul 로 변경했는데 왜 모델 인스턴스의 시간은UTC로 표기가 되는 것일까?
이는
settings.py의USE_TZ와 관련있다. 장고는USE_TZ = True인 경우 설정한 타임존이 템플릿과 폼에만 영향을 끼친다. 따라서USE_TZ = False로 변경하면 해결된다.
5.3 관리자 페이지에서 데이터 수정
이번에는 shell 환경이 아닌 관리자 페이지에서 데이터를 수정해보자.
5.3.1 관리자 페이지에 모델 등록
admin.py에 Post 모델을 등록한다.#posts/admin.py from django.contrib import admin from .models import Post #모델에서 Post 클래스를 불러온다 # Register your models here. admin.site.register(Post) #Post를 관리자 페이지에 등록한다
5.3.2 관리자 계정 생성
shell 환경을 종료한다.
exit() #shell 환경 종료
관리자 계정을 생성한다.
python manage.py createsuperuser #관리자 계정 생성
5.3.3 관리자 페이지 접속
개발서버를 실행한다.
python manage.py runserver
로컬호스트:8000/admin으로 접속한다.
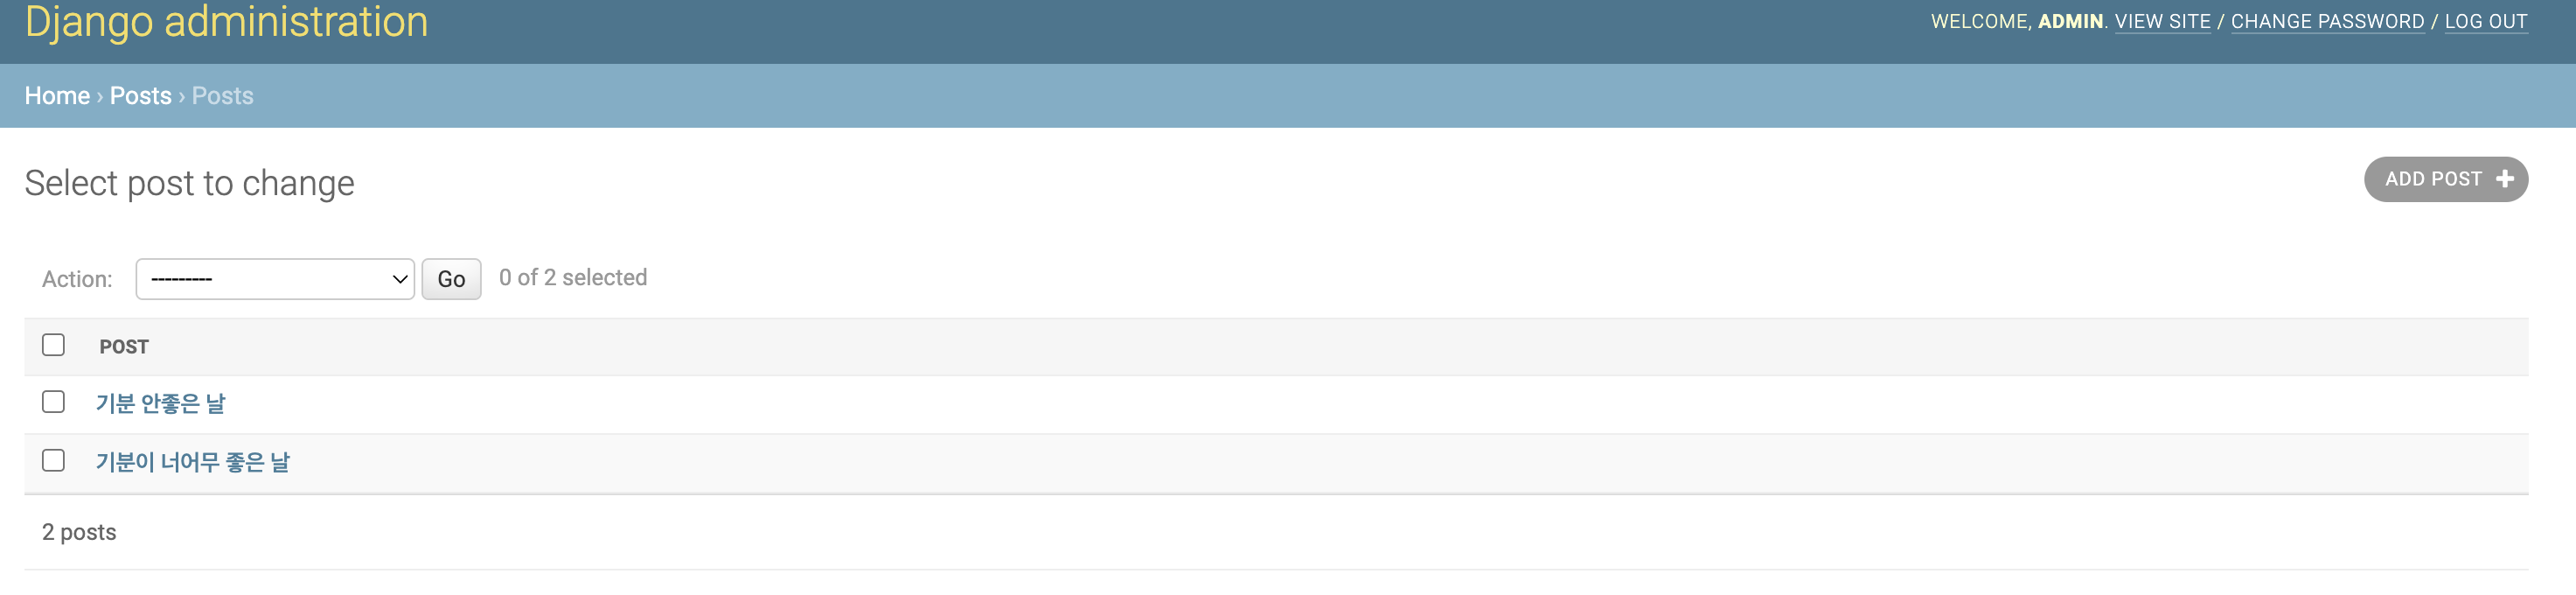
관리자로 로그인하면 Posts가 생성된 것을 확인할 수 있다.
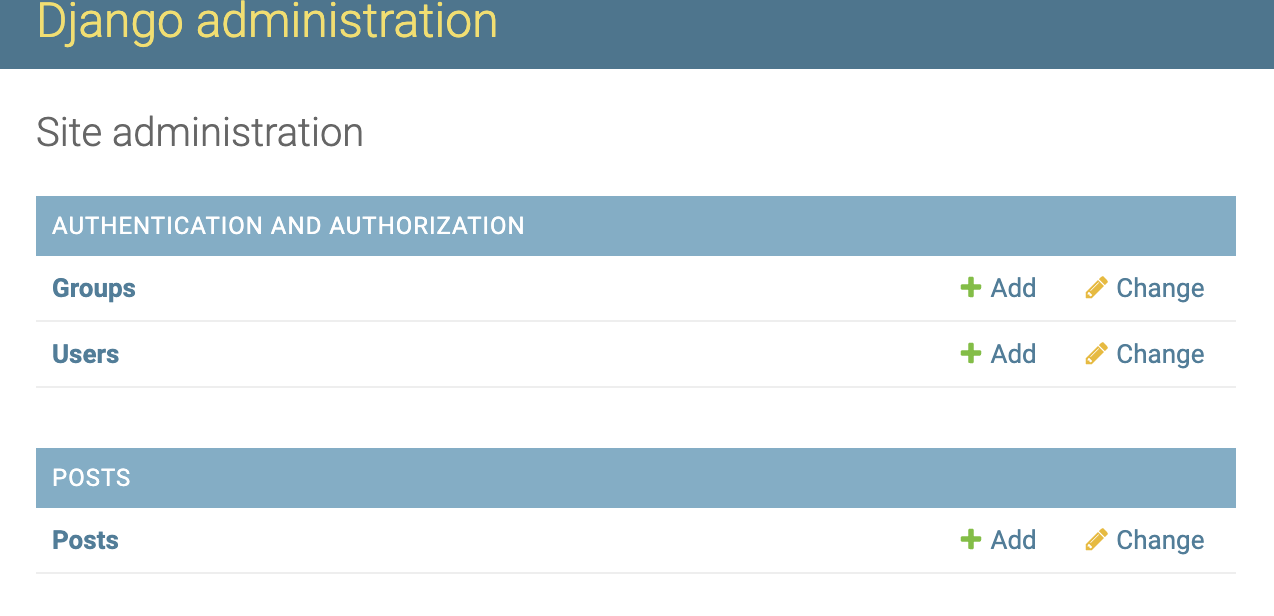
Posts를 클릭하면 shell 환경으로 작성한 데이터를 확인할 수 있다.
6. 포스트 목록 페이지 만들기
6.1 url 패턴 주석 해제
posts 앱 디렉토리의
urls.py의url 패턴중포스트 목록 페이지에 해당하는 코드를주석 해제한다.
from django.urls import path
from . import views
urlpatterns = [
# path('', views.index),
path('posts/', views.post_list), #주석 해제
# path('posts/new', views.post_create),
# path('posts/<int:post_id>', views.post_detail),
# path('posts/<int:post_id>/edit', views.post_update),
# path('posts/<int:post_id>/delete', views.post_delete),
]6.2 views.py 작성
로컬호스트:8000/posts/ 경로로 접속 시 매칭되는 views의
post_list함수를 작성한다.
from django.shortcuts import render
# Create your views here.
def post_list(request):
return render(request, 'posts/post_list.html')
post_list함수는 요청이 들어오면 posts 앱 디렉토리의post_list.html템플릿을 렌더한다.
6.3 post_list.html 템플릿 작성
6.3.1 templates 디렉토리 생성
먼저 templates 디렉토리를 생성한다. templates과 정적 파일은
샌드위치 구조의 디렉토리를 생성해야 한다.
6.3.2 base.html 템플릿 생성
자주 사용되며 변경되지 않는 내용은 부모 템플릿을 통해 상속받도록
temlpates/posts에base.html을 생성하고 작성한다.
<!-- base.html -->
<!DOCTYPE html>
<html lang="en">
<head>
<meta charset="UTF-8">
<meta name="viewport" content="width=device-width, initial-scale=1.0">
<title>Dear :: Daily Events and Affective Reactions</title>
</head>
<body>
{% block post_container %} <!--상속받지 않는 부분-->
{% endblock post_container %}
</body>
</html>상속받지 않는 부분은
block영역을 지정하고post_container로 명명한다.
6.3.3 post_list.html 템플릿 생성
base.html을 상속받는
post_list.html을 생성하고 내용을 작성한다.
{% extends "./base.html" %} <!--부모 템플릿 상속-->
{% block post_container %} <!--상속받지 않는 영역-->
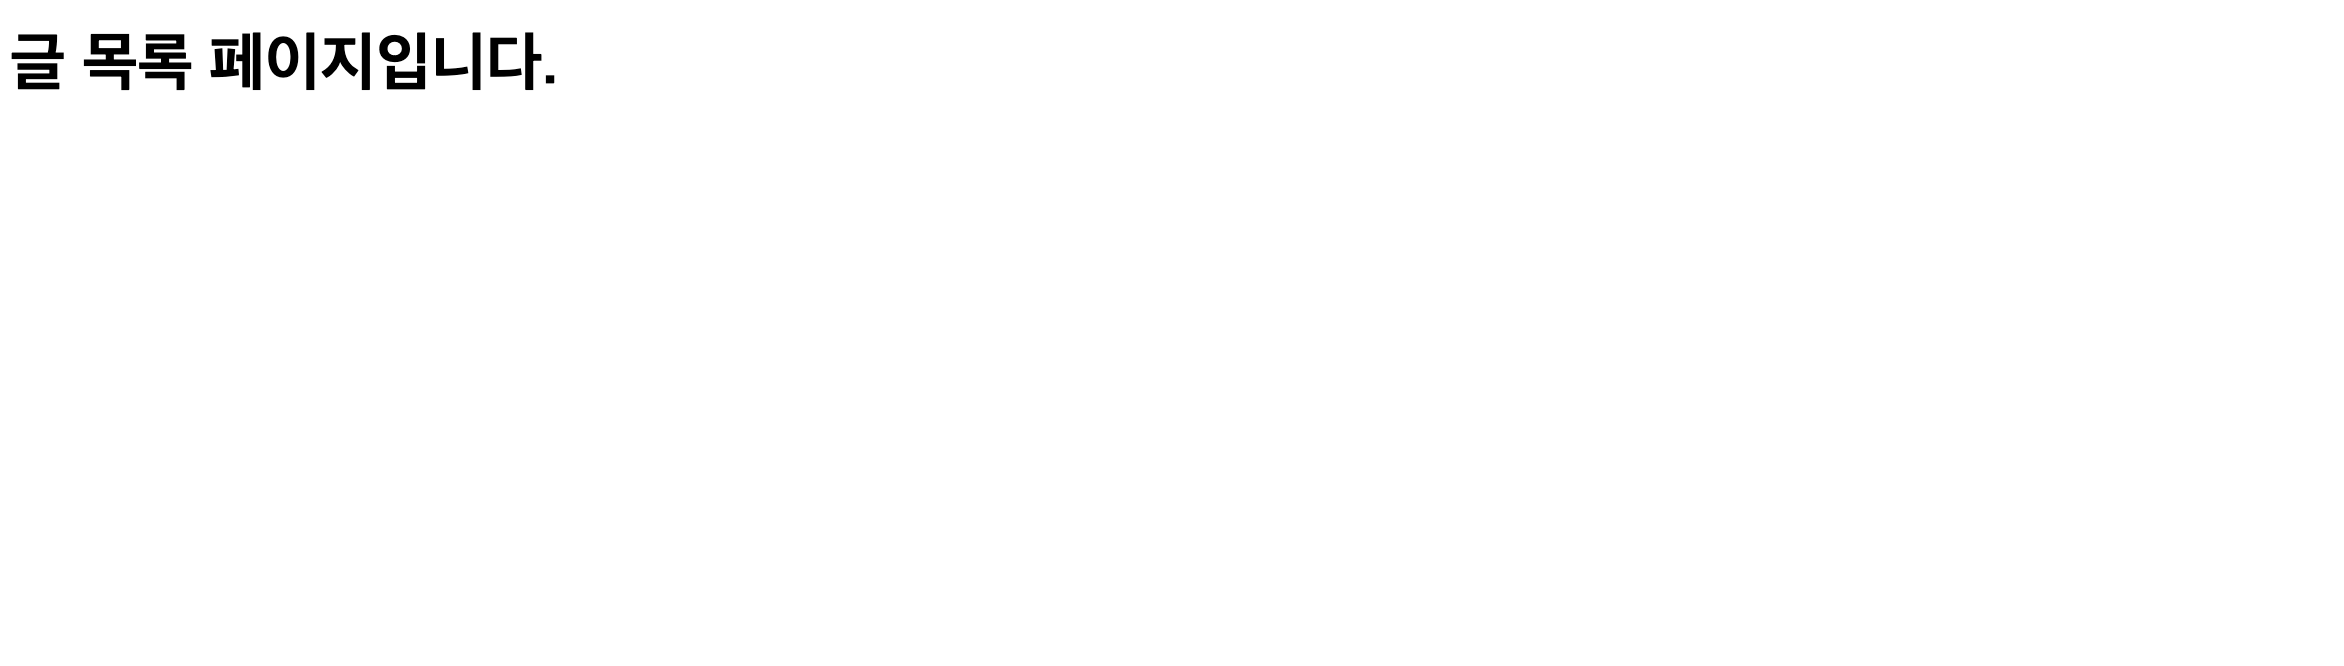
<h1>글 목록 페이지입니다.</h1>
{% endblock post_container %}base.html을 상속받는
extends템플릿 태그를 작성하고, container 블록에 <h1> 태그를 입력한다.
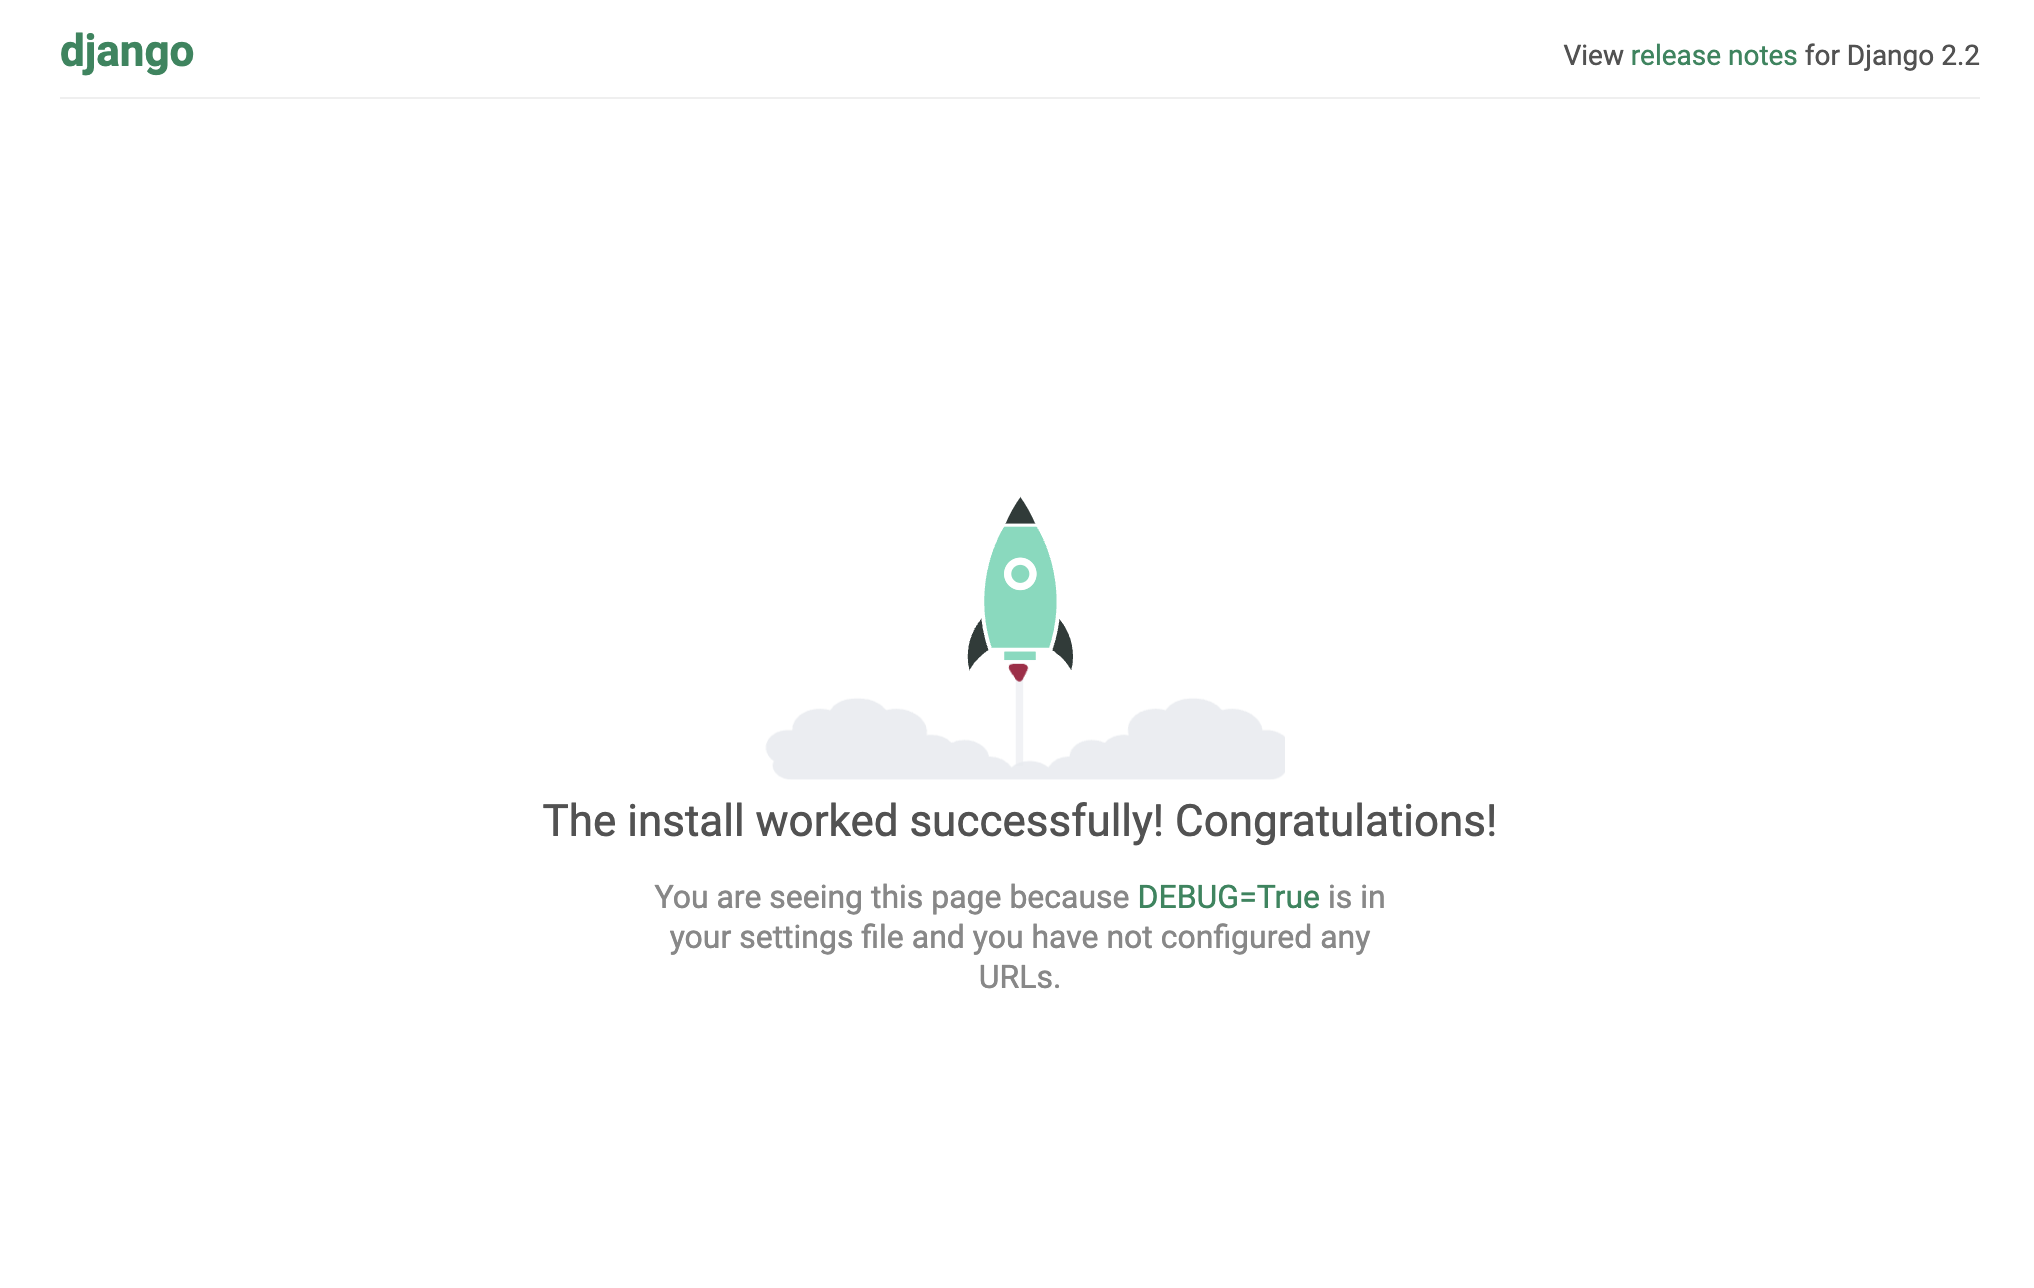
개발 서버를 실행하고 접속하면 다음과 같이 나타난다.
6.4 view에 데이터를 불러오는 로직 추가
post_list 함수에 Post 모델을 통해 데이터를 가져오는 로직을 추가한다.
# views.py
from django.shortcuts import render
from .models import Post
# Create your views here.
def post_list(request):
posts = Post.objects.all()
context = {"posts" : posts}
return render(request, 'posts/post_list.html', context=context)6.4.1 각 코드의 의미
현재 디렉토리의
models파일에서Post모델을 불러온다.from .models import Post
posts변수에Post 모델의 모든 데이터를 불러오고,context변수에 사전형으로 담아서 post_list.html 템플릿을 렌더할 때 함께 전달한다.def post_list(request): posts = Post.objects.all() context = {"posts" : posts} return render(request, 'posts/post_list.html', context=context)
6.5 post_list 템플릿 수정
view로부터 context로 전달받은 데이터를 호출할 수 있도록
템플릿 태그를 사용해 템플릿을 수정한다.
<!--post_list.html-->
{% extends "./base.html" %}
{% block post_container %}
<h1>글 목록 페이지입니다.</h1>
<table>
<tr>
<td>제목</td>
<td>작성일</td>
<td>수정일</td>
</tr>
{% for post in posts %}
<tr>
<td>{{post.title}}</td>
<td>{{post.dt_created}}</td>
<td>{{post.dt_modified}}</td>
</tr>
{% endfor %}
</table>
{% endblock post_container %}각 게시글이 쉽게 구분될 수 있도록
테이블 태그를 사용했다.
6.5.1 각 코드의 의미
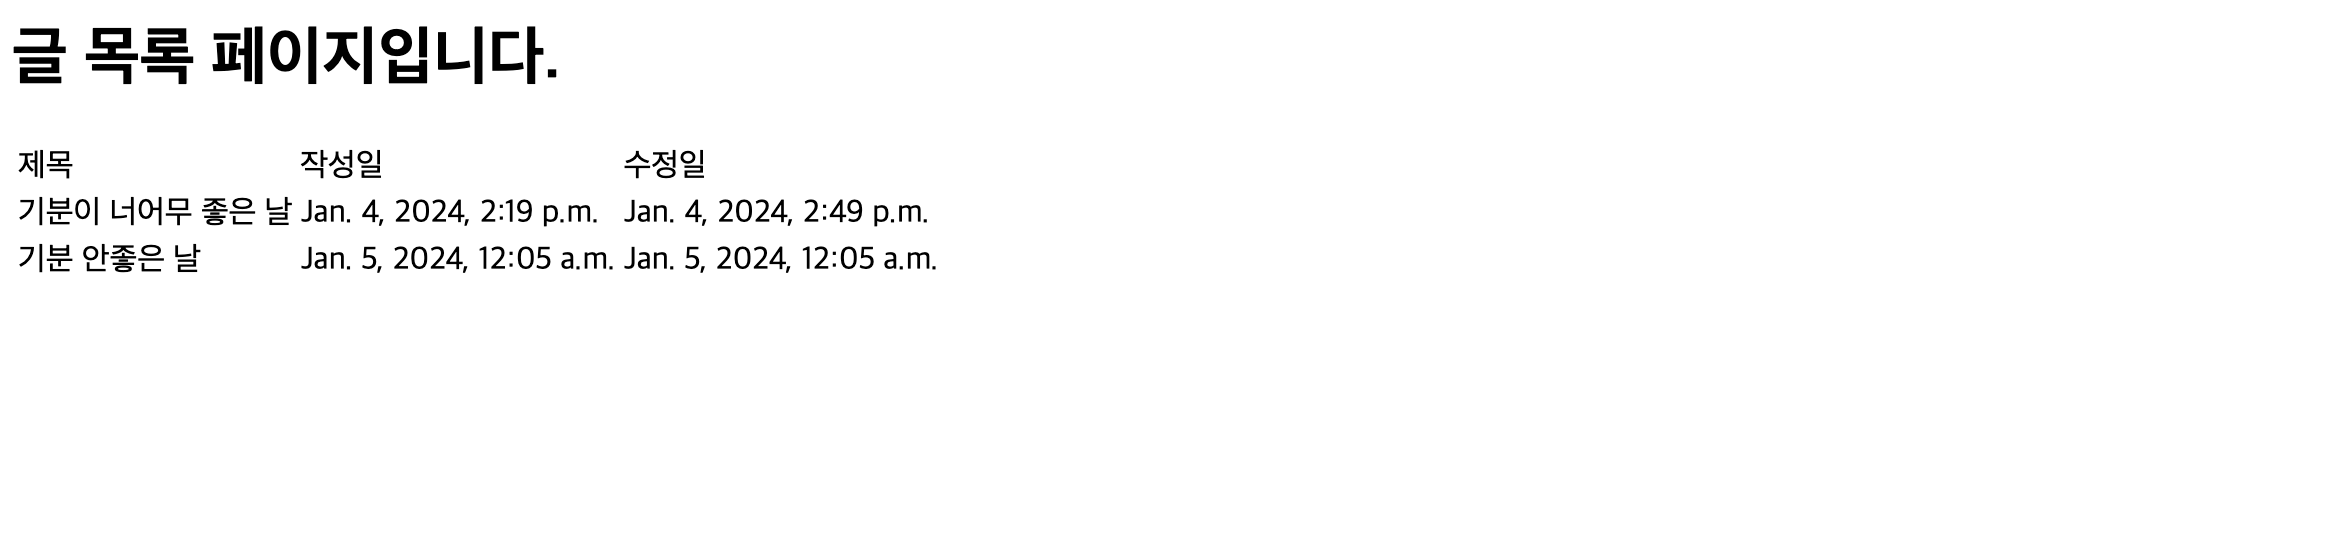
for 템플릿 태그를 사용해사전형으로 전달받은 데이터를 post 이름으로 안쪽 속성에 접근해title,de_created,dt_modified를 각 <td> 태그에 작성하는 것을 반복한다.{% for post in posts %} <tr> <td>{{post.title}}</td> <td>{{post.dt_created}}</td> <td>{{post.dt_modified}}</td> </tr> {% endfor %}
6.5.2 결과
개발 서버를 실행하고 접속해보면 아래와 같이 호출된다.
7. 포스트 상세 페이지 만들기
7.1 url 패턴 설정
기존에 작성한
urls.py에서 포스트 상세 페이지에 대한 url 패턴을 주석해제 한다.
#posts/urls.py
from django.urls import path
from . import views
urlpatterns = [
# path('', views.index),
path('posts/', views.post_list),
# path('posts/new', views.post_create),
path('posts/<int:post_id>', views.post_detail), #주석 해제
# path('posts/<int:post_id>/edit', views.post_update),
# path('posts/<int:post_id>/delete', views.post_delete),
]7.2 post_detail 뷰 작성
post_detail뷰를 작성한다.
#posts/views.py
from django.shortcuts import render
from .models import Post
# Create your views here.
def post_list(request):
posts = Post.objects.all()
context = {"posts" : posts}
return render(request, 'posts/post_list.html', context=context)
def post_detail(request, post_id): #작성
post = Post.objects.get(id=post_id)
context = {"post": post}
return render(request, 'posts/post_detail.html', context=context)
7.2.1 각 코드의 의미
post_detail함수는 request와post_id를 파라미터로 받는다.post_id는posts/{url}인 경우{url}을정수로 보고post_id라는 이름으로 넘겨받는 것으로 url 패턴에서 정의했다.def post_detail(request, post_id):
post 변수에 Post 모델에서 post_id와 일치하는 값의 id를 지닌 데이터를 지정하고 context에 사전형으로 지정한다.
post = Post.objects.get(id=post_id) context = {"post": post}
context와post_detail.html템플릿을 렌더해 반환한다.return render(request, 'posts/post_detail.html', context)
7.3 post_detail.html 템플릿 생성
post_detail.html파일을 생성하고 작성한다.
<!--post_detail.html-->
{% extends "./base.html" %}
{% block post_container %}
<h2>{{post.title}}</h2>
<div>작성일: {{post.dt_created}}</div>
<hr>
<div>{{post.content}}</div>
<hr>
{% endblock post_container %}7.3.1 각 코드의 의미
먼저 부모 템플릿을 상속받는
extends템플릿 태그를 작성한다.{% extends "./base.html" %}
부모 템플릿을 상속받지 않는
post_container블록 영역을 추가한다.{% block post_container %} {% endblock post_container %}
템플릿 변수를 사용해view로 부터 전달받은post의 안쪽 속성에 접근한다.{% block post_container %} <h2>{{post.title}}</h2> <div>작성일: {{post.dt_created}}</div> <hr> <div>{{post.content}}</div> <hr> {% endblock post_container %}
7.3.2 결과
개발 서버를 실행하고
posts/3으로 접속해보면 아래와 같이 출력된다.

7.3.3 줄바꿈
그런데 문제가 있다. 생성한 데이터의 내용 중 엔터가 줄바꿈으로 인식되지 않는다.
그 이유는 장고에서는 엔터를
\n로 저장하지만 html에서는<br>태그로 저장하기 때문이다. 따라서\n을<br>로 변경하는 작업이 필요하다.
post_detail.html템플릿에서post.content변수에linebreaksbr템플릿 필터를 작성하면 된다.<!--post_detail.html--> {% extends "./base.html" %} {% block post_container %} <h2>{{post.title}}</h2> <div>작성일: {{post.dt_created}}</div> <hr> <div>{{post.content|linebreaksbr}}</div> <!--작성--> <hr> {% endblock post_container %}
작성하면 아래와 같이 장고의
\n이 html의<br>로 변경된 것을 확인할 수 있다.

8. 목록 페이지와 상세 페이지 연결
포스트 목록 페이지와 포스트 상세 페이지를 만들었다. 현재는 포스트 상세 페이지로 이동하려면
posts/{url}을 통해 url을 직접 입력해 이동하는 방법만 있다. 포스트 목록 페이지와 상세 페이지를 연결해보자.
8.1 목록 페이지에서 상세 페이지로 연결
post_list.html템플릿에서 포스트 제목에<a>태그를 추가한다.
<!--post_list.html-->
{% extends "./base.html" %}
{% block post_container %}
<h1>글 목록 페이지입니다.</h1>
<table>
<tr>
<td>제목</td>
<td>작성일</td>
<td>수정일</td>
</tr>
{% for post in posts %}
<tr>
<td><a href="/posts/{{post.id}}">{{post.title}}</a></td>
<td>{{post.dt_created}}</td>
<td>{{post.dt_modified}}</td>
</tr>
{% endfor %}
</table>
{% endblock post_container %}8.1.1 각 코드의 의미
<td>태그 안에<a>태그가 있고<a>태그의 경로는posts/{{post.id}}이며 대체 텍스트는{{post.title}}이다.<td><a href="/posts/{{post.id}}">{{post.title}}</a></td>
포스트 목록 페이지를 렌더할 때 url로 부터
posts/{url}의{url}을 정수로 보고post_id로 전달받고 view는post_id를 이용해 각각의 포스트의title,dt_created,de_modified데이터에 접근해 출력할 수 있다.
따라서
post.id로 각 포스트의id데이터에 접근할 수 있고, 이를 통해<a>태그의 경로를posts/{각 포스트의 id}로 지정해 제목을 클릭하면 각 포스트의상세 페이지로 연결할 수 있다.
8.1.2 결과
포스트 목록 페이지에서 포스트 제목을 클릭하면

posts/{포스트의 id}로 이동되며

포스트의 상세 페이지를 확인할 수 있다.
8.2 상세 페이지에서 목록 페이지로 연결
post_detail.html템플릿에<a>태그를 추가한다.
<!--post_detail.html-->
{% extends "./base.html" %}
{% block post_container %}
<h2>{{post.title}}</h2>
<div>작성일: {{post.dt_created}}</div>
<hr>
<div>{{post.content|linebreaksbr}}</div>
<hr>
<a href="/posts/">돌아가기</a> <!--추가-->
{% endblock post_container %}
<a>태그에/posts/경로를 입력하면 클릭 시 포스트 목록 페이지로 이동한다.
9. url에 이름 붙이기
목록 페이지에서 상세 페이지로 이동하는 url은
/posts/{{post.id}}로 정의되어 있고, 상세 페이지에서 목록 페이지로 이동하는 url은/posts/로 정의되어 있다.
문제는 url의 구조 또는 url 패턴이 변경되는 경우, 많은 수정이 필요하다는 것이다. 이번에는 하드코딩으로 인한 유지보수의 어려움을 해결하기 위해 url에 이름을 붙인다.
9.1 url 이름 붙이기
urls.py 에서 url 패턴을 살펴보자
#posts/urls.py
from django.urls import path
from . import views
urlpatterns = [
# path('', views.index),
path('posts/', views.post_list),
# path('posts/new/', views.post_create),
path('posts/<int:post_id>/', views.post_detail),
# path('posts/<int:post_id>/edit/', views.post_update),
# path('posts/<int:post_id>/delete/', views.post_delete),
]
name속성을 추가해 각 url에 이름을 붙여보자.
#posts/urls.py
from django.urls import path
from . import views
from django.urls import path
from . import views
urlpatterns = [
# path('', views.index),
path('posts/', views.post_list, name="post-list"), #name 속성 추가
# path('posts/new/', views.post_create),
path('posts/<int:post_id>/', views.post_detail, name="post-detail"), # name 속성 추가
# path('posts/<int:post_id>/edit/', views.post_update),
# path('posts/<int:post_id>/delete/', views.post_delete),
]9.2 하드코딩된 부분 수정
하드코딩된 url 경로를 템플릿 태그
{% url {url name} {인자} %}를 이용해 수정한다.
9.2.1 post_list.html 템플릿 수정
기존
<a>태그에서는 포스트 상세 페이지 경로를/posts/{{post.id}}로 설정했다.
템플릿 태그
url에 포스트 상세 페이지의url name을 경로로 입력한 뒤, 한 칸 띄어서post.id인자를 넘겨준다.
<!--post_list.html-->
{% extends "./base.html" %}
{% block post_container %}
<h1>글 목록 페이지입니다.</h1>
<table>
<tr>
<td>제목</td>
<td>작성일</td>
<td>수정일</td>
</tr>
{% for post in posts %}
<tr>
<td><a href={% url "post-detail" post.id %}>{{post.title}}</a></td> <!--수정-->
<td>{{post.dt_created}}</td>
<td>{{post.dt_modified}}</td>
</tr>
{% endfor %}
</table>
{% endblock post_container %}9.2.2 post_detail.html 템플릿 수정
기존
<a>태그에서는 포스트 목록 경로를/posts/로 설정했다.
템플릿 태그
url에 포스트 목록 페이지의url name을 경로로 입력한다.
<!--post_detail.html-->
{% extends "./base.html" %}
{% block post_container %}
<h2>{{post.title}}</h2>
<div>작성일: {{post.dt_created}}</div>
<hr>
<div>{{post.content|linebreaksbr}}</div>
<hr>
<a href={% url "post-list" %}>돌아가기</a> <!--수정-->
{% endblock post_container %}9.2.3 결과
기존에 하드코딩된 방식과 똑같이 작동한다. 추후 url이 변경되는 경우 하드코딩된 방식은 연관된 모든 파일을 수정해야 하지만,
url name속성을 입력한 방식은 연관된 파일을 수정하지 않아도 된다.
10. 디자인 입히기
html과 css를 직접 작성하지 않고, 다른 사람이 작성한 템플릿을 프로젝트에 적용하는 방법을 알아본다.
10.1 부모 템플릿 확인
base.html은 다음과 같이 작성되어 있다.
<!--base.html-->
{% load static %}
<!DOCTYPE html>
<html lang="en">
<head>
<title>DEAR :: Daily Events and Affective Reactions</title>
<meta charset="UTF-8">
{% block css %}
{% endblock css %}
<link rel="stylesheet" type="text/css"
href="https://fonts.googleapis.com/earlyaccess/nanummyeongjo.css">
</head>
<body>
<div id="warp">
<div id="header">
<div id="nav">
<div class="logo">
<a href="[A]"><img src="{% static 'posts/images/logo.png' %}"></a>
</div>
</div>
{% block post_header %}
{% endblock post_header %}
</div>
{% block logo_text %}
{% endblock logo_text %}
<div id="content">
<div class="container">
{% block content %}
{% endblock content %}
</div>
</div>
<div id="footer">
<div class="footer">
<p>Costory</p>
</div>
</div>
</div>
</body>
</html>10.1.1 block 영역
부모 템플릿의
block영역은 총 4개로 구분된다.
<head>태그 안에 작성된block css는 자식 템플릿 별로 다른css파일을 적용하기 위한 영역이다.{% block css %} {% endblock css %}
<body>태그 안에 작성된block header은 포스트 상세 페이지의 제목을 입력하기 위한 영역이다.{% block post_header %} {% endblock post_header %}
<body>태그 안에 작성된block logo_text는 포스트 목록 페이지의 상단 로고를 작성하기 위한 영역이다.{% block logo_text %} {% endblock logo_text %}
<body>태그 안에 작성된block content는 포스트 목록 페이지의 각 포스트를 보여주기 위한 영역이다.{% block content %} {% endblock content %}
10.2 부모 템플릿 수정
부모 템플릿의 상단 로고를 클릭하면 이동하는 url이 비어있다. 하드코딩이 아닌,
url name속성을 입력한다. dear의 메인페이지는 포스트 목록 페이지니까url 템플릿 태그에 포스트 목록 페이지의name 속성인post-list를 입력한다.
<!--base.html-->
{% load static %}
<!DOCTYPE html>
<html lang="en">
<head>
<title>DEAR :: Daily Events and Affective Reactions</title>
<meta charset="UTF-8">
{% block css %}
{% endblock css %}
<link rel="stylesheet" type="text/css"
href="https://fonts.googleapis.com/earlyaccess/nanummyeongjo.css">
</head>
<body>
<div id="warp">
<div id="header">
<div id="nav">
<div class="logo">
<a href={% url "post-list" %}><img src="{% static 'posts/images/logo.png' %}"></a> <!--수정-->
</div>
</div>
{% block post_header %}
{% endblock post_header %}
</div>
{% block logo_text %}
{% endblock logo_text %}
<div id="content">
<div class="container">
{% block content %}
{% endblock content %}
</div>
</div>
<div id="footer">
<div class="footer">
<p>Costory</p>
</div>
</div>
</div>
</body>
</html>10.3 post_list.html 확인
post_list.html은 다음과 같이 작성되어 있다.
<!--post_list.html-->
{% block css %}
<link rel="stylesheet" href="./css/post_list.css">
{% endblock css %}
{% block logo_text %}
<div id="header">
<div class="container">
<h1><img src="{% static 'posts/images/headertxt.png' %}"></h1>
</div>
</div>
{% endblock logo_text %}
{% block content %}
<div class="post_container">
</div>
{% endblock content %}10.4 post_list.html 수정
우선 부모 템플릿을 상속받는 템플릿 태그와 정적파일을 불러오는 템플릿 태그를 작성한다.
<!--post_list.html-->
{% extends "./base.html" %} <!--작성-->
{% load static %} <!--작성-->
{% block css %}
<link rel="stylesheet" href="./css/post_list.css">
{% endblock css %}
{% block logo_text %}
<div id="header">
<div class="container">
<h1><img src="{% static 'posts/images/headertxt.png' %}"></h1>
</div>
</div>
{% endblock logo_text %}
{% block content %}
<div class="post_container">
</div>
{% endblock content %}다음은 하드 코딩된 css 경로를 정적파일 경로로 수정한다.
<!--post_list.html-->
{% extends "./base.html" %}
{% load static %}
{% block css %}
<link rel="stylesheet" href="{% static "posts/css/post_list.css" %}"> <!--수정-->
{% endblock css %}
{% block logo_text %}
<div id="header">
<div class="container">
<h1><img src="{% static 'posts/images/headertxt.png' %}"></h1>
</div>
</div>
{% endblock logo_text %}
{% block content %}
<div class="post_container">
</div>
{% endblock content %}다음은
block content영역이다. 여기에는 각 포스트의제목,작성일,본문의 일부를 표기해야 한다. css를 반영할 수 있는 class를 포함한 코드를 추가하면 다음과 같다.
<!--post_list.html-->
{% extends "./base.html" %}
{% load static %}
{% block css %}
<link rel="stylesheet" href="{% static "posts/css/post_list.css" %}">
{% endblock css %}
{% block logo_text %}
<div id="header">
<div class="container">
<h1><img src="{% static 'posts/images/headertxt.png' %}"></h1>
</div>
</div>
{% endblock logo_text %}
{% block content %}
<div class="post_container">
<div class="post"><a href="[A] 개별 포스트로 이동하는 URL"> <!---->
<h2 class="title">[B] 글 목록에서 보여질 제목</h2>
<p class="date">[C] 글 목록에서 보여질 작성일</p>
<p class="text">[D] 글 목록에서 보여질 본문 100자</p>
</a></div>
</div>
{% endblock content %}각 포스트는 클릭 시 해당 포스트의 상세 페이지로 이동하는 기능을 해야 하니,
<a>태그로 감싼다.
우리는 이전 과정에서 for 문을 사용해 posts에 담긴 각각의 게시글을 post로 생성했다. 이를 변경된 디자인 템플릿에도 적용될 수 있도록 작성한다.
<!--post_list.html-->
{% extends "./base.html" %}
{% load static %}
{% block css %}
<link rel="stylesheet" href="{% static "posts/css/post_list.css" %}">
{% endblock css %}
{% block logo_text %}
<div id="header">
<div class="container">
<h1><img src="{% static 'posts/images/headertxt.png' %}"></h1>
</div>
</div>
{% endblock logo_text %}
{% block content %}
<div class="post_container">
{% for post in posts %}
<div class="post"><a href="{% url "post-detail" post.id %}">
<h2 class="title">{{post.title}}</h2>
<p class="date">{{post.dt_created}}</p>
<p class="text">{{post.content}}</p>
</a></div>
{% endfor %}
</div>
{% endblock content %}10.5 post_detail.html 수정
이전 과정과 크게 다르지 않다. 부모 템플릿을 상속받는 템플릿 태그와 정적 파일을 불러오는 템플릿 태그를 작성한다.
<!--post_detail.html-->
{% extends "./base.html" %}
{% load static %}
css를 불러오는css 블럭을 작성한다.
<!--post_detail.html-->
{% extends "./base.html" %}
{% load static %}
{% block css %}
<link rel="stylesheet" href="{% static "posts/css/post_detail.css" %}">
{% endblock css %}
post_header 블럭을 작성한다.
<!--post_detail.html-->
{% extends "./base.html" %}
{% load static %}
{% block css %}
<link rel="stylesheet" href="{% static "posts/css/post_detail.css" %}">
{% endblock css %}
{% block post_header %}
<div class="container">
<h1 class="title">{{post.title}}</h1>
<p class="date">{{post.dt_created}}</p>
</div>
{% endblock post_header %}
content 블럭을 작성한다.
<!--post_detail.html-->
{% extends "./base.html" %}
{% load static %}
{% block css %}
<link rel="stylesheet" href="{% static "posts/css/post_detail.css" %}">
{% endblock css %}
{% block post_header %}
<div class="container">
<h1 class="title">{{post.title}}</h1>
<p class="date">{{post.dt_created}}</p>
</div>
{% endblock post_header %}10.5 결과
포스트 목록 페이지는 다음과 같이 출력된다.

포스트 상세 페이지는 다음과 같이 출력된다.

11. 포스트 작성 페이지
포스트를 작성하고 저장하는 페이지를 만든다.
11.1 form.py 생성 및 작성
포스트 작성 페이지를 만들기 위해 posts 앱 디렉토리에
forms.py파일을 생성한다.
장고의
forms 모듈을 불러온다.
#forms.py
from django import forms
PostForm클래스를 만들고forms의Form클래스를 부모클래스로 두어상속받는다.
from django import forms
class PostForm(forms.form):
PostForm클래스의 내용을 입력한다.
from django import forms
class PostForm(forms.form):
title = forms.CharField(max_length=50, label="제목")
content = forms.CharField(label="내용", widget=forms.Textarea)기본적으로 폼 클래스는 모델 클래스와 작성 방식이 유사하다. 하나하나 살펴보자.
title필드는 forms 모듈의CharField이며최대 길이는 50이고필드 이름은 제목이다.title = forms.CharField(max_length=50, label="제목")
content필드는 forms 모듈의CharField이며필드 이름은 내용이다.위젯 스타일은 forms 모듈의 Textarea로 설정했다.content = forms.CharField(label="내용", widget=forms.Textarea)
Charfield는 기본적으로 한 줄 입력의 위젯을 제공하는데Textarea위젯을 지정하면 여러 줄 입력의 위젯으로 변경된다.
11.2 url 패턴 주석 해제
포스트 작성 페이지의 url 주석을 해제하고
url name을 입력한다.
#urls.py
from django.urls import path
from . import views
urlpatterns = [
# path('', views.index),
path('posts/', views.post_list, name="post-list"),
path('posts/new/', views.post_create, name="post-create"), #수정
path('posts/<int:post_id>/', views.post_detail, name="post-detail"),
# path('posts/<int:post_id>/edit/', views.post_update),
# path('posts/<int:post_id>/delete/', views.post_delete),
]11.3 post_create 뷰 작성
url 경로와 매칭되는 view 함수를 작성한다.
생성한 forms 파일의 PostForm 클래스를 불러온다.
#views.py
from django.shortcuts import render
from .models import Post
from .forms import PostForm #PostForm 클래스 불러오기
# Create your views here.
def post_list(request):
posts = Post.objects.all()
context = {"posts" : posts}
return render(request, 'posts/post_list.html', context=context)
def post_detail(request, post_id):
post = Post.objects.get(id=post_id)
context = {"post": post}
return render(request, 'posts/post_detail.html', context=context)post_create 함수를 작성한다.
#views.py
from django.shortcuts import render
from .models import Post
from .forms import PostForm
# Create your views here.
def post_list(request):
posts = Post.objects.all()
context = {"posts" : posts}
return render(request, 'posts/post_list.html', context=context)
def post_detail(request, post_id):
post = Post.objects.get(id=post_id)
context = {"post": post}
return render(request, 'posts/post_detail.html', context=context)
def post_create(request): #작성
post_form = PostForm()
context = {"post_form": post_form}
return render(request, 'posts/post_form.html', context=context)11.3.1 각 코드의 의미
post_form 변수에PostForm을빈 양식으로 지정한다.posts_form = PostForm()
context변수에 post_form키와 post_form밸류를 쌍으로 저장한다.context = {"post_form": post_form}
context 변수를 context 인자로 담아서posts/post_form.html페이지를 렌더한다.
11.4 post_form.html 템플릿 생성
post_form.html템플릿을 생성하고 내용을 작성한다.
<!--post_form.html-->
<form>
{{post_form}}
<input type="submit" value="전송">
</form>
Post_Form 클래스를 만들었고 views의post_create함수에서 이를 템플릿으로 전달했으니<form>태그 안에 템플릿 변수인{{post_form}}을 입력하면 폼 형식이 렌더된다. 추가적으로 전송 버튼만<input>태그로 작성한다.
결과는 다음과 같다.
{{post_form}}템플릿 변수에 .as_p를 입력하면<p>태그의 형태로 변환된다.

이 밖에도
리스트 형태(as_ul),테이블 형태(as_table)도 가능하다. 본 프로젝트는 미리 작성된 css 스타일을 적용하기 위해리스트 형태로 변환한다.
<!--post_form.html-->
<form>
{{post_form.as_ul}} <!--작성-->
<input type="submit" value="전송">
</form>다음은
<form>태그의 속성을 작성한다.method속성은post로 작성하고action속성은 작성하지 않는다.
<!--post_form.html-->
<form method="post"> <!--작성-->
{{post_form.as_ul}}
<input type="submit" value="전송">
</form>이렇게 하면
action속성을 작성하지 않았기 때문에post방식으로현재 url로 데이터를 전송한다.
다음으로는
csrf_token템플릿 태그를 추가한다. 이 템플릿 태그는교차 사이트 위조 검증으로 <요청하지 않은 요청>을 마치 <요청한 것 처럼 위조>하는 것을방지하는 기술이다.
<!--post_form.html-->
<form method="post">{% csrf_token %} <!--csrf토큰-->
{{post_form.as_ul}}
<input type="submit" value="전송">
</form>11.5 view 작성
뷰를 수정해야하는데, 기존에 작성된 뷰를 살펴보면 다음과 같다.
#views.py
def post_create(request):
post_form = PostForm()
context = {"post_form": post_form}
return render(request, 'posts/post_form.html', context=context)우리가 해야할 것은 두 가지다.
하나는
posts/new로 처음 접속 했을 때는 폼을 띄우는 것이고,다른 하나는
posts/new에서 데이터를 입력하고 전송 버튼을 눌렀을 때입력된 데이터로 새 게시글을 저장한 다음,해당 게시글의 상세 페이지로 이동하는 것이다.
이는
if문과else문으로 구분해서 작성할 수 있다. 작성된 코드는 다음과 같다.
#views.py
from django.shortcuts import render, redirect
from .models import Post
from .forms import PostForm
# Create your views here.
def post_list(request):
posts = Post.objects.all()
context = {"posts" : posts}
return render(request, 'posts/post_list.html', context=context)
def post_detail(request, post_id):
post = Post.objects.get(id=post_id)
context = {"post": post}
return render(request, 'posts/post_detail.html', context=context)
def post_create(request):
if request.method =="POST":
title = request.POST["title"]
content = request.POST["content"]
new_post = Post(
title = title,
content = content
)
new_post.save()
return redirect("post-detail", post_id=new_post.id)
else:
post_form = PostForm()
context = {"post_form": post_form}
return render(request, 'posts/post_form.html', context=context)우리는 여기서 post_create 함수만 살펴본다.
#views.py > post_create
def post_create(request):
if request.method =="POST":
title = request.POST["title"]
content = request.POST["content"]
new_post = Post(
title = title,
content = content
)
new_post.save()
return redirect("post-detail", post_id=new_post.id)
else:
post_form = PostForm()
context = {"post_form": post_form}
return render(request, 'posts/post_form.html', context=context)우선 render 함수 외에 redirect 함수를 사용하기 때문에 redirect 함수를 불러온다.
from django.shortcuts import render, redirect
11.5.1 if문
먼저 if문으로 작성된 코드를 살펴본다.
if request.method =="POST":
title = request.POST["title"]
content = request.POST["content"]
new_post = Post(
title = title,
content = content
)
new_post.save()
return redirect("post-detail", post_id=new_post.id)만약
요청 방식이POST라면:if request.method =="POST":
변수 title에POST 요청이 담고 있는 데이터중키를title로 하는값을 지정한다.title = request.POST["title"]
변수 content에POST 요청이 담고 있는 데이터중키를content로 하는값을 지정한다.content = request.POST["content"]
변수 new_post에Post 모델을 사용해title 필드에는변수 title에 저장한 값을 넣고,content 필드에는변수 content에 저장한 값을 넣는다.new_post = Post( title = title, content = content )
new_post를데이터베이스에 저장한다.new_post.save()그리고
redirect함수를 사용해post-detail(상세 페이지) url로 이동한다. 그런데post-detail(상세 페이지)는<int:post_id>를 필요로 하니,post_id에 방금 생성한new_post의 id를 전달한다.return redirect("post-detail", post_id=new_post.id)
간단히 설명하면, posts/new에 접속해 폼에 데이터를 입력하고 전송 버튼을 누르면 입력된 데이터로 게시글을 생성하고, 해당 게시글의 상세 페이지로 이동하는 로직이다.
11.5.2 else문
else문으로 작성된 코드를 살펴본다.
else:
post_form = PostForm()
context = {"post_form": post_form}
return render(request, 'posts/post_form.html', context=context)만약 그렇지 않으면 (여기서는 요청 방식이 POST가 아니라면, 즉
요청 방식이GET이라면)else:
변수 post_form에PostForm폼을 지정한다.post_form = PostForm()그리고
변수 context에 post_form을 지정한다.context = {"post_form": post_form}렌더 함수를 사용해
posts/post_form.html을 렌더하고,파라미터 context의 인자로변수 context를 전달한다.
간단히 설명하면,
posts/newurl에 처음 접속(GET)하면forms.py의PostForm클래스를 포함하는게시글 작성 페이지로 이동하는 로직이다.
11.5 글쓰기 버튼 생성
form을 통해 게시글 작성 페이지를 만들었으니,게시글 목록 페이지에서글쓰기 버튼을 추가한다.
post_list.html의content 블럭에<a>태그를 추가한다.
<!--post_list.html-->
{% extends "./base.html" %}
{% load static %}
{% block css %}
<link rel="stylesheet" href="{% static "posts/css/post_list.css" %}">
{% endblock css %}
{% block logo_text %}
<div id="header">
<div class="container">
<h1><img src="{% static 'posts/images/headertxt.png' %}"></h1>
</div>
</div>
{% endblock logo_text %}
{% block content %}
<div class="btn_post">
<a href={% url "post-create" %}>기록하기</a> <!--추가-->
</div>
<div class="post_container">
{% for post in posts %}
<div class="post"><a href="{% url "post-detail" post.id %}">
<h2 class="title">{{post.title}}</h2>
<p class="date">{{post.dt_created}}</p>
<p class="text">{{post.content}}</p>
</a></div>
{% endfor %}
</div>
{% endblock content %}
btn_post<div>태그로 감싼 이유는css 파일을 적용하기 위함이다.
12. 포스트 작성 페이지 (모델 폼)
#11. 포스트 작성 페이지에서 폼을 활용해 사용자가 입력한 데이터를 기반으로 새로운 게시글을 생성하는 기능을 구현했다.
이번에는 장고의
모델 폼기능을 활용해 폼을 더욱 간편하게 만드는 방법을 알아본다.
12.1 forms.py 수정
기존에 작성된 폼은 다음과 같다.
#forms.py
from django import forms
class PostForm(forms.Form):
title = forms.CharField(max_length=50, label="제목")
content = forms.CharField(label="내용", widget=forms.Textarea)모델 폼을 활용하기 위한 코드는 다음과 같다.
#forms.py
from django import forms
from .models import Post
class PostForm(forms.ModelForm):
class Meta:
model = Post
fields = ["title", "content"]
모델 폼은 모델을 기반으로 폼을 간편하게 생성할 수 있는 기능이다.
먼저 모델을 불러와야 한다.
from .models import Post
forms.ModelForm클래스를 상속받는PostForm클래스를 생성한다.class PostForm(forms.ModelForm):
Post모델을 참고해title 필드와content 필드를 입력받는 폼을 생성한다.class Meta: model = Post #Post 모델을 참고 fields = ["title", "content"] #폼을 통해 입력받을 필드를 추가만약 필드가 너무 많아 일일이 입력하기가 힘들다면
모든 필드를 추가하는 방법이 있다.fields = "__all__"
12.2 views.py 수정
기존에 작성한
post_create함수를 살펴본다.
def post_create(request):
if request.method =="POST":
title = request.POST["title"]
content = request.POST["content"]
new_post = Post(
title = title,
content = content
)
new_post.save()
return redirect("post-detail", post_id=new_post.id)
else:
post_form = PostForm()
context = {"post_form": post_form}
return render(request, 'posts/post_form.html', context=context)
if문을 모델폼에 맞게 변경한다.
def post_create(request):
if request.method =="POST":
post_form = PostForm(request.POST)
new_post = post_form.save()
return redirect("post-detail", post_id=new_post.id)12.2.1 각 코드의 의미
변경된 코드의 의미는 다음과 같다.
만약 요청 방식이 POST라면
if request.method =="POST":요청에 포함되어 있는 데이터(폼에 입력되고 전송된)를 PostForm과 바인딩하고 변수 post_form에 지정한다.
post_form = PostForm(request.POST)변수 post_form에 지정된 바운드폼을 데이터베이스에 저장한 뒤, new_post에 지정한다.
new_post = post_form.save()new_post의 상세 페이지로 이동한다.
return redirect("post-detail", post_id=new_post.id)
앞으로는 더 간단한 방법인 모델 폼을 사용하도록 하자.
13. 유효성 검증
이번에는 모델폼으로 작성하는 데이터의
유효성을 검증하는 방법을 알아본다.
유효성을 검증하는 방법은
두 가지가 있다.모델 필드 또는 폼 필드를 통한 유효성 검증 방법과Validator를 통한 유효성 검증 방법이 있다.
13.1 필드를 통한 유효성 검증
우리는 모델 폼을 사용하기 때문에 폼 필드가 아닌,
모델 필드를 통해유효성을 검증하는 방법을 알아본다.
13.1.1 models.py 수정
만약,
게시글의 제목은 중복될 수 없음이라는 정책이 있다면, 우리는 게시글 작성 페이지에서 게시글을 생성하기 전, 제목에 입력된 데이터가 기존에 생성된 게시글의 제목과 중복되지 않는지 유효성을 검사해야 한다.
그러기 위해서
Post 모델의title 필드에unique 옵션을 추가한다.
from django.db import models
# Create your models here.
class Post(models.Model):
title = models.CharField(max_length=50, unique=True)
content = models.TextField()
dt_created = models.DateTimeField(verbose_name="Date Created", auto_now_add=True)
dt_modified = models.DateTimeField(verbose_name="Date Modified", auto_now=True)
def __str__(self):
return self.title중복된 제목으로 인해 유효성 검증에 실패하면 유저에게 보여줄 에러메세지를 변경하는
error_messages 옵션을 추가한다.
from django.db import models
# Create your models here.
class Post(models.Model):
title = models.CharField(max_length=50, unique=True, error_messages={"unique":"이미 같은 제목의 게시글이 존재합니다"})
content = models.TextField()
dt_created = models.DateTimeField(verbose_name="Date Created", auto_now_add=True)
dt_modified = models.DateTimeField(verbose_name="Date Modified", auto_now=True)
def __str__(self):
return self.title13.1.2 views.py 수정
post_create 뷰에서 유효성 검증을 통과한 경우와 그렇지 않은 경우에 따른 로직을 구분한다.
#views.py > post_create
def post_create(request):
if request.method =="POST":
post_form = PostForm(request.POST)
if post_form.is_valid():
new_post = post_form.save()
return redirect("post-detail", post_id=new_post.id)
else:
context = {"post_form": post_form}
else:
post_form = PostForm()
context = {"post_form": post_form}
return render(request, 'posts/post_form.html', context=context)변경된 코드의 의미는 다음과 같다.
만약 요청 방식이
POST라면if request.method =="POST":
PostForm 폼과 요청이 담고있는 데이터를 바인딩 하고변수 post_form에 지정한다.post_form = PostForm(request.POST)만약
post_form이 유효성 검증에 통과하면if post_form.is_valid():
post_form을 기반으로 게시글을 생성하고변수 new_post에 지정한다.new_post = post_form.save()그리고 해당 게시글의 상세 페이지로 이동한다.
return redirect("post-detail", post_id=new_post.id)만약
post_form이 유효성 검증에 실패하면else:
변수 context에post_form을 지정한다.context = {"post_form": post_form}이때,
else문과if문 밖으로 이동해 마지막return문으로 이동한다. 결과적으로는post_form(입력한 데이터)를유지한 채로post_form.html을 다시 렌더한다.만약 요청 방식이
POST가 아니라면,else:
변수 post_form에비어있는Post_form 폼을 지정한다.post_form = PostForm()
변수 context에post_form을지정한다.context = {"post_form": post_form}
context에 담긴 데이터를 가지고post_form.html을 렌더한다.return render(request, 'posts/post_form.html', context=context)
13.2 bulit-in validator를 통한 유효성 검증
만약 보다 복잡한 유효성 검증이 필요한 경우, 장고에서 제공하는 유효성 검증인
validator를 통한 유효성 검증을 방법을 선택할 수 있다.
validator는 장고에서 제공하는bulit-in validator와 직접 구현한validator가 있는데, 여기서는 전자를 사용할 것이다.
13.2.1 django built-in validators
django built-in validators에 접속하면 다양한 밸리데이터를 찾을 수 있다.
13.2.2 models.py 수정
게시글 내용에최소길이제한유효성 검증을 적용해본다.
djnago.core.validators모듈의최소길이제한클래스를 불러온 뒤,content 필드에 적용할최소길이와에러메세지를 입력한다.
밸리데이터를 추가하기 위해서는
리스트 형식으로 작성해야 한다.
# models.py
from django.db import models
from django.core.validators import MinLengthValidator #최소길이제한 클래스
# Create your models here.
class Post(models.Model):
title = models.CharField(max_length=50, unique=True, error_messages={"unique":"이미 같은 제목의 게시글이 존재합니다"})
content = models.TextField(validators=[MinLengthValidator(10, "10자 이상 입력해주세요")]) #입력
dt_created = models.DateTimeField(verbose_name="Date Created", auto_now_add=True)
dt_modified = models.DateTimeField(verbose_name="Date Modified", auto_now=True)
def __str__(self):
return self.title개발서버를 실행한 결과 아래와 같이 잘 적용되는 것을 확인할 수 있다.
13.3 직접 만든 validator
이번에는 validator를 직접 만드는 방법을 알아본다.
13.3.1 validators.py 생성 및 작성
validators.py을 생성하고 ValidationError 객체를 불러온 뒤, 함수를 작성한다.
#validators.py
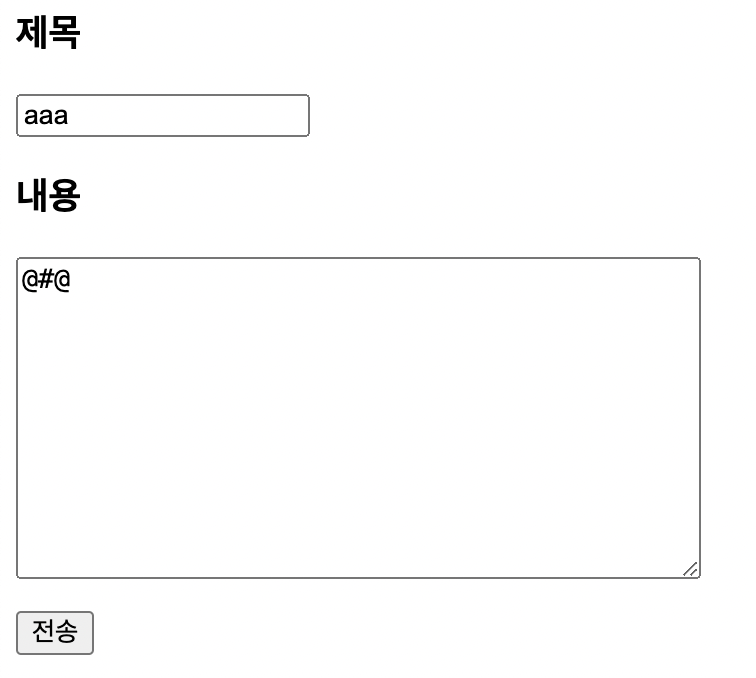
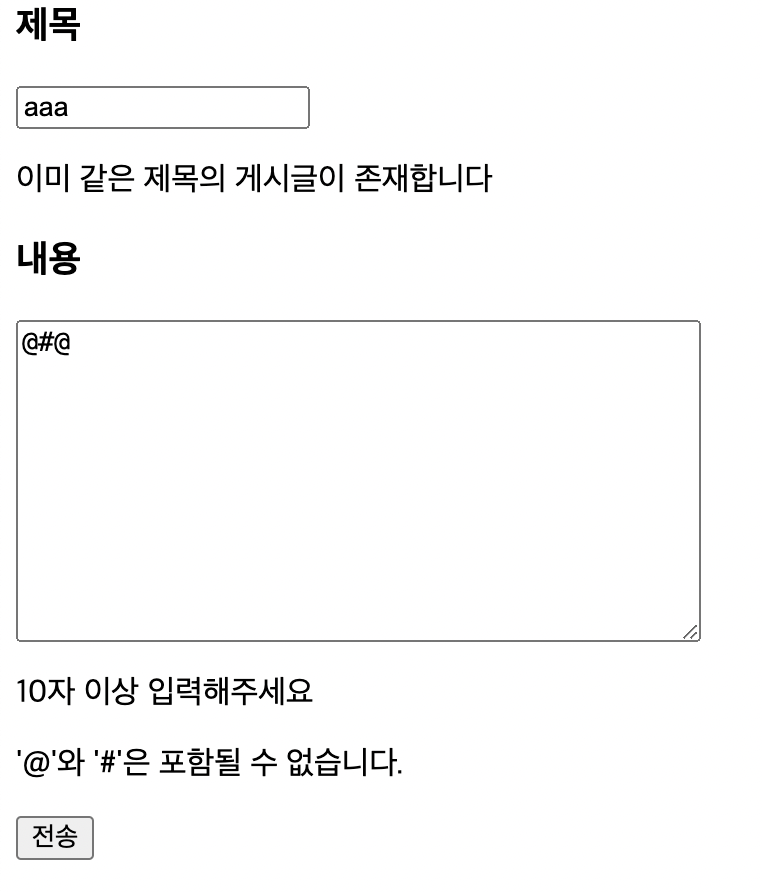
from django.core.exceptions import ValidationError
def validate_symbols(value):
if ("@" in value) or ("#" in value):
raise ValidationError("'@'와 '#'은 포함될 수 없습니다.", code="symbol_error")
ValidationError는 유효성 검증 에러를 일으키는 객체다.from django.core.exceptions import ValidationError
validate_symbols함수는if문을 사용해@ 또는 #이 포함되면 유효성검증 에러를 발생시킨다.def validate_symbols(value): if ("@" in value) or ("#" in value): raise ValidationError("'@'와 '#'은 포함될 수 없습니다.", code="symbol_error")
13.3.2 models.py 수정
작성한
validate_symbols를Post 모델의content 필드에 적용한다.
#models.py
from django.db import models
from django.core.validators import MinLengthValidator
from .validators import validate_symbols #밸리데이터 불러오기
# Create your models here.
class Post(models.Model):
title = models.CharField(max_length=50, unique=True, error_messages={"unique":"이미 같은 제목의 게시글이 존재합니다"})
content = models.TextField(validators=[MinLengthValidator(10, "10자 이상 입력해주세요"),
validate_symbols]) #밸리데이터 적용
dt_created = models.DateTimeField(verbose_name="Date Created", auto_now_add=True)
dt_modified = models.DateTimeField(verbose_name="Date Modified", auto_now=True)
def __str__(self):
return self.title개발서버를 실행한 결과 잘 작동되는 것을 확인할 수 있다.
14. 폼 구조 변경하기
지금의 폼 구조는 이쁘지가 않다. css를 적용하기 전 폼의 구조를 변경하는 방법을 알아본다.
14.1 post_form.html 템플릿 수정
현재는
PostForm 폼을템플릿 태그 {{post_form}}으로 일괄적으로 불러온다. 각 폼의 인풋을 별도로 불러오는 코드로 변경해 본다.
<!--post_form.html-->
<form method="post">{% csrf_token %}
<h3>제목</h3>
<p>{{post_form.title}}</p>
<h3>내용</h3>
<p>{{post_form.content}}</p>
<input type="submit" value="전송">
</form>코드를 살펴보면 폼의 안쪽 속성으로 필드에 접근해서
<p>태그로 감싼 형태로 작성했다. 결과는 아래와 같다.
좀 더 깔끔한 모습으로 변했다. 그러나
에러메세지가 호출되지 않는다. 기존에는템플릿 태그 {{post_form}}로 폼을 일괄적으로 호출해서 에러메세지가 포함되었다. 이번에는에러메세지도 별도로 호출하는 코드를 작성한다.
<!--post_form.html-->
<form method="post">{% csrf_token %}
<h3>제목</h3>
<p>{{post_form.title}}</p>
{% for error in post_form.title.errors %}
<p>{{error}}</p>
{% endfor %}
<h3>내용</h3>
<p>{{post_form.content}}</p>
{% for error in post_form.content.errors %}
<p>{{error}}</p>
{% endfor %}
<input type="submit" value="전송">
</form>
에러메세지가 여러 개일 수 있으니for문을 활용해 각 필드의 에러 중, 각각의 에러를 호출한다. 에러는.errors로 접근할 수 있다.
개발서버를 실행한 결과 에러메세지가 잘 호출되는 것을 확인할 수 있다.
15. 폼 디자인 적용
폼 디자인을 적용하는 방법을 단계별로 알아본다.
15.1 form.css
정적파일 디렉토리에form.css파일을 생성하고 작성한다.
/*form.css*/
.error {
color: red;
}15.2 post_form.html
css를 적용하기 위해부모 템플릿을 상속받는템플릿 태그와정적파일을 불러오는템플릿 태그를 작성한다.
그리고
css 블럭 영역에 방금 생선한form.css파일을 적용한다.
다음으로
<form>태그를content 블럭 영역으로 감싼다.
마지막으로 에러메세지를 담고있는
<p>태그에error 클래스를 적용한다.
<!--post_form.html-->
{% extends "./base.html" %}
{% load static %}
{% block css %}
<link rel="stylesheet" href="{% static "posts/css/form.css" %}">
{% endblock css %}
{% block content %}
<form method="post">{% csrf_token %}
<h3>제목</h3>
<p>{{post_form.title}}</p>
{% for error in post_form.title.errors %}
<p class="error">{{error}}</p>
{% endfor %}
<h3>내용</h3>
<p>{{post_form.content}}</p>
{% for error in post_form.content.errors %}
<p class="error">{{error}}</p>
{% endfor %}
<input type="submit" value="전송">
</form>
{% endblock content %}결과는 아래와 같다.
15.3 인풋 디자인 적용
에러메세지의 경우클래스를 지정해서 해당 클래스에css를 적용할 수 있었다.
그러나
인풋의 경우필드별로 장고가 지정한 위젯을 사용하기 때문에장고 공식 문서에서해당 필드의 기본 위젯이 무엇인지 확인한 뒤,해당 위젯에 클래스를 지정한 뒤, 해당 클래스에css를 적용해야 한다.
15.3.1 CharField의 위젯 변경
장고 공식문서를 통해 확인한 결과
CharField의 기본 위젯은TextInput이다.
forms.py의Meta 클래스에서widgets은필드를 키로 하고값으로 위젯이름을 입력하면,다른 위젯을 기본 위젯으로 사용할 수 있다. 또는 지금처럼직접 기본 위젯에 접근해야 할 때 사용할 수 있다.
#forms.py

from django import forms
from .models import Post
class PostForm(forms.ModelForm):
class Meta:
model = Post
fields = ["title", "content"]
widgets = {"title": forms.TextInput(attrs={"class": "title", "placeholder": "제목이 입력하세요",}),
"content": forms.Textarea(attrs={"placeholder": "내용을 입력하세요"})}위 코드를 확인해보면
Meta 클래스에widgets을 두고title 필드의 위젯을TextInput으로 지정하고attrs로 해당 위젯의속성에 접근해title 클래스를 지정했다.
또한
title 필드와content 필드의placeholder를 지정했다.
이후
form.css에서title 클래스에 대한css를 선언한다.
/*form.css*/

.error {
    color: red;
}
.title {
width: 400px;
}16. 폼 css 적용
이미 작성되어 있는 css를 적용하는 방법을 알아본다.
16.1 css 파일 살펴보기
전달 받은 css는 다음과 같다.
/*post_form.css*/

h1,h2,h3,p,a,ul,li{
    margin: 0;
    padding: 0;
    font-family : 'NanumMyeongjo';
    font-weight: 200;
    list-style:  none;
    text-decoration: none;
    outline: none;
    color: black;
}
a:hover,a:active,button:hover {
    text-decoration: none;
}
html{
    position: relative;
    min-height: 100%;
    margin: 0;
}
body {
    min-height: 100%;
    margin: 0;
    padding: 0;
    background: #2b2a2e;
    -webkit-font-smoothing: antialiased;
    -moz-osx-font-smoothing: auto;
}
img {
    margin: 0;
    padding: 0;
    border: 0;
}

#nav{
    height: 60px;
}
#header{
    margin: 20px 0 20px;
}
#content{
    margin-bottom: 300px;
}
#footer{
    position: absolute;
    left: 0;
    bottom: 0;
    width: 100%;
    height: 75px;
    background: rgba(41, 41, 44, 0.7);
}
.container{
    width: 800px;
    margin: 0 auto;
}

.logo{
    width: 65%;
    min-width: 899px;
    margin: 0 auto;
    padding-top: 17px;
}
.logo img{
    width: 88px;
}
h1{
    text-align: center;
    font-size: 32px;
    letter-spacing: -2px;
    color: #fff;
}
.error{
    text-align: right;
    color: red;
    padding-right: 20px;
    padding-bottom: 20px;
}
.submit{
    margin-bottom: 27px;
    text-align: right;
}
input[type="submit"]{
    padding: 10px 43px 11px 19px;
    font-size: 15px;
    font-family : 'NanumMyeongjo';
    color: #fff;
    border: 1px solid #5b595f;
    border-radius: 1px;
    letter-spacing: -0.35px;
    background: url(../images/pen.svg)no-repeat 89px 11px/16px;
    cursor: pointer;
}
input[type="submit"]:hover{
    color: #ccc;
    transition: all 0.2s;
}
.editor{
    background: #f9f9f9;
}
input[type="text"]{
    display: block;
    width: 100%;
    padding: 35px 33px 0 30px;
    border: none;
    font-size: 19px;
    font-family : 'NanumMyeongjo';
    background-color: transparent;
    box-sizing: border-box;
}
textarea{
    width: 100%;
    height: 500px;
    padding: 33px 33px 30px 30px;
    border: none;
    font-size: 15px;
    line-height: 1.73;
    font-family : 'NanumMyeongjo';
    background-color: transparent;
    resize: none;
    box-sizing: border-box;
}
textarea,input:focus{
    outline: none;
}
textarea::placeholder{
    color: #a9abb7;
    letter-spacing: -0.44px;
}
input::placeholder{
    color: #a9abb7;
    letter-spacing: -0.44px;
}
.btn_back a{
    display: inline-block;
    margin-top: 30px;
    padding: 10px 19px 11px;
    color: #e38917;
    font-size: 15px;
    border: 1px solid #e38917;
}
.btn_back a:hover{
    color: #f2ad56;
    transition: all .2s;
}
.footer{
    width: 65%;
    min-width: 899px;
    margin: 0 auto;
}
.footer p{
    text-align: right;
    font-size: 20px;
    line-height: 75px;
    font-weight: 800;
    letter-spacing: -0.85px;
    color: #53534f;
}
16.2 post_form.html 수정
작성된 css 적용을 위해 html 템플릿을 수정한다.
<!--post_form.html-->

{% extends "./base.html" %}
{% load static %}

{% block css %}
    <link rel="stylesheet" href="{% static "posts/css/post_form.css" %}">  <!--css 파일 이름 변경-->
{% endblock css %}

{% block post_header %}  <!--글 쓰기 버튼을 post_header 블럭 영역에 추가-->
    <div class="container">  <!--글 쓰기 버튼 div 태그로 감싸고 클래스로 지정-->
        <h1>글쓰기</h1>
    </div>
{% endblock post_header %}

{% block content %}
    <form method="post">{% csrf_token %}
        <div class="submit">
            <input type="submit" value="작성 완료">
        </div>
        <div class="editor"> <!--작성 영역을 div 태그로 감싸고 editor 클래스로 지정 -->
                <p>{{post_form.title}}</p>
                {% for error in post_form.title.errors %}
                <p class="error">{{error}}</p>
                {% endfor %}
                <p>{{post_form.content}}</p>
                {% for error in post_form.content.errors %}
                <p class="error">{{error}}</p>
                {% endfor %}
        </div>
    </form>
    <div class="btn_back">  <!--목록으로 이동하는 div 태그 생성 후, 클래스 추가-->
        <a href="{% url "post-list" %}">목록으로</a>  <!--a 태그 작성-->
    </div>
{% endblock content %}
17. 포스트 수정 페이지
기존에 작성된 게시글을 수정하는 페이지를 만들어 본다. 수정 페이지는
폼 페이지에 기존에 작성된 내용을 불러오는 형태로 만들면 될 것 같다.
17.1 url 패턴 주석 해제
urls.py에서 주석 처리된 url 패턴을주석 해제하고name 속성에post-update를 작성한다.
#urls.py

from django.urls import path
from . import views

urlpatterns = [
    # path('', views.index),
    path('posts/', views.post_list, name="post-list"),
    path('posts/new/', views.post_create, name="post-create"),
    path('posts/<int:post_id>/', views.post_detail, name="post-detail"),
    path('posts/<int:post_id>/edit/', views.post_update, name="post-update"),  #주석 해제 및 name 속성 작성
    # path('posts/<int:post_id>/delete/', views.post_delete),
]
17.2 상세 페이지에서 수정하기 버튼 추가
상세 페이지에서 게시글을 수정할 수 있는
<a>태그를 추가한다.
css 적용을 위해 두 개의<div>태그로 감싸고 클래스를 지정한다.
포스트의
id를 넘겨준다.
<!--post_detail.html > block content-->

{% block content %}
    <div class="content">
        <p class="text">{{post.content|linebreaksbr}}</p>
        <p class="date_md">수정일 <span>{{post.dt_modified}}</span></p>
    </div>
        <div class="btn">
            <div class="btn_list">
                <a href="{% url "post-list" %}">스토리 목록으로</a>
            </div>
            <div class="right_btn">  <!--추가-->
                <div class="btn_modify">  <!--추가-->
                    <a href="{% url "post-update" post.id %}">수정하기</a>  <!--추가-->
                </div>  <!--추가-->
            </div>  <!--추가-->
    </div>
{% endblock content %}
17.3 뷰 작성
views.py에서post_update함수를 추가한다.
#views.py > post_update

def post_update(request, post_id):
    post = Post.objects.get(id=post_id)
    if request.method == "POST":
        post_form = PostForm(request.POST, instance=post)
        if post_form.is_valid():
            post_form.save()
            return redirect("post-detail", post_id=post.id)
    else:
        post_form = PostForm(instance=post)
    context = {"post_form": post_form}
    return render(request, "posts/post_form.html", context)
17.3.1 각 코드의 의미
post_update 함수를 생성하는데, 요청과, post_id를 인자로 받는 파라미터를 추가한다.
def post_update(request, post_id):
Post 모델에서post_id로 전달 받은 인자와동일한 값의 id를 지닌 데이터를 불러와변수 post에 지정한다.post = Post.objects.get(id=post_id)
만약 요청 방식이
POST라면if request.method == "POST":
폼 PostForm에POST에 담긴 데이터를바인딩하고, 새 인스턴스가 아닌post로 지정된 인스턴스에 매칭시킨 후변수 post_form에 지정한다.post_form = PostForm(request.POST, instance=post)
만약
변수 post_form의 데이터가 유효성 검증을 통과하면if post_form.is_valid():
post_form을 데이터 베이스에 저장한다.post_form.save()
>상세 페이지로 이동하는데, 상세 페이지에서는 포스트의 id를 필요로 하기 때문에 `post_id`에 다시 `post.id`를 담아서 넘겨준다.
```python
            return redirect("post-detail", post_id=post.id)
만약 요청 방식이
POST가 아니라면,else:
변수 post_form에폼 PostForm을 지정하는데, 새 인스턴스가 아닌,post로 지정된 인스턴스에 매칭시킨다.post_form = PostForm(instance=post)
변수 context에post_form을 지정한다.context = {"post_form": post_form}
요청과context를 담아서post_form.html템플릿을 렌더한다.return render(request, "posts/post_form.html", context)
18. 포스트 삭제
포스트를 삭제하는 기능을 구현한다.
18.1 url 패턴 주석 해제
url 패턴의 주석을 해제하고name 속성을 작성한다.
#urls.py

from django.urls import path
from . import views

urlpatterns = [
    # path('', views.index),
    path('posts/', views.post_list, name="post-list"),
    path('posts/new/', views.post_create, name="post-create"),
    path('posts/<int:post_id>/', views.post_detail, name="post-detail"),
    path('posts/<int:post_id>/edit/', views.post_update, name="post-update"),
    path('posts/<int:post_id>/delete/', views.post_delete, name="post-delete),  # 주석 해제
]
18.2 상세 페이지에서 삭제하기 버튼 추가
상세 페이지에
<a>태그를 작성해 삭제하기 버튼을 추가한다.
<!--post_detail.html > block content-->

{% block content %}
    <div class="content">
        <p class="text">{{post.content|linebreaksbr}}</p>
        <p class="date_md">수정일 <span>{{post.dt_modified}}</span></p>
    </div>
        <div class="btn">
            <div class="btn_list">
                <a href="{% url "post-list" %}">스토리 목록으로</a>
            </div>
            <div class="right_btn">
                <div class="btn_modify">
                    <a href="{% url "post-update" post.id %}">수정하기</a>
                </div>
                <div class="btn_delete"> <!--추가-->
                    <a href="{% url "post-delete" post.id %}">삭제하기</a>
                </div>
            </div>
    </div>
{% endblock content %}
18.3 뷰 작성
포스트를 삭제하는 뷰를 작성한다.
#views.py

def post_delete(request, post_id):
    post = Post.objects.get(id=post_id)
    post.delete()
    return redirect("post-list")
url로부터 전달받은 id에 해당하는
데이터를 삭제하는 코드다. 삭제 후에는 목록 페이지로 리다이렉트 한다.
19. 삭제하기 컨펌 페이지
삭제하기 버튼 클릭 시, 컨펌 없이 바로 삭제가 된다면 유저 경험 측면에서 좋지 않다. 따라서
삭제하기 컨펌 페이지를 만드는 방법을 알아본다.
19.1 삭제하기 컨펌 페이지 템플릿 작성
삭제하기 버튼을 클릭하면 이동되는 템플릿을 작성한다.
<!--post_confirm_delete.html-->

{% extends './base.html' %}
{% load static %}

{% block css %}
    <link rel="stylesheet" href="{% static 'posts/css/post_confirm_delete.css' %}">
{% endblock css %}

{% block content %}
<div class="confirm">
    <p class="title">[{{post.title}}]</p>
    <p>삭제하시겠습니까?</p>
    <form method="POST">{% csrf_token %}
        <div class="confirm_btn">
            <input type="submit" value="삭제하기">
            <a href="{% url "post-detail" post.id %}">돌아가기</a>
        </div>
    </form>
</div>
{% endblock content %}
19.2 삭제하기 컨펌 페이지 css 작성
css는
강의에서 전달받은 css파일에 개인적으로 적용하고 싶은 부분을 추가했다.
/*post_confirm_delete.css*/

h1,h2,h3,p,a,ul,li{
    margin: 0;
    padding: 0;
    font-family : 'NanumMyeongjo';
    font-weight: 200;
    list-style:  none;
    text-decoration: none;
    outline: none;
    color: black;
}
a:hover,a:active,button:hover {
    text-decoration: none;
}
html{
    position: relative;
    min-height: 100%;
    margin: 0;
}
body {
    min-height: 100%;
    margin: 0;
    padding: 0;
    background: #2b2a2e;
    -webkit-font-smoothing: antialiased;
    -moz-osx-font-smoothing: auto;
}
img {
    margin: 0;
    padding: 0;
    border: 0;
}

#nav{
    height: 60px;
}
#content{
    margin-top: 160px;
    margin-bottom: 300px;
}
#footer{
    position: absolute;
    left: 0;
    bottom: 0;
    width: 100%;
    height: 75px;
    background: rgba(41, 41, 44, 0.7);
}
.container{
    width: 800px;
    margin: 0 auto;
}

.logo{
    width: 65%;
    min-width: 899px;
    margin: 0 auto;
    padding-top: 17px;
}
.logo img{
    width: 88px;
}
.confirm{
    padding: 108px 0 124px;
    text-align: center;
    background: #fff;
}
p{
    font-size: 17px;
    color: #575362;
    letter-spacing: -0.35px;
}
p.title{
    padding-bottom: 8px;
    font-size: 20px;
    font-weight: bold;
    color: #333236;
    letter-spacing: -0.45px;
}
.confirm_btn{
    padding-top: 46px;
}
.confirm_btn ul li{
    display: inline-block;
}
.confirm_btn input{

    display: inline-block;
    padding: 10px 19px 11px;
    font-size: 15px;
    color: #f6f6f6;
    background: red;
    border: none;
}
.confirm_btn a{
    display: inline-block;
    margin-left: 18px;
    padding: 10px 19px 11px;
    font-size: 15px;
    color: #69666d;
    background: #f6f6f6;
    border: none;
}

.confirm_btn a:hover{
    color: #95929a;
    transition: all .2s;
}

.confirm_btn input:hover{
    color: red;
    background: #f6f6f6;
    transition: all .2s;
}
.footer{
    width: 65%;
    min-width: 899px;
    margin: 0 auto;
}
.footer p{
    text-align: right;
    font-size: 20px;
    line-height: 75px;
    font-weight: 800;
    letter-spacing: -0.85px;
    color: #53534f;
}
19.3 뷰 작성
기존에 작성한
post_delete함수를 수정한다.
#views.py > post_delete

def post_delete(request, post_id):
    post = Post.objects.get(id=post_id)
    if request.method == "POST":
        post.delete()
        return redirect("post-list")
    else:
        context = {"post": post}
        return render(request, "posts/post_confirm_delete.html", context=context)
요청 방식이
POST인 경우 게시글을 삭제하고 포스트 목록 페이지로 리다이렉트 한다.
요청 방식이
GET인 경우 삭제하기 컨펌 템플릿을 렌더한다.