반복문
Ansible Loops : 반복문을 사용하면 동일한 모듈을 사용하는 작업을 여러 번 작성하지 않아도 됩니다. 예를 들어 서비스에 필요한 포트를 방화벽에 추가한다고 하면, 포트를 추가하는 작업을 여러 개 작성하는 대신 loop 반복문을 이용해 작업 하나로 여러 개의 포트를 추가할 수 있습니다.
- 단순 반복문 : 특정 항목에 대한 작업을 반복 - item 변수, 변수 목록 지정
- loop 키워드를 작업에 추가하면 작업을 반복해야 하는 항목의 목록을 값으로 사용합니다. 그리고 해당하는 값을 사용하려면 item 변수를 이용할 수 있습니다.
- 플레이북 파일 생성 : 플레이북의 목적은 sshd 와 rsyslog 서비스가 시작되어 있지 않다면 시작입니다.
- check-services1.yml
---
- hosts: all
tasks:
- name: Check sshd and rsyslog state
ansible.builtin.service:
name: "{{ item }}"
state: started
- sshd
- rsyslog

- loop 문에 사용하는 아이템을 변수에 저장하면 loop 키워드에 해당 변수명을 사용할 수 있습니다.
- check-service2.yml
---
- hosts: all
  vars:
    services:
      - sshd
      - rsyslog

  tasks:
  - name: Check sshd and rsyslog state
    ansible.builtin.service:
      name: "{{ item }}"
      state: started
    loop: "{{ services }}"
-
사전 목록에 의한 반복문 : 여러 개의 아이템을 loop 문에서 사전 목록 dictionary 으로 사용합니다.
-
하나의 아이템을 사용할 때도 있지만, 여러 개의 아이템이 필요한 경우가 발생합니다.
-
예를 들어 여러 개의 사용자 계정을 생성하는 플레이북을 작성한다면 사용자 계정을 생성하기 위해 필요한 이름과 패스워드 등의 여러 항목을 loop 문에서 사전 목록으로 사용할 수 있습니다.
-
ansible.builtin.file 모듈 : https://docs.ansible.com/ansible/latest/collections/ansible/builtin/file_module.html
-
make-file.yml

---
- hosts: all

  tasks:
    - name: Create files
      ansible.builtin.file:
        path: "{{ item['log-path'] }}"
        mode: "{{ item['log-mode'] }}"
        state: touch
      loop:
        - log-path: /var/log/test1.log
          log-mode: '0644'
        - log-path: /var/log/test2.log
          log-mode: '0600'

## 모니터링

watch -d "ssh tnode1 ls -l /var/log/test*.log"

## all 확인
ansible -m shell -a "ls -l /var/log/test*.log" all
tnode1 | CHANGED | rc=0 >>
-rw-r--r-- 1 root root 0 Jan 17 22:01 /var/log/test1.log
-rw------- 1 root root 0 Jan 17 22:01 /var/log/test2.log
tnode2 | CHANGED | rc=0 >>
-rw-r--r-- 1 root root 0 Jan 17 22:01 /var/log/test1.log
-rw------- 1 root root 0 Jan 17 22:01 /var/log/test2.log
tnode3 | CHANGED | rc=0 >>
-rw-r--r-- 1 root root 0 Jan 17 22:01 /var/log/test1.log
-rw------- 1 root root 0 Jan 17 22:01 /var/log/test2.log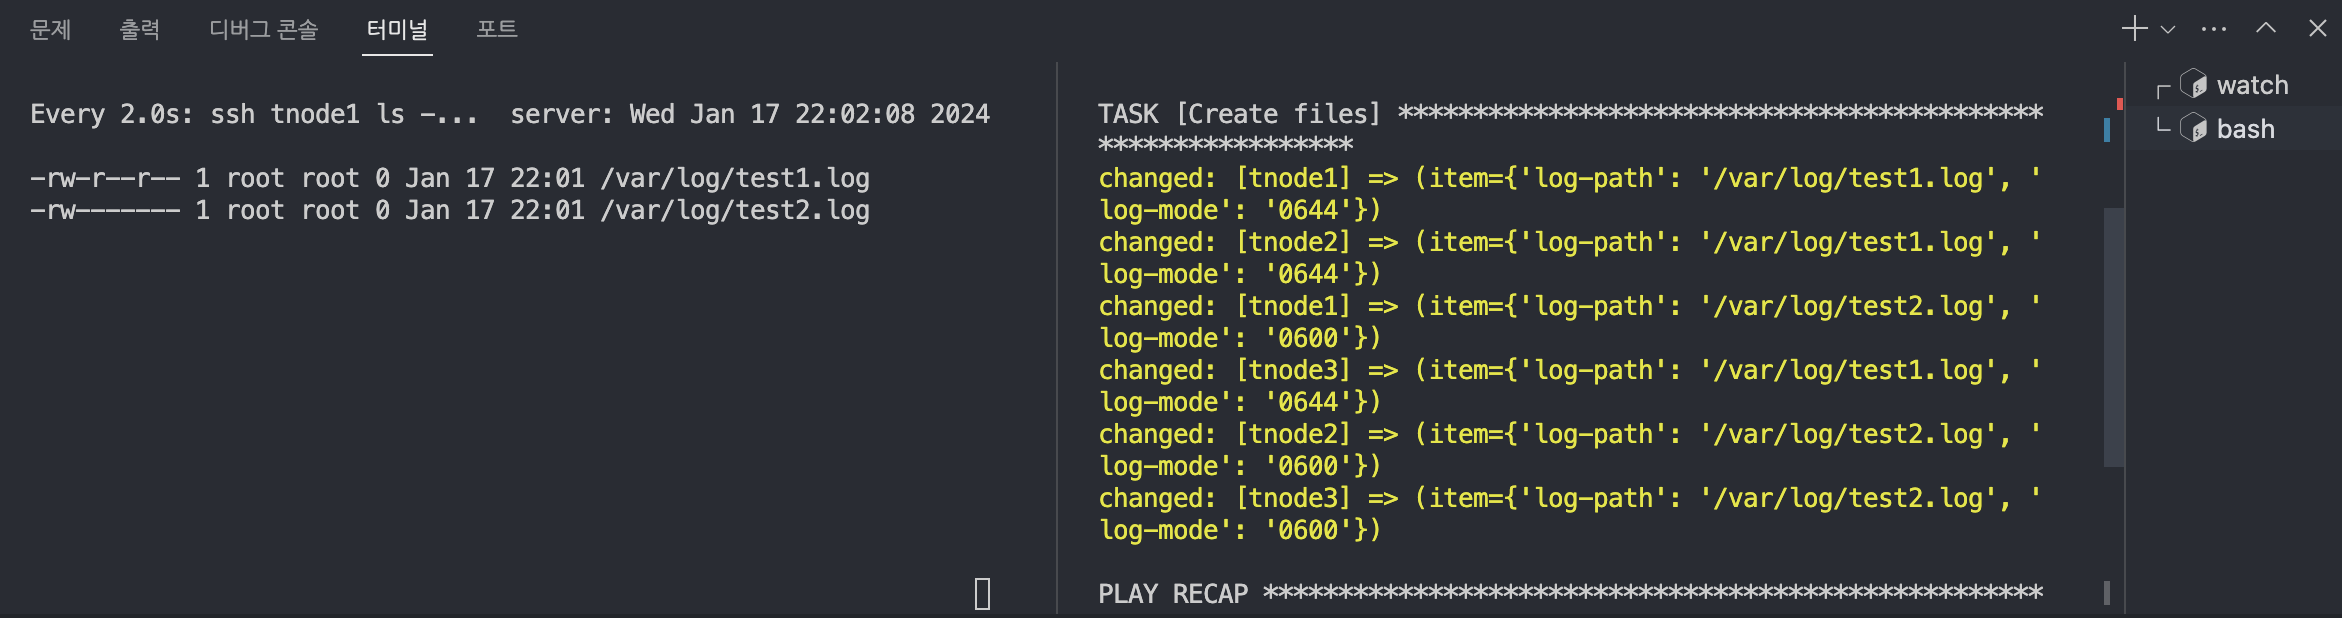
-
ansible.builtin.shell 모듈 : https://docs.ansible.com/ansible/latest/collections/ansible/builtin/shell_module.html
-
반복문과 Register 변수 사용 : Register 변수는 반복 실행되는 작업의 출력을 캡처할 수 있습니다.
- 이를 통해 반복 실행되는 작업들이 모두 잘 수행되었는지 확인할 수 있으며, 이 값을 이용하여 다음 작업을 수행할 수 있습니다.
-
파일을 생성해봅시다.
-
loop-register.yml
- shell 모듈을 이용하여 “I can speak~”라는 메시지를 출력합니다.
- 이때 loop 키워드를 이용하여 Korean과 English를 할 수 있다고 아이템을 나열합니다.
- 그리고 하단에 register 키워드를 이용하여 실행 결과를 result 변수에 저장합니다.
- 이렇게 저장된 result 변수는 debug 모듈을 통해 해당 내용을 확인합니다.
-
---
- hosts: localhost
  tasks:
    - name: Loop echo test
      ansible.builtin.shell: "echo 'I can speak {{ item }}'"
      loop:
        - Korean
        - English
      register: result

    - name: Show result
      ansible.builtin.debug:
        var: result

## register 키워드에 의해 저장된 result 내용에는 대괄호 ([]) 사이에 Key-Value 쌍으로 구성된 결과 값들이 모두 저장됩니다.

## 실행

ansible-playbook loop-register.yml


PLAY [localhost] ***************************************************************

TASK [Gathering Facts] *********************************************************
ok: [localhost]

TASK [Loop echo test] **********************************************************
changed: [localhost] => (item=Korean)
changed: [localhost] => (item=English)

TASK [Show result] *************************************************************
ok: [localhost] => {
    "result": {
        "changed": true,
        "msg": "All items completed",
        "results": [
            {
                "ansible_loop_var": "item",
                "changed": true,
                "cmd": "echo 'I can speak Korean'",
                "delta": "0:00:00.007032",
                "end": "2024-01-17 22:07:53.478288",
                "failed": false,
                "invocation": {
                    "module_args": {
                        "_raw_params": "echo 'I can speak Korean'",
                        "_uses_shell": true,
                        "argv": null,
                        "chdir": null,
                        "creates": null,
                        "executable": null,
                        "removes": null,
                        "stdin": null,
                        "stdin_add_newline": true,
                        "strip_empty_ends": true
                    }
                },
                "item": "Korean",
                "msg": "",
                "rc": 0,
                "start": "2024-01-17 22:07:53.471256",
                "stderr": "",
                "stderr_lines": [],
                "stdout": "I can speak Korean",
                "stdout_lines": [
                    "I can speak Korean"
                ]
            },
            {
                "ansible_loop_var": "item",
                "changed": true,
                "cmd": "echo 'I can speak English'",
                "delta": "0:00:00.003680",
                "end": "2024-01-17 22:07:53.768406",
                "failed": false,
                "invocation": {
                    "module_args": {
                        "_raw_params": "echo 'I can speak English'",
                        "_uses_shell": true,
                        "argv": null,
                        "chdir": null,
                        "creates": null,
                        "executable": null,
                        "removes": null,
                        "stdin": null,
                        "stdin_add_newline": true,
                        "strip_empty_ends": true
                    }
                },
                "item": "English",
                "msg": "",
                "rc": 0,
                "start": "2024-01-17 22:07:53.764726",
                "stderr": "",
                "stderr_lines": [],
                "stdout": "I can speak English",
                "stdout_lines": [
                    "I can speak English"
                ]
            }
        ],
        "skipped": false
    }
}

PLAY RECAP *********************************************************************
localhost                  : ok=3    changed=1    unreachable=0    failed=0    skipped=0    rescued=0    ignored=0
- 방금 results의 실행 결과는 배열 형식으로 저장된 것을 볼 수 있다. 이때 results의 특정 값을 플레이북에서 사용할 경우 loop문을 이용할 수 있습니다.
- debug 모듈에 loop 키워드를 사용하여 result.results를 아이템 변수로 사용하겠습니다.
- 그리고 해당 아이템의 stdout의 값을 출력할 때는 item.stdout이라는 변수로 결과값을 출력하겠습니다.
## loop_register1.yml

---
- hosts: localhost
  tasks:
    - name: Loop echo test
      ansible.builtin.shell: "echo 'I can speak {{ item }}'"
      loop:
        - Korean
        - English
      register: result

    - name: Show result
      ansible.builtin.debug:
        msg: "Stdout: {{ item.stdout }}"
      loop: "{{ result.results }}"

## 실행
ansible-playbook loop_register1.yml

PLAY [localhost] ***************************************************************

TASK [Loop echo test] **********************************************************
changed: [localhost] => (item=Korean)
changed: [localhost] => (item=English)

TASK [Show result] *************************************************************
ok: [localhost] => (item={'changed': True, 'stdout': 'I can speak Korean', 'stderr': '', 'rc': 0, 'cmd': "echo 'I can speak Korean'", 'start': '2024-01-17 22:12:53.504547', 'end': '2024-01-17 22:12:53.508476', 'delta': '0:00:00.003929', 'msg': '', 'invocation': {'module_args': {'_raw_params': "echo 'I can speak Korean'", '_uses_shell': True, 'stdin_add_newline': True, 'strip_empty_ends': True, 'argv': None, 'chdir': None, 'executable': None, 'creates': None, 'removes': None, 'stdin': None}}, 'stdout_lines': ['I can speak Korean'], 'stderr_lines': [], 'failed': False, 'item': 'Korean', 'ansible_loop_var': 'item'}) => {
    "msg": "Stdout: I can speak Korean"
}
ok: [localhost] => (item={'changed': True, 'stdout': 'I can speak English', 'stderr': '', 'rc': 0, 'cmd': "echo 'I can speak English'", 'start': '2024-01-17 22:12:53.739508', 'end': '2024-01-17 22:12:53.743119', 'delta': '0:00:00.003611', 'msg': '', 'invocation': {'module_args': {'_raw_params': "echo 'I can speak English'", '_uses_shell': True, 'stdin_add_newline': True, 'strip_empty_ends': True, 'argv': None, 'chdir': None, 'executable': None, 'creates': None, 'removes': None, 'stdin': None}}, 'stdout_lines': ['I can speak English'], 'stderr_lines': [], 'failed': False, 'item': 'English', 'ansible_loop_var': 'item'}) => {
    "msg": "Stdout: I can speak English"
}

PLAY RECAP *********************************************************************
localhost                  : ok=2    changed=1    unreachable=0    failed=0    skipped=0    rescued=0    ignored=0
- result 의 results 값들을 표준출력으로 출력한 것을 볼 수 있습니다.
도전과제 1 : linux user1~10(10명) 를 반복문을 통해서 생성 후 확인 후 삭제까지 해보자
## add-user10.yml
---

- hosts: all
  tasks:
  - name: Create User user
    ansible.builtin.user:
      name: user"{{ item }}"
      state: present
    loop: "{{ range(1, 11)|list }}"
## 결과

for i in {1..3}; do echo ">> tnode$i <<"; ssh tnode$i tail -n 10 /etc/passwd; echo; done
>> tnode1 <<
user"1":x:1001:1001::/home/user"1":/bin/sh
user"2":x:1002:1002::/home/user"2":/bin/sh
user"3":x:1003:1003::/home/user"3":/bin/sh
user"4":x:1004:1004::/home/user"4":/bin/sh
user"5":x:1005:1005::/home/user"5":/bin/sh
user"6":x:1006:1006::/home/user"6":/bin/sh
user"7":x:1007:1007::/home/user"7":/bin/sh
user"8":x:1008:1008::/home/user"8":/bin/sh
user"9":x:1009:1009::/home/user"9":/bin/sh
user"10":x:1010:1010::/home/user"10":/bin/sh

>> tnode2 <<
user"1":x:1001:1001::/home/user"1":/bin/sh
user"2":x:1002:1002::/home/user"2":/bin/sh
user"3":x:1003:1003::/home/user"3":/bin/sh
user"4":x:1004:1004::/home/user"4":/bin/sh
user"5":x:1005:1005::/home/user"5":/bin/sh
user"6":x:1006:1006::/home/user"6":/bin/sh
user"7":x:1007:1007::/home/user"7":/bin/sh
user"8":x:1008:1008::/home/user"8":/bin/sh
user"9":x:1009:1009::/home/user"9":/bin/sh
user"10":x:1010:1010::/home/user"10":/bin/sh

>> tnode3 <<
user"1":x:1001:1001::/home/user"1":/bin/sh
user"2":x:1002:1002::/home/user"2":/bin/sh
user"3":x:1003:1003::/home/user"3":/bin/sh
user"4":x:1004:1004::/home/user"4":/bin/sh
user"5":x:1005:1005::/home/user"5":/bin/sh
user"6":x:1006:1006::/home/user"6":/bin/sh
user"7":x:1007:1007::/home/user"7":/bin/sh
user"8":x:1008:1008::/home/user"8":/bin/sh
user"9":x:1009:1009::/home/user"9":/bin/sh
user"10":x:1010:1010::/home/user"10":/bin/sh


## remove-user10.yml

---

- hosts: all
  tasks:
  - name: Remove User user
    ansible.builtin.user:
      name: user"{{ item }}"
      state: absent
      remove: yes
    loop: "{{ range(1, 11)|list }}"

## 결과

for i in {1..3}; do echo ">> tnode$i <<"; ssh tnode$i tail -n 10 /etc/passwd; echo; done
>> tnode1 <<
uuidd:x:107:113::/run/uuidd:/usr/sbin/nologin
tcpdump:x:108:114::/nonexistent:/usr/sbin/nologin
sshd:x:109:65534::/run/sshd:/usr/sbin/nologin
pollinate:x:110:1::/var/cache/pollinate:/bin/false
landscape:x:111:116::/var/lib/landscape:/usr/sbin/nologin
fwupd-refresh:x:112:117:fwupd-refresh user,,,:/run/systemd:/usr/sbin/nologin
ec2-instance-connect:x:113:65534::/nonexistent:/usr/sbin/nologin
_chrony:x:114:121:Chrony daemon,,,:/var/lib/chrony:/usr/sbin/nologin
ubuntu:x:1000:1000:Ubuntu:/home/ubuntu:/bin/bash
lxd:x:999:100::/var/snap/lxd/common/lxd:/bin/false

>> tnode2 <<
uuidd:x:107:113::/run/uuidd:/usr/sbin/nologin
tcpdump:x:108:114::/nonexistent:/usr/sbin/nologin
sshd:x:109:65534::/run/sshd:/usr/sbin/nologin
pollinate:x:110:1::/var/cache/pollinate:/bin/false
landscape:x:111:116::/var/lib/landscape:/usr/sbin/nologin
fwupd-refresh:x:112:117:fwupd-refresh user,,,:/run/systemd:/usr/sbin/nologin
ec2-instance-connect:x:113:65534::/nonexistent:/usr/sbin/nologin
_chrony:x:114:121:Chrony daemon,,,:/var/lib/chrony:/usr/sbin/nologin
ubuntu:x:1000:1000:Ubuntu:/home/ubuntu:/bin/bash
lxd:x:999:100::/var/snap/lxd/common/lxd:/bin/false

>> tnode3 <<
uuidd:x:107:113::/run/uuidd:/usr/sbin/nologin
tcpdump:x:108:114::/nonexistent:/usr/sbin/nologin
sshd:x:109:65534::/run/sshd:/usr/sbin/nologin
pollinate:x:110:1::/var/cache/pollinate:/bin/false
landscape:x:111:116::/var/lib/landscape:/usr/sbin/nologin
fwupd-refresh:x:112:117:fwupd-refresh user,,,:/run/systemd:/usr/sbin/nologin
ec2-instance-connect:x:113:65534::/nonexistent:/usr/sbin/nologin
_chrony:x:114:121:Chrony daemon,,,:/var/lib/chrony:/usr/sbin/nologin
ubuntu:x:1000:1000:Ubuntu:/home/ubuntu:/bin/bash
lxd:x:999:100::/var/snap/lxd/common/lxd:/bin/false
도전과제 2 : loop 반복문 중 sequence 를 이용하여 /var/log/test1 ~ /var/log/test100 100개 파일(file 모듈)을 생성 확인 후 삭제를 해보자
## 생성
## add-file100.yml
---
- hosts: all

  tasks:
    - name: Create files
      ansible.builtin.file:
        path: /var/log/test{{ item }}
        state: touch
      with_sequence: start=1 end=100

## 확인 -> 세갸의 노드에 /var/log/test100 파일이 존재하는지 확인

ansible -m shell -a "ls -l /var/log/test100" all
tnode2 | CHANGED | rc=0 >>
-rw-r--r-- 1 root root 0 Jan 17 22:44 /var/log/test100
tnode1 | CHANGED | rc=0 >>
-rw-r--r-- 1 root root 0 Jan 17 22:44 /var/log/test100
tnode3 | CHANGED | rc=0 >>
-rw-r--r-- 1 root root 0 Jan 17 22:44 /var/log/test100

## 삭제

## remove-file100.yml
---
- hosts: all

  tasks:
    - name: Remove files
      ansible.builtin.file:
        path: /var/log/test{{ item }}
        state: absent
      with_sequence: start=1 end=100

## 확인

ansible -m shell -a "ls -l /var/log/test100" all
tnode1 | FAILED | rc=2 >>
ls: cannot access '/var/log/test100': No such file or directorynon-zero return code
tnode3 | FAILED | rc=2 >>
ls: cannot access '/var/log/test100': No such file or directorynon-zero return code
tnode2 | FAILED | rc=2 >>
ls: cannot access '/var/log/test100': No such file or directorynon-zero return code
조건문
-
Conditionals when : https://docs.ansible.com/ansible/latest/playbook_guide/playbooks_conditionals.html
-
앤서블은 조건문을 사용하여 특정 조건이 충족될 때 작업 또는 플레이를 실행할 수 있습니다.
-
예를 들면 조건문을 사용하여 호스트의 운영체제 버전에 해당하는 서비스를 설치하는 방식입니다.
-
앤서블에서 조건문을 사용할 때는 플레이 변수, 작업 변수, 앤서블 팩트 등을 사용할 수 있습니다.
조건 작업 구문 : when 문은 조건부로 작업을 실행할 때 테스트할 조건을 값으로 사용합니다.
-
조건이 충족되면 작업이 실행되고, 조건이 충족되지 않으면 작업을 건너뜁니다.
-
when 문을 테스트하는 가장 간단한 조건 중 하나는 Boolean 변수가 true인지 false인지 여부입니다.
- run_my_task 변수에 true 값, when 문에서 run_my_task를 사용하면 true인 경우에만 작업이 실행되는 플레이북을 작성해보겠습니다.
## when_task.yml
---
- hosts: localhost
  vars:
    run_my_task: true

  tasks:
  - name: echo message
    ansible.builtin.shell: "echo test"
    when: run_my_task
    register: result

  - name: Show result
    ansible.builtin.debug:
      var: result

## 결과
ansible-playbook when_task.yml

PLAY [localhost] ***************************************************************

TASK [echo message] ************************************************************
changed: [localhost]

TASK [Show result] *************************************************************
ok: [localhost] => {
    "result": {
        "changed": true,
        "cmd": "echo test",
        "delta": "0:00:00.015949",
        "end": "2024-01-17 22:59:08.481549",
        "failed": false,
        "msg": "",
        "rc": 0,
        "start": "2024-01-17 22:59:08.465600",
        "stderr": "",
        "stderr_lines": [],
        "stdout": "test",
        "stdout_lines": [
            "test"
        ]
    }
}

PLAY RECAP *********************************************************************
localhost : ok=2 changed=1 unreachable=0 failed=0 skipped=0 rescued=0 ignored=0 - 만약, run_my_task 값을 false 로 준다면 어떻게 되는지 봅시다.
## when_task.yml
---
- hosts: localhost
  vars:
    run_my_task: false

  tasks:
  - name: echo message
    ansible.builtin.shell: "echo test"
    when: run_my_task
    register: result

  - name: Show result
    ansible.builtin.debug:
      var: result


## 확인
ansible-playbook when_task.yml

PLAY [localhost] ***************************************************************

TASK [echo message] ************************************************************
skipping: [localhost]

TASK [Show result] *************************************************************
ok: [localhost] => {
    "result": {
        "changed": false,
        "false_condition": "run_my_task",
        "skip_reason": "Conditional result was False",
        "skipped": true
    }
}

PLAY RECAP *********************************************************************
localhost : ok=1 changed=0 unreachable=0 failed=0 skipped=1 rescued=0 ignored=0 - 해당 태스트가 수행되지 않고 skipping 됩니다.(건너뜀)
조건 연산자 : when 문에 bool 변수(true, false) 외에도 조건 연산자를 사용할 수 있습니다.
- 예를 들어 when 문에 ansible_facts[’machine’] == “x86_64” 라는 구문을 사용했다면 ansible_facts[’machine’] 값이 x86_64일 때만 해당 태스크를 수행합니다.
| 연산 예시 | 설명 |
|---|---|
| ansible_facts[’machine’] == “x86_64” | ansible_facts[’machine’] 값이 x86_64와 같으면 true |
| max_memory == 512 | max_memory 값이 512와 같다면 true |
| min_memory https://www.youtube.com/watch?v=u17SmSSQ9rE 128 | min_memory 값이 128보다 작으면 true |
| min_memory > 256 | min_memory 값이 256보다 크면 true |
| min_memory <= 256 | min_memory 값이 256보다 작거나 같으면 true |
| min_memory >= 512 | min_memory 값이 512보다 크거나 같으면 true |
| min_memory != 512 | min_memory 값이 512와 같지 않으면 true |
| min_memory is defined | min_memory 라는 변수가 있으면 true |
| min_memory is not defined | min_memory 라는 변수가 없으면 true |
| memory_available | memory 값이 true이며 true, 이때 해당 값이 1이거나 True 또는 yes면 true |
| not memory_available | memory 값이 false이며 true, 이때 해당 값이 0이거나 False 또는 no면 true |
| ansible_facts[’distribution’] in supported_distros | ansible_facts[’distribution’]의 값이 supported_distros 라는 변수에 있으면 true |
- != : 값이 같지 않을 때 참 true
- >, >=, <=, < : ‘초과, ‘ 이상’, ‘이하’, ‘미만’ 일 때에 참 true
- not : 조건의 부정
- and, or : ‘그리고’, ‘또는’의 의미로 여러 조건의 조합 가능
- in : 값이 포함된 경우에 참 true. 예를 들어 2 in “1, 2, 3” 은 참 true
- is defined : 변수가 정의된 경우 참 true
- OS 종류에 따라 태스크를 수행하는 예제를 통해 조건 연산자 사용법에 대해 알아보겠습니다.
- vars 키워드로 supported_distros 라는 변수를 사전 타입의 값으로 저장하고 태스크의 when 구문에서 ansible_facts[’distribution’] in supported_distros 라는 조건문을 추가하는 플레이북을 작성해보겠습니다.
## check_os.yml
---
- hosts: all
  vars:
    supported_distros:
      - Ubuntu
      - CentOS

  tasks:
    - name: Print supported os
      ansible.builtin.debug:
        msg: "This {{ ansible_facts['distribution'] }} need to use apt"
      when: ansible_facts['distribution'] in supported_distros

## 플레이북 실행
ansible-playbook check_os.yml

PLAY [all] *********************************************************************

TASK [Print supported os] ******************************************************
ok: [tnode1] => {
    "msg": "This Ubuntu need to use apt"
}
ok: [tnode2] => {
    "msg": "This Ubuntu need to use apt"
}
ok: [tnode3] => {
    "msg": "This Ubuntu need to use apt"
}

PLAY RECAP *********************************************************************
tnode1                     : ok=1    changed=0    unreachable=0    failed=0    skipped=0    rescued=0    ignored=0
tnode2                     : ok=1    changed=0    unreachable=0    failed=0    skipped=0    rescued=0    ignored=0
tnode3                     : ok=1    changed=0    unreachable=0    failed=0    skipped=0    rescued=0    ignored=0
복수 조건문 : when 문은 단일 조건문 뿐만 아니라 복수 조건문도 사용할 수 있습니다.
-
예를 들어 CentOS이고 서버 타입이 x86_64일 경우에만 작업이 실행되게 구성할 수 있습니다.
-
그럼 운영체제가 CentOS이거나 우분투일 경우 작업이 수행되는 예제를 통해 복수 조건문 사용 예를 살펴보겠습니다.
## check_os1.yml
---
- hosts: all

  tasks:
    - name: Print os type
      ansible.builtin.debug:
        msg: "OS Type {{ ansible_facts['distribution'] }}"
      when: ansible_facts['distribution'] == "CentOS" or ansible_facts['distribution'] == "Ubuntu"

## 플레이북 실행 결과
ansible-playbook check_os1.yml

PLAY [all] *********************************************************************

TASK [Print os type] ***********************************************************
ok: [tnode1] => {
    "msg": "OS Type Ubuntu"
}
ok: [tnode2] => {
    "msg": "OS Type Ubuntu"
}
ok: [tnode3] => {
    "msg": "OS Type Ubuntu"
}

PLAY RECAP *********************************************************************
tnode1                     : ok=1    changed=0    unreachable=0    failed=0    skipped=0    rescued=0    ignored=0
tnode2                     : ok=1    changed=0    unreachable=0    failed=0    skipped=0    rescued=0    ignored=0
tnode3                     : ok=1    changed=0    unreachable=0    failed=0    skipped=0    rescued=0    ignored=0
- 그러면 운영체제가 ubuntu 이고 버전이 22.04 인 경우에만 메시지를 출력하는 플레이북을 작성해보겠습니다.
## check_os3.yml
---
- hosts: all

  tasks:
    - name: Print os type
      ansible.builtin.debug:
        msg: >-
             OS Type: {{ ansible_facts['distribution'] }}
             OS Version: {{ ansible_facts['distribution_version'] }}
      when: ansible_facts['distribution'] == "Ubuntu" and ansible_facts['distribution_version'] == "22.04"

## 플레이북 실행
ansible-playbook check_os2.yml

PLAY [all] *********************************************************************

TASK [Print os type] ***********************************************************
ok: [tnode1] => {
    "msg": "OS Type: Ubuntu OS Version: 22.04"
}
ok: [tnode2] => {
    "msg": "OS Type: Ubuntu OS Version: 22.04"
}
ok: [tnode3] => {
    "msg": "OS Type: Ubuntu OS Version: 22.04"
}

PLAY RECAP *********************************************************************
tnode1                     : ok=1    changed=0    unreachable=0    failed=0    skipped=0    rescued=0    ignored=0
tnode2                     : ok=1    changed=0    unreachable=0    failed=0    skipped=0    rescued=0    ignored=0
tnode3                     : ok=1    changed=0    unreachable=0    failed=0    skipped=0    rescued=0    ignored=0
- 사전 형태의 목록으로 표현하는 방법도 있습니다.
---
- hosts: all

  tasks:
    - name: Print os type
      ansible.builtin.debug:
        msg: >-
             OS Type: {{ ansible_facts['distribution'] }}
             OS Version: {{ ansible_facts['distribution_version'] }}
      when:
        - ansible_facts['distribution'] == "Ubuntu"
- ansible_facts['distribution_version'] == "22.04"-
and 와 or 연산자를 동시에 사용할수도 있습니다.
- 운영체제가 CentOS 이면서 버전이 8 또는 운영체제가 Ubuntu 이면서 버전이 22.04 면 메시지를 출력하는 플레이북입니다.
---
- hosts: all

  tasks:
    - name: Print os type
      ansible.builtin.debug:
        msg: >-
             OS Type: {{ ansible_facts['distribution'] }}
             OS Version: {{ ansible_facts['distribution_version'] }}
      when: >
          ( ansible_facts['distribution'] == "CentOS" and
            ansible_facts['distribution_version'] == "8" )
          or
          ( ansible_facts['distribution'] == "Ubuntu" and
            ansible_facts['distribution_version'] == "22.04" )
도전 과제 3 : Ubuntu OS이면서 fqdn으로 tnode1 인 경우, debug 모듈을 사용하여 OS 정보와 fqdn 정보를 출력해봅시다.
## fqdn.yml
---
- hosts: all

  tasks:
    - name: Print os type
      ansible.builtin.debug:
        msg: >-
             fqdn: {{ ansible_facts['fqdn'] }}
             OS: {{ ansible_facts['distribution'] }}
      when:
        - ansible_facts['fqdn'] == "ip-10-10-1-11.ap-northeast-2.compute.internal"
        - ansible_facts['distribution'] == "Ubuntu"

## 플레이북 실행 결과
ansible-playbook fqdn.yml

PLAY [all] *********************************************************************

TASK [Print os type] ***********************************************************
ok: [tnode1] => {
    "msg": "fqdn: ip-10-10-1-11.ap-northeast-2.compute.internal OS: Ubuntu"
}
skipping: [tnode2]
skipping: [tnode3]

PLAY RECAP *********************************************************************
tnode1                     : ok=1    changed=0    unreachable=0    failed=0    skipped=0    rescued=0    ignored=0
tnode2                     : ok=0    changed=0    unreachable=0    failed=0    skipped=1    rescued=0    ignored=0
tnode3 : ok=0 changed=0 unreachable=0 failed=0 skipped=1 rescued=0 ignored=0 - ansible.builtin.command 모듈 : https://docs.ansible.com/ansible/latest/collections/ansible/builtin/command_module.html
반복문과 조건문을 함께 사용
-
when 문의 item[’mount’]은 loop문에서 선언한 ansible_facts의 mounts 중 mount 값과 size_available 값을 사용해 구현하는 플레이북을 작성해봅시다.
- 앤서블 팩트에서 mounts라는 사전 타입의 변수값을 반복하면서 mount가 ‘/’ 이고 size_available 값이 ‘300000000’(300메가)보다 큰 경우에만 메시지를 출력하고, 그렇지 않을 경우에는 작업을 건너뛰는 작업을 하게 됩니다.
## check_mount.yml
---
- hosts: db
  tasks:
    - name: Print Root Directory Size
      ansible.builtin.debug:
        msg: "Directory {{ item.mount }} size is {{ item.size_available }}"
      loop: "{{ ansible_facts['mounts'] }}"
      when: item['mount'] == "/" and item['size_available'] > 300000000

## 결과

ansible-playbook check_mount.yml --fl
ush-cache

PLAY [db] **********************************************************************

TASK [Gathering Facts] *********************************************************
ok: [tnode3]

TASK [Print Root Directory Size] ***********************************************
ok: [tnode3] => (item={'mount': '/', 'device': '/dev/root', 'fstype': 'ext4', 'options': 'rw,relatime,discard,errors=remount-ro', 'size_total': 31024283648, 'size_available': 29117050880, 'block_size': 4096, 'block_total': 7574288, 'block_available': 7108655, 'block_used': 465633, 'inode_total': 3870720, 'inode_available': 3796179, 'inode_used': 74541, 'uuid': '9e71e708-e903-4c26-8506-d85b84605ba0'}) => {
    "msg": "Directory / size is 29117050880"
}
skipping: [tnode3] => (item={'mount': '/snap/amazon-ssm-agent/7628', 'device': '/dev/loop0', 'fstype': 'squashfs', 'options': 'ro,nodev,relatime,errors=continue,threads=single', 'size_total': 26214400, 'size_available': 0, 'block_size': 131072, 'block_total': 200, 'block_available': 0, 'block_used': 200, 'inode_total': 16, 'inode_available': 0, 'inode_used': 16, 'uuid': 'N/A'})
skipping: [tnode3] => (item={'mount': '/snap/core18/2812', 'device': '/dev/loop1', 'fstype': 'squashfs', 'options': 'ro,nodev,relatime,errors=continue,threads=single', 'size_total': 58458112, 'size_available': 0, 'block_size': 131072, 'block_total': 446, 'block_available': 0, 'block_used': 446, 'inode_total': 10944, 'inode_available': 0, 'inode_used': 10944, 'uuid': 'N/A'})
skipping: [tnode3] => (item={'mount': '/snap/snapd/20290', 'device': '/dev/loop4', 'fstype': 'squashfs', 'options': 'ro,nodev,relatime,errors=continue,threads=single', 'size_total': 42860544, 'size_available': 0, 'block_size': 131072, 'block_total': 327, 'block_available': 0, 'block_used': 327, 'inode_total': 658, 'inode_available': 0, 'inode_used': 658, 'uuid': 'N/A'})
skipping: [tnode3] => (item={'mount': '/snap/lxd/24322', 'device': '/dev/loop3', 'fstype': 'squashfs', 'options': 'ro,nodev,relatime,errors=continue,threads=single', 'size_total': 117440512, 'size_available': 0, 'block_size': 131072, 'block_total': 896, 'block_available': 0, 'block_used': 896, 'inode_total': 873, 'inode_available': 0, 'inode_used': 873, 'uuid': 'N/A'})
skipping: [tnode3] => (item={'mount': '/snap/core20/2015', 'device': '/dev/loop2', 'fstype': 'squashfs', 'options': 'ro,nodev,relatime,errors=continue,threads=single', 'size_total': 66584576, 'size_available': 0, 'block_size': 131072, 'block_total': 508, 'block_available': 0, 'block_used': 508, 'inode_total': 11991, 'inode_available': 0, 'inode_used': 11991, 'uuid': 'N/A'})
skipping: [tnode3] => (item={'mount': '/boot/efi', 'device': '/dev/nvme0n1p15', 'fstype': 'vfat', 'options': 'rw,relatime,fmask=0077,dmask=0077,codepage=437,iocharset=iso8859-1,shortname=mixed,errors=remount-ro', 'size_total': 109422592, 'size_available': 103088640, 'block_size': 512, 'block_total': 213716, 'block_available': 201345, 'block_used': 12371, 'inode_total': 0, 'inode_available': 0, 'inode_used': 0, 'uuid': 'A62D-E731'})

PLAY RECAP *********************************************************************
tnode3 : ok=2 changed=0 unreachable=0 failed=0 skipped=0 rescued=0 ignored=0 -
조건문을 사용할 때는 반복문뿐만 아니라 register 키워드로 작업 변수도 사용할 수 있습니다.
- 아래 플레이북은 systemctl 명령어로 rsyslog가 active인지를 체크하여 해당 결과를 result 변수에 저장하고, Print rsyslog status 태스크에서 result.stdout 값이 active 일 경우에만 해당 값을 출력하는 플레이북입니다.
## register-when.yml
---
- hosts: all

  tasks:
    - name: Get rsyslog service status
      ansible.builtin.command: systemctl is-active rsyslog
      register: result

    - name: Print rsyslog status
      ansible.builtin.debug:
        msg: "Rsyslog status is {{ result.stdout }}"
      when: result.stdout == "active"

## 플레이북 실행결과
ansible-playbook register-when.yml

PLAY [all] *********************************************************************

TASK [Gathering Facts] *********************************************************
ok: [tnode2]
ok: [tnode1]

TASK [Get rsyslog service status] **********************************************
changed: [tnode2]
changed: [tnode1]
changed: [tnode3]

TASK [Print rsyslog status] ****************************************************
ok: [tnode1] => {
    "msg": "Rsyslog status is active"
}
ok: [tnode2] => {
    "msg": "Rsyslog status is active"
}
ok: [tnode3] => {
    "msg": "Rsyslog status is active"
}

PLAY RECAP *********************************************************************
tnode1                     : ok=3    changed=1    unreachable=0    failed=0    skipped=0    rescued=0    ignored=0
tnode2                     : ok=3    changed=1    unreachable=0    failed=0    skipped=0    rescued=0    ignored=0
tnode3                     : ok=2    changed=1    unreachable=0    failed=0    skipped=0    rescued=0    ignored=0
도전 과제 4 : 0 부터 10까지 2씩 증가하는 인덱스에서 5보다 큰 값을 출력해보자
## simple.yml
---
- hosts: all

  tasks:
      - name: Run with items greater than 5
        ansible.builtin.command: echo {{ item }}
        loop: [ 0, 2, 4, 6, 8, 10 ]
        when: item > 5

## 플레이북 실행 결과
ansible-playbook simple.yml

PLAY [all] *********************************************************************

TASK [Run with items greater than 5] *******************************************
skipping: [tnode1] => (item=0)
skipping: [tnode1] => (item=2)
skipping: [tnode1] => (item=4)
skipping: [tnode2] => (item=0)
skipping: [tnode2] => (item=2)
skipping: [tnode3] => (item=0)
skipping: [tnode2] => (item=4)
skipping: [tnode3] => (item=2)
skipping: [tnode3] => (item=4)
changed: [tnode2] => (item=6)
changed: [tnode1] => (item=6)
changed: [tnode3] => (item=6)
changed: [tnode2] => (item=8)
changed: [tnode1] => (item=8)
changed: [tnode2] => (item=10)
changed: [tnode1] => (item=10)
changed: [tnode3] => (item=8)
changed: [tnode3] => (item=10)

PLAY RECAP *********************************************************************
tnode1                     : ok=1    changed=1    unreachable=0    failed=0    skipped=0    rescued=0    ignored=0
tnode2                     : ok=1    changed=1    unreachable=0    failed=0    skipped=0    rescued=0    ignored=0
tnode3                     : ok=1    changed=1    unreachable=0    failed=0    skipped=0    rescued=0    ignored=0
핸들러 및 작업 실패 처리
-
앤서블 모듈은 멱등(idempotent)이 가능하도록 설계되어 있습니다. 즉, 플레이북을 여러 번 실행해도 결과는 항상 동일합니다.
-
또한, 플레이 및 해당 작업은 여러 번 실행할 수 있지만, 해당 호스트는 원하는 상태로 만드는 데 필요한 경우에만 변경됩니다.
-
하지만, 실행한 작업에서 시스템을 변경해야 하는 경우 추가 작업을 실행해야 할 수도 있습니다.
-
예를 들어 서비스의 구성 파일을 변경하려면 변경 내용이 적용되도록 서비스를 다시 로드해야 합니다. 이때 핸들러는 다른 작업에서 트리거한 알림에 응답하는 작업이며, 해당 호스트에서 작업이 변경될 때만 핸들러에 통지합니다.
-
Handlers: running operations on change : https://docs.ansible.com/ansible/latest/playbook_guide/playbooks_handlers.html
핸들러
-
앤서블에서 핸들러를 사용하려면 notify 문을 사용하여 명시적으로 호출된 경우에만 사용할 수 있습니다.
-
또한 핸들러를 정의할 때는 같은 이름으로 여러 개의 핸들러를 정의하기보다는 각각의 고유한 이름을 사용하여 정의하는 것이 좋습니다.
-
rsyslog 재시작 태스크가 실행되면 notify 키워드를 통해 print msg라는 핸들러를 호출하는 플레이북을 작성해보겠습니다. 또한, 핸들러는 handlers 키워드로 시작합니다.
## handler_sample.yml
---
- hosts: tnode2
  tasks:
    - name: restart rsyslog
      ansible.builtin.service:
        name: "rsyslog"
        state: restarted
      notify:
        - print msg

  handlers:
    - name: print msg
      ansible.builtin.debug:
        msg: "rsyslog is restarted"

## 플레이북 실행 결과
ansible-playbook handler-sample.yml

PLAY [tnode2] ******************************************************************

TASK [restart rsyslog] *********************************************************
changed: [tnode2]

RUNNING HANDLER [print msg] ****************************************************
ok: [tnode2] => {
    "msg": "rsyslog is restarted"
}

PLAY RECAP *********************************************************************
tnode2                     : ok=2    changed=1    unreachable=0    failed=0    skipped=0    rescued=0    ignored=0
도전 과제 5 : - apache2 패키지를 apt 모듈을 통해서 설치 시, 핸들러를 호출하여 service 모듈로 apache2를 재시작 해보자
-
apt 모듈 : https://docs.ansible.com/ansible/latest/collections/ansible/builtin/apt_module.html
-
ansible.builtin.dnf 모듈 : https://docs.ansible.com/ansible/latest/collections/ansible/builtin/dnf_module.html
ansible-playbook handler_apache.yml

---
- hosts : all

  tasks:
    - name: Install apache httpd  (state=present is optional)
      ansible.builtin.apt:
        name: apache2
        state: present
      notify:
        - restart Apache2
        - print-msg

  handlers:
    - name: restart Apache2
      ansible.builtin.service:
        name: "apache2"
        state: restarted

    - name: print-msg
      ansible.builtin.debug:
        msg: "apache2 is restarted"


## 플레이북 실행
ansible-playbook handler_apache.yml

PLAY [all] *********************************************************************

TASK [Install apache httpd  (state=present is optional)] ***********************
ok: [tnode2]
ok: [tnode3]
ok: [tnode1]

PLAY RECAP *********************************************************************
tnode1                     : ok=1    changed=0    unreachable=0    failed=0    skipped=0    rescued=0    ignored=0
tnode2                     : ok=1    changed=0    unreachable=0    failed=0    skipped=0    rescued=0    ignored=0
tnode3                     : ok=1    changed=0    unreachable=0    failed=0    skipped=0    rescued=0    ignored=0
작업 실패 무시
-
앤서블은 플레이 시 각 작업의 반환 코드를 평가하여 작업의 성공 여부를 판단합니다. 일반적으로 작업이 실패하면 앤서블은 이후의 모든 작업을 건너뜁니다.
-
하지만 작업이 실패해도 플레이를 계속 실행할 수 있습니다. 이는 ignore_errors 라는 키워드로 구현할 수 있습니다.
- 존재하지 않는 apache3 패키지를 설치하는 작업을 추가하고 비교해보겠습니다.
## ignore_example.yml
---
- hosts : tnode1

  tasks:
    - name: Install apache3
      ansible.builtin.apt:
        name: apache3
        state: latest

    - name: Print msg
      ansible.builtin.debug:
        msg: "Before task is ignored"

## 플레이북 실행 결과
ansible-playbook ignore_example.yml

PLAY [tnode1] ******************************************************************************************

TASK [Install apache3] *********************************************************************************
fatal: [tnode1]: FAILED! => {"changed": false, "msg": "No package matching 'apache3' is available"}

PLAY RECAP *********************************************************************************************
tnode1                     : ok=0    changed=0    unreachable=0    failed=1    skipped=0    rescued=0    ignored=0

## ignore_example2.yml

---
- hosts : tnode1

  tasks:
    - name: Install apache3
      ansible.builtin.apt:
        name: apache3
        state: latest
      ignore_errors: yes

    - name: Print msg
      ansible.builtin.debug:
        msg: "Before task is ignored"

## 앤서블 플레이북 실행
ansible-playbook ignore-example-2.yml

PLAY [tnode1] ******************************************************************************************

TASK [Install apache3] *********************************************************************************
fatal: [tnode1]: FAILED! => {"changed": false, "msg": "No package matching 'apache3' is available"}
...ignoring

TASK [Print msg] ***************************************************************************************
ok: [tnode1] => {
    "msg": "Before task is ignored"
}

PLAY RECAP *********************************************************************************************
tnode1                     : ok=2    changed=0    unreachable=0    failed=0    skipped=0    rescued=0    ignored=1
작업 실패 후 핸들러 실행
-
앤서블은 일반적으로 작업이 실패하고 해당 호스트에서 플레이가 중단되면 이전 작업에서 알림을 받은 모든 핸들러가 실행되지 않습니다.
-
하지만 플레이북에 force_handlers: yes 키워드를 설정하면 이후 작업이 실패하여 플레이가 중단되어도 알림을 받은 핸들러가 호출됩니다.
- hosts 아래 force_handlers: yes 를 추가하고, install apache2 태스크를 추가한 플레이북을 작성해보겠습니다.
## force-handler.yml

---
- hosts: tnode2
  force_handlers: yes

  tasks:
    - name: restart rsyslog
      ansible.builtin.service:
        name: "rsyslog"
        state: restarted
      notify:
        - print msg

    - name: install apache3
      ansible.builtin.apt:
        name: "apache3"
        state: latest

  handlers:
    - name: print msg
      ansible.builtin.debug:
        msg: "rsyslog is restarted"

## 실행
ansible-playbook force-handler.yml