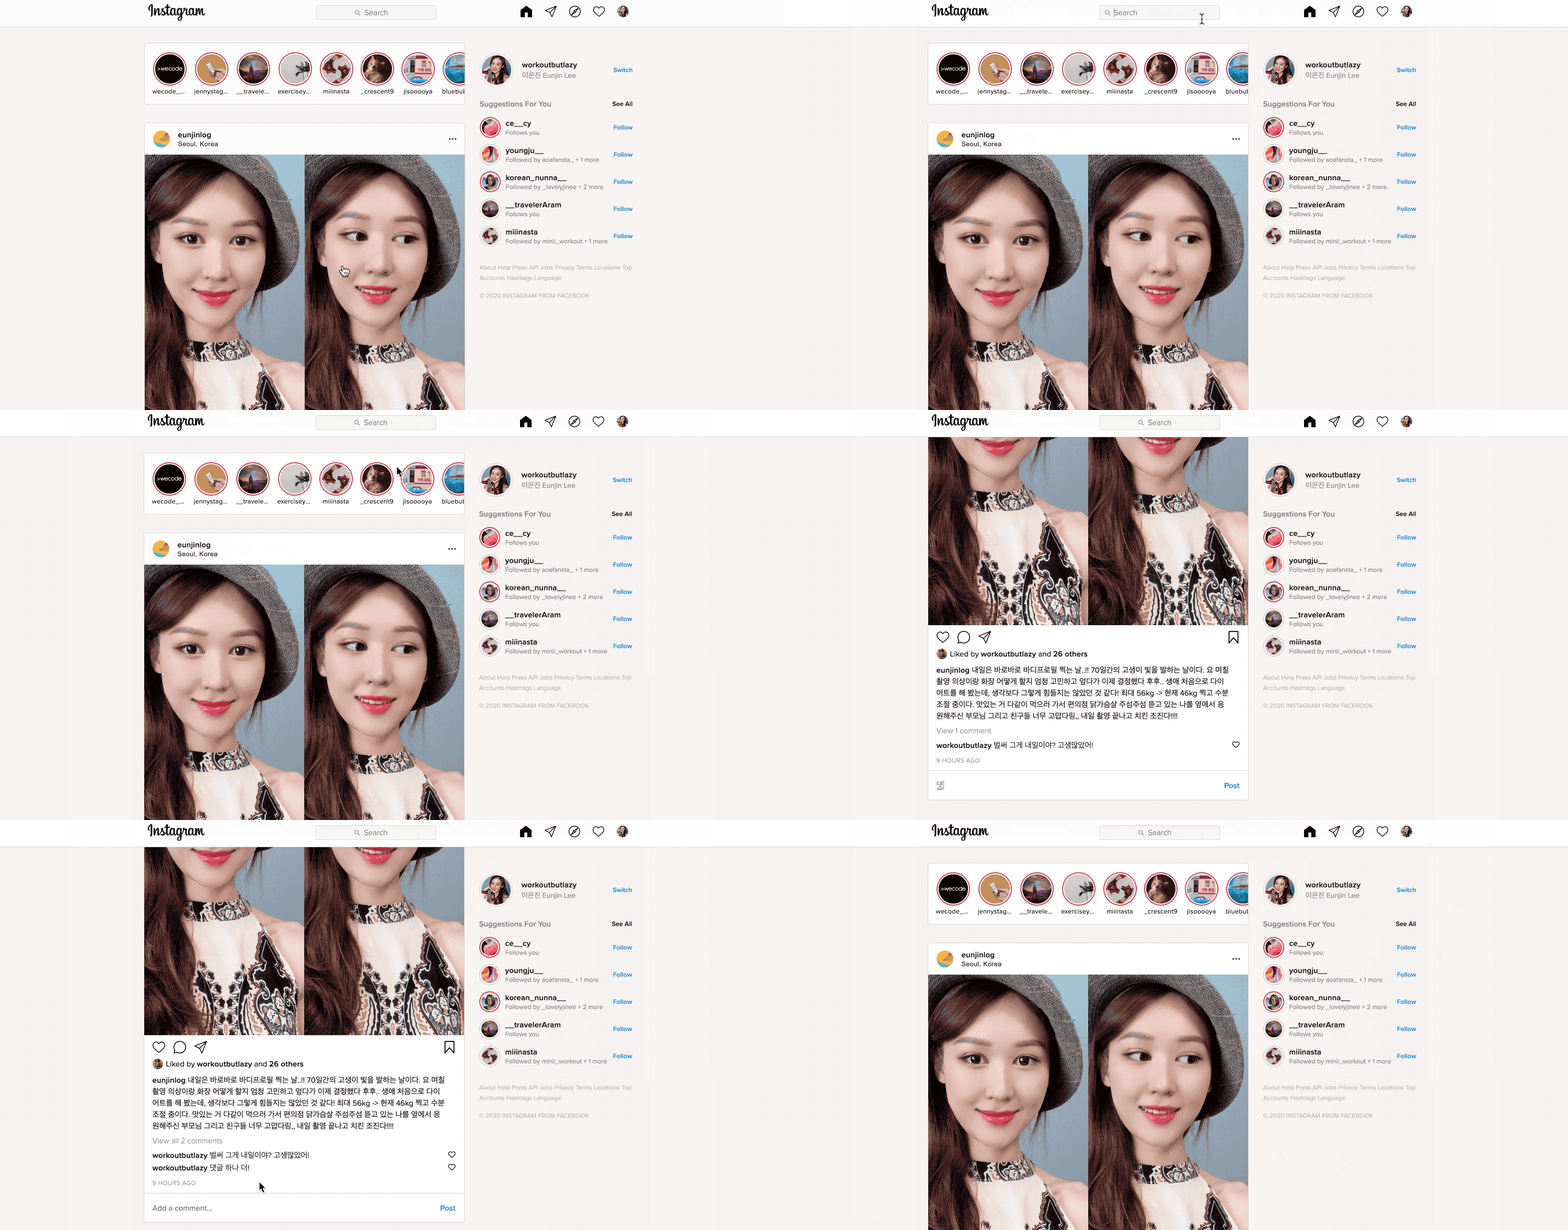
인스타그램 메인페이지를 클론해보았습니다. 이전까지 만들어 온 바닐라 JS 기능 구현 방법이 많이 적용되었습니다. 이번 프로젝트는 사용자 경험을 고려한 세부적인 기획을 한다기보다는, 자바스크립트의 기본적인 메서드를 연습하는 것과 CSS을 탄탄한 구조로 짜는 것이 목표였습니다. 처음으로 다른 사람에게 코드리뷰를 받아 본 프로젝트이자, 가장 오랫동안 애정을 가지고 작업한 웹앱입니다.
1. Main Features
1-1. Stories
인스타그램의 주요 기능인 스토리 부분입니다. Mock Data를 만들어서 자바스크립트에서 랜덤으로 가져오는 함수를 만들어 렌더링해주었습니다. CSS에서는 스크롤바를 감추는 속성과, 문자가 일정 길이 이상일 경우 '...'으로 축약하는 속성을 적용했습니다.
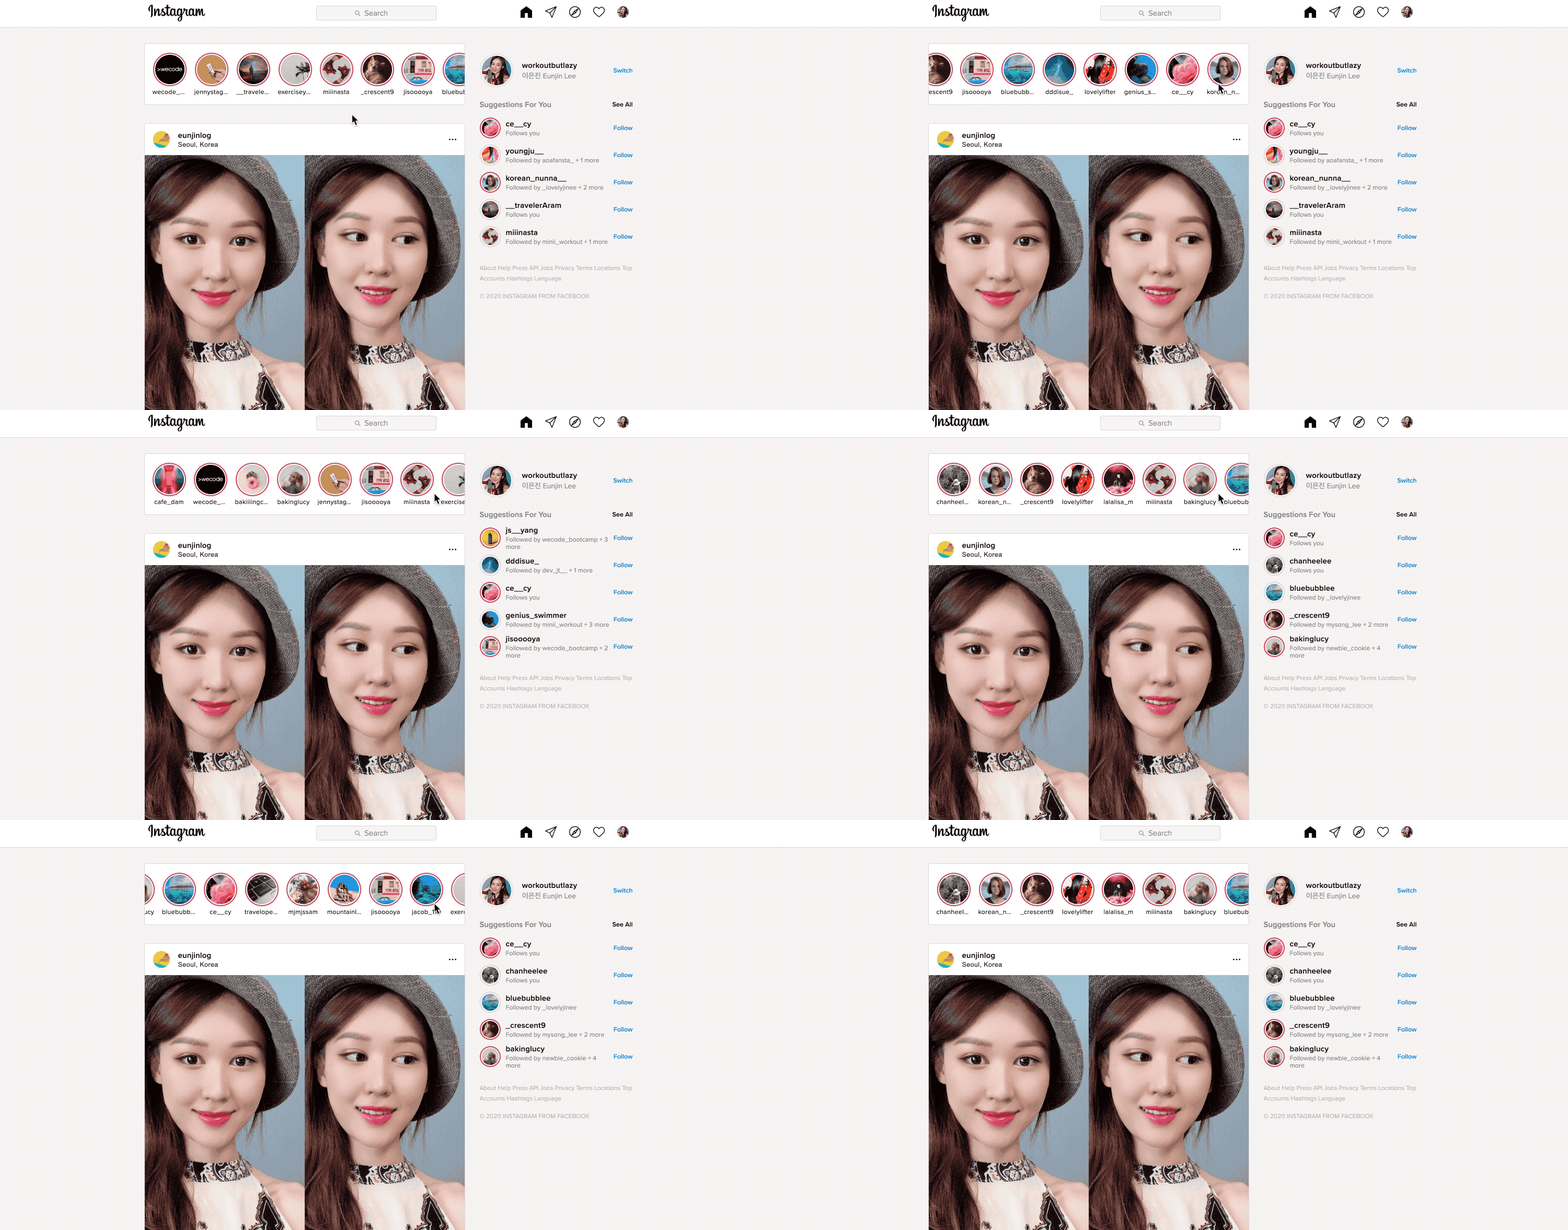
중복되지 않는 랜덤 인덱스 배열로 출력하기
//selecting random index without same element
const selectIndex = (totalIndex, selectingNumber) => {
  let randomIndexArray = []
  for (i=0; i<selectingNumber; i++) {   //check if there is any duplicate index
    randomNum = Math.floor(Math.random() * totalIndex)
    if (randomIndexArray.indexOf(randomNum) === -1) {
      randomIndexArray.push(randomNum)
    } else { //if the randomNum is already in the array retry
      i--
    }
  }
  return randomIndexArray
}
mock data에서 해당 인덱스 정보 불러오기
//rendering stories / getting data from user-infos.js
const renderStories = () => {
  const storyContainer = document.getElementById('stories-container')
  const randomIndexArray = selectIndex(24, 15)
  randomIndexArray.map((index) => {
    const story = document.createElement('div')
    story.classList.add('story')
    story.innerHTML = `
    <div class="story__view-button"><img src="${userInfos[index].userProfile}" alt="User image" class="story__user-image"></div>
    <div class="story__user-id">${userInfos[index].userId}</div>
    `
    storyContainer.appendChild(story)
  })
}
스크롤바 감추기
.stories-container {
  width: 614px;
  height: 118px;
  background: white;

  display: flex;
  justify-content: start;
  align-items: center;

  border: 1px solid var(--border-line-gray);
  border-radius: 4px;

  margin-bottom: 35px;
  padding: 0 8px;

  position: relative;

  overflow: scroll;
  overflow-y: hidden;
  -ms-overflow-style: none;
  scrollbar-width: none;
}

.stories-container::-webkit-scrollbar {
  display: none; /* Chrome, Safari, Opera*/
}
긴 아이디 축약하기
.story__user-id {
  max-width: 66px;
  font-size: var(--font-size-extrasmall);
  font-weight: var(--font-weight-medium);
  letter-spacing: 0.3px;

  display: inline-block;
  text-overflow: ellipsis;
  overflow: hidden;
  white-space: nowrap;
}
1-2. Search Users
구현하고 예쁘게 보여주는 데 가장 오랜 시간 동안 붙들고 있었던 부분이 바로 사용자 검색 기능입니다. 마찬가지로 mock data를 활용해서 검색 결과를 보여주었습니다. 장현님의 조언에 따라, 먼저 어떤 검색어를 입력해도 모든 사용자가 검색결과로 나오도록 만들고 난 다음에, 검색어에 따라 필터되어 결과로 나오게 하는 순서로 작업했습니다. 이를 위해 addSearchResultDOM(inputText, userInfo) 함수를 만들어서, innerHTML로 DOM에 접근해서 모든 결과를 한번에 출력하도록 만들었습니다. 그리고 나서 구체적인 인풋값을 받아 filter() 메서드와 includes() 메서드를 활용해 사용자 아이디나 정보가 검색되면 그 배열을forEach() 메서드로 하나씩 DOM에 출력되도록 했습니다.
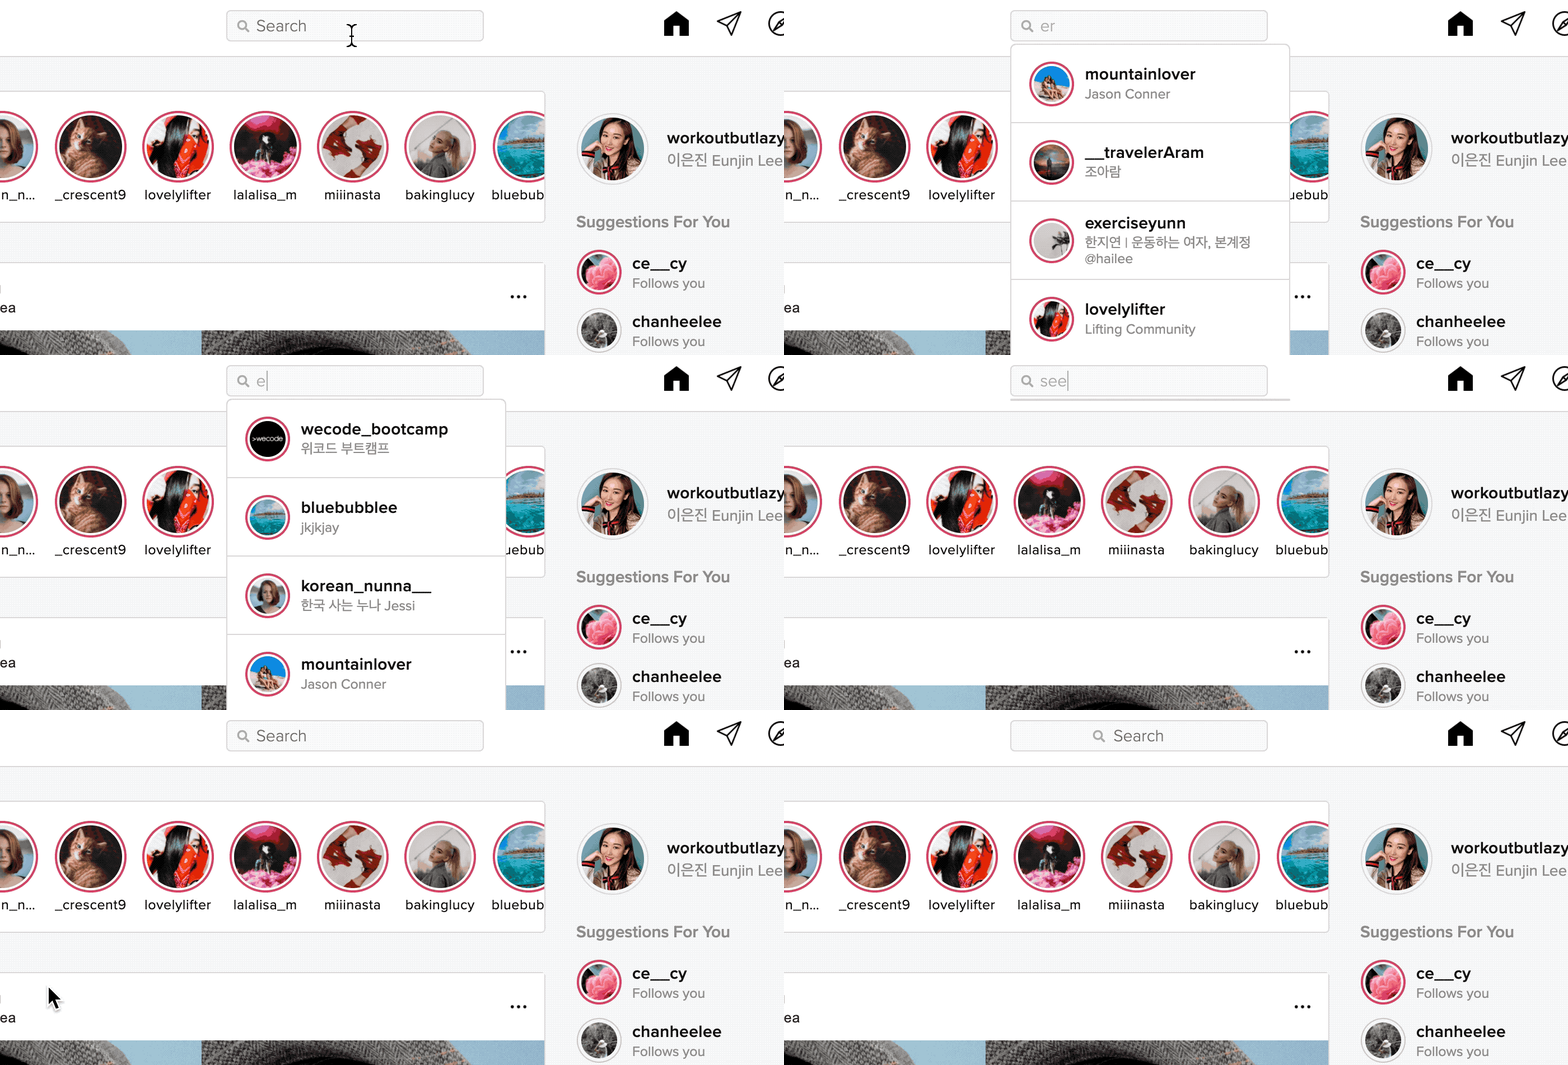
input값이 들어오면 DOM에 접근해서 검색결과를 나타내는 함수
//making search result DOM
const addSearchResultDOM = (inputText, userInfo) => {
  const searchResultEl = document.createElement('li') //li
  if (inputText !== '') {
    searchResultEl.classList.add('search-list__result')
    searchResultEl.innerHTML = `
    <div class="search-list__user-image-container">
      <img src="${userInfo.userProfile}" alt="User profile" class="search-list__user-image">
    </div>
    <div class="search-list__user-info-container">
      <div class="search-list__user-id user-link">${userInfo.userId}</div>
      <div class="search-list__user-name">${userInfo.userName}</div>
    </div>
    `
    searchList.classList.add('open')
    searchList.appendChild(searchResultEl)
    return searchList
  } else {
    searchList.classList.remove('open')
  }
}
input값에 따라 필터된 데이터를 위의 함수를 이용해 하나씩 렌더하는 함수
//search users
const renderSearchResult = () => {
  const searchText = searchInput.value
  let filteredUsers = userInfos.filter((userInfo) => {
    if (userInfo.userId.toLowerCase().includes(searchText.toLowerCase())
       || userInfo.userName.toLowerCase().includes(searchText.toLowerCase())) {
      return userInfo
    }
  })
  searchList.innerHTML = ''
  filteredUsers.forEach((filteredUser) => addSearchResultDOM(searchText, filteredUser))
}
1-3. Feed
인스타그램 피드의 데이터는 HTML로 하드코딩하였습니다. 실제 인스타의 느낌을 살리기 위해 본문을 1~2줄씩만 노출해서 보이게 한 후, more 버튼을 누르면 전체 글이 뜨도록 했습니다. {text-overflow: ellipsis;} 속성을 사용해서 본문의 첫 줄 가로길이보다 조금 짧은 길이에서 말줄임표를 넣어주도록 했고, more 버튼을 클릭해서 본문에 open 이라는 클래스가 추가되면 전체 가로길이를 차지하는 본문글을 전부 열람할 수 있도록 했습니다.
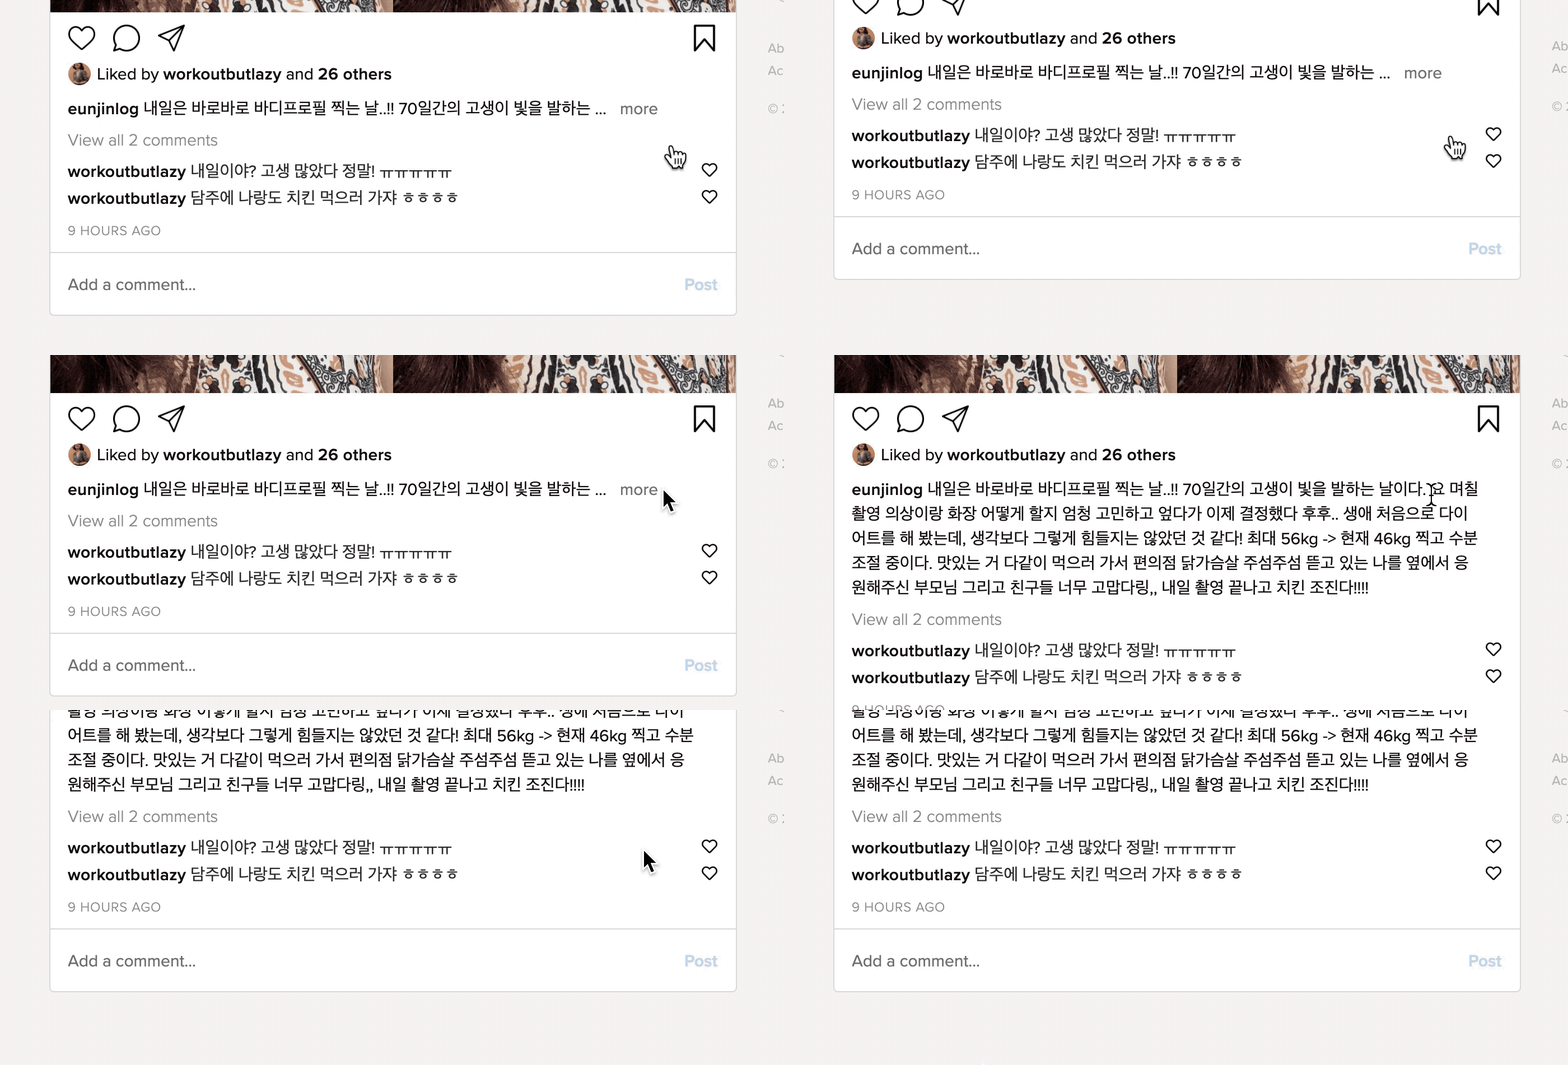
특정 가로길이 이상이면 말줄임표로 줄여서 나타내는 css 속성
/* feed article */
.feed__article {
  width: 490px;
  display: inline-block;
  text-overflow: ellipsis;
  overflow: hidden;
  white-space: nowrap;
}

.feed__article-more-button {
  display: inline;
  cursor: pointer;
  color: #777;
  margin-left: 3px;
}

.feed__article-more-button.open {
  display: none;
}

.feed__article.open {
  width: 560px;
  text-overflow: '';
  overflow: visible;
  white-space: normal;
}
more 버튼을 눌러 본문을 열람함
//opening an article with more button
const openArticle = () => {
  const article = document.getElementById('article')
  article.classList.add('open')
  moreArticleBtn.classList.add('open')
}

//more button event listener
moreArticleBtn.addEventListener('click', openArticle)
1-4. Comments
댓글을 입력하면 DOM에 예쁘게 출력이 되고, 댓글이 3개 이상 넘어가면 2개만 노출이 되고 나머지는 View all 5 comments와 같은 버튼을 클릭해 모두 열람할 수 있는 기능을 넣어보았습니다. 로컬스토리지 저장에 대한 내용은 밑에서 다시 언급할 것입니다.
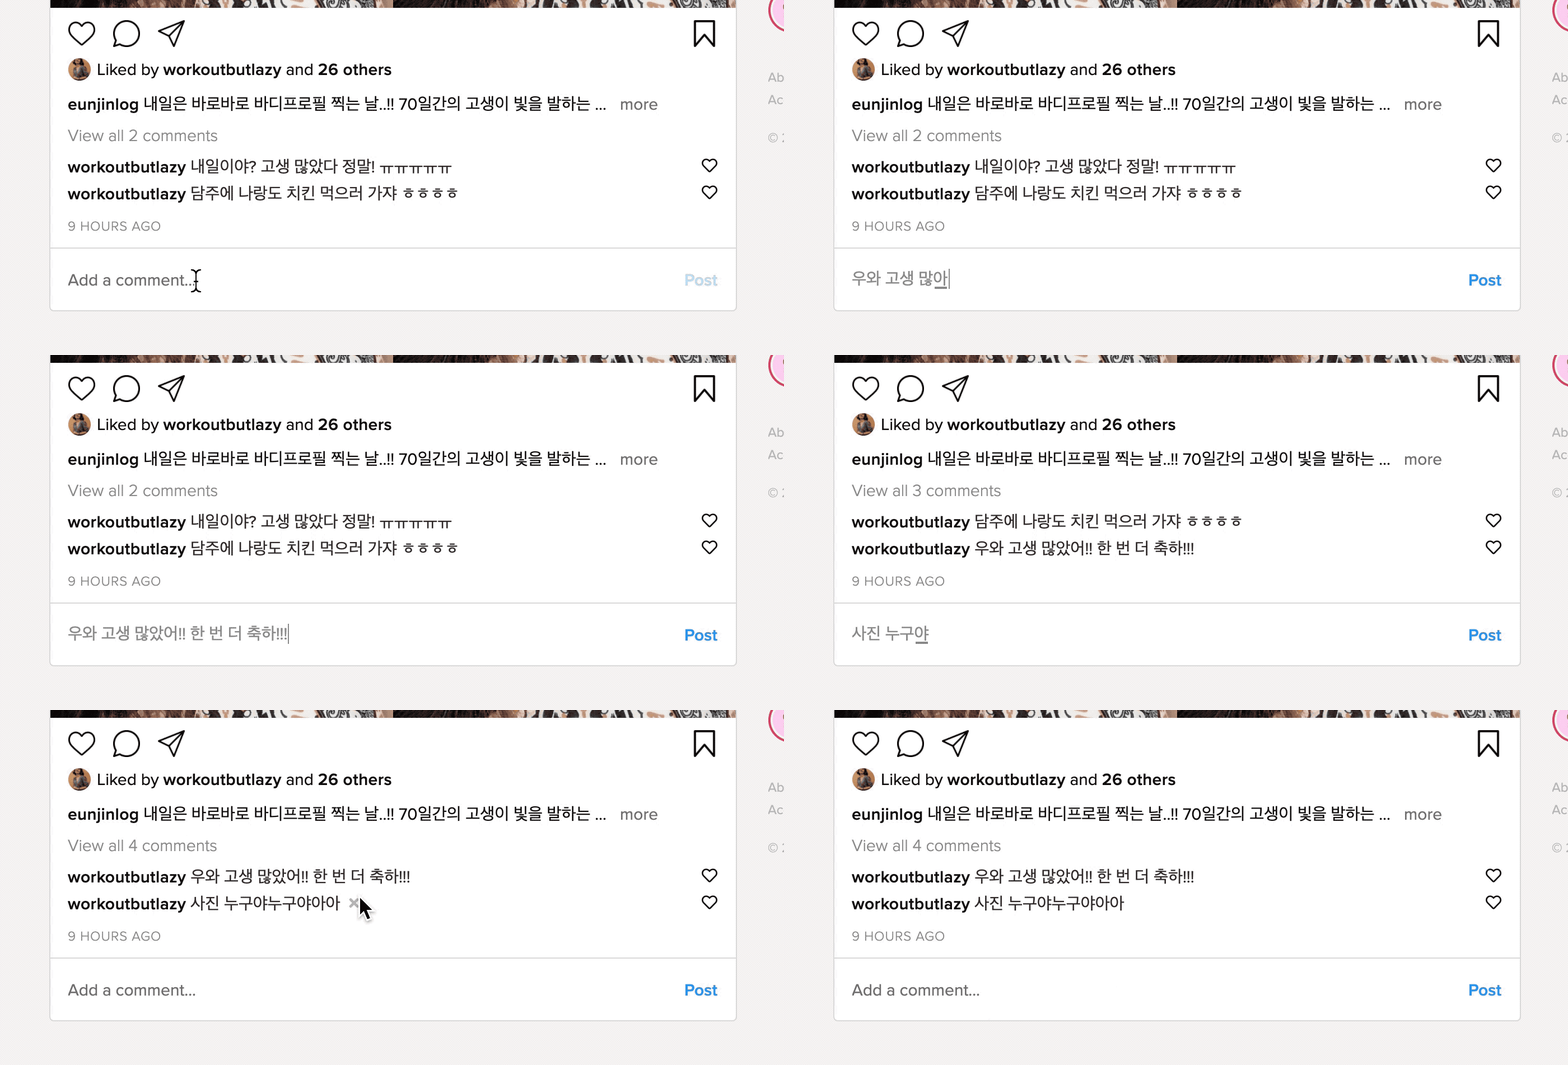
댓글 작성 시 DOM에 내용을 추가하는 함수
// add localstorage comments on the html one by one
const addCommentDOM = (comment) => {
  const commentEl = document.createElement('li')
  if (comment.text !== '') {
    viewCommentsBtn.innerText = `View ${comments.length === 1 ? '' : 'all'} ${comments.length} comment${comments.length === 1 ? '' : 's'}`
    commentEl.classList.add('comment__content-list')
    commentEl.innerHTML = ''
    commentEl.innerHTML = `
    <div class="comment__content-box">
      <span class="comment__content"><span class="comment__user user-link">workoutbutlazy</span>${comment.text}</span>
      <i class="comment__content-delete fas fa-times"token interpolation">${comment.id})"></i>
    </div>
    <i class="far fa-heart comment__heart" id="comment-heart"></i>
    `
    commentList.appendChild(commentEl)
  }
}
로컬스토리지의 댓글이 하나씩 addCommentDOM() 함수로 DOM에 추가됨
//render each comments from localstorage when refreshed
const renderComments = () => {
  comments.forEach((comment) => addCommentDOM(comment))
}
댓글 모두보기 버튼
//view all comments with button
const toggleViewCommentsBtn = () => {
  commentList.classList.toggle('view')
  if (commentList.classList.contains('view')) {
    viewCommentsBtn.innerText = 'Hide comments'
  } else {
    viewCommentsBtn.innerText = `View ${comments.length === 1 ? '' : 'all'} ${
      comments.length} comment${comments.length === 1 ? '' : 's'}`
  }
}

//view all comments button event listener
viewCommentsBtn.addEventListener('click', toggleViewCommentsBtn)
1-5. Suggested Users
추천친구 목록을 만들었습니다. mock data에서 정보를 불러와 DOM에 추가했고, newStory값이 true인 것만 스토리 업로드 표시(분홍색 테두리)가 되도록 했습니다.
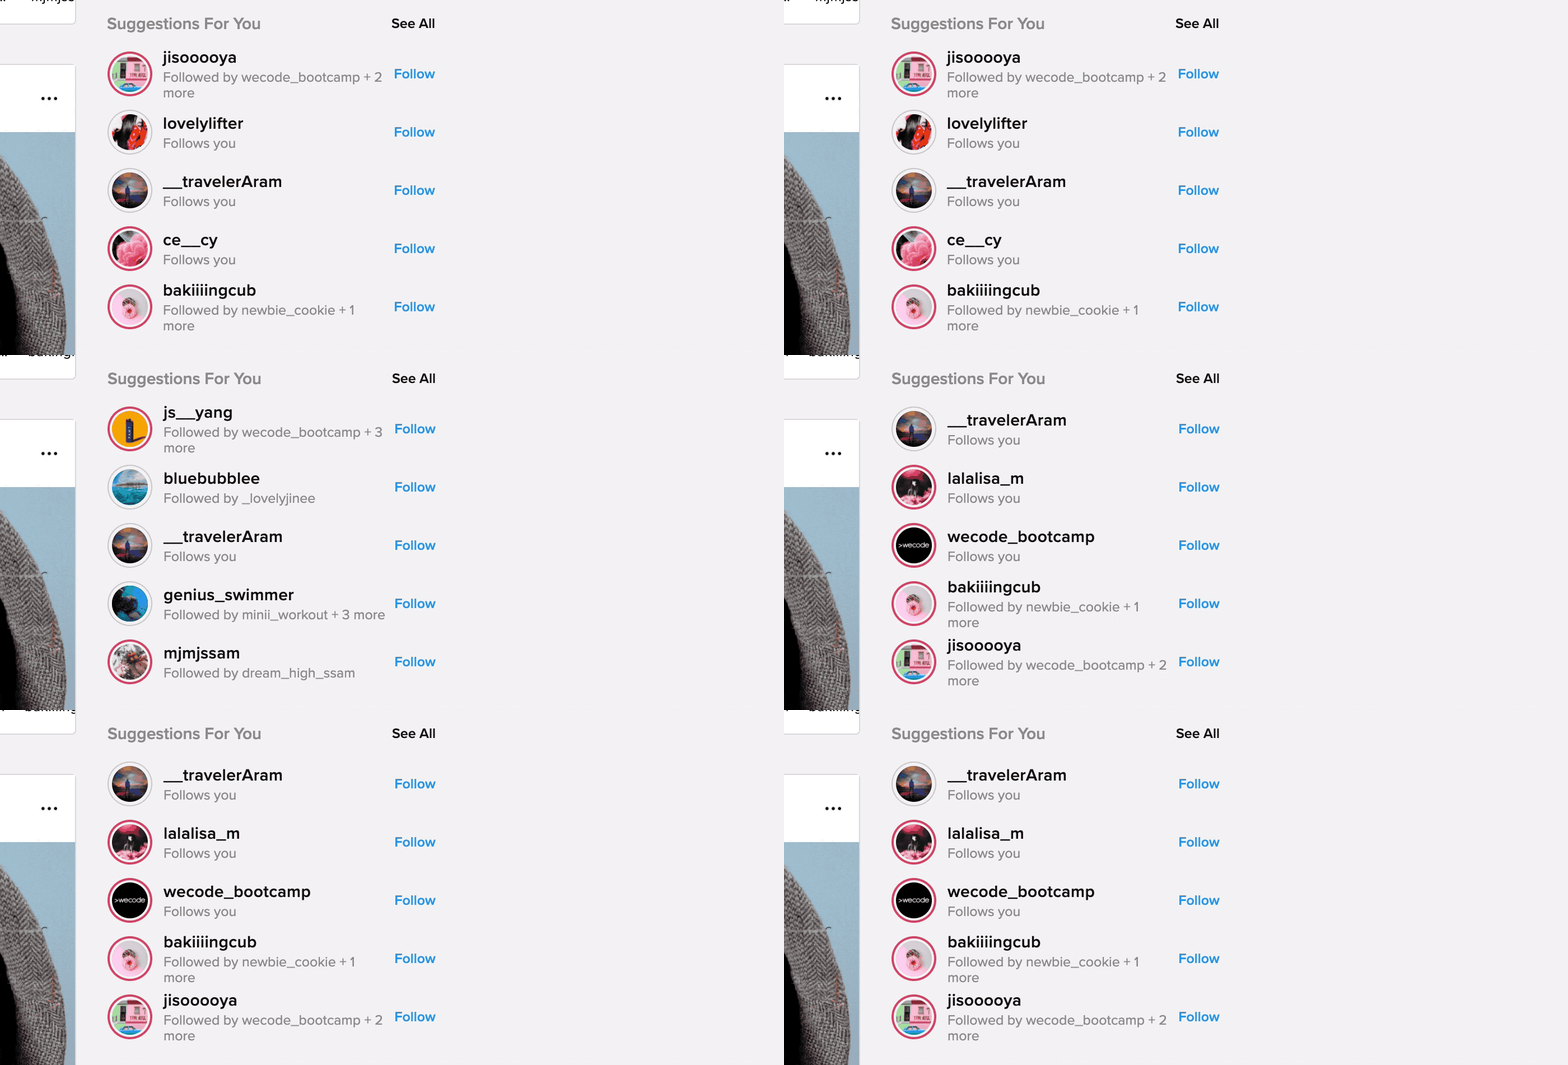
//rendering suggestion dom
const renderSuggestion = () => {
  const suggestionContainer = document.getElementById('suggestion-container')
  // const suggestionUserContainer = document.getElementById('suggestion-user-container')
  const randomIndexArray = selectIndex(24, 5)
  randomIndexArray.map((index) => {
    const recommendedUser = document.createElement('li')
    recommendedUser.classList.add('suggestion-user')
    recommendedUser.innerHTML = `
    <div class="suggestion-user-container ${!userInfos[index].newStory ? 'new-story-false' : ''}">
      <img src="${userInfos[index].userProfile}" class="suggestion-user-profile">
    </div>
    <div class="suggestion-user-info">
      <div class="suggestion-user-id user-link">${userInfos[index].userId}</div>
      <div class="suggestion-detail">${userInfos[index].userStatus}</div>
    </div>
    <a href="#" class="follow-btn" id="follow-btn">Follow</a>
    `
    suggestionContainer.appendChild(recommendedUser)
  })
}
2. Details
2-1. Using Local Storage Data
새로고침해도 댓글이 남아있을 수 있게 하고 싶어서 로컬스토리지를 활용했습니다. 댓글을 입력하면 로컬스토리지에 댓글의 고유 아이디값과 함께 저장된 후, 그 데이터를 가져와서 화면에 보여줍니다.
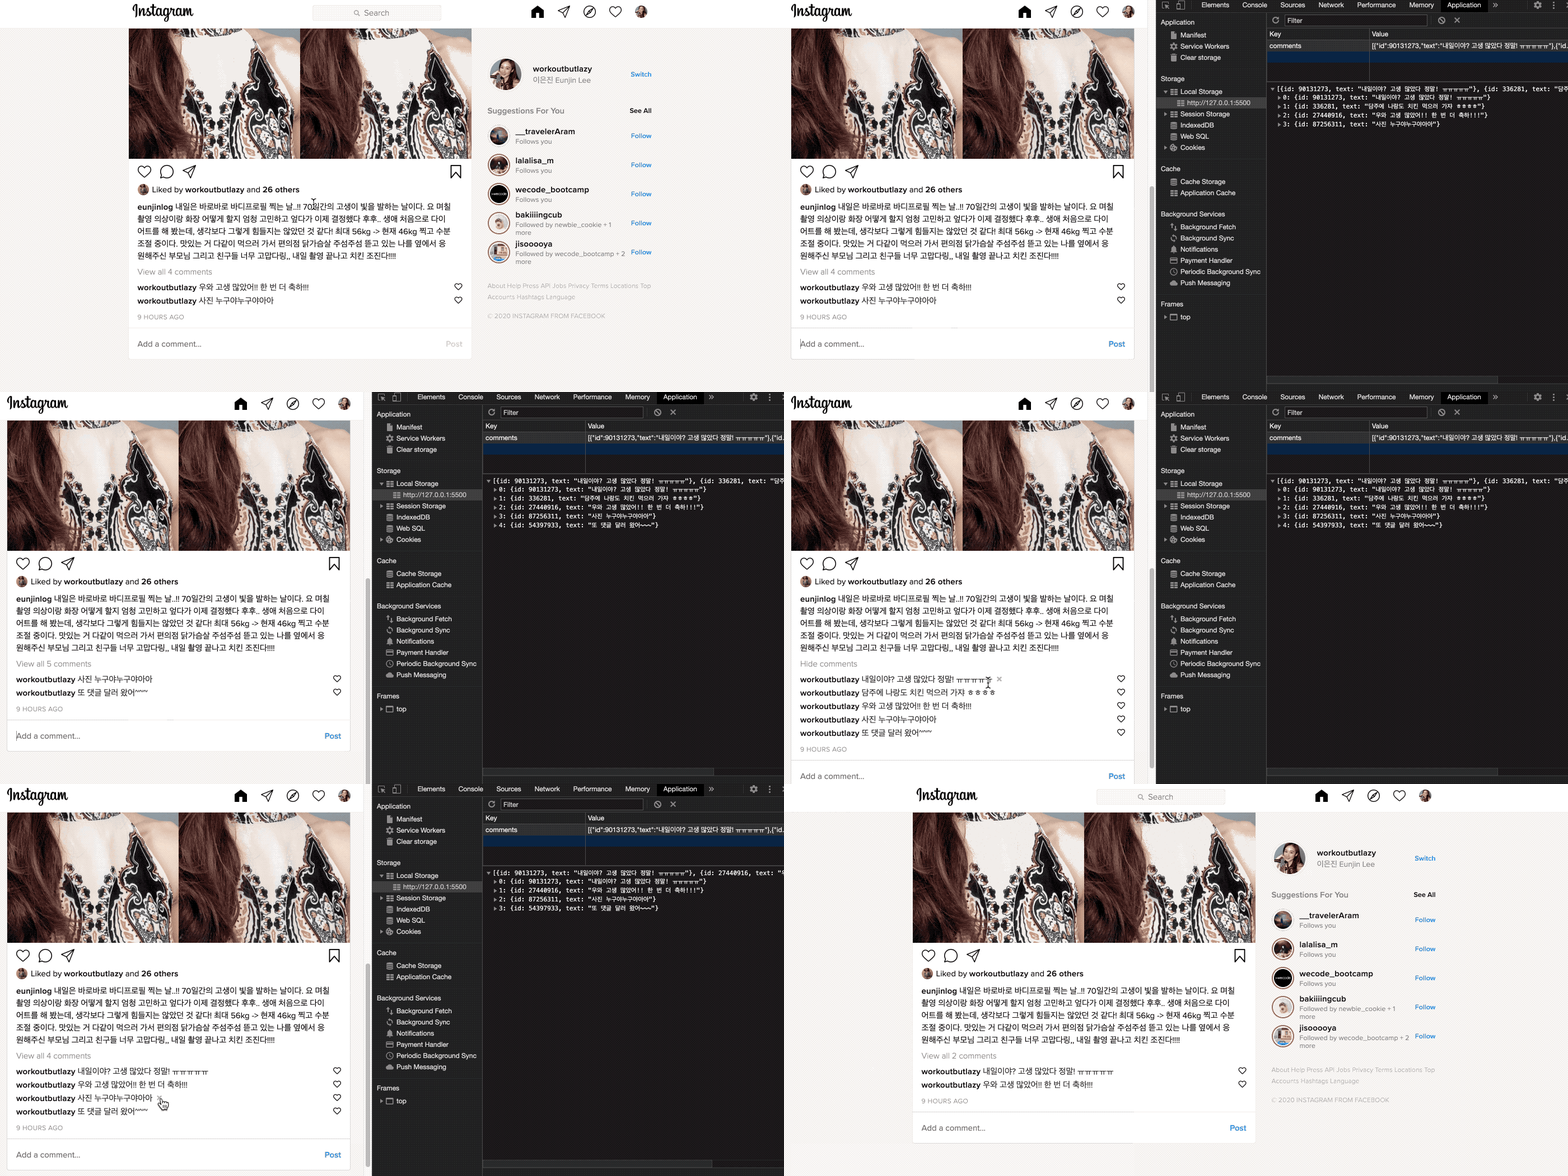
//comments from the local Storage
let comments =
  localStorage.getItem('comments') !== null ? JSON.parse(localStorage.getItem('comments')) : []

//setting new comments in the local storage
const updateLocalStorage = () => { localStorage.setItem('comments', JSON.stringify(comments))
}

//just adding comments array in localstorage with random id
const addCommentsInLocalStorage = () => {
  const generateID = () => Math.floor(Math.random() * 100000000)
  const comment = {
    id: generateID(),
    text: commentInput.value,
  }
  comments.push(comment)
  updateLocalStorage()
}
2-2. Removing Comments
댓글 삭제 기능을 구현했습니다. 개별 댓글의 삭제 버튼을 누르면 타깃 아이디값과 일치하는 댓글을 필터해서 나머지 댓글만 화면에 렌더하고, 동시에 로컬스토리지에서도 삭제됩니다.
//remove comments by id
const removeComment = (id) => {
  commentList.innerHTML = ''
  comments = comments.filter((comment) => comment.id !== id)
  updateLocalStorage()
  renderComments()
}
2-3. Modal Closing
상단 nav바의 프로필 사진을 누르면 작은 메뉴창이 뜨도록 했습니다. 메뉴창이 열린 상태에서 다른 부분을 아무데나 클릭해도 창은 닫힘니다.
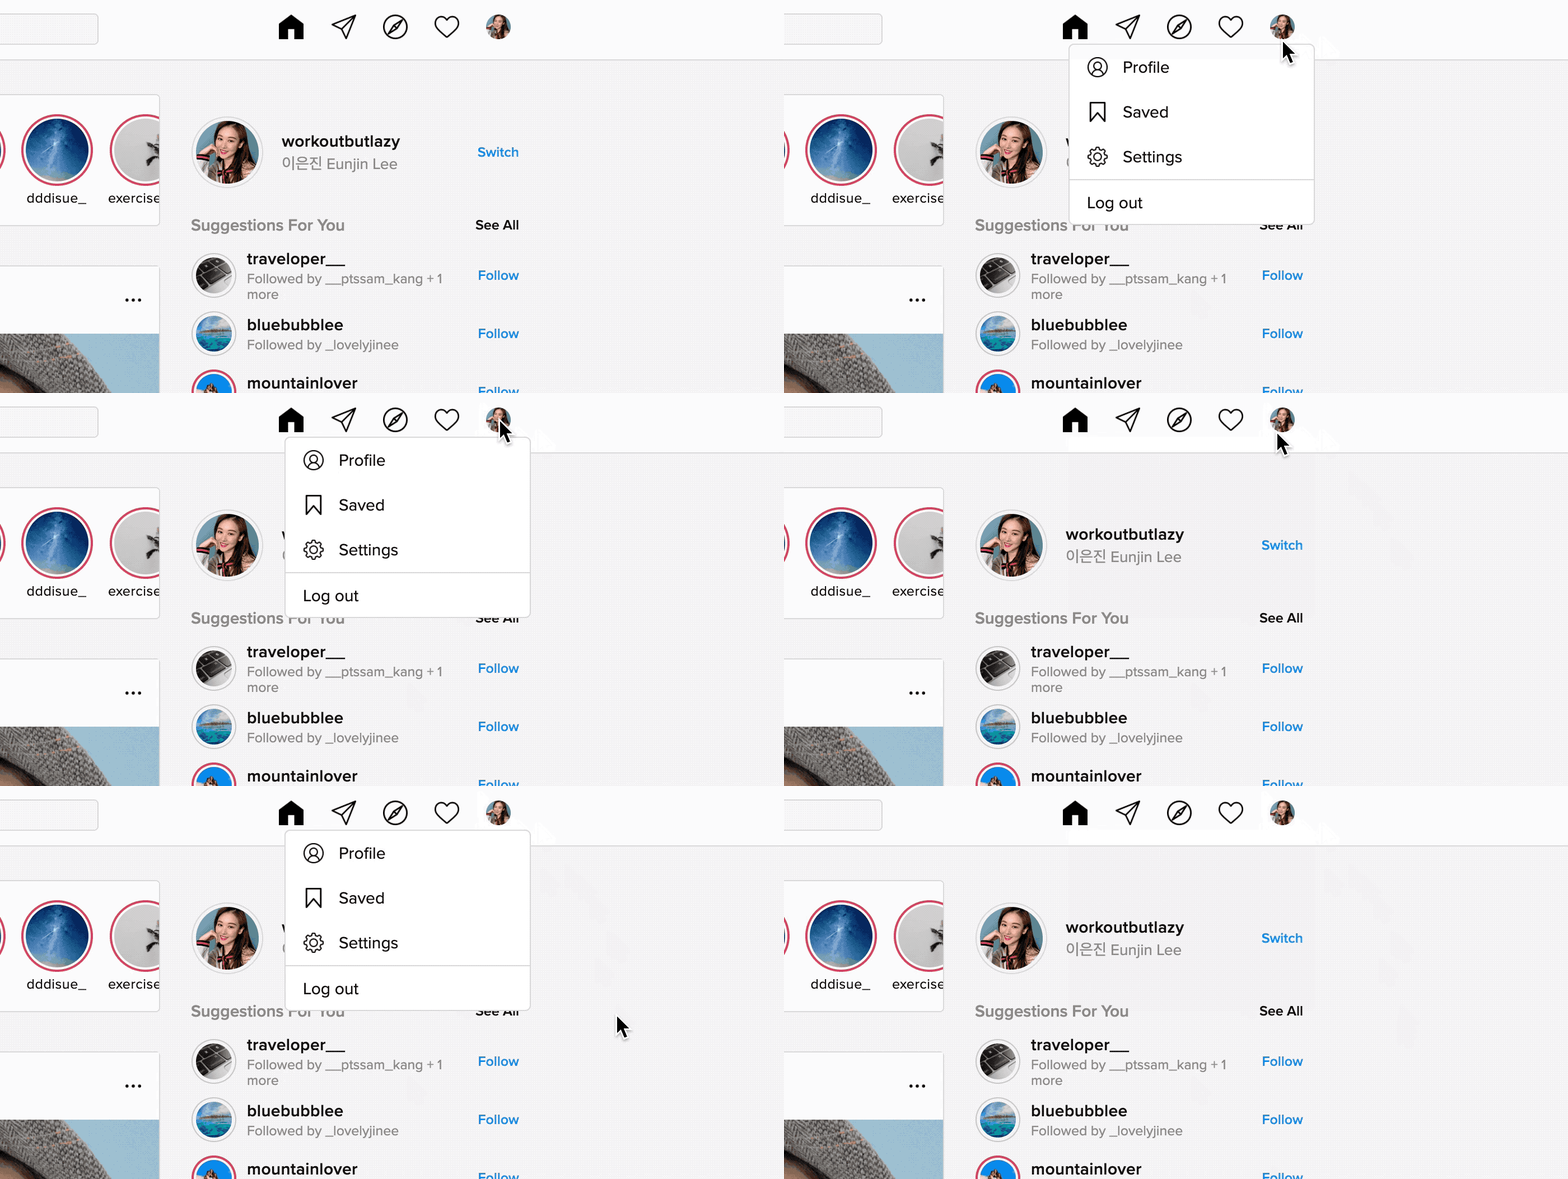
.nav__profile-menu {
  width: 220px;
  background: white;
  border: 1px solid var(--border-line-gray);
  border-radius: 5px;
  position: absolute;
  top: 40px;
  left: 50%;
  transform: translateX(250px);
  z-index: 20;
}

.nav__profile-menu-item {
  width: 100%;
  height: 40px;
  display: flex;
  justify-content: start;
  align-items: center;
  font-size: var(--font-size-regular);
  padding: 0 16px;
}
//opening menu and closing it by clicking outside container
const openAndCloseMenu = (e) => {
if (e.target === openMenuBtn) {
navContainerOutside.classList.add('open')
}
if (e.target === navContainerOutside) {
navContainerOutside.classList.remove('open')
}
}
//profile icon click and open menu event listener
window.addEventListener('click', openAndCloseMenu)2-4. Activating Post Button
댓글창에 입력하기 시작하면 POST 버튼이 활성화됩니다.
//activate posting button
const activatePostBtn = () => {
  if (commentInput.value.length > -1) {
    commentBtn.classList.toggle('active')
  }
}

//posting button event listener
commentForm.addEventListener('keyup', activatePostBtn)
2-5. Using Mock Data
API를 이용하는 대신, 이번 프로젝트에서는 userInfos라는 회원 정보를 직접 만들어서 하나씩 불러왔습니다.
const userInfos = [{
  userId: 'wecode_bootcamp',
  userName: '위코드 부트캠프',
  userProfile: 'https://media.vlpt.us/images/inyong_pang/post/f0ea605d-c2d9-460c-aedc-a0ec77e6759f/wecode.png',
  userStatus: 'Follows you',
  newStory: true,
},{
  userId: 'bluebubblee',
  userName: 'jkjkjay',
  userProfile: 'https://images.unsplash.com/photo-1544550581-1bcabf842b77?ixlib=rb-1.2.1&ixid=eyJhcHBfaWQiOjEyMDd9&auto=format&fit=crop&w=1258&q=80',
  userStatus: 'Followed by _lovelyjinee',
  newStory: false,
},{
  userId: 'jacob_110',
  userName: 'Jacob Juhyung Lee',
  userProfile: 'https://images.unsplash.com/photo-1582032511796-a2aadc689117?ixlib=rb-1.2.1&ixid=MXwxMjA3fDB8MHxwaG90by1wYWdlfHx8fGVufDB8fHw%3D&auto=format&fit=crop&w=637&q=80',
  userStatus: 'Followed by mysong_lee + 3 more',
  newStory: false,
},{
  userId: 'jennystagram',
  userName: '김제니스타그램',
  userProfile: 'https://images.unsplash.com/photo-1581090731827-0ccd446ec831?ixlib=rb-1.2.1&ixid=MXwxMjA3fDB8MHxwaG90by1wYWdlfHx8fGVufDB8fHw%3D&auto=format&fit=crop&w=1600&q=80',
  userStatus: 'Follows you',
  newStory: true,
}

...24개의 댓글
안녕하세요 작성하신 토이프로젝트 너무너무 잘 읽고 있습니다..! 혹시 자바스크립트 공부를 어떻게 하셨는지 여쭤봐도 될까요? 아니면 보신 인강이나,, 프로젝트 너무 잘 보고 있어요!ㅠㅠ
Do you know the best modded version of Instagram is Instagram Pro Dark Apk where you can get tons of different additional features and best dark mods.
fbsub net is a website that offers tools and services related to Facebook, such as follower tracking and analytics. https://fbsubnet.in/





매번 느끼지만 정말 대단하시네요!!