HTML DOM
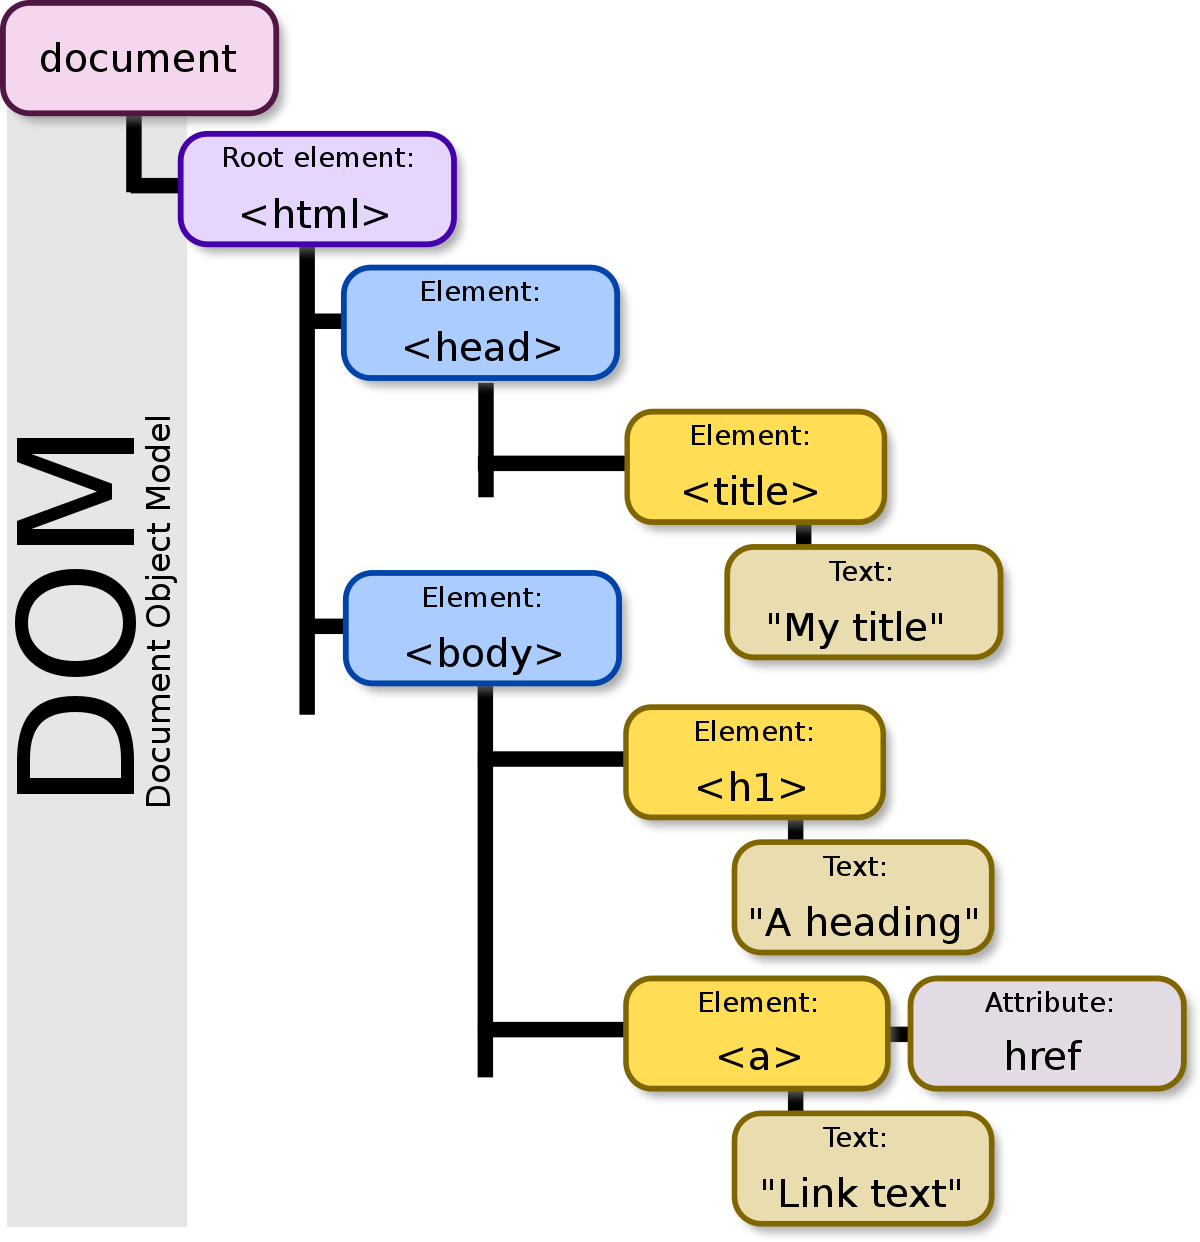
- 웹 브라우저가 웹페이지를 불러올 때 웹페이지의 전체 html element에 대해 객체 모델을 생성 (Document Object Model)
- object tree 형태로 생성됨
- 따라서 각 HTML elements는 JS object 데이터타입이다.
dom_basic
<body>
    <h1>My Header</h1>
    <a href="#">My Link</a>
</body>- h1 javascript object를 program에서 삭제 가능
- h1 object의 property값도 변경 가능
dom_basic2
<body>
    <h2>My First Page</h2>

    <p id="demo">Init Value</p>

    <script>
        var x = document.getElementById("demo");
        x.innerHTML = "Hello World!";
        // 내용을 Init Value 에서 Hello World! 로 변경
    </script>
</body>
- document.getElementById("demo") : id가 "demo"인 태그의 element를 가져옴
- innerHTML : 해당 element의 화면에 보여지는 내용을 가져오거나 설정
dom_find_id
- getElementsById()
id로 요소를 얻음
1개만을 가져옴
<body>

    <h2>JavaScript HTML DOM</h2>

    <p id="intro">Finding HTML Elements by Id</p>
    <p>This example demonstrates the <b>getElementsById</b> method.</p>

    <p id="demo"></p>

    <script>
        const element = document.getElementById("intro");
        // element : id가 "intro" 인 요소
        // -> Finding HTML Elements by Id

        document.getElementById("demo").innerHTML =
                    "The text from the intro paragraph is: " + element.innerHTML;
        // id가 "demo"인 요소 내용을 변경
        // element.innerHTML : element 의 화면에 보여지는 내용
        // X -> "The text from the intro paragraph is: Finding HTML Elements by Id"
    </script>

</body>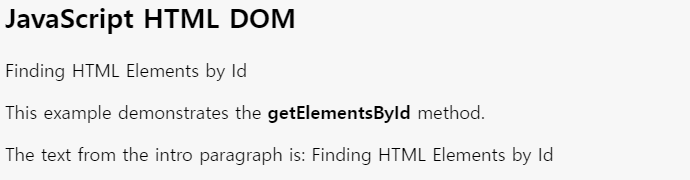
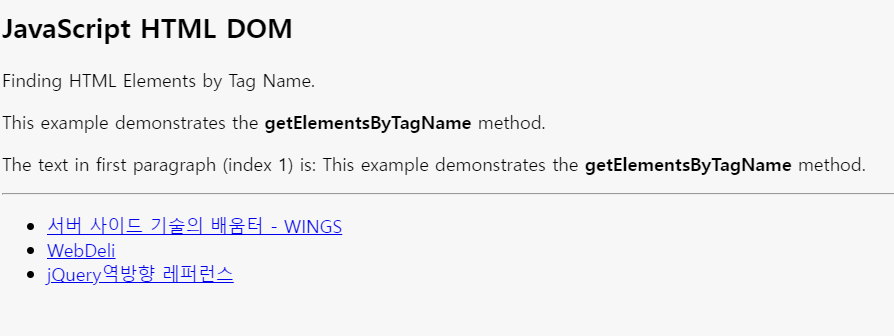
dom_find_tagname
- getElementsByTagName()
태그 이름으로 요소를 얻음
복수일 가능성 있음 (1개 이상)
<body>
    <h2>JavaScript HTML DOM</h2>
    <p>Finding HTML Elements by Tag Name.</p>
    <p>This example demonstrates the <b>getElementsByTagName</b> method.</p>
    <p id="demo"></p>

    <hr/>

    <ul>
        <li><a href="http://www.wings.msn.to/">
                서버 사이드 기술의 배움터 - WINGS</a></li>
        <li><a href="http://www.web-deli.com/">WebDeli</a></li>
        <li><a href="http://www.buildinsider.net/web/jqueryref">
                jQuery역방향 레퍼런스</a></li>
    </ul>

    <script>
        const element = document.getElementsByTagName("p");
        // p 태그 전체를 가져와서 element에 저장
        document.getElementById("demo").innerHTML =
                'The text in first paragraph (index 1) is: ' + element[1].innerHTML;
        // id가 "demo"인 요소의 내용을 변경
        // element[1].innerHTML : 인덱스가 1인 p 태그 요소의 내용
        // = This example demonstrates the <b>getElementsByTagName</b> method.

        var list = document.getElementsByTagName('a');
        // 태그명이 'a'인 모든 요소를 가져와서 list에 저장
        for (var i = 0, len = list.length; i < len; i++) {
            console.log(list.item(i).href);
            // 리스트의 i번째 노드의 href attribute를 출력
        }
    </script>
</body>
console
web page

dom_find_classname
- getElementsByClassName()
클래스 이름으로 요소를 얻음
복수일 가능성 있음 (1개이상)
<body>

    <h2>JavaScript HTML DOM</h2>

    <p>Finding HTML Elements by Class Name.</p>
    <p class="intro">Hello World!</p>
    <p class="intro">This example demonstrates the <b>getElementsByClassName</b> method.</p>

    <p id="demo"></p>

    <script>
        const x = document.getElementsByClassName("intro");
        // class 이름이 "intro"인 요소를 모두 x에 저장
        document.getElementById("demo").innerHTML =
                'The first paragraph (index 0) with class="intro" is: ' + x[0].innerHTML;
        // id가 "demo"인 요소의 내용을 변경
        // x[0].innerHTML : Hello World! (첫번째 "intro" class 요소의 내용)
    </script>
</body>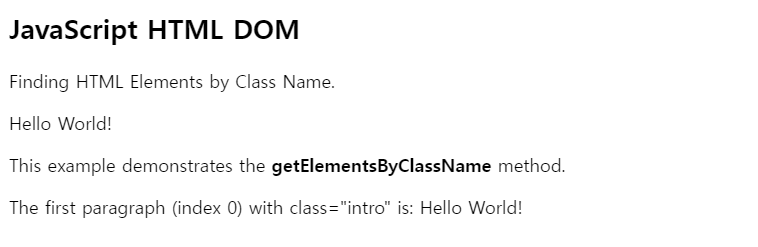
dom_find_css_selector
-
querySelectorAll()
css selector로 요소를 가져옴- 선택된 선택자 그룹에 일치하는 도큐먼트의 엘리먼트 리스트를 나타내는 NodeList를 반환
-
querySelector()
- 선택된 선택자 또는 선택자 그룹과 일치하는 문서 내 첫 번째 Element를 반환. 일치하는 요소가 없으면 null을 반환.
<body>

    <h2>JavaScript HTML DOM</h2>

    <p>Finding HTML Elements by Query Selector</p>
    <p class="intro">Hello World!.</p>
    <p class="intro">This example demonstrates the <b>querySelectorAll</b> method.</p>
    <p id="demo"></p>

    <script>
        // p 태그 중 class="intro"인 요소를 모두 x에 저장
        const x = document.querySelectorAll("p.intro");
        document.getElementById("demo").innerHTML =
                'The first paragraph (index 0) with class="intro" is: ' + x[0].innerHTML;
        // id가 "demo"인 요소의 내용을 변경
        // x[0].innerHTML : Hello World!. (p 태그 중 class="intro"인 첫번째 요소)
    </script>

</body>
dom_find_document_forms
document.forms는 여러개의 <form> tag 객체들을 가져옴document.forms["frm1"]: id가 "frm1"인 form 객체만 가져옴
<body>

    <h2>JavaScript HTML DOM</h2>
    <p>Finding HTML Elements Using <b>document.forms</b>.</p>

    <form id="frm1" action="/action_page.php">
      First name: <input type="text" name="fname" value="Donald"><br>
      Last name: <input type="text" name="lname" value="Duck"><br><br>
      <input type="submit" value="Submit">
    </form>

    <p>These are the values of each element in the form:</p>

    <p id="demo"></p>

    <script>
        const x = document.forms["frm1"];
        let text = "";
        for (let i = 0; i < x.length ;i++) {
            // forms.elements 객체는 form tag안에 있는
            // 모든 html elements 들을 관리하는 collection 객체를 말함
            text += x.elements[i].value + "<br>";
            // text += x.elements.item(i).value + "<br>";
        }
        document.getElementById("demo").innerHTML = text;
    </script>
</body>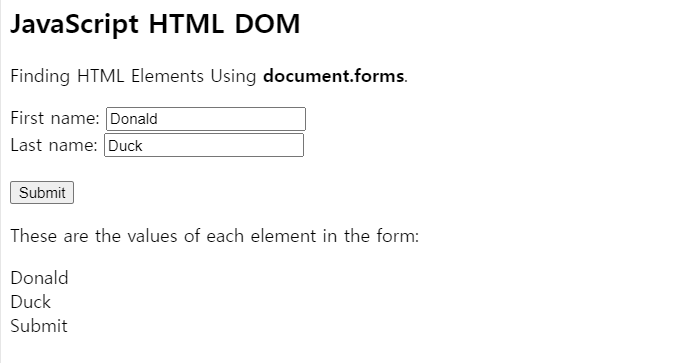
dom_find_document_links
- document.links : href 속성을 가지는 <a>와 <area> 요소 모두 반환
<body>

    <h2>Finding HTML Elements Using document.links</h2>

    <p>
    <a href="/html/default.asp">HTML</a>
    <br>
    <a href="/css/default.asp">CSS</a>
    </p>

    <p id="demo"></p>

    <script>
        document.getElementById("demo").innerHTML =
                "Number of links: " + document.links.length;
    </script>

</body>
get_attributes
- element.attribute
element의 attribute 반환
<body>

    <img id="logo" src="http://www.wings.msn.to/image/wings.jpg"
        height="67" width="215" border="0"
        alt="WINGS(Www INtegrated Guide on Server-architecture)" />

    <script>
        var logo = document.getElementById('logo');
        var attrs = logo.attributes;
        for (var i = 0, len = attrs.length; i < len; i++) {
            var attr = attrs.item(i);
            console.log(attr.name + ':' + attr.value);
        }
    </script>
</body>
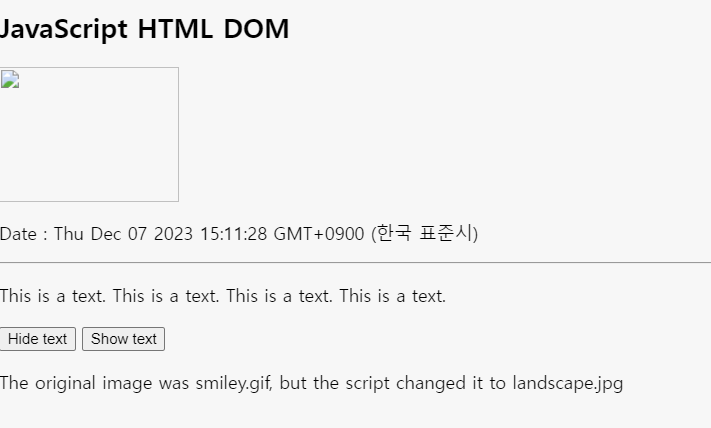
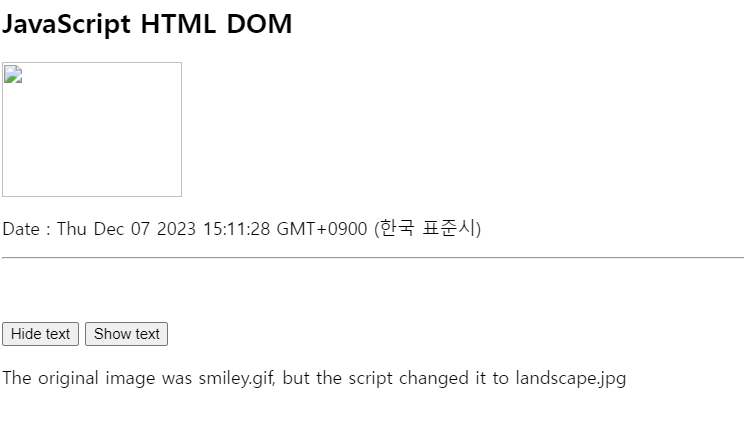
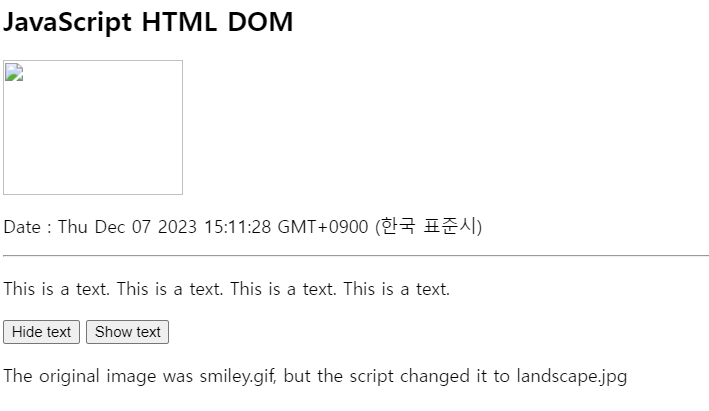
change_css_attributes
<body>
    <h2>JavaScript HTML DOM</h2>
    <img id="image" src="images/smiley.gif" width="160" height="120">
    <p id="demo"></p>

    <hr/>
    <p id="p1">
        This is a text.
        This is a text.
        This is a text.
        This is a text.
    </p>
    <!-- css style 변경
    elem.style.prop = value -->

    <!-- onclick -> id가 p1인 요소를 숨김 -->
    <input type="button" value="Hide text"
        onclick="document.getElementById('p1').style.visibility='hidden'">

    <!-- onclick -> id가 p1인 요소를 보이게 함 -->
    <input type="button" value="Show text"
        onclick="document.getElementById('p1').style.visibility='visible'">

    <script>
    	// <img> tag의 src attribute 값을 변경
        document.getElementById("image").src = "images/landscape.jpg";
        document.getElementById("demo").innerHTML = "Date : " + Date();
    </script>

    <p>The original image was smiley.gif, but the script changed it to landscape.jpg</p>

</body>
- 'Hide text' 버튼 클릭
- 'Show text' 버튼 클릭
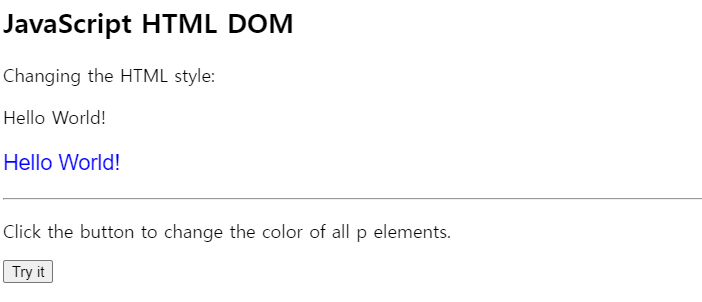
change_css_styles
-
elem.style.prop [=value]
elem : HTML elements 객체
prop : style 객체 property
value : style 설정하고자 하는 값 -
css 에서 background-color 인 경우 JS에서는 backgroundColor 로 표현
<body>
<h2>JavaScript HTML DOM</h2>
<p>Changing the HTML style:</p>
<p id="p1">Hello World!</p>
<p id="p2">Hello World!</p>
<hr/>
<p>Click the button to change the color of all p elements.</p>
// 'Try it' 버튼을 클릭하면 myFunction() 함수 실행
<button onclick="myFunction()">Try it</button>
<script>
// id가 p2인 요소만 style 변경
document.getElementById("p2").style.color = "blue";
document.getElementById("p2").style.fontFamily = "Arial";
document.getElementById("p2").style.fontSize = "larger";
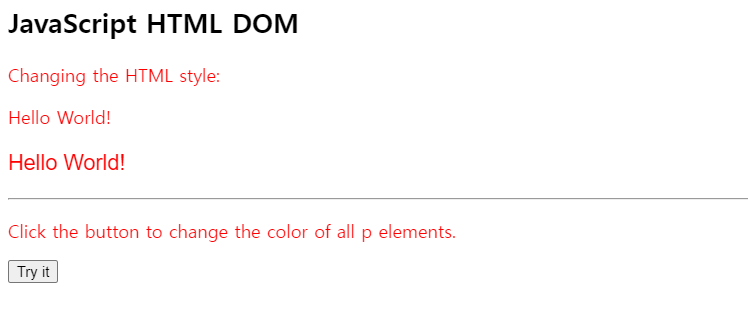
function myFunction() {
// <p> 태그 모두 가져와 myNodelist에 저장
const myNodelist = document.querySelectorAll("p");
for (let i = 0; i < myNodelist.length; i++) {
// 색상 모두 red 로 변경
myNodelist[i].style.color = "red";
}
}
</script>
</body>
- 버튼 클릭 전
- 버튼 클릭 후
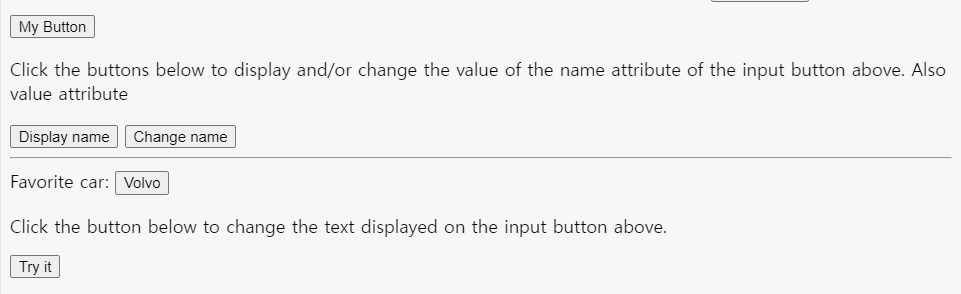
form_button
<body>
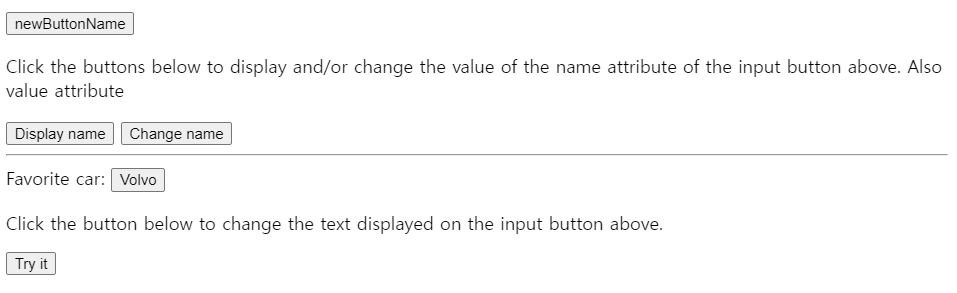
<input type="button" id="myBtn" name="myname" value="My Button">
<p>Click the buttons below to display and/or change the value of the name
attribute of the input button above. Also value attribute</p>
<button onclick="display()">Display name</button>
<button onclick="change()">Change name</button>
<hr/>
Favorite car:
<input type="button" id="myBtn1" value="Volvo">
<p>Click the button below to change the text displayed on the input button above.</p>
<button onclick="myFunction()">Try it</button>
<script>
function display() {
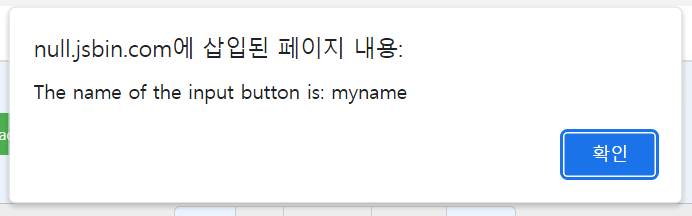
// id가 "myBtn"인 요소의 name property를 출력
var x = document.getElementById("myBtn").name;
alert("The name of the input button is: " + x);
// id가 "myBtn"인 요소의 value property를 출력
var x = document.getElementById("myBtn").value;
alert("The value of the input button is: " + x);
}
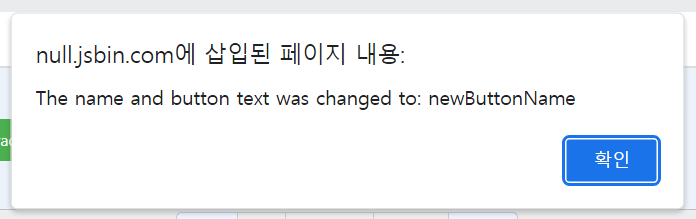
function change() {
// id가 "myBtn"인 요소의 name, value property를 "newButtonName"으로 변경
var x = document.getElementById("myBtn").name = "newButtonName";
var x = document.getElementById("myBtn").value = "newButtonName";
alert ("The name and button text was changed to: " + x);
}
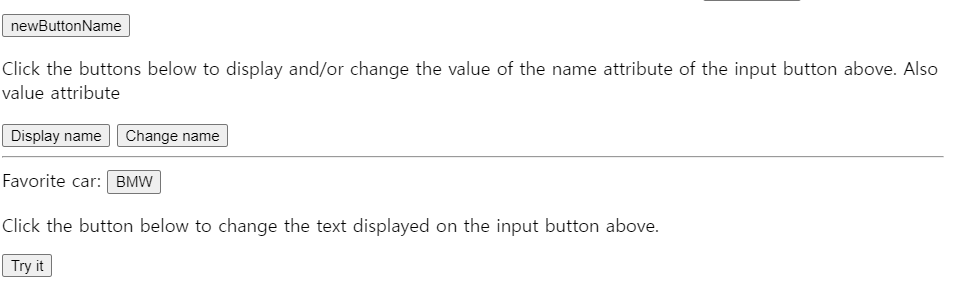
function myFunction() {
// id가 "myBtn"인 요소의 value property를 "BMW"로 변경
document.getElementById("myBtn1").value = "BMW";
}
</script>
</body>
- 클릭 이전
My Button클릭 ➡ 변화없음Display name클릭
Change name클릭 : name과 value 변경됨
Try it클릭 : value 변경됨
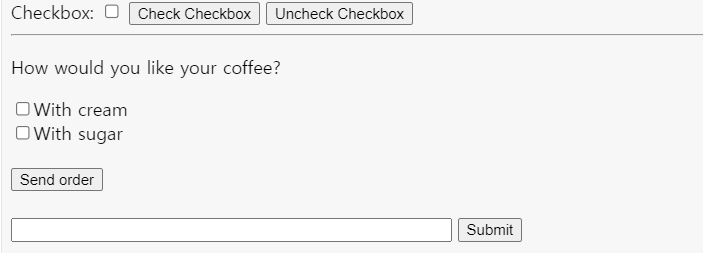
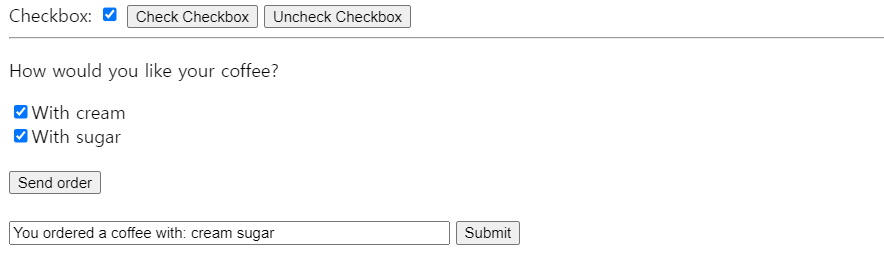
form_checkbox
<body>

    Checkbox: <input type="checkbox" id="myCheck">
    <button onclick="check()">Check Checkbox</button>
    <button onclick="uncheck()">Uncheck Checkbox</button>

    <hr/>

    <p>How would you like your coffee?</p>

    <form action="#"> // document.forms[0]
        <input type="checkbox" name="coffee" value="cream">With cream<br>

        <input type="checkbox" name="coffee" value="sugar">With sugar<br>
        <br>
        <input type="button" onclick="myFunction()" value="Send order">
        <br><br>
        <input type="text" id="order" size="50">
        <input type="submit" value="Submit">
    </form>

    <script>
        function check() {
          // checked state = true
          document.getElementById("myCheck").checked = true;
        }

        function uncheck() {
          // checked state = false
          document.getElementById("myCheck").checked = false;
        }

        function myFunction() {
            var coffee = document.forms[0];
            var txt = "";
            var i;
            // check 된 value만 txt에 추가
            for (i = 0; i < coffee.length; i++) {
                if (coffee[i].checked) {
                    txt = txt + coffee[i].value + " ";
                }
            }
            document.getElementById("order").value = "You ordered a coffee with: " + txt;
        }
    </script>
</body>
- 체크 이전
Check Checkbox클릭 ➡ Checkbox : ✅- 'With cream', 'With sugar' check 후
send order클릭
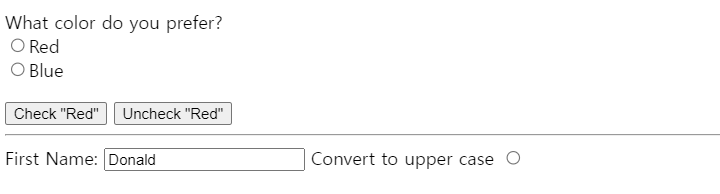
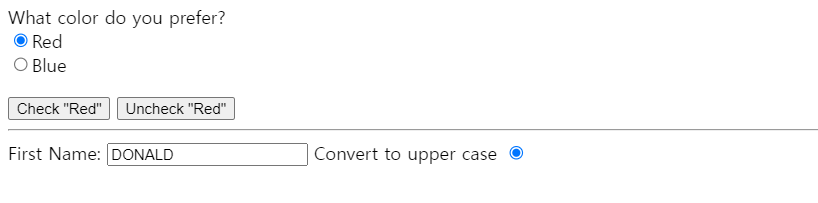
form_radiobutton
<body>

    <form>
        What color do you prefer?<br>
        <input type="radio" name="colors" id="red">Red<br>
        <input type="radio" name="colors" id="blue">Blue
    </form>
    <button onclick="check()">Check "Red"</button>
    <button onclick="uncheck()">Uncheck "Red"</button>

    <hr/>

    <form>
        First Name: <input type="text" id="fname" value="Donald">
        Convert to upper case
        // 해당 radio 가 checked 상태라면 myFunction() 실행
        <input type="radio" onclick="if(this.checked){myFunction()}">
    </form>

    <script>
    	// id 가 "red"인 요소를 checked = true로 변경
        function check() {
          document.getElementById("red").checked = true;
        }
        // id 가 "red"인 요소를 checked = false로 변경
        function uncheck() {
          document.getElementById("red").checked = false;
        }
        // id가 "fname"인 요소의 value를 대문자로 변경
        function myFunction() {
            document.getElementById("fname").value =
                        document.getElementById("fname").value.toUpperCase();
        }
    </script>
</body>
- 기본
Check "Red"버튼 클릭Convert to upper caseradio checkbox 클릭
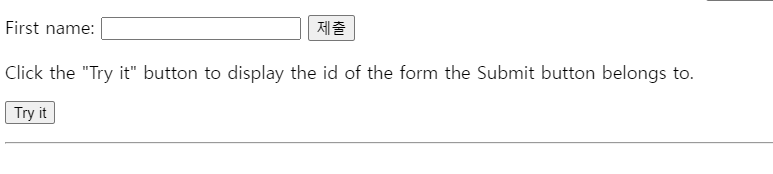
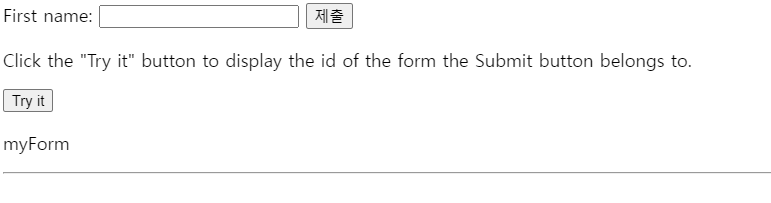
form_submit
<body>
    <form id="myForm">
        First name: <input type="text" name="fname">
        <input type="submit" id="mySubmit">
    </form>
    <p>Click the "Try it" button to display the id of the form the Submit button belongs to.</p>
    <button onclick="myFunction()">Try it</button>
    <p id="demo"></p>

    <hr/>

    <script>
        function myFunction() {
          var x = document.getElementById("mySubmit").form.id;
          document.getElementById("demo").innerHTML = x;
        }
    </script>
</body>
- 기본
Try it버튼 클릭
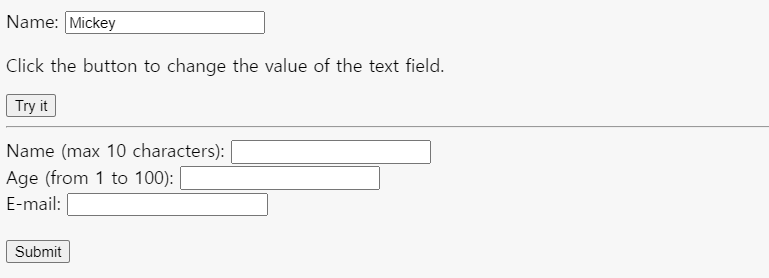
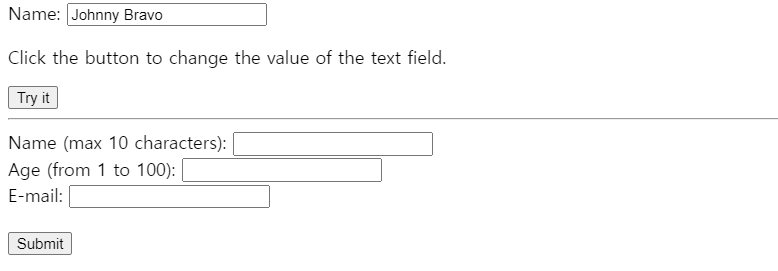
form_input_text
indexOf 함수
- 문자열(string)에서 특정 문자열(searchvalue)을 찾고, 검색된 문자열이 '첫번째'로 나타나는 위치 index를 리턴
- 찾는 문자열이 없으면 -1을 리턴
<body>
Name: <input type="text" id="myText" value="Mickey">
<p>Click the button to change the value of the text field.</p>
<button onclick="myFunction()">Try it</button>
<hr/>
<!-- onsubmit : event name, submit 버튼을 click하면, myFunction1 실행 -->
<form action="#" onsubmit="return myFunction1()">
Name (max 10 characters): <input type="text" id="fname" size="20" name="fname"><br>
Age (from 1 to 100): <input type="text" id="age" size="20" name="age"><br>
E-mail: <input type="text" id="email" size="20" name="mail"><br><br>
<input type="submit" value="Submit">
</form>
<script>
function myFunction() {
document.getElementById("myText").value = "Johnny Bravo";
}
function myFunction1() {
var at = document.getElementById("email").value.indexOf("@");
var age = document.getElementById("age").value;
var fname = document.getElementById("fname").value;
submitOK = "true";
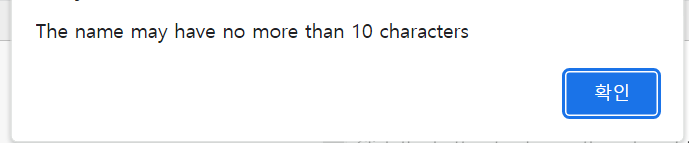
if (fname.length > 10) {
alert("The name may have no more than 10 characters");
submitOK = "false";
}
if (isNaN(age) || age < 1 || age > 100) {
alert("The age must be a number between 1 and 100");
submitOK = "false";
}
// -1 : '@' 문자가 email안에 포함이 되지 않은 경우
if (at == -1) {
alert("Not a valid e-mail!");
submitOK = "false";
}
if (submitOK == "false") {
return false;
}
}
</script>
</body>
Try it버튼 클릭
- 잘못 입력한 경우


select
<body>
    <form>
        Select your favorite fruit:
        <select id="mySelect">
          <option value="apple">Apple</option>
          <option value="orange">Orange</option>
          <option value="pineapple">Pineapple</option>
          <option value="banana">Banana</option>
        </select>
      </form>

      <p>Click the button to return the value of the selected fruit.</p>
      <button type="button" onclick="myFunction()">Try it</button>
      <p id="demo"></p>

    <script>
        function myFunction() {
            var x = document.getElementById("mySelect").value;
            document.getElementById("demo").innerHTML = x;
        }
    </script>
</body>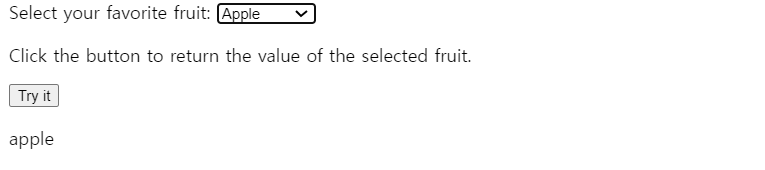
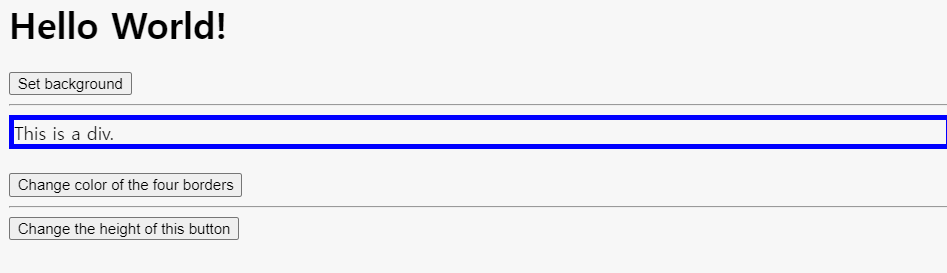
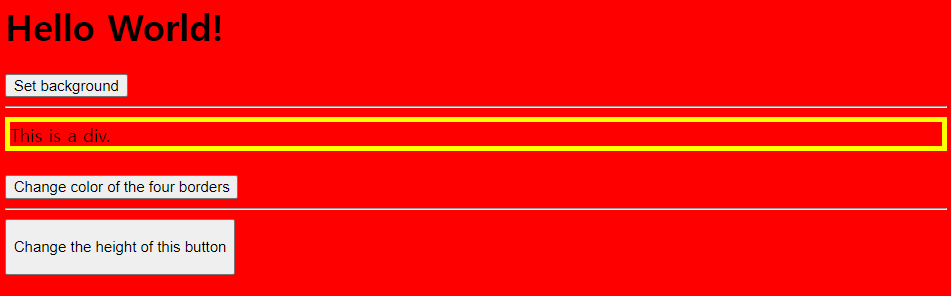
style_property
<head>
<style>
#myDiv {
border: thick solid blue;
}
</style>
<title>Document</title>
</head>
<body>
<h1>Hello World!</h1>
<button onclick="myFunction()">Set background</button>
<hr/>
<div id="myDiv">This is a div.</div>
<br>
<button type="button" onclick="myFunction1()">Change color of the four borders</button>
<hr/>
<button type="button" id="myBtn" onclick="myFunction2()">
Change the height of this button</button>
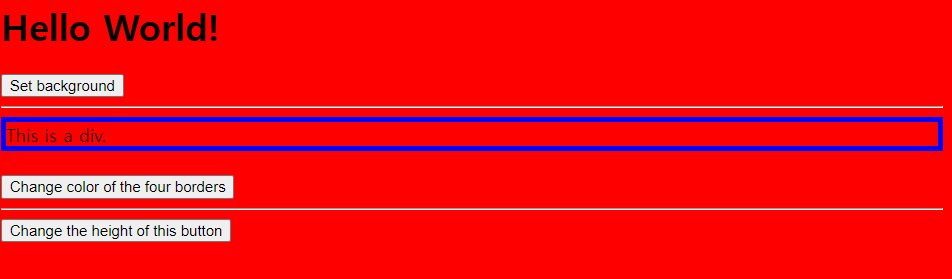
<script>
function myFunction() {
// <body> 의 style.background 변경
document.body.style.background =
"#f3f3f3 url('images/img_tree.png') no-repeat right top";
// <body>의 style.backgroundColor 변경
document.body.style.backgroundColor = "red";
}
function myFunction1() {
// id 가 "myDiv"인 요소의 style.borderColor 색상 변경
document.getElementById("myDiv").style.borderColor = "yellow";
}
function myFunction2() {
// id 가 "myBtn"인 요소의 style.height 높이 변경
document.getElementById("myBtn").style.height = "50px";
}
</script>
</body>
- 기본
Set background클릭
- 하단 버튼 2개 클릭
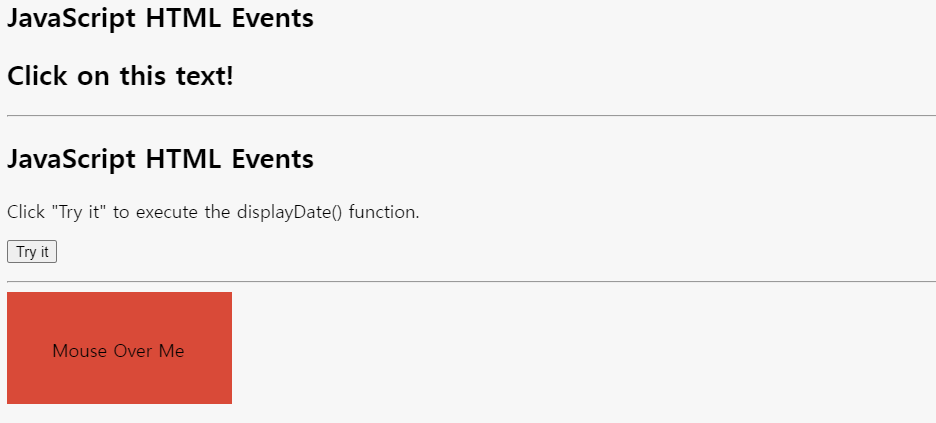
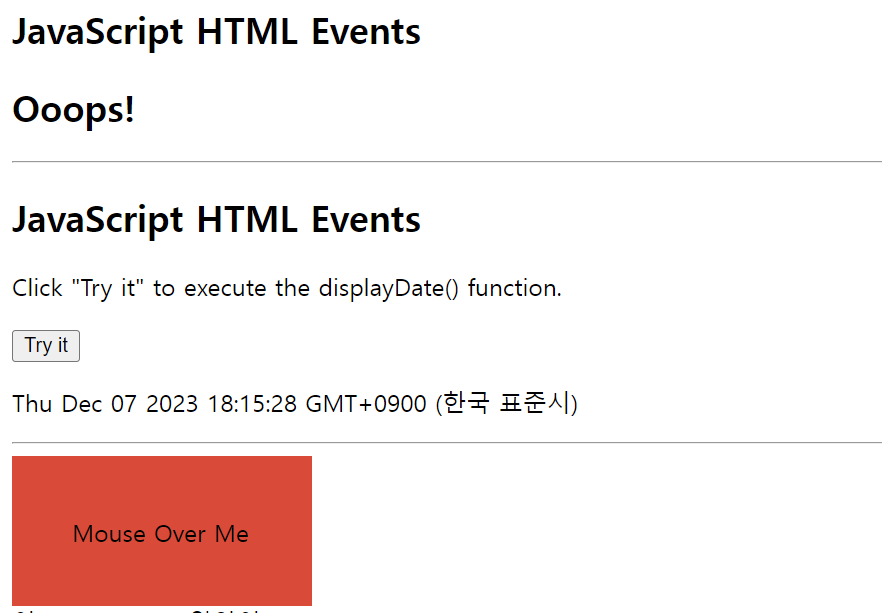
event_basic
-
DOM events 등록하기
1) html elements에 event handler 직접 추가document.getElementById.onclick = function(){code}
<body>
    <h2>JavaScript HTML Events</h2>
    <!-- onclick : 해당 객체를 click(event)하면 실행, -->
    <!-- this : event를 받은 javascrtipt 객체 -->
    <h2 onclick="changeText(this)">Click on this text!</h2>

    <hr/>

    <h2>JavaScript HTML Events</h2>
    <p>Click "Try it" to execute the displayDate() function.</p>
    <button id="myBtn">Try it</button>
    <p id="demo"></p>

    <hr/>
    <!-- onmouseover : 마우스가 div객체안에 들어올 때 실행,
        onmouseover : 마우스가 div객체밖으로 나갈 때 실행 -->
    <div onmouseover="mOver(this)" onmouseout="mOut(this)"
        style="background-color:#D94A38;width:120px;height:20px;padding:40px;">
        Mouse Over Me</div>

    <script>
        function changeText(id) {
            id.innerHTML = "Ooops!";
        }

        // id가 myBtn인 javascript객체에 onclick event로 displayDate 함수를 설정
        document.getElementById("myBtn").onclick = displayDate;

        function displayDate() {
            document.getElementById("demo").innerHTML = Date();
        }
        function mOver(obj) {
            obj.innerHTML = "Thank You"
        }
        function mOut(obj) {
            obj.innerHTML = "Mouse Over Me"
        }
    </script>
</body>
- 기본
Try it클릭, Text 클릭
- onmouse event 실행 시 ➡ Thank You! 로 바뀜
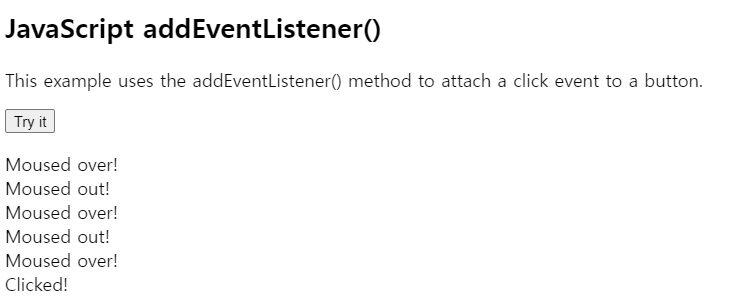
event_listener
2) html elements에 EventListener method 활용하여 events 등록
element.addEventListener(event, function, useCapture)event : "click", "mouseover", "mouseout" 등 event name
function(e) : event 처리 callback 함수, e : 이벤트 객체
useCapture
⭐ false : bubbling, default
⭐ true : capturing (잘 사용X)
- 같은 이벤트 여러개 등록 가능
- 다른 이벤트 여러개 등록 가능
<body>

    <h2>JavaScript addEventListener()</h2>
    <p>This example uses the addEventListener() method to attach a
        click event to a button.</p>
    <button id="myBtn">Try it</button>
    <p id="demo"></p>

    <script>
        // 동일 html 객체에 동일 event를 여러번 반복 등록 가능
        document.getElementById("myBtn").addEventListener("click", function() {
            alert("Hello World!, first click event");
        });
        document.getElementById("myBtn").addEventListener("click", myFunction);
        document.getElementById("myBtn").addEventListener("click", someOtherFunction);
        function myFunction() {
            alert ("Hello World!, 2nd click event");
        }
        function someOtherFunction() {
            alert ("This function was also executed!");
        }

        // 동일 html 객체에 종류가 다른 event들을 여러개 등록 가능
        var x = document.getElementById("myBtn");
        x.addEventListener("mouseover", myFunction1);
        x.addEventListener("click", mySecondFunction1);
        x.addEventListener("mouseout", myThirdFunction1);

        function myFunction1() {
            document.getElementById("demo").innerHTML += "Moused over!<br>";
        }
        function mySecondFunction1() {
            document.getElementById("demo").innerHTML += "Clicked!<br>";
        }
        function myThirdFunction1() {
            document.getElementById("demo").innerHTML += "Moused out!<br>";
        }

    </script>


</body>
- 한 번만 클릭하면
"Hello World!, first click event"
"Hello World!, 2nd click event"
"This function was also executed!"
연속으로 출력
remove_eventListener
element에 addEventListener() method로 등록된 event 삭제
element.removeEventListener(event, function);<head>
<style>
#myDIV {
background-color: coral;
border: 1px solid;
padding: 50px;
color: white;
font-size: 20px;
}
</style>
<title>Document</title>
</head>
<body>
<h2>JavaScript removeEventListener()</h2>
<div id="myDIV">
<p>This div element has an onmousemove event handler that displays a random number every time you move your mouse inside this orange field.</p>
<p>Click the button to remove the div's event handler.</p>
<button onclick="removeHandler()" id="myBtn">Remove</button>
</div>
<p id="demo"></p>
<script>
// id가 "myDIV"인 요소 위에서 마우스를 움직이면
document.getElementById("myDIV").addEventListener("mousemove", myFunction);
// 랜덤한 숫자를 출력
function myFunction() {
document.getElementById("demo").innerHTML = Math.random();
}
// 버튼 누르면 이벤트 삭제
function removeHandler() {
document.getElementById("myDIV").removeEventListener("mousemove", myFunction);
}
</script>
</body>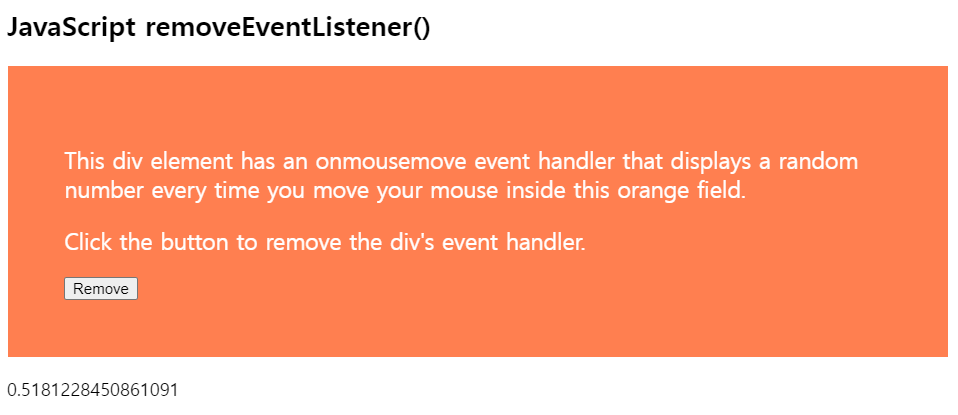
event_bubble_capture
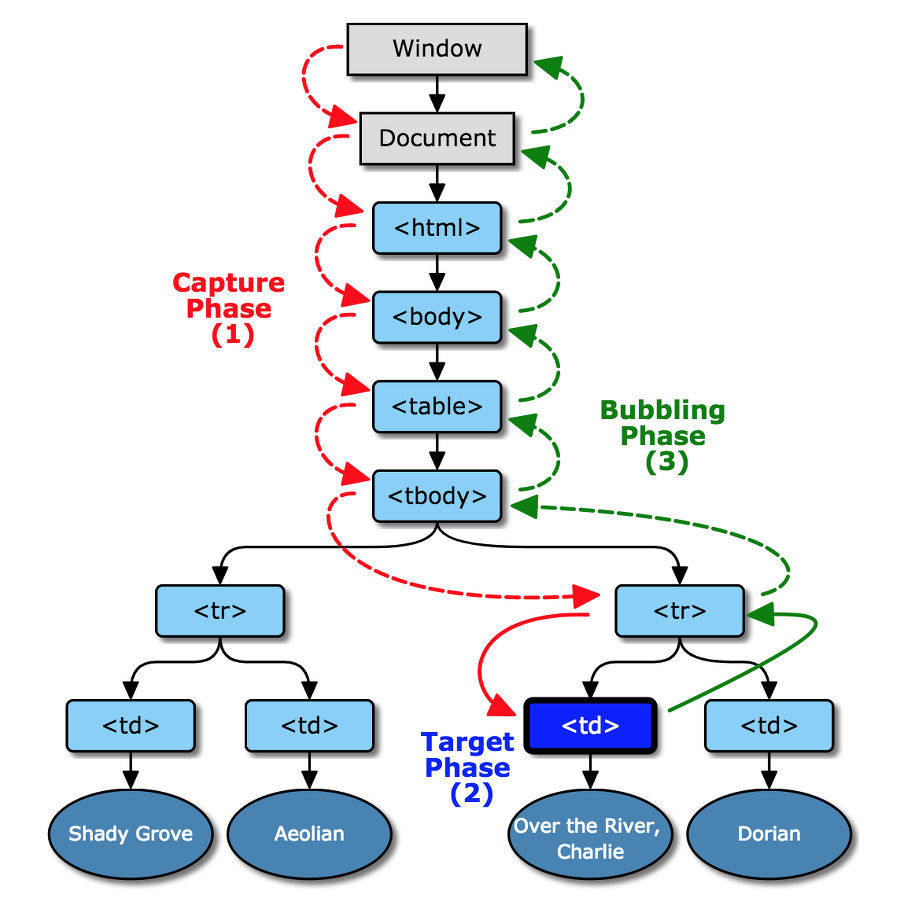
(1) Capturing (자식->부모)
(2) Target
(3) Bubbling (부모->자식)
✅ 거품이 아래에서 위로 올라오는 것을 연상
✅ target 객체는 event가 1번 발생
✅ 부모 객체들은 똑같은 event가 2번 발생
BOM
Browser Object Model
- window : 웹브라우저에서 제공하는 기본 javascript object
(웹브라우저가 최상위 JS 객체로 window 객체를 생성함)
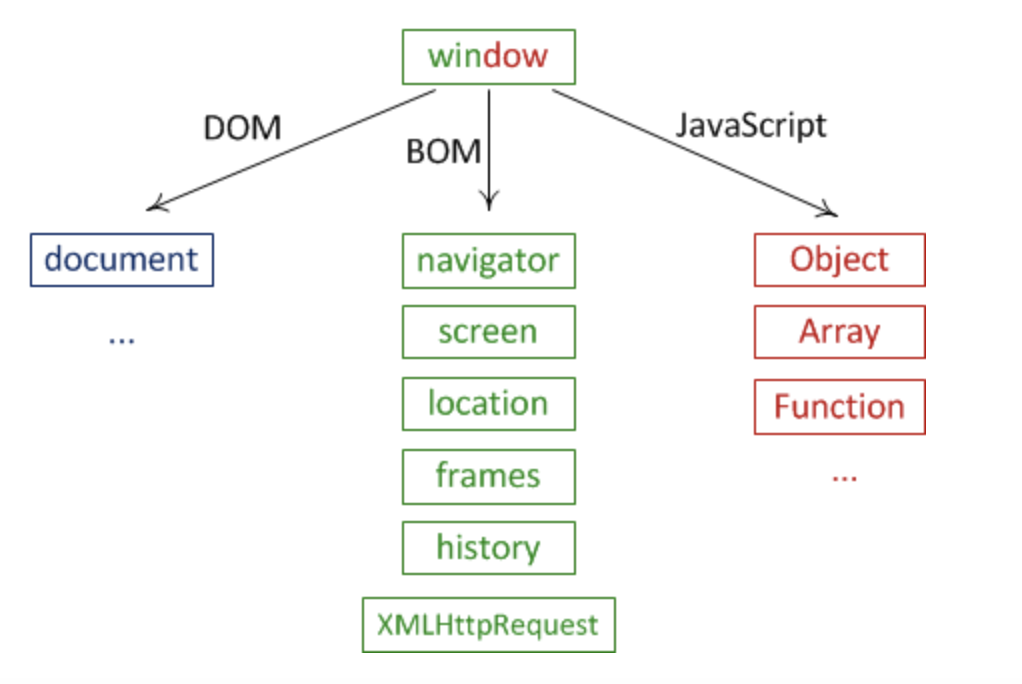
- BOM Objects
: window, screen, location, history, navigator
bom_window
window.document.getElementById("header");
document.getElementById("header");
⬆⬆ 둘은 동일한 작업을 한다 (window가 생략되었을 뿐)
<body>
    <h2>JavaScript Window</h2>
    <p id="demo"></p>

    <hr/>
    <p>Click the button to open a new browser window.</p>
    <button onclick="myFunction()">New Window Open</button>

    <script>
        document.getElementById("demo").innerHTML =
                "Browser inner window width: " + window.innerWidth + "px<br>" +
                "Browser inner window height: " + window.innerHeight + "px";
        function myFunction() {
            window.open("https://www.w3schools.com");
        }
</script>
</body>
브라우저 크기를 조정하고 새로고침하면 값이 변한다.
window.innerHeight: 윈도우 브라우저의 내부 높이window.innerwidth: 윈도우 브라우저의 내부 너비window.open: 새 윈도우 열기window.close: 현재 윈도우 닫기window.moveTo: 현재 윈도우 이동하기window.resizeTo: 현재 윈도우의 크기 변경
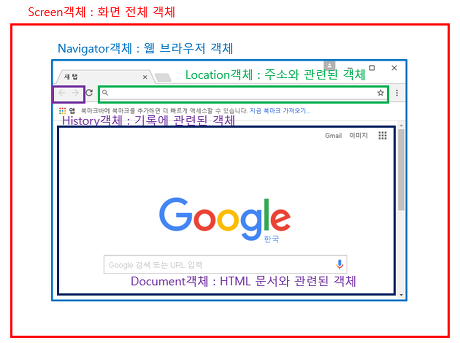
bom_screen
<body>

    <p id="demo"></p>

    <script>
    document.getElementById("demo").innerHTML =
        "Screen width is " + screen.width + "<br>" +
        "Screen Height: " + screen.height + "<br>" +
        "Available Screen Width: " + screen.availWidth + "<br>" +
        "Available Screen Height: " + screen.availHeight + "<br>" +
        "Screen Color Depth: " + screen.colorDepth + "<br>" +
        "Screen Pixel Depth: " + screen.pixelDepth;
    </script>

</body>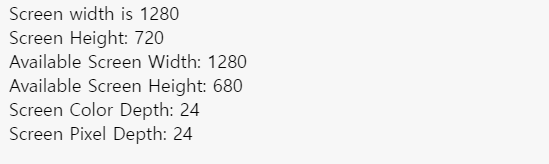
bom_location
window.location.href: 현재 페이지의 url 반환
<body>
    <h2>JavaScript</h2>

    <h3>The window.location object</h3>

    <p id="demo"></p>

    <script>
        document.getElementById("demo").innerHTML =
            "The full URL of this page is:<br>" + window.location.href;
    </script>
</body>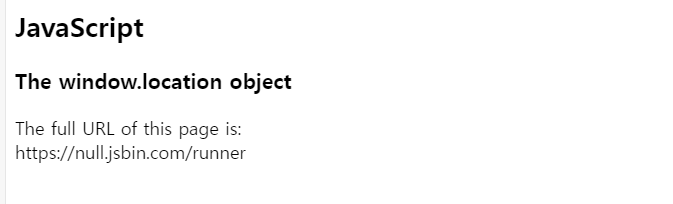
Timing Events
-
window object에서 특정 timing interval 마다 원하는 함수 (callback 함수)를 실행할 수 있는 메소드 제공
-
setTimeout(function, milliseconds)
: 정해진 milliseconds 시간에 function(callback)을 1번 실행- 실행취소 :
window.clearTimeout(timeoutVariable)
- 실행취소 :
-
setInterval(function, milliseconds)
: 정해진 milliseconds 시간마다 function(callback)을 반복 실행-
실행취소 :
window.clearInterval(timeoutVariable)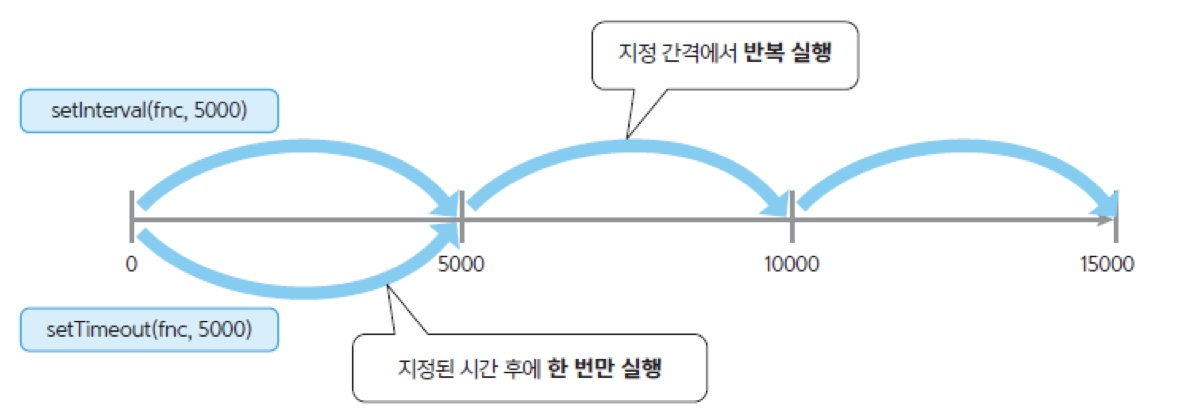
-
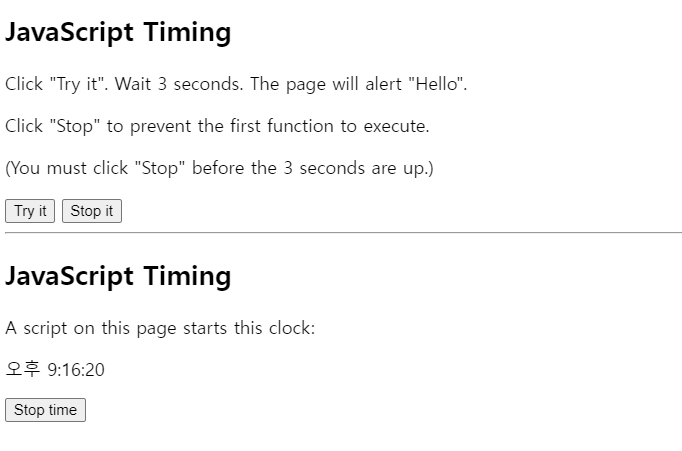
<body>
    <h2>JavaScript Timing</h2>

    <p>Click "Try it". Wait 3 seconds. The page will alert "Hello".</p>
    <p>Click "Stop" to prevent the first function to execute.</p>
    <p>(You must click "Stop" before the 3 seconds are up.)</p>
    <!-- setTimeout(myFunction, 3000) => 3000ms(3초)후에 myFunction을 1번 실행 -->
    <button onclick="myVar = setTimeout(myFunction, 3000)">Try it</button>
    <button onclick="clearTimeout(myVar)">Stop it</button>

    <hr/>
    <h2>JavaScript Timing</h2>
    <p>A script on this page starts this clock:</p>
    <p id="demo"></p>
    <button onclick="clearInterval(myVar1)">Stop time</button>

    <script>
        function myFunction() {
            alert("Hello");
        }

        let myVar1 = setInterval(myTimer, 1000);
        function myTimer() {
            const d = new Date();
            document.getElementById("demo").innerHTML = d.toLocaleTimeString();
        }
    </script>
</body>
Try it클릭하면 3초 후 "Hello" alert 창 출력
3초가 지나기 전에Stop it클릭하면 alert 창 출력X- 1초에 한번씩 시간이 갱신됨
Stop time클릭하면 갱신X, 멈춤