React에는 컴포넌트를 실제 DOM에 연결시켜주는
Portals기능이 있다. 이번 포스팅에서는 해당 기능에 대해서 알아보고 어떤 용도에 사용하는지 배워보자.
1. "Portals"란?
컴포넌트 안에 중첩된 요소를 다른 곳으로 옮길 수 있는 React의 기능이다.
장점으로는 더 간결한 코드를 작성할 수 있고, 시멘틱 마크업의 적절한 방법이 될 수 있다.
2. "Portals"사용법
import React from 'react';
import styled from 'styled-components';

const ModalOverlay = styled.div`
  position: fixed;
  width: 100%;
  height: 100%;
  top: 0;
  background-color: rgba(0, 0, 0, 0.25);
  z-index: 1;
`;

const ModalContent = styled.div`
  position: fixed;
  top: 50%;
  left: 50%;
  transform: translate(-50%, -50%);
  z-index: 2;
  width: 640px;
  height: 400px;
  background-color: #f7f8fa;
  button {
    position: fixed;
    margin: 16px;
    right: 0px;
    border-radius: 50%;
  }
`;

interface ModalProps {
  modalHandler: (e: React.MouseEvent<HTMLButtonElement>) => void;
}

const Modal = (props: ModalProps): JSX.Element => {
  return (
    <>
      <ModalOverlay />
      <ModalContent>
        <button onClick={props.modalHandler}>X</button>
      </ModalContent>
    </>
  );
};

export default Modal;
위 예시코드는 Portals없이 Modal을 구현한 코드이다.
시멘틱 마크업 관점으로는 Modal은 "body"의 직속 자식이 되도록 만들어야 하는데 위 예시 코드는 중첩 요소로 Modal이 구현된걸 확인할 수 있다.
이를 위해 필요한건 "body"의 직속 자식이 되도록 만드는 것이다.
1. 컴포넌트가 이동할 장소 정의
컴포넌트에게 해당 장소에 포탈을 가져야 한다고 알려줘야 한다.
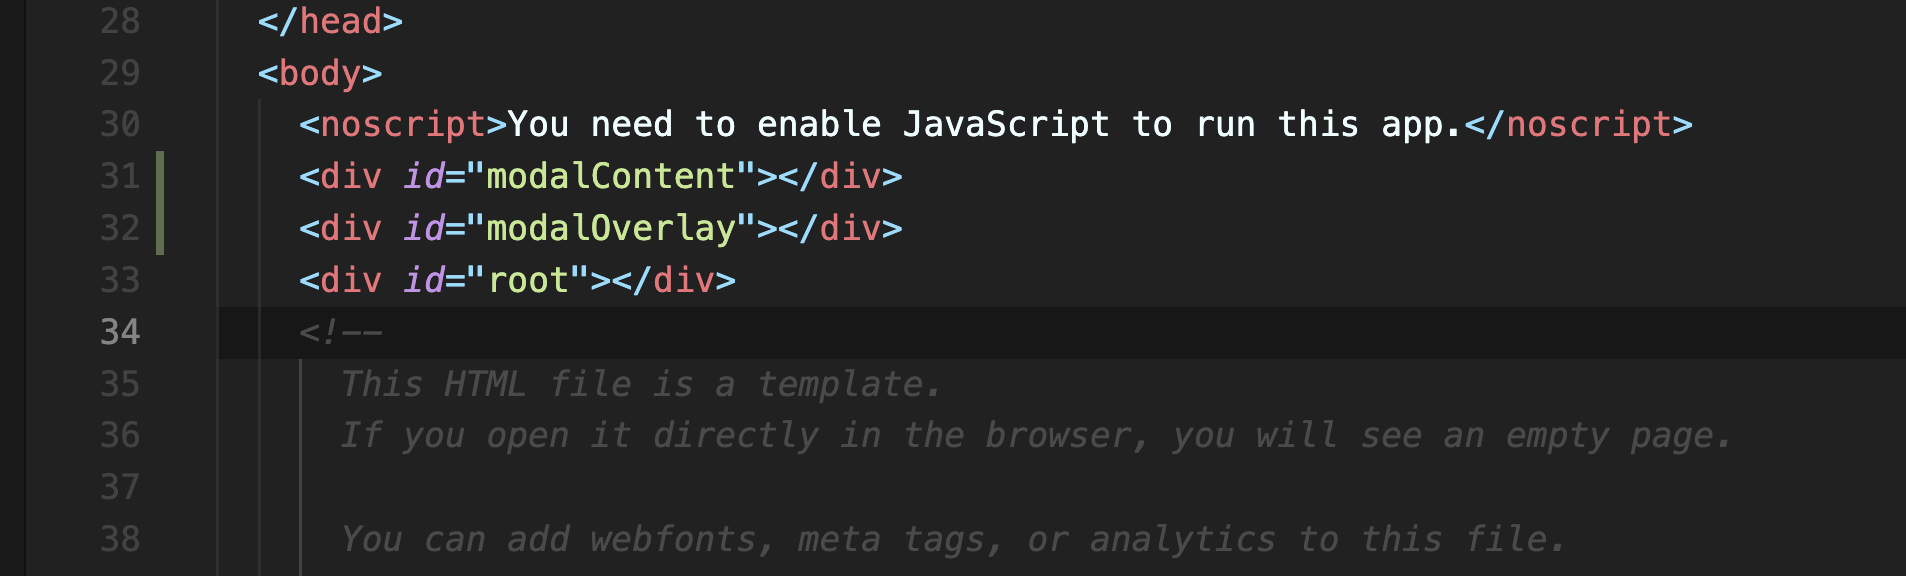 위와같이 "public"폴더에 있는 "index.html"파일에 포털을 이용한 컴포넌트의 위치를 "id"값으로 명시해준다.
2. Portal 이용을 위한 createPortal import
import { createPortal } from "react-dom"3. Portal이용을 위한 컴포넌트 분리
const ModalOverlay = (): JSX.Element => {
  return <div className={styles.modalOverlay}></div>;
};

const ModalContent = (props: ModalProps): JSX.Element => {
  return (
    <div className={styles.modalContent}>
      <button onClick={props.modalHandler}>X</button>
    </div>
  );
};Portals로 렌더링 할 컴포넌트를 기존의 컴포넌트에서 따로 컴포넌트화 시킨다.
4. createPortal 호출
const Modal = (props: ModalProps): JSX.Element => {
  return (
    <>
      {createPortal(
        <ModalOverlay />,
        document.getElementById("modalOverlay") as HTMLElement
      )}
      {createPortal(
        <ModalContent modalHandler={props.modalHandler} />,
        document.getElementById("modalContent") as HTMLElement
      )}
    </>
  );
};createPortal은 2개의 인자를 취한다.
-
렌더링 되어야 하는 React노드
-
포인터
-
포인터는 해당 컴포넌트가 렌더링 되어야 하는 실제 DOM의 컨테이너를 가르키는 포인터이다.
-
브라우저가 제공하는 내장 API인
document.getElementById를 이용해서 "index.html"에서 지정한 요소로 지정할 수 있다.
-
5. 최종 완성 코드
import { createPortal } from "react-dom";
import styles from "./Modal.module.css";


interface ModalProps {
  modalHandler: (e: React.MouseEvent<HTMLButtonElement>) => void;
}

const ModalOverlay = (): JSX.Element => {
  return <div className={styles.modalOverlay}></div>;
};

const ModalContent = (props: ModalProps): JSX.Element => {
  return (
    <div className={styles.modalContent}>
      <button onClick={props.modalHandler}>X</button>
    </div>
  );
};

const Modal = (props: ModalProps): JSX.Element => {
  return (
    <>
      {createPortal(
        <ModalOverlay />,
        document.getElementById("modalOverlay") as HTMLElement
      )}
      {createPortal(
        <ModalContent modalHandler={props.modalHandler} />,
        document.getElementById("modalContent") as HTMLElement
      )}
    </>
  );
};

export default Modal;
위와같이
위와같이 Portals로 이동시킨 위치에 createPortal로 연결시킨 컴포넌트가 제대로 렌더링 되는걸 확인할 수 있다.
3. "Portals"쓰면서 여러 궁금점
1. 꼭 "id"로 요소를 지정해서 사용해야 하는가?
아니다.
"class"로 지정하고 사용해도 된다.
다만 "id"로 한 이유는 모달 자체는 고유한 컨텐츠이기 때문에 "id"로 했다.
2. 분리한 컴포넌트를 꼭 같은 파일에 넣어놔야 하는가?
아니다.
분리한 컴포넌트를 다른 파일로 구분하여 import해서 사용해도 된다.
4. 마치며
createPortal은 실제DOM에 직접적으로 연결해준다는 장점 때문에 시멘틱 마크업을 주 목적으로 사용하는 기능이라고 생각한다.
실제 프로젝트를 진행할때도 빠지지 않고 쓰는 기능이였고 앞으로도 Modal을 구현하거나 요소를 이동할때는 createPortal을 쓰지 않을까 싶다.
5. Reference