MAC 기준으로 설명하였습니다.
1. Homebrew 설치
/bin/bash -c "$(curl -fsSL https://raw.githubusercontent.com/Homebrew/install/HEAD/install.sh)"2. Nginx 설치
brew install nginx3-1. Nginx 실행
brew services start nginx3-2. Nginx 종료
brew services stop nginx3-3. Nginx 서버 재시작 및 리로드
sudo service nginx restart
sudo service nginx reload
둘의 차이는 Nginx 재기동, restart vs reload 참고
4. 설치 확인
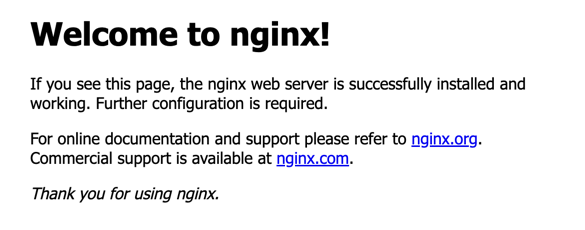
- 설치가 완료되었으면 NGINX 실행을 해보자.
- 그 후 http://localhost:8080/ 으로 접속하여 다음과 같은 페이지가 나오는지 확인
5. Nginx에 html 파일 추가
-
document root 위치에 html 파일을 추가해야 한다.
-
일단 terminal에 다음과 같이 버전을 확인해보자
nginx -V

seungjo@Seungjos-MacBook-Air html % nginx -V
nginx version: nginx/1.25.3
built by clang 15.0.0 (clang-1500.0.40.1)
built with OpenSSL 3.1.3 19 Sep 2023
TLS SNI support enabled
configure arguments: --prefix=/opt/homebrew/Cellar/nginx/1.25.3 ...-
nginx -V를 입력하면 configure arguments가 나오는데 여기서--prefix를 확인해보자. -
그러면, 각자의 환경에 따라 다르겠지만, 나의 경우에는
/opt/homebrew/Cellar/nginx/1.25.3이다. -
이제,
/opt/homebrew/Cellar/nginx/1.25.3/로 이동해서ls -al을 확인하면 다음과 같이 나올 것이다.
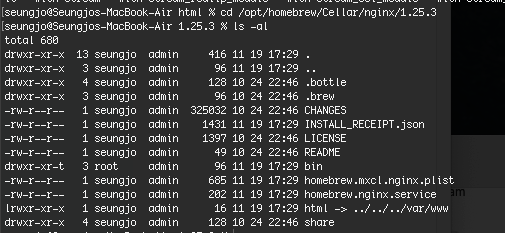
- 여기에 존재하는
html directory로 이동한 후hello.html을 다음과 같이 생성하였다.
<!DOCTYPE html>
<html lang="ko">
<head>
        <meta charset="UTF-8">
        <title>Hello</title>
</head>
<body>
        <h1>hello nginx!</h1>
</body>
</html>- 이제, http://localhost:8080/hello.html 을 들어가면 다음과 같은 화면이 나올 것이다.


https://blog.f1v3.my