FEAT: 라벨링 결과 출력
사실상 QuickDrop 플젝의 핵심기능인,
카테고리 자동분류 by AI를 렌더링하는데 성공하였다.
Future<void> _uploadImageAndSetCategory() async {
setState(() {
isLoading = true; // Show loading indicator
});
try {
String categoryText =
await UploadApi.uploadImageAndGetCategory(widget.image);
// Extract 'Utensil' from the result string
if (categoryText.contains(':')) {
categoryText = categoryText.split(':')[1].trim();
}
categoryText = categoryText.replaceAll(
RegExp(r'[^\w\s]'), ''); // Remove non-word characters
categoryText =
categoryText.trim(); // Remove leading and trailing whitespace
setState(() {
this.categoryText = categoryText; // Update category text field
isLoading = false; // Hide loading indicator
});
} catch (e) {
setState(() {
isLoading = false; // Hide loading indicator
});
print('Error uploading image and getting category: $e');
// Handle error here, such as displaying an error message to the user
}
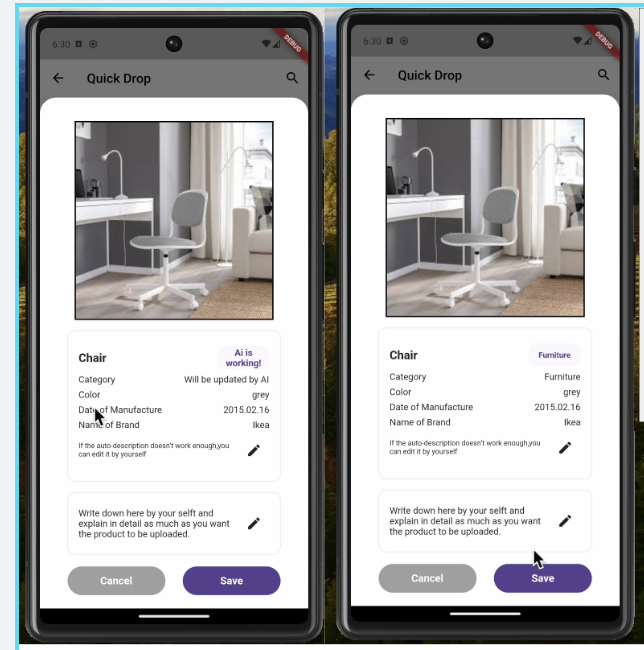
}일단 AI -> BE -> FE 로 넘어오는 라벨링 정보를 출력하는데 큰 어려움은 없었다.
그러나 라벨링 정보가 {result: "Utensil"}로 넘어오는지라,
Split 메소드와 인덱싱, 정규표현식을 사용하여 Utensil 만 출력할 수 있도록 하였다.
그리고 isLoading 변수를 사용하여 사용자에게 AI가 카테고리를 분류하고 있다는 것을 알려주도록 하였다.
구현 결과
FEAT: 물품 이미지 Post/Get
- Post
  static Future<String> uploadImageAndGetCategory(File image) async {
    try {
      var uri = Uri.parse('${ApiConstants.BASE_URL}/classify');
      var bytes = await image.readAsBytes();
      var imageData = base64Encode(bytes);

      var response = await http.post(
        uri,
        headers: {"Content-Type": "application/json"},
        body: json.encode({'data': imageData}),
      );

      if (response.statusCode == 200) {
        return response.body; // Return category text
      } else {
        throw Exception('Failed to upload image.');
      }
    } catch (e) {
      throw Exception('Error uploading image: $e');
    }
  }

  static String extractCategoryText(String responseText) {
    String categoryText = responseText.replaceAll(
        RegExp(r'[^\w\s]'), ''); // Remove non-word characters
    if (categoryText.contains(':')) {
      categoryText = categoryText.split(':')[1].trim();
    } // Remove leading and trailing whitespace
    return categoryText;
  }
}
BE분께서 category 필드에 AI가 라벨링해준 결과를 넣고, base64로 인코딩된 이미지 정보를
image_data 필드에 넣어서 달라고 하셔서, 원하시는 대로 받을 수 있도록 코드를 구현하였다,
FEAT & FIX: ApiConstants
사실 구현한다고 바빠서 api 주소값을 일일히 copy & Paste 하고 있었는데
api 주소가 바뀌니 이것을 일일히 바꿔야 하는게 귀찮아서
공통 폴더를 만들고 여기에 API 주소를 담고 import 하는 형식으로 바꾸었다.
FEAT : AI 판독중 표지 추가
처음엔 표시하는 곳을 비워두고 AI 가 라벨링한 결과를 보여줬는데
이게 사용자 입장에서 생각해보니 아무런 변화가 없어서 뭐지? 하고 모달창을 내려버릴 수도 있겠다는
생각이 들었다.
이러면 발생하는 문제가, See more Details 버튼을 계속해서 누르게 되고 중복된 POST 요청이 계속해서 갈 수 있을 뿐더러, UX적으로도 사용자가 진행상황을 체크하지 못하는 상황이 발생한다는 것이다.
따라서 isLoading 변수를 추가하여 진행상황을 확인할 수 있게 하였다.
bool isLoading = false;
Future<void> _uploadImageAndSetCategory() async {
if (mounted) {
setState(() {
isLoading = true; // Show loading indicator
});
}
try {
String? categoryText =
await UploadApi.uploadImageAndGetCategory(widget.image);
// Extract 'Utensil' from the result string
if (categoryText.contains(':')) {
categoryText = categoryText.split(':')[1].trim();
}
categoryText = categoryText.replaceAll(
RegExp(r'[^\w\s]'), ''); // Remove non-word characters
categoryText =
categoryText.trim(); // Remove leading and trailing whitespace
setState(() {
if (categoryText != null) {
this.categoryText = categoryText; // Update category text field
isLoading = false;
}
});
} catch (e) {
if (mounted) {
setState(() {
isLoading = false; // Hide loading indicator
});
}
print('Error uploading image and getting category: $e');
// Handle error here, such as displaying an error message to the user
}
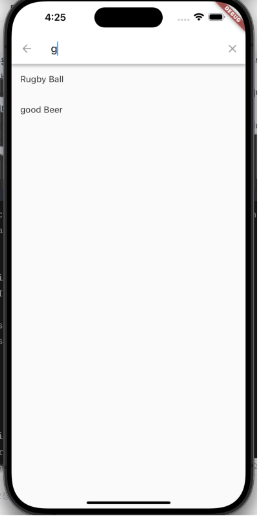
}FEAT: Search 기능 추가
Search.dart와search_delegate.dart 파일로 로직을 분리하여 구현하였다.
- Search_delegate.dart
Serach.dart에서 받은 입력값(query)을 사용하여
이Query와 일치하는 데이터를 찾는 역할을 하는 위젯.
import 'package:flutter/material.dart';
import 'package:quick_drop/services/product_list_api.dart';
class ProductSearchDelegate extends SearchDelegate<ProductInfo?> {
ProductSearchDelegate();
Widget buildLeading(BuildContext context) {
return IconButton(
icon: const Icon(Icons.arrow_back),
onPressed: () {
close(context, null);
},
);
}
Widget buildSuggestions(BuildContext context) {
if (query.isEmpty) {
return Container();
}
return FutureBuilder<List<ProductInfo>>(
future: ItemListApi.fetchData(searchKeyword: query),
builder: (context, snapshot) {
if (snapshot.connectionState == ConnectionState.waiting) {
return const Center(child: CircularProgressIndicator());
} else if (snapshot.hasError) {
return Text('Error: ${snapshot.error}');
} else {
final results = snapshot.data!.where((productInfo) {
return productInfo.title
.toLowerCase()
.contains(query.toLowerCase());
}).toList();
return ListView.builder(
itemCount: results.length,
itemBuilder: (context, index) {
final item = results[index];
return ListTile(
title: Text(item.title),
onTap: () {
close(context, item);
},
);
},
);
}
},
);
}
Widget buildResults(BuildContext context) {
return Container();
}
List<Widget> buildActions(BuildContext context) {
return [
IconButton(
icon: const Icon(Icons.clear),
onPressed: () {
query = '';
showSuggestions(context);
},
),
];
}
}
- Search.dart
입력값을 받아Serach_delegate.dart로 넘겨주고
없다면 검색결과가 없음을 보여주는 위젯
import 'package:flutter/material.dart';
import 'package:quick_drop/screen/home/search/search_delegate.dart';
class SearchScreen extends StatefulWidget {
const SearchScreen({Key? key}) : super(key: key);
_SearchScreenState createState() => _SearchScreenState();
}
class _SearchScreenState extends State<SearchScreen> {
Widget build(BuildContext context) {
return Scaffold(
appBar: AppBar(
leading: IconButton(
icon: const Icon(Icons.arrow_back, color: Colors.black),
onPressed: () {
Navigator.pop(context);
},
),
title: const Text('Search', style: TextStyle(color: Colors.black)),
backgroundColor: Colors.white,
shadowColor: Colors.transparent,
actions: [
IconButton(
icon: const Icon(Icons.search, color: Colors.black),
onPressed: () {
showSearch(
context: context,
delegate: ProductSearchDelegate(),
).then((productInfo) {
if (productInfo != null) {
Center(
child: Text("No matching results, please double check"),
);
}
});
},
),
],
),
body: const Center(
child: Column(
children: [
SizedBox(height: 20),
Text(
'Result will be here :)',
style: TextStyle(
fontSize: 16,
fontWeight: FontWeight.bold,
),
),
],
),
),
);
}
}
Trouble Shooting
Fix:setState() called after dispose
모달창을 띄워서 이미지를 보내려는데,
위에 적어두었던 _uploadImageAndSetCategory 요놈이 디버깅모드로 실행을 하니
저런 에러를 밷어내는 것이아닌가...
super.dispose()
_uploadImageAndSetCategory.dispose()
로 되어있던 걸 순서를 뒤바꾸니
Fix: _AssertionError ('package:flutter/src/widgets/framework.dart': Failed assertion: line 4833 pos 12: '_lifecycleState != _ElementLifecycle.defunct': is not true.)
라는 에러가 또 나왔다.
결국 두 가지 에러는 생명주기가 끝났음에도 dispose하라는 코드로 인해서
"defunct"가 발생해서 나타나는 에러였다.
난생 처음 보는 에러여서 defunct가 무슨 뜻인가 했더니 "no Longer exist"
그래서 super.dispose() 만 남기니 에러가 해결되었다.
구현에 급급해서 위젯과 함수의 생명주기를 간과해서 발생한 에러였다.
위젯의 생명주기
StatefulWidget의 생명주기는 8단계로 나눌 수가 있다.
- createState() : 최초 생성시 호출되는 메서드, 상태를 관리하는 State객체를 생성
- initState(): State 객체가 초기화시 호출, 일회성 작업을 수행하는데 주로 사용
- didChangeDependencies(): 상위위젯 혹은 InheritedWidget의 종속성이 변경시 호출, 이전의 의존성이 변경되었을 때 실행되며, 데이터를 가져오거나 업데이트시 실행
- build(): 위 단계들이 완료되면 빌드 메서드를 통해 화면을 그림. 사용자의 인터페이스 모습을 반환
- didUpdateWidget(): 상위 위젯이 다시 렌더링 되어 해당 StatefulWidget이 재구성될때 호출됨, 새 위젯과 이전 위젯의 차이점을 처리하는 로직을 구현
- setState(): 사용자가 상호작용하여 상태가 변할때 이를 호출하여 업데이트. 화면을 다시 렌더링하고 업데이트함
- deactivate(): 더이상 활성상태가 아니라면 이 메서드를 호출, 필요한 정리작업을 수행
- dispose(): StatefulWidget이 파괴시 dispose() 메서드가 호출.
즉, 모달창을 띄워서 상태 업데이트를 위해 _uploadImageAndSetCategory를 호출해야하는데
dispose 시켜버려서 dispose 이후 setState가 실행되니 뱉어냈던 에러였다.