Chapter 05. 객체지향 클래스(2)

수강날짜 : 21-08-07
강의명 : 07 생성자, 생성자 오버로딩
강의명 : 08 참조 자료형
강의명 : 09 정보 은닉 - 1
강의명 : 10 정보 은닉 - 2
강의명 : 11 this에 대하여
강의명 : 12 객체 간 협력
강의명 : 13 코딩해 보세요(2)
생성자, 생성자 오버로딩
생성자
- 객체를 생성할 때 new 키워드와 함께 호출 (객체 생성 외에는 호출할 수 없음)
- 인스턴스를 초기화 하는 코드가 구현 됨 (주로 멤버 변수 초기화)
- 반환 값이 없음, 상속되지 않음
- 생성자는 클래스 이름과 동일
매개변수가 없는 생성자가 생성자 비 명시시 자동으로 작성된다.
기본 생성자
- 하나의 클래스에는 반드시 하나 이상의 생성자가 존재해야 함
- 프로그래머가 생성자를 구현하지 않으면 컴파일러가 생성자 코드를 넣어줌 => 기본 생성자
- 기본 생성자는 매개 변수가 없고, 구현부가 없음
- 만약 클래스에 다른 생성자가 있는 경우 디폴트 생성자는 제공되지 않음
public class Student {

	int studentID;
	String studentName;
	String address;

	public void showStudentInfo() {
		System.out.println(studentName + ", " + address);
	}

	public String getStudentName() {
		return studentName;
	}
}
생성자를 선언하지 않아 기본 생성자가 자동으로 생성된다.
그렇다면 기본 생성자가 아닌 매개변수가 있는 생성자를 작성 해 보자
public class Student {

	int studentID;
	String studentName;
	String address;

	public Student (int id, String name) {
		studentID = id;
		studentName = name;
	}

	public void showStudentInfo() {
		System.out.println(studentName + ", " + address);
	}

	public String getStudentName() {
		return studentName;
	}
}
멤버 변수를 생성자 호출시 매개변수를 멤버변수로 초기화 한다.
에러가 발생한다!
기본 생성자는 생성자를 선언하지 않은 클래스에 대하여 자동으로 생성이 된다.
기존 코드 테스트에서는 다음과 같이 기본 생성자로 호출하였으나 더 이상 기본 생성자가 존재하지 않아 문제가 발생한다.
public class Student {

	int studentID;
	String studentName;
	String address;

	public Student() {};

	public Student (int id, String name) {
		studentID = id;
		studentName = name;
	}

	public void showStudentInfo() {
		System.out.println(studentName + ", " + address);
	}

	public String getStudentName() {
		return studentName;
	}
}
다음과 같이 일부러 기본 생성자를 만들어서 문제를 해결할 수 있다.
다음과 같이 매개변수는 다르지만 똑같은 생성자 메서드를 볼수 있다.
public Student메서드가 이렇게 다양한 매개 변수로 다른 기능을 하는 것을 생성자 오버로딩이라고 한다.
메서드 또한 오버로딩이 있다.
오버로딩의 조건은 다른 갯수의 매개변수, 다른 속성의 매개 변수인지로 구분이 가능하다.
생성자가 다양하면 그것에 맞는 생성자를 골라서 호출이 가능하므로 좋다,
참조 자료형
변수의 자료형은 두가지 타입이 존재
기본 자료형
참조 자료형
클래스형은 참조 자료형이다.
기본 자료형은 사용하는 메모리가 정해져 있지만, 참조 자료형은 클래스에 따라 다름
참조 자료형 직접 만들어 사용하기
학생 클래스(Student)에 있는 과목 이름. 과목 성적 속성을 과목 클래스(Subject)로 분리하고
Subject참조 자료형 멤버 변수를 Student에 정의 하여 사용함
함수가 함수를 멤버 변수로 갖는다.
기존 방법으로 구현한 것과 비교해보자
public class Student {

	int studentID;
	String studentName;

	int koreaScore;
	int mathScore;
	int engScore;


	String koreaName;
	String mathName;
	String engName;

}
과목 점수와 과목 이름이 연결되지 않는다.
이는 변수들의 관계를 코드로 파악하기 힘들어진다.
또한 과목이 하나 하나 증가하는 데에 있어서 많은 문제가 발생한다.
만약 여러 변수가 있는 것일 경우 업무의 양이 늘어난다.
-> 유지 보수성이 떨어진다.
그래서 과목 클래스를 맴버 변수로 바꿔보자.
Student 클래스
public class Student {

	int studentID;
	String studentName;

	Subject korea;
	Subject math;

	public Student(int id, String name) {
		this.studentID = id;
		this.studentName = name;

		korea = new Subject();
		math = new Subject();
	}

	public void setKoreaSubject(String name, int score) {
		korea.subjectName = name;
		korea.score = score;
	}

	public void setMathSubject(String name, int score) {
		math.subjectName = name;
		math.score = score;
	}

	public void showStudentScore() {
		int total = korea.score + math.score;
		System.out.println(studentName + " 학생의 총점은 " + total + "점 입니다.");

	}

}
Subject 클래스
public class Subject {
	int subjectSCore;
	String subjectName;

}
StudentTest 클래스
public class StudentTest {

	public static void main(String[] args) {
		Student studentLee = new Student(100, "Lee");
		studentLee.setKoreaSubject("국어", 100);
		studentLee.setMathSubject("수학", 95);

		Student studentKim = new Student(200, "Kim");
		studentKim.setKoreaSubject("국어", 80);
		studentKim.setMathSubject("수학", 99);

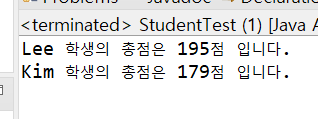
		studentLee.showStudentScore();
		studentKim.showStudentScore();
	}
}
정보 은닉 - 1
접근 제어자
- 변수, 메서드, 생성자에 대한 접근 권한 지정
- public, private, protected, 아무것도 안 쓰는 경우(기본 접근 제어자)
- private을 사용하면 클래스 외부에서는 접근 할 수 없음
정보 은닉
외부에서 클래스 내부의 정보에 접근하지 못하도록 함
private 키워드를 활용
private 변수를 외부에서 접근하게 하려면 public 메서드 제공함
클래스 내부 데이터를 잘못 사용하는 오류를 방지할 수 있음
package hiding;

public class MyDate {
	private int day;
	private int month;
	private int year;

	public void setDay(int day) {
		this.day = day;
	}

	public void showDate() {
		System.out.println(year + "년 " + month + "월 " + day + "일");
	}
}
다음과 같이 정보은닉을 하고 메서드를 이용하여 값을 변경 혹은 조회하도록 할 수 있다.
정보 은닉 - 2
실습
MyDate
public class MyDate {
	private int day;
	private int month;
	private int year;

	public void setDay(int day) {
		this.day = day;
	}

	public int getDay() {
		return day;
	}

	public int getMonth() {
		return month;
	}

	public void setMonth(int month) {

		if(month < 1 || month > 12) {
			isValid = false;
		}
		this.month = month;
	}

	public int getYear() {
		return year;
	}

	public void setYear(int year) {
		this.year = year;
	}

	public void showDate() {

		System.out.println(year + "년 " + month + "월 " + day + "일");
	}
}
MyDateTest
public class MyDateTest {
	public static void main(String[] args) {

		MyDate date = new MyDate();

		date.setYear(2019);
		date.setMonth(7);
		date.setDay(10);

		date.showDate();
	}
}
this에 대하여
this의 역할
자신의 메모리를 가리킴
생성자에서 다른 생성자를 호출 함
인스턴스 자신의 주소를 반환
참조 변수 관련하여 자신의 메모리(힙)를 가르킨다.
생성자에서 다른 생성자를 호출
public Person() {
this("이름없음",1);
}
public Person(String name, int age) {
this.name = name;
this.age = age;
}
실제 예제
Person 클래스
public class Person {

	String name;
	int age;

	public Person() {
		this("이름 없음", 1);
	}

	public Person(String name, int age) {
		this.name = name;
		this.age = age;
	}

	public void showInfo() {
		System.out.println(name + ", " + age );
	}

	public Person getSelf() {
		return this;
	}
}
PersonTest 클래스
public class PersonTest {
	public static void main(String[] args) {
		Person personNoname = new Person();
		personNoname.showInfo();


		Person personLee = new Person("Lee", 20);
		personLee.showInfo();
		System.out.println(personLee);

		Person p = personLee.getSelf();
		System.out.println(p);
	}
}
객체 간 협력
객체 간 협력
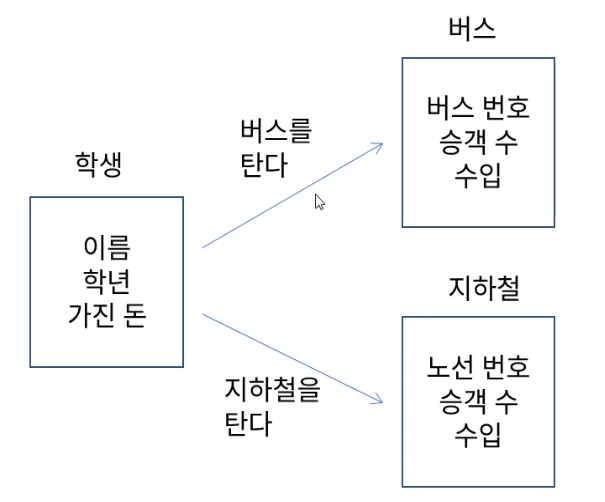
객체 지향 프로그램은 객체를 정의 하고 객체간의 협력을 구현한 프로그램
ex) 학생이 지하철이나 버스를 타고 학교 가는 과정에서 일어나는 협력
실습
Student 클래스
public class Student {

	String studentName;
	int grade;
	int money;

	public Student(String studentName, int money ) {
		this.studentName = studentName;
		this.money = money;
	}

	public void takeBus(Bus bus) {
		bus.take(1000);
		this.money -= 1000;
	}

	public void takeSubway(Subway subway) {
		subway.take(1200);
		this.money -= 1200;
	}

	public void showInfo() {
		System.out.println(studentName + "님의 남은 돈은 " + money + "원 입니다.");
	}
}
Bus 클래스
public class Bus {

	int busNumber;
	int passengerCount;
	int money;

	public Bus(int busNumber) {
		this.busNumber = busNumber;
	}

	public void take(int money) { //승차
		this.money += money;
		passengerCount++;
	}

	public void showBusInfo() {
		System.out.println(busNumber + "번 버스의 승객은 " + passengerCount + " 명 이고, 수입은 " + money + "입니다");
	}
}
Subway 클래스
public class Subway {
	int lineNumber;
	int passengerCount;
	int money;


	public Subway(int lineNumber) {
		this.lineNumber = lineNumber;
	}

	public void take(int money) {
		this.money += money;
		passengerCount++;
	}

	public void showSubwayInfo() {
		System.out.println(lineNumber + "번 지하철의 승객은 " + passengerCount + " 명 이고, 수입은 " + money + "입니다");
	}
}
TakeTransTest
public class TakeTransTest {
	public static void main(String[] args) {
		Student studentJ = new Student("James", 5000);
		Student studentT = new Student("Tomas", 10000);

		Bus bus100 = new Bus(100);
		Bus bus500 = new Bus(500);
		Subway subwayGreen = new Subway(2);
		Subway subwayBlue = new Subway(4);


		studentJ.takeBus(bus100);
		studentT.takeSubway(subwayGreen);

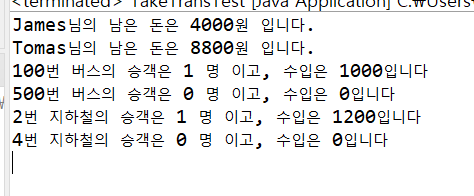
		studentJ.showInfo();
		studentT.showInfo();

		bus100.showBusInfo();
		bus500.showBusInfo();

		subwayGreen.showSubwayInfo();
		subwayBlue.showSubwayInfo();
	}
}
코딩해보세요(2)
정보은닉- 날짜의 유효성을 검증하는 프로그램을 구현해 보세요
다음과 같은 MyDate 클래스가 있습니다.
- day, month, year 변수는 private으로 선언합니다.
- 각 변수의 getter, setter를 public으로 구현합니다.
- MyDate(int day, int month, int year) 생성자를 만듭니다.
- public boolean isValid()메서드를 만들어 날짜가 유효한지 확인합니다.
- MyDateTest 클래스에서 생성한 MyDate 날짜가 유효한지 확인합니다.
풀이
MyDate 클래스
public class MyDate {
	private int day;
	private int month;
	private int year;

	public MyDate(int day, int month, int year) {
		this.setDay(day);
		this.setMonth(month);
		this.setYear(year);
	}

	public void setDay(int day) {
		this.day = day;
	}

	public int getDay() {
		return day;
	}

	public int getMonth() {
		return month;
	}

	public void setMonth(int month) {

		this.month = month;
	}

	public int getYear() {


		return year;
	}

	public void setYear(int year) {
		this.year = year;
	}

	public void showDate() {
		if(check()) {
			System.out.println(year + "년 " + month + "월 " + day + "일");
		}
		else {
			System.out.println("유효하지 않은 날짜 입니다");
		}
	}

	public String isValid() {
		if(check()) {
			return "유효한 날짜입니다.";
		}
		return "유효하지 않은 날짜입니다.";
	}

	public boolean check() {
		if(month<1 && month>12) {
			return false;
		}
		else if(year<1) {
			return false;
		}
		else if(day<1) {
			return false;
		}
		else if(month==2){
			if(year%400==0) {
				if(day>29) return false;
			}
			else if(year%100==0) {
				if(day>30) return false;
			}
			else if(year%4==0) {
				if(day>29) return false;
			}
		}
		else {
			switch(month) {
			case 1:case 3:case 5:case 7:case 8:case 10:case 12:
				if(day >31) return false;
				break;
			case 2: break;
			default:
				if(day > 30) return false;
			}
		}

		return true;
	}
}
MyDateTest 클래스
public class MyDateTest {

	public static void main(String[] args) {
		MyDate date1 = new MyDate(30, 2, 2000);
		System.out.println(date1.isValid());
		MyDate date2 = new MyDate(2, 10, 2006);
		System.out.println(date2.isValid());

	}

}
객체 간 협력 - 출근길 커피 사기
아침 출근길에 김 졸려 씨는 4,000원을 내고 별다방에서 아메리카노를 사 마셨습니다. 이 피곤 씨는 콩다방에서 4,500원을 내고 라떼를 사 마셨습니다.
객체 간의 협력 강의를 참고하여 객체 지향 방법으로 구현해 보세요.
Person
public class Person {

	private String name;
	private int money;

	public Person(String name, int money) {
		this.name = name;
		this.money = money;
	}

	public void buyStarCoffee(StarCoffee starCoffee, int pay) {
		starCoffee.payMoney(pay);
		this.money -= pay;
		if(pay == Menu.STARAMERICANO)
			System.out.println(name + " 님이 " + pay +"으로 별 다방 아메리카노를 구입했습니다");
		else
			System.out.println(name + " 님이 " + pay +"으로 별 다방 라떼를 구입했습니다");

	}

	public void buyBeanCoffee(BeanCoffee beanCoffee, int pay) {
		beanCoffee.payMoney(pay);
		this.money -= pay;
		if(pay == Menu.BEANAMERICANO)
			System.out.println(name + " 님이 " + pay +"으로 콩 다방 아메리카노를 구입했습니다");
		else
			System.out.println(name + " 님이 " + pay +"으로 콩 다방 라떼를 구입했습니다");

	}

}
StarCoffee
public class StarCoffee {
	private int money;

	public void payMoney(int pay) {
		money -= pay;
	}
}
BeanCoffee
public class BeanCoffee {

	private int money;

	public void payMoney(int pay) {
		money -= pay;
	}
}
Menu
public class Menu {
	public static final int STARAMERICANO = 4000;
	public static final int STARLATTE = 4300;

	public static final int BEANAMERICANO = 4100;
	public static final int BEANLATTE = 4500;


}
CoffeeTest
public class CoffeeTest {
	public static void main(String[] args) {

		Person kim = new Person("Kim", 10000);
		Person lee = new Person("Lee", 10000);
		StarCoffee starCoffee = new StarCoffee();
		BeanCoffee beanCoffee = new BeanCoffee();

		kim.buyStarCoffee(starCoffee, Menu.STARAMERICANO);
		lee.buyBeanCoffee(beanCoffee, Menu.BEANLATTE);

	}
}


