Retrofit2을 이용해 안드로이드 스튜디오에 서버의 데이터를 가져오기
✔️나는 MySql과 spring을 연동하여 Mysql의 데이터를 tomcat 서버에 데이터를 Json 형식으로 올려두었다.
✔️서버에 올려둔 Json 형식의 데이터를 안드로이드 스튜디오에 가져오고자 한다.
우리가 필요한 것?
1. Retrofit
Retrofit은 서버와 클라이언트 간 http 통신을 위한 라이브러리로, API 인터페이스가 호출가능한 객체로 변환해주는 클래스를 제공한다.
https://square.github.io/retrofit/2. Gson
Gson은 json구조를 띄는 직렬화된 데이터를 JAVA의 객체로 역직렬화, 직렬화를 해주는 java 라이브러리 이다.
즉 Json Object <-> JAVA Object 양방향 변환을 해주는 라이브러리이다.
0. 준비단계
① manifest.xml 설정
② build.gradle(Module) 설정
① manifest.xml 설정
uses-permission android:name="android.permission.INTERNET" 을 추가한다.
<?xml version="1.0" encoding="utf-8"?>
<manifest xmlns:android="http://schemas.android.com/apk/res/android"
    package="kr.ac.duksung.myapplication">
    <uses-permission android:name="android.permission.INTERNET"/>

    <application
        android:allowBackup="true"
        android:icon="@mipmap/ic_launcher"
        android:label="@string/app_name"
        android:roundIcon="@mipmap/ic_launcher_round"
        android:supportsRtl="true"
        android:theme="@style/Theme.MyApplication">

        <activity
            android:name=".MainActivity"
            android:exported="true"
            android:usesCleartextTraffic="true">
            <intent-filter>
                <action android:name="android.intent.action.MAIN" />

                <category android:name="android.intent.category.LAUNCHER" />
            </intent-filter>
        </activity>
    </application>

</manifest>
② build.gradle(Module) 설정
⚡️⚡️⚡️
gson converter / retrofit 라이브러리를 반드시 같은 버전 으로 추가해준다.
implementation 'com.squareup.retrofit2:converter-gson:2.9.0'
implementation 'com.squareup.retrofit2:retrofit:2.9.0'
1. API로 받아올 데이터를 변환하여 매핑할 DTO 클래스 선언
① 서버에 올려놓은 json 데이터구조 확인하기.
② ①에 맞게 DTO 클래스 생성하기 -> Stock.java 클래스 생성
① 서버에 올려놓은 json 데이터구조 확인하기.
내가 서버에 올려놓은 데이터구조를 postman을 통해 확인해보자.
http://localhost:8080/stock
[
    {
        "market_id": 1,
        "item_id": 1,
        "item_name": "칸쵸",
        "item_price": "1200",
        "item_stock": "3"
    },
    {
        "market_id": 1,
        "item_id": 2,
        "item_name": "콘치",
        "item_price": "1500",
        "item_stock": "3"
    },
    {
        "market_id": 1,
        "item_id": 3,
        "item_name": "허쉬초콜릿우유",
        "item_price": "100",
        "item_stock": "5"
    },
    {
        "market_id": 1,
        "item_id": 4,
        "item_name": "진라면소컵",
        "item_price": "2000",
        "item_stock": "3"
    },
    {
        "market_id": 1,
        "item_id": 5,
        "item_name": "새우탕면소컵",
        "item_price": "2100",
        "item_stock": "3"
    }
]
http://localhost:8080/stock/1
{
"market_id": 1,
"item_id": 1,
"item_name": "칸쵸",
"item_price": "1200",
"item_stock": "3"
}② ①에 맞게 DTO 클래스 생성하기 -> Stock.java 클래스 생성
위의 데이터 구조에 맞게 DTO=Data Transfer Object 클래스 선언하기.
API의 응답 데이터 구조에 맞게 데이터 모델 클래스를 선언한다.
Stock.java
package kr.ac.duksung.myapplication;

import com.google.gson.annotations.Expose;
import com.google.gson.annotations.SerializedName;

public class stock {
    @SerializedName("market_id")
    @Expose
    private int market_id;

    @SerializedName("item_id")
    @Expose
    private int item_id;

    @SerializedName("item_name")
    @Expose
    private String item_name;

    @SerializedName("item_price")
    @Expose
    private String item_price;

    @SerializedName("item_stock")
    @Expose
    private String item_stock;


    public int getMarket_id() {
        return market_id;
    }

    public int getItem_id() {
        return item_id;
    }

    public String getItem_name() {
        return item_name;
    }

    public String getItem_price() {
        return item_price;
    }

    public String getItem_stock() {
        return item_stock;
    }

    }
2. Retrofit_interface 인터페이스 생성
Retrofit_interface란?
http 통신을 위해 호출할 메소드를 포함한 서비스 인터페이스이다.
Retrofit_interface.java
package kr.ac.duksung.myapplication;

import retrofit2.Call;
import retrofit2.http.GET;
import retrofit2.http.Path;

public interface Retrofit_interface {
    @GET("stock/{item_id}")
    Call<stock> stock_api_get(
            @Path("item_id")String itemid);
}
3. retrofit_Client 클래스 생성
retrofit클래스와 gsonconverter를 이용하여 interface에 기술된 API 명세를 http API로 변환해주는 클래스를 생성한다.
⚡️⚡️⚡️
여기서 주의할점은 localhost 자리에 서버를 돌리고 있는 ip주소를 넣어야 한다.
스프링이나 postman은 localhost를 알아먹지만, adroid studio에서는 서버ip주소를 입력을해야 알아먹는다.
이거 안바꿔서 한참을 해맸다 😰😰
retrofit_client.java
package kr.ac.duksung.myapplication;

import com.google.gson.Gson;
import com.google.gson.GsonBuilder;

import retrofit2.Retrofit;
import retrofit2.converter.gson.GsonConverterFactory;

public class retrofit_client {

    private static final String BASE_URL = "http://localhost:8080/";

    public static Retrofit_interface getApiService(){
        //아래 getInstance()를 통해 생성된 Retrofit 클라이언트를 이용하여 Http API 명세가
        //담긴  interface 구현체를 생성한 뒤 반환한다.
        return getInstance().create(Retrofit_interface.class);
    }

    //getInstance 메소드를 통해 한번만 생성된 객체를 가져온다.
    private static Retrofit getInstance(){
        //
        Gson gson = new GsonBuilder().setLenient().create();
        //응답을 객체로 변환하기 위한 GsonConverter 설정을 하여 Retrofit Client를 생성하여 반환한다.
        return new Retrofit.Builder()
                .baseUrl(BASE_URL)
                .addConverterFactory(GsonConverterFactory.create(gson))
                .build();
    }
}
4. MainActivity 데이터 불러오기
MainActivity.java
package kr.ac.duksung.myapplication;
import androidx.appcompat.app.AppCompatActivity;
import android.os.Bundle;
import android.widget.TextView;
import retrofit2.Call;
import retrofit2.Callback;
import retrofit2.Response;
public class MainActivity extends AppCompatActivity {
Call<stock> call ;
@Override
protected void onCreate(Bundle savedInstanceState) {
super.onCreate(savedInstanceState);
setContentView(R.layout.activity_main);
TextView textView = (TextView) findViewById(R.id.textView);
//retrofit_client.getApiService()의 반환값은 Interface 구현체이다.
//Inteface의 stock_api_get()메소드에 구현된 API를 호출한다.
call = retrofit_client.getApiService().stock_api_get("1");
call.enqueue(new Callback<stock>() {
@Override
public void onResponse(Call<stock> call, Response<stock> response) {
stock result = response.body();
String item_name, item_stock, item_price;
item_name = result.getItem_name();
item_price = result.getItem_price();
item_stock = result.getItem_stock();
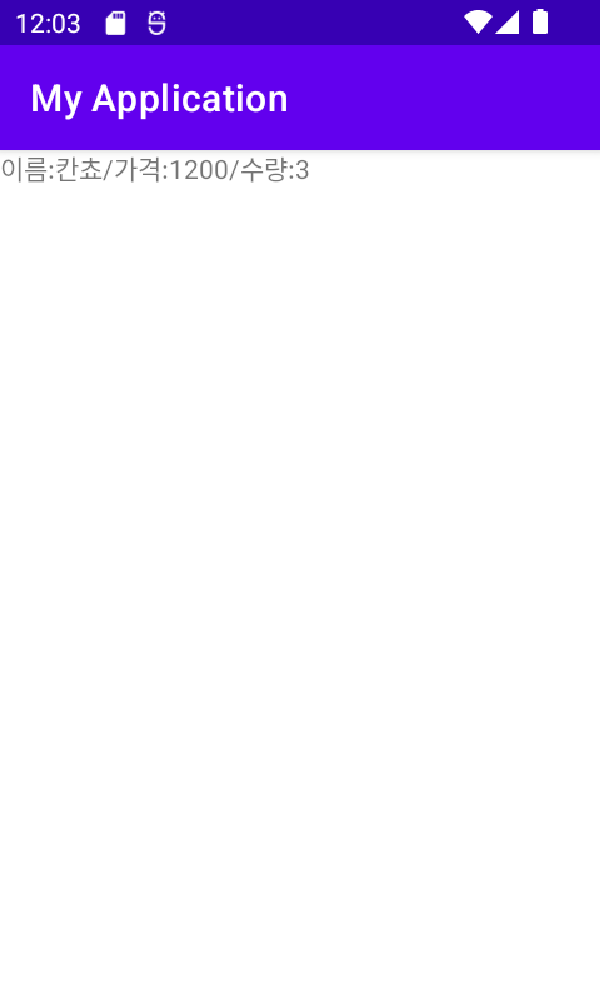
textView.setText("이름:"+item_name+"/가격:"+item_price+"/수량:"+item_stock);
}
//응답실패했을때
@Override
public void onFailure(Call<stock> call, Throwable t) {
textView.setText("실패");
}
});
};
}activity_main.xml
<?xml version="1.0" encoding="utf-8"?>
<LinearLayout xmlns:android="http://schemas.android.com/apk/res/android"
    xmlns:app="http://schemas.android.com/apk/res-auto"
    xmlns:tools="http://schemas.android.com/tools"
    android:layout_width="match_parent"
    android:layout_height="match_parent"
    android:orientation="vertical"
    app:layoutDescription="@xml/activity_main_scene"
    tools:context=".MainActivity">

    <TextView
        android:id="@+id/textView"
        android:layout_width="match_parent"
        android:layout_height="wrap_content"
        android:text="TextView" />
</LinearLayout>
5. 결과