이 글은
React 개발 환경을 구축하면서 배우는 Webpack 기초를
따라하면서 적은 글입니다.
Webpack의 개념
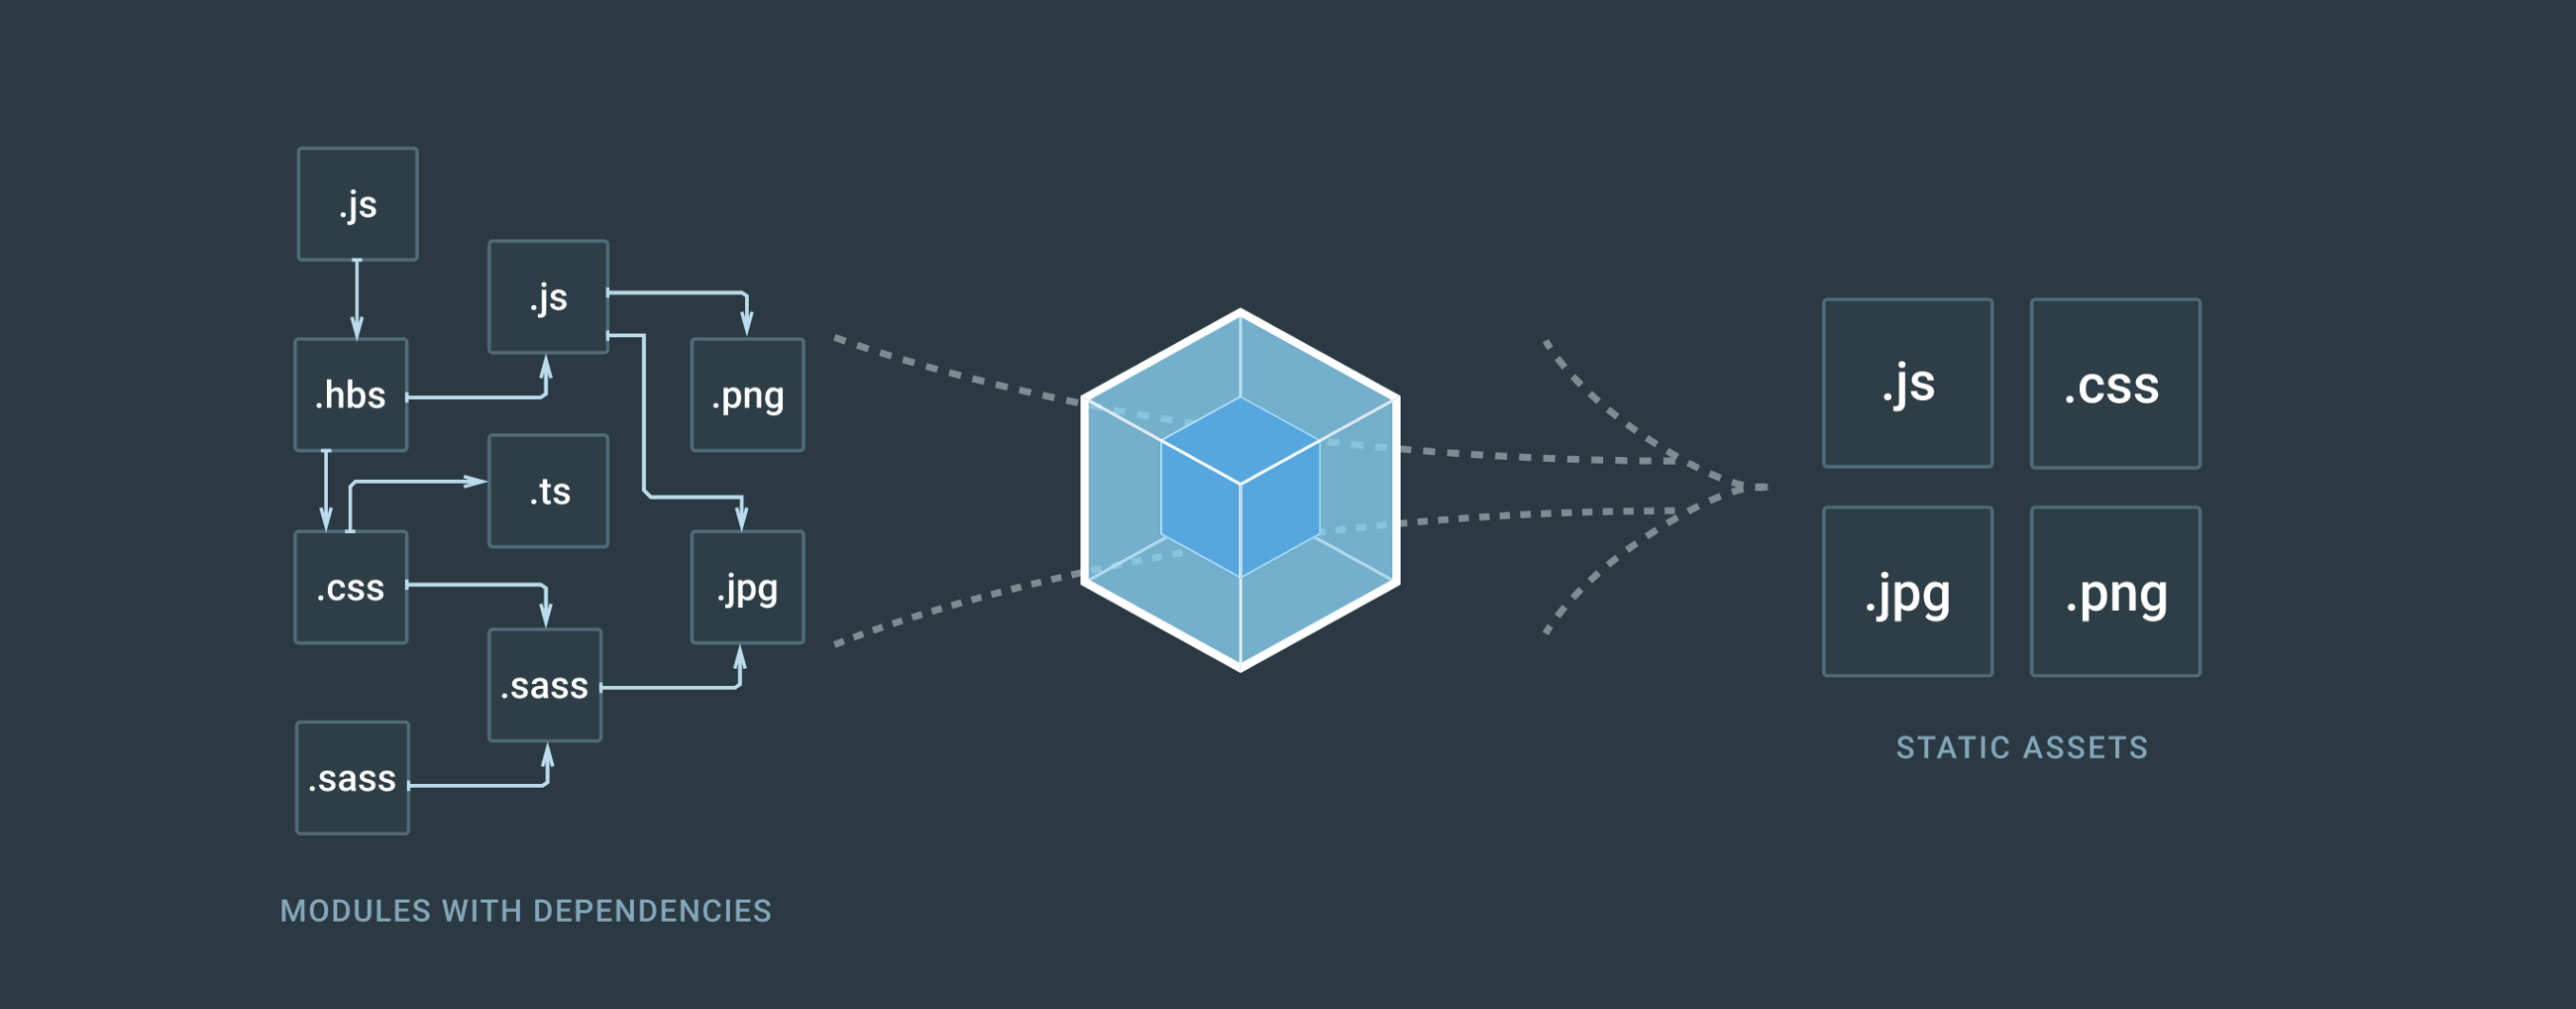
우선 Webpack에 대해 알기 위해서는 모듈 번들러(module bundler)를 알아야 합니다.
모듈 번들러란 여러개의 나누어져 있는 파일들을 하나의 파일로 만들어주는 라이브러리를 말합니다.
왜 모듈번들러가 필요한가?
웹 페이지를 보여주기 위해, 수많은 자바스크립트 파일을 서버를 통해 불러와야 합니다. 이러한 과정은 비효율적입니다. 또한, 개발과정에서 변수 스코프(scope)를 생각하면서 개발해야 번거로움이 있습니다.
이러한 문제를 해결하기 위해 최신 자바스크립트부터는 모듈의 개념이 생겼습니다. 이것이 웹팩과 같은 모듈 번들러(bundler) 라이브러리 입니다.
실습
프로젝트 설정하기
webpack-react라는 디렉터리를 만든 후 아래와 같은 명령어를 통해 초기화를 진행합니다.
yarn init -y그 후 실습에 필요한 라이브러리들을 설치합니다.
yarn add -D @babel/core @babel/preset-env @babel/preset-react babel-loader clean-webpack-plugin css-loader html-loader html-webpack-plugin mini-css-extract-plugin node-sass react react-dom sass-loader style-loader webpack webpack-cli webpack-dev-server웹팩으로 자바스크립트 파일 빌드하기
- src 폴더에 test.js 파일을 작성합니다.
// src/test.js


console.log("webpack test");- 최상위 디렉터리에 webpack.config.js 파일을 작성.
const path = require("path");

module.exports = {
  entry: "./src/test.js",
  output: {
    filename: "bundle.js",
    path: path.resolve(__dirname + "/build")
  },
  mode: "none"
};
entry : 웹팩이 빌드할 파일을 알려주는 역할.
output: 웹팩에서 빌드를 완료하면 filename과 path를 이용해 빌드파일 생성.
mode : 웹팩 빌드 옵션 설정 (production, development, none)
- package.json 파일에 build: webpack 스크립트 추가
{
  "name": "webpack-react",
  "version": "1.0.0",
  "main": "index.js",
  "license": "MIT",
  "scripts": {
    "build": "webpack"
  },
  "devDependencies": {
    "@babel/core": "^7.4.3",
    "@babel/preset-env": "^7.4.3",
    "@babel/preset-react": "^7.0.0",
    "babel-loader": "^8.0.5",
    "clean-webpack-plugin": "^2.0.1",
    "css-loader": "^2.1.1",
    "html-loader": "^0.5.5",
    "html-webpack-plugin": "^3.2.0",
    "mini-css-extract-plugin": "^0.6.0",
    "node-sass": "^4.11.0",
    "react": "^16.8.6",
    "react-dom": "^16.8.6",
    "sass-loader": "^7.1.0",
    "style-loader": "^0.23.1",
    "webpack": "^4.30.0",
    "webpack-cli": "^3.3.1",
    "webpack-dev-server": "^3.3.1"
  }
}
webpack 명령어가 실행되면 디폴트로 실행할 파일은 같은 경로에 있는 webpack.config.js에 내용을 가지고 빌드 됩니다.
그 후 yarn build를 하면 빌드 디렉터리에 bundle.js가 생기게 됩니다.
* 주의사항 : script가 있어야 합니다.
웹팩으로 HTML 파일 빌드하기
웹팩은 자바스크립트 파일뿐만 아니라 자바스크립트가 아닌 파일들도 모듈로 관리할 수 있습니다.
그건 웹팩의 로더(loader)를 통해 가능합니다.
로더의 기본적인 사용 방법.
module: {
    rules: {
        use: [
            {
                loader: '사용할 로더 이름',
                options: { 사용할 로더 옵션 }
            }
        ]
    }
}
우선 로더의 기능을 알기 위해서 직접 html파일을 웹팩의 로더로 빌드 해봅니다.
- public 디렉터리를 만들어 그 안에 index.html 파일을 만들어 줍니다.
<!DOCTYPE html>
<html lang="kr">
    <head>
        <meta charset="utf-8" />
        <title>WEBPACK4-REACT</title>
    </head>
    <body>
        <noscript>스크립트가 작동되지 않습니다!</noscript>
        <div id="root"></div>
    </body>
</html>
그 후 webpack.cofing.js파일에 html 관련 코드를 추가해 줍니다.
const path = require("path");
const HtmlWebPackPlugin = require("html-webpack-plugin");

module.exports = {
  entry: "./src/test.js",
  output: {
    filename: "bundle.js",
    path: path.resolve(__dirname + "/build")
  },
  mode: "none",
  module: {
    rules: [
      {
        test: /\.html$/,
        use: [
          {
            loader: "html-loader",
            options: { minimize: true }
          }
        ]
      }
    ]
  },
  plugins: [
    new HtmlWebPackPlugin({
            template: './public/index.html', // public/index.html 파일을 읽는다.
      filename: 'index.html' // output으로 출력할 파일은 index.html 이다.
    })
  ]
};
html파일을 읽었을 때 html-loader를 실행하여 웹팩이 이해할 수 있게 하고, options으로 minimize라는 코드 최적화 옵션을 사용하여 한줄로 표현합니다.
웹팩으로 리액트 빌드하기
- src/index.js를 만들고 아래와 같이 입력합니다.
import React from 'react';
import ReactDOM from 'react-dom';
import Root from './Root';

ReactDOM.render(<Root />, document.getElementById("rood"));- src/Root.js를 만듭니다.
import React from 'react';

const Root = () => {
	return (
    	<h3>Hello, React </h3>
    );
};

export default Root;- 최상위 디렉터리에 .babelrc를 만들어 다음과 같이 적습니다.
{
  "presets": ["@babel/preset-env", "@babel/preset-react"]
}- 마지막으로 webpack.config.js에 babel-loader를 추가합니다
rules: [
      {
        test: /\.(js|jsx)$/,
        exclude: "/node_modules",
        use: ['babel-loader'],
      },
그리고 build를 진행합니다.
웹팩에서 CSS 사용하기
- src/style.css를 만들고 아래와 같은 내용을 입력해 줍니다.
.title {
    color: #2196f3;
    font-size: 52px;
    text-align: center;
}
그 후, src/Root.js에서 style.css를 가지고 올 수 있도록 import 합니다.
import React from 'react';
import './style.scss';

const Root = () => {
  return (
    <h3 className="title">Hello, React</h3>
  );
};

export default Root;- webpack.config.js에 추가.
      {
        test: /\.css$/,
        use: ['css-loader']
}- yarn build를 하면 성공적인 빌드 가능.
하지만, css적용이 되어있지 않습니다. 그 이유는 웹팩에서 css파일을 읽은 후 어딘가에 저장해야하기 때문입니다. 그래서 webpack.config.js에 CSS를 추출해서 파일로 저장하는 플러그인을 추가합니다.
const path = require("path");
const HtmlWebPackPlugin = require("html-webpack-plugin");
const MiniCssExtractPlugin = require("mini-css-extract-plugin");

module.exports = {
  entry: "./src/index.js",
  output: {
    filename: "bundle.js",
    path: path.resolve(__dirname + "/build")
  },
  mode: "none",
  module: {
    rules: [
      {
        test: /\.(js|jsx)$/,
        exclude: "/node_modules",
        use: ['babel-loader'],
      },
      {
        test: /\.html$/,
        use: [
          {
            loader: "html-loader",
            options: { minimize: true }
          }
        ]
      },
      {
        test: /\.css$/,
        use: [MiniCssExtractPlugin.loader, 'css-loader']
      }
    ]
  },
  plugins: [
    new HtmlWebPackPlugin({
      template: './public/index.html', // public/index.html 파일을 읽는다.
      filename: 'index.html' // output으로 출력할 파일은 index.html 이다.
    }),
    new MiniCssExtractPlugin({
      filename: 'style.css'
    })
  ]
};
{
test: /\.css$/,
use: [MiniCssExtractPlugin.loader, 'css-loader']
}여기서, use: [MiniCssExtractPlugin.loader, 'css-loader'] 부분은 오른쪽에서 왼쪽으로 읽습니다. css-loader를 통해 css를 읽고 MiniCssExtractPlugin.loader를 통해 CSS를 추출합니다.
웹팩에서 Scss 사용하기
- src/style.scss 파일을 만듭니다.
$fontColor: #2196f3;
$fontSize: 52px;
.title {
color: $fontColor;
font-size: $fontSize;
text-align: center;
}- 그리고 src/Root.js를 아래와 같이 scss파일을 import 합니다.
import React from 'react';
import './style.scss';
const Root = () => {
return (
<h3 className="title">Hello, React</h3>
);
};
export default Root;- 웹팩이 scss파일을 읽을 수 있도록, scss loader를 사용합니다.
{
test: /\.scss$/,
use: [MiniCssExtractPlugin.loader, "css-loader", "sass-loader"]
}- 그리고 yarn build를 해줍니다.
웹팩 개발 서버 적용하기
소스코드를 수정할 때마다 빌드를 해주어야 하는 불편함을 없애기 위해 webpack-dev-server가 있습니다.
- 우선 webpack.config.js파일에 들어가 devServer를 추가합니다.
const path = require("path");
const HtmlWebPackPlugin = require("html-webpack-plugin");
const MiniCssExtractPlugin = require("mini-css-extract-plugin");
module.exports = {
entry: "./src/index.js",
output: {
filename: "bundle.js",
path: path.resolve(__dirname + "/build")
},
devServer: {
contentBase: path.resolve("./build"),
index: "index.html",
port: 9000
},
mode: "none",
module: {
rules: [
{
test: /\.(js|jsx)$/,
exclude: "/node_modules",
use: ['babel-loader'],
},
{
test: /\.html$/,
use: [
{
loader: "html-loader",
options: { minimize: true }
}
]
},
  {
    test: /\.css$/,
    use: [MiniCssExtractPlugin.loader, 'css-loader']
},
      {
        test: /\.scss$/,
        use: [MiniCssExtractPlugin.loader, "css-loader", "sass-loader"]
      }
]
},
plugins: [
new HtmlWebPackPlugin({
template: './public/index.html', // public/index.html 파일을 읽는다.
filename: 'index.html' // output으로 출력할 파일은 index.html 이다.
}),
new MiniCssExtractPlugin({
filename: 'style.css'
})
]
};- 그 후 package.json 파일에 scripts에 다음과 같이 추가해줍니다.
"scripts": {
    "build": "webpack",
    "start": "webpack-dev-server --hot"
}- yarn start를 실행하면 localhost:9000에서 변경사항을 실시간으로 확인할 수 있습니다.
빌드 디렉터리 깨긋하게 하기
build 디렉터리를 clean-webpack-plugin을 통해 빌드 될 때마다 안쓰는 파일을 삭제할 수 있습니다.
- webpack.config.js에서 아래와 같이 plugins에 MiniCssExtractPlugin에 filename을 style-test.css로 변경합니다.
plugins: [
    new HtmlWebPackPlugin({
        template: './public/index.html', // public/index.html 파일을 읽는다.
        filename: 'index.html' // output으로 출력할 파일은 index.html 이다.
    }),
    new MiniCssExtractPlugin({
        filename: 'style-test.css'
    })
]- build 폴더에 style-test.css가 생기고, style.css는 아직 남아있게 됩니다. 안쓰는 파일을 지우기 위해 clean-webpack-plugin을 적용합니다.
- webpack.config.js에 아래와 같이 추가합니다.
const CleanWebpackPlugin = require("clean-webpack-plugin");

module.exports = {
     ...,
  plugins: [
    new HtmlWebPackPlugin({
      template: './public/index.html', // public/index.html 파일을 읽는다.
      filename: 'index.html' // output으로 출력할 파일은 index.html 이다.
    }),
    new MiniCssExtractPlugin({
      filename: 'style-test.css'
    }),
    new CleanWebpackPlugin()
  ]
};
* 주의사항 : 위와 같이 입력시 "CleanWebpackPlugin is not constructor" error가 발생합니다. 그래서 위에서 선언할 때
const CleanWebpackPlugin = require("clean-webpack-plugin");가 아니라
const { CleanWebpackPlugin } = require("clean-webpack-plugin"); 로 선언해야 합니다.
웹팩 빌드 모드 나누기
웹팩은 빌드모드가 Development와 Production에 따라 차이가 있습니다.
- Development는 빠르게 빌드하기 위해서 빌드할때 최적화를 하지 않습니다.
- Production은 빌드할때 최적화 작업을 합니다.
- config/webpack.config.dev.js와 config/webpack.config.prod.js를 작성합니다.
config/webpack.config.dev.js
const path = require("path");
const HtmlWebPackPlugin = require("html-webpack-plugin");
const MiniCssExtractPlugin = require("mini-css-extract-plugin");
const CleanWebpackPlugin = require("clean-webpack-plugin");

module.exports = {
  entry: "./src/index.js",
  output: {
    filename: "bundle.[contenthash].js",
    path: path.resolve(__dirname, "../build")
  },
  mode: "production",
  module: {
    rules: [
      {
        test: /\.(js|jsx)$/,
        exclude: "/node_modules",
        use: ["babel-loader"]
      },
      {
        test: /\.html$/,
        use: [
          {
            loader: "html-loader",
            options: { minimize: true }
          }
        ]
      },
      {
        test: /\.css$/,
        use: [MiniCssExtractPlugin.loader, "css-loader"]
      },
      {
        test: /\.scss$/,
        use: [MiniCssExtractPlugin.loader, "css-loader", "sass-loader"]
      }
    ]
  },
  plugins: [
    new HtmlWebPackPlugin({
      template: "./public/index.html",
      filename: "index.html"
    }),
    new MiniCssExtractPlugin({
      filename: "style.css"
    }),
    new CleanWebpackPlugin()
  ]
};
config/webpack.config.prod.js
const path = require("path");
const HtmlWebPackPlugin = require("html-webpack-plugin");
const MiniCssExtractPlugin = require("mini-css-extract-plugin");
const CleanWebpackPlugin = require("clean-webpack-plugin");

module.exports = {
  entry: "./src/index.js",
  output: {
    filename: "bundle.[contenthash].js",
    path: path.resolve(__dirname, "../build")
  },
  mode: "production",
  module: {
    rules: [
      {
        test: /\.(js|jsx)$/,
        exclude: "/node_modules",
        use: ["babel-loader"]
      },
      {
        test: /\.html$/,
        use: [
          {
            loader: "html-loader",
            options: { minimize: true }
          }
        ]
      },
      {
        test: /\.css$/,
        use: [MiniCssExtractPlugin.loader, "css-loader"]
      },
      {
        test: /\.scss$/,
        use: [MiniCssExtractPlugin.loader, "css-loader", "sass-loader"]
      }
    ]
  },
  plugins: [
    new HtmlWebPackPlugin({
      template: "./public/index.html",
      filename: "index.html"
    }),
    new MiniCssExtractPlugin({
      filename: "style.css"
    }),
    new CleanWebpackPlugin()
  ]
};- 마지막으로 package.json에 scripts에 다음과 같이 추가합니다.
"scripts": {
  "start": "webpack-dev-server --config ./config/webpack.config.dev --hot",
  "build": "webpack --config ./config/webpack.config.prod"
 },
yarn build와 yarn start를 통해 잘 되는지 확인합니다.