흔히 성능 향상을 위해 캐싱을 고려하고는 한다.
캐싱을 위해 Local Cache 또는 Global Cache(Cache Server)를 사용하게 되는데
각 방법에 따라 장단점이 있다.
Local Cache의 경우 아래와 같은 특징을 갖는다.
- 각 서버마다 개별 캐시 서버를 사용하여 캐시를 별도로 저장
- 로컬 서버의 자원(Memory, Disk)을 활용하여 캐싱을 수행
- 개별 서버 내에서 동작하기 때문에 접근 속도가 빠름
- 다른 서버의 캐시를 참조하기 어렵고 캐시 동기화 작업 필요
- ex) EhCache, Guava Cache, Caffeine Cache
Global Cache의 경우 아래와 같은 특징을 갖는다.
- 여러 서버에서 하나의 캐시 서버를 통해 캐시에 접근하여 활용
- 캐싱을 수행하기 위해 별도의 캐시 서버가 필요
- 네트워크 트래픽을 사용하기에 접근 속도가 상대적으로 느림
- 별도의 캐시 서버를 활용하기에 서버 간에 데이터 공유과 쉽고 동기화 작업이 필요 없음
- ex) Redis, Memcached
위와 같이 각 방법의 장단점을 알아보았는데
이번에는 단일 서버 환경에서 좀 더 적합한 Local Cache를 사용해보자
Local Cache 종류
Ehcache
Ehcache는 Spring에서 간단하게 사용할 수 있는 Java 기반의 오픈소스 라이브러리
Ehcache는 Spring 내부에서 동작하며 캐싱을 수행한다.
Guava Cache
Guava Cache는 Google에서 제공하는 Java Cache 라이브러리
Key-Value 형식으로 동작하여 캐싱을 수행한다.
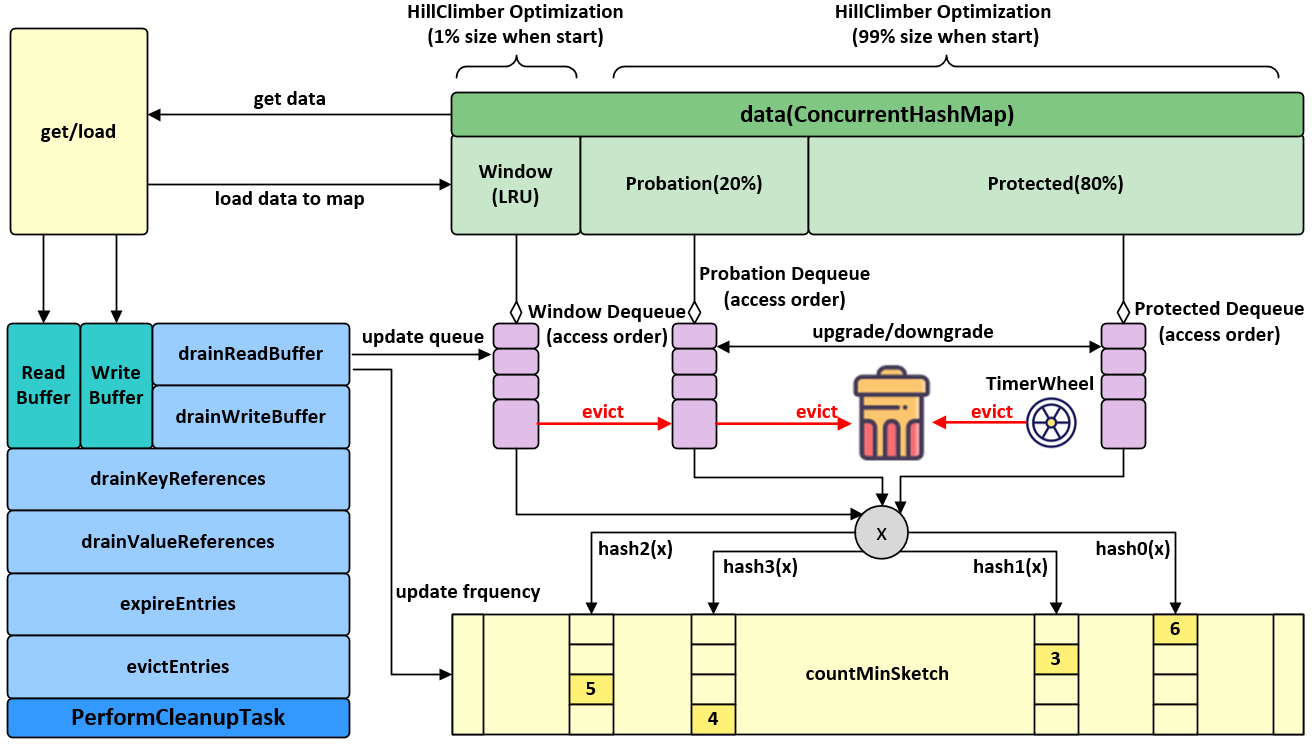
Caffeine Cache
Caffeine Cache는 Guava Cache와 ConcurrentHashMap을 개선한 ConcurrentLinkedHashMap을 바탕으로 구현된 Cache 라이브러리
Guava Cache를 재작성한 것이기에 Guava Cache와 비슷하다.
Local Cache 적용 방법
Ehcache
먼저 Ehcache를 사용하는데 필요한 package를 설치하기 위해 build.gradle의 dependency에
아래와 같이 Spring-boot-starter-cache, Ehcache, JCache를 추가한다.
	implementation 'org.springframework.boot:spring-boot-starter-cache:2.7.14'
    implementation 'org.ehcache:ehcache:3.8.1'
    implementation 'javax.cache:cache-api:1.1.1'
사용하고 싶은 특정 버전이 있는 경우, maven repository에서 해당 버전을 찾아 사용하자
[참고: https://mvnrepository.com/]
그 다음 Cache Manager에 대한 Configuration을 작성할 ehcache.xml을 작성하자
해당 파일은 src/main/resources/에 위치하면 된다.
<config
        xmlns:xsi='http://www.w3.org/2001/XMLSchema-instance'
        xmlns='http://www.ehcache.org/v3'
        xsi:schemaLocation="http://www.ehcache.org/v3 http://www.ehcache.org/schema/ehcache-core.xsd">
    <!-- Cache의 별명을 foo로 선언 -->
    <cache alias="foo">
        <!-- Key와 Value의 type을 설정 -->
        <key-type>java.lang.String</key-type>
        <value-type>java.lang.String</value-type>
        <resources>
            <!-- heap에 가질 수 있는 cache entry의 수를 지정 -->
            <heap unit="entries">20</heap>
            <!-- off-heap에 가질 수 있는 cache entry의 수를 지정 -->
            <offheap unit="MB">10</offheap>
        </resources>
    </cache>

    <!-- Cache element가 상속받을 수 있는 unique한 name을 가진 template를 설정 -->
    <cache-template name="myDefaults">
        <key-type>java.lang.Long</key-type>
        <value-type>java.lang.String</value-type>
        <!-- Cache의 Expired Time을 설정 -->
        <expiry>
            <ttl unit="seconds">60</ttl>
        </expiry>
        <heap unit="entries">200</heap>
    </cache-template>

    <!-- Cache Template를 상속받아 override하여 사용 -->
    <cache alias="bar" uses-template="myDefaults">
        <key-type>java.lang.Number</key-type>
    </cache>

    <!-- Cache Template를 상속받아 사용 -->
    <cache alias="simpleCache" uses-template="myDefaults" />

</config>
각 element에 대한 설명은 https://www.ehcache.org/schema/ehcache-core-3.0.xsd 참고
Spring이 XML Configuration 파일을 인식하도록 application.properties(또는 application.yml)에 해당 내용을 추가하자
spring.cache.jcache.config=classpath:ehcache.xml
캐시 기능을 사용하고자 하는 class에 @EnableCaching annotation을 추가하자
@EnableCaching
@SpringBootApplication
public class HelloApplication {
    public static void main(String[] args) {
        SpringApplication.run(HelloApplication.class, args);
    }
}
이렇게 @EnableCaching annotation을 추가하고 나면, spring에서 제공하는 AOP 방식을 활용하여 method에 annotation을 추가하여 원하는 방식으로 cache를 활용할 수 있다.
캐시를 사용하고자 하는 method에 @Cacheable annotation을 추가하자
@Cacheable(cacheNames="simpleCache", key="#number", condition="#number>10")
public String customMethod(Long number){
	return "";
}simpleCache라는 이름을 가진 cache를, number를 key로, number가 10 보다 큰 condition을 만족하는 경우 캐싱을 수행
만약 cache를 항상 update하고자 하는 경우 @CachePut annotation을 사용한다
@CachePut(cacheNames="simpleCache")
public void update(){
}simpleCache라는 이름을 가진 cache에 cache를 put
만약 data가 변경되어 cache를 evict하려는 경우 @CacheEvict annotation을 사용한다
@CacheEvict(cacheNames="simpleCache", allEntries=true)
public void remove(){
}simpleCache라는 이름을 가진 cache entry 전부를 evict함
Guava Cache
먼저 Guava Cache를 사용하는데 필요한 package를 설치하기 위해 build.gradle의 dependency에 필요한 Guava dependency를 추가한다.
implementation("com.google.guava:guava:33.0.0-jre")사용하고 싶은 특정 버전이 있는 경우, maven repository에서 해당 버전을 찾아 사용하자
[참고: https://mvnrepository.com/]
CacheBuilder를 통해서 Cache의 설정을 진행하여 사용한다.
Cache<Key, Value> cache = CacheBuilder.newBuilder()
    .maximumSize(1000)
    .build();
또는
LoadingCache<Key, Graph> graphs = CacheBuilder.newBuilder()
       .maximumSize(1000)
       .build(
           new CacheLoader<Key, Graph>() {
             public Graph load(Key key) throws AnyException {
               return createExpensiveGraph(key);
             }
});LoadingCache는 CacheLoader를 추가한 Cache로 CacheLoader의
load함수를 override하여 사용함
Guava의 경우 Spring에서 deprecated 되었기에, Spring에서 Cache Provider로 사용하고 싶다면, Caffeine을 사용하는 것이 낫다.
기본적인 Cache를 사용하는 방법은 다음과 같다.
-
put(K, V): cache에 value를 직접 추가 -
Cache.asMap()을 통해ConcurrentMap자료구조를 조작하여 사용
atomic operation이 automatic cache loading의 범위를 넘어가게 되어 권장하지 않음 -
get(K): cache된 값을 return하거나, CacheLoader를 이용하여 cache에 값을 자동으로 load
  try {
    return graphs.get(key);
  } catch (ExecutionException e) {
    throw new OtherException(e.getCause());
}getUnchecked(K):UncheckedExecutionException을 처리한get함수
return graphs.getUnchecked(key);-
getAll(Iterable<? extends K>): cache에 없는 각 key에 대하여CacheLoader.load를 수행
만약 한 번에 가져오는 것이 더 효율적이라면CacheLoader.loadAll을 override하여 사용 -
get(K, Callable<V>): cache에 있는 key와 관련된 값을 return하거나,Callable을 통해 계산하여 cache에 추가 후 return
  try {
    cache.get(key, new Callable<Value>() {
      @Override
      public Value call() throws AnyException {
        return doThingsTheHardWay(key);
      }
    });
  } catch (ExecutionException e) {
    throw new OtherException(e.getCause());
  }
Cache Eviction 정책은 다음과 같다.
- Size-based Eviction: cache size가 지정한 limit에 근접하면 evict
CacheBuilder.maximumSize(long): 캐시의 최대 크기 limit을 지정CacheBuilder.maximumWeight(long): 캐시의 최대 가중치 limit을 지정CacheBuilder.weigher(weigher): 가중치 계산 방식을 지정
- Time-based Eviction: 지정한 시간이 지나면 evict
expireAfterAccess(long, TimeUnit): cache entry가 일정시간 동안 access되지 않으면 expireexpireAfterWrite(long, TimeUnit): cache entry가 생성/교체되고 일정시간 후에 expire
- Reference-based Eviction: cache entry에 GC를 허용하여 evict
CacheBuilder.weakKeys(): key를 weak reference를 이용하여 저장CacheBuilder.weakValues(): value를 weak reference를 이용하여 저장
=> 대상에 strong 또는 soft reference가 없을 경우 GC 대상으로 처리CacheBuilder.softValues(): value를 soft reference로 wrapping
=> JVM의 메모리가 부족한 경우 globally least-recently-used 방식으로 GC 처리
Strong Reference: Java의 기본 참조 유형(
=)으로 해당 참조의 대상은 GC의 대상이 되지 않음
Soft Reference:SoftReference<?>로 JVM의 메모리가 부족한 경우에 SoftReference로만 참조하는 경우 GC의 대상이 됨
Weak Reference:WeakReference<?>로 WeakReference로만 참조하는 경우 GC의 대상이 됨
또한, GC는 identity(==)를 바탕으로 객체를 비교함
명시적으로 cache를 제거하는 방법은 다음과 같다.
Cache.invalidate(key): 개별적으로 제거Cache.invalidateAll(key): 대량으로 제거Cache.invalidateAll(): 모두 제거
또한 Removal Listener를 통해 Cache에서 entry가 제거되었을 때 특정 동작을 수행하게 할 수 있다.
CacheLoader<Key, DatabaseConnection> loader = new CacheLoader<Key, DatabaseConnection> () {
  public DatabaseConnection load(Key key) throws Exception {
    return openConnection(key);
  }
};
RemovalListener<Key, DatabaseConnection> removalListener = new RemovalListener<Key, DatabaseConnection>() {
  public void onRemoval(RemovalNotification<Key, DatabaseConnection> removal) {
    DatabaseConnection conn = removal.getValue();
    conn.close(); // tear down properly
  }
};

return CacheBuilder.newBuilder()
  .expireAfterWrite(2, TimeUnit.MINUTES)
  .removalListener(removalListener)
  .build(loader);
추가적으로 Cache의 Cleanup이나 Refresh가 필요한 경우
Cache.cleanUp()을 통해 수행LoadingCache.refresh(K)를 통해 수행CacheLoader.reload(K, V)와CacheBuilder.refreshAfterWrite(long, limit)을 통해 수행
또한 CacheBuilder.recordStats()를 통해 cache statistic을 저장하고
Cache.stats()를 통해 CacheStats 객체로 이를 확인할 수 있음
Caffeine Cache
먼저 Caffeine Cache를 사용하는데 필요한 package를 설치하기 위해 build.gradle의 dependency에 필요한 Caffeine dependency를 추가한다.
implementation 'com.github.ben-manes.caffeine:caffeine:2.9.3'사용하고 싶은 특정 버전이 있는 경우, maven repository에서 해당 버전을 찾아 사용하자
[참고: https://mvnrepository.com/]
Guava Cache와 유사하게 Caffeine의 Builder를 통해서 Cache의 설정을 진행하여 사용한다.
Cache<Key, Graph> cache = Caffeine.newBuilder()
    .expireAfterWrite(10, TimeUnit.MINUTES)
    .maximumSize(10_000)
    .build();
또는
LoadingCache<Key, Graph> graphs = Caffeine.newBuilder()
    .maximumSize(10_000)
    .expireAfterWrite(Duration.ofMinutes(5))
    .refreshAfterWrite(Duration.ofMinutes(1))
    .build(key -> createExpensiveGraph(key));
만약, CacheManager를 이용해서 Spring에서 Caffeine Cache를 Cache Provider로 사용하고 싶다면 Configuration을 작성하면 된다.
@Configuration
public class CacheConfig {

    @Bean
    public CacheManager cacheManager() {
        List<CaffeineCache> caches = Arrays.stream(CacheType.values())
                .map(cache -> new CaffeineCache(cache.getCacheName(),
                        Caffeine.newBuilder().recordStats()
                                .expireAfterWrite(cache.getExpireAfterWrite(), TimeUnit.SECONDS)
                                .maximumSize(cache.getMaximumSize())
                                .build()
                        )
                )
                .collect(Collectors.toList());

        SimpleCacheManager cacheManager = new SimpleCacheManager();
        cacheManager.setCaches(caches);

        return cacheManager;
    }
}
위와 같은 과정을 통해 CacheManager에 Caffeine Cache 객체를 등록하면
앞서 언급한 Ehcache를 annotation을 이용해서 다루는 것처럼 사용할 수 있다.
또한 Spring Boot 2.0부터 auto-configuration을 통해 CaffeineCacheManager가 자동으로 설정되어 활용할 수도 있다.
기본적인 Cache를 사용하는 방법은 Guava Cache와 거의 유사하다.
Cache의 경우
// Lookup an entry, or null if not found
Graph graph = cache.getIfPresent(key);

// Lookup and compute an entry if absent, or null if not computable
graph = cache.get(key, k -> createExpensiveGraph(key));

// Insert or update an entry
cache.put(key, graph);

// Remove an entry
cache.invalidate(key);LoadingCache의 경우
// Lookup and compute an entry if absent, or null if not computable
Graph graph = cache.get(key);

// Lookup and compute entries that are absent
Map<Key, Graph> graphs = cache.getAll(keys);AsyncCache의 경우
// Lookup an entry, or null if not found
CompletableFuture<Graph> graph = cache.getIfPresent(key);

// Lookup and asynchronously compute an entry if absent
graph = cache.get(key, k -> createExpensiveGraph(key));

// Insert or update an entry
cache.put(key, graph);

// Remove an entry
cache.synchronous().invalidate(key);AsyncLoadingCache의 경우
// Lookup and asynchronously compute an entry if absent
CompletableFuture<Graph> graph = cache.get(key);

// Lookup and asynchronously compute entries that are absent
CompletableFuture<Map<Key, Graph>> graphs = cache.getAll(keys);
AsyncCache는Executor를 통해 Cache entry의 연산을 진행하고CompletableFuture를 return하는Cache의 변형으로ForkJoinPool.commonPool()을 default executor로 사용한다.
CompletableFuture는 명시적으로 완료될 수 있고, 완료시 발생하는 의존적인 function이나 action을 지원하는CompletionStage로 사용될 수 있는Future이다.
Future는 비동기 연산의 결과를 표현한다. 또한 연산의 완료를 확인, 연산의 완료를 대기, 연산의 결과를 가져오는 method 등을 제공한다.
CompletionStage는 다른CompletionStage가 완료되면 action 또는 값을 연산하는 비동기 연산의 단계이다.
이처럼 Caffeine의 경우 Guava Cache를 바탕으로 개발된 것이기에 사용 방법은 Guava Cache와 크게 다르지 않다.
출처
https://medium.com/uplusdevu/%EB%A1%9C%EC%BB%AC-%EC%BA%90%EC%8B%9C-%EC%84%A0%ED%83%9D%ED%95%98%EA%B8%B0-e394202d5c87
https://dev.gmarket.com/16
https://github.com/jsr107/jsr107spec
https://www.ehcache.org/
https://github.com/google/guava
https://github.com/ben-manes/caffeine
https://docs.spring.io/spring-boot/docs/1.5.1.RELEASE/reference/html/boot-features-caching.html