Nginx
Nginx는 경량 웹 서버이다.클라이언트로부터 요청을 받았을 때 요청에 맞는 정적 파일을 응답해주는 HTTP Web Server로 활용되기도 하고, Reverse Proxy Server로 활용하여 WAS 서버의 부하를 줄일 수 있는 로드 밸런서로 활용되기도 한다.
Nginx와 CodeDeploy Agent를 이용해 WAS간 스위칭을 무중단으로 배포해보겠다.
Nginx 설치, 설정
- EC2에 Nginx 설치를 해보겠다.
# Nginx 설치
sudo yum install nginx

# Nginx 버전확인
sudo nginx -v- nginx.conf 파일 설정을 해주겠다.
sudo vim /etc/nginx/nginx.conf해당 명령어로 파일을 열면 아래와 같은 화면을 확인 할 수 있다.
중요한것은 꼭 sudo를 붙혀서 열어야한다. 안그러면 저장이 잘 안될것이다.
위의 사진에서 Server 내부에 root 아래부분에 해당 코드를 붙혀넣는다.
include /home/ec2-user/service_url.inc;

location / {
    proxy_set_header    X-Forwarded-For $remote_addr;
    proxy_set_header    Host $http_Host;
    proxy_pass          $service_url;
}- include
- 다른 곳에 존재하는 설정 파일 등을 불러올 수 있다.
- proxy_pass
- 우리가 지정할 $service_url로 요청을 보낼 수 있도록 하는 프록시 설정이다.
이제 inculde로 불러올 service_url.inc 파일을 설정해보겠다.
sudo vim /home/ec2-user/service_url.inc# service_url.inc
set $service_url http://127.0.0.1:8081;위와 같이 service_url을 설정한다.
그러면 Nginx 설정을 끝이다.
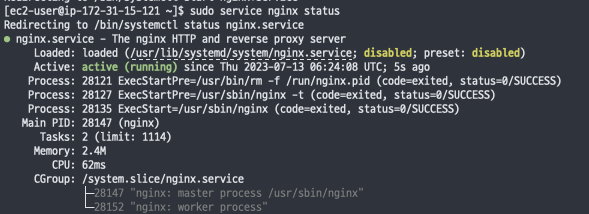
이제 Nginx를 재시작하겠다.
sudo service nginx start
sudo service nginx status
appspec 업데이트
Nginx를 추가한 부분에 대해 CodeDeploy Agent가 참고하여 배포를 진행하기 위한 스크립트들을 추가하겠다.
# appspec.yml

version: 0.0
os: linux
files:
  - source: /
    destination: /home/ec2-user/cicd_hwan/ # 프로젝트 이름(본인의 프로젝트 이름을 적는다.)
    overwrite: yes

permissions:
  - object: /
    pattern: "**"
    owner: ec2-user
    group: ec2-user

### 새로 추가한 부분 ###
hooks:
  ApplicationStart:
    - location: scripts/run_new_was.sh
      timeout: 180
      runas: ec2-user
    - location: scripts/health_check.sh
      timeout: 180
      runas: ec2-user
    - location: scripts/switch.sh
      timeout: 180
runas: ec2-user- hooks : 이벤트가 발생할때 실행되는 작업을 정의하는 섹션이다.
- CodeDeploy의 배포에는 각 단계 별 수명 주기가 존재한다. 수명 주기에 따라 원하는 스크립트를 수행할 수 있다.
- location: 실행할 스크립트 경로 지정
- timeout: 작업이 최대로 실행될 수 있는 시간(초)을 지정. 여기서는 180초로 설정.
- runas: 작업을 실행할 사용자를 지정합니다.
이제 프로젝트 상단에 scripts를 만들고 위의 코드에서 정의한 파일 3개를 생성한다.
- run_new_was.sh
# run_new_was.sh

#!/bin/bash

CURRENT_PORT=$(cat /home/ec2-user/service_url.inc | grep -Po '[0-9]+' | tail -1)
TARGET_PORT=0

echo "> Current port of running WAS is ${CURRENT_PORT}."

if [ ${CURRENT_PORT} -eq 8081 ]; then
  TARGET_PORT=8082
elif [ ${CURRENT_PORT} -eq 8082 ]; then
  TARGET_PORT=8081
else
  echo "> No WAS is connected to nginx"
fi

TARGET_PID=$(lsof -Fp -i TCP:${TARGET_PORT} | grep -Po 'p[0-9]+' | grep -Po '[0-9]+')

if [ ! -z ${TARGET_PID} ]; then
  echo "> Kill WAS running at ${TARGET_PORT}."
  sudo kill ${TARGET_PID}
fi

nohup java -jar -Dserver.port=${TARGET_PORT} /home/ec2-user/cicd_hwan/build/libs/cicd_hwan-0.0.1-SNAPSHOT.jar > /home/ec2-user/nohup.out 2>&1 &
echo "> Now new WAS runs at ${TARGET_PORT}."
exit 0- 새로운 WAS를 띄우는 스크립트이다.
- service_url.inc 에서 현재 서비스를 하고 있는 WAS의 포트 번호를 읽어온다.(현재 8081)
- 현재 포트 번호가 8081이면 새로 WAS를 띄울 타겟 포트는 8082, 혹은 그 반대 상황이라면 8081을 지정한다.
- 만약 타겟포트에도 WAS가 떠 있다면 kill하고 새롭게 WAS를 띄운다.
- nohup
- 터미널 엑세스가 끊겨도 실행한 프로세스가 계속 동작하게 한다.
- 마지막의 &는 프로세스가 백그라운드로 실행되도록 해줍니다.
- health_check.sh
# health_check.sh

#!/bin/bash

# Crawl current connected port of WAS
CURRENT_PORT=$(cat /home/ec2-user/service_url.inc | grep -Po '[0-9]+' | tail -1)
TARGET_PORT=0

# Toggle port Number
if [ ${CURRENT_PORT} -eq 8081 ]; then
    TARGET_PORT=8082
elif [ ${CURRENT_PORT} -eq 8082 ]; then
    TARGET_PORT=8081
else
    echo "> No WAS is connected to nginx"
    exit 1
fi


echo "> Start health check of WAS at 'http://127.0.0.1:${TARGET_PORT}' ..."

for RETRY_COUNT in 1 2 3 4 5 6 7 8 9 10
do
    echo "> #${RETRY_COUNT} trying..."
    RESPONSE_CODE=$(curl -s -o /dev/null -w "%{http_code}"  http://127.0.0.1:${TARGET_PORT}/health)

    if [ ${RESPONSE_CODE} -eq 200 ]; then
        echo "> New WAS successfully running"
        exit 0
    elif [ ${RETRY_COUNT} -eq 10 ]; then
        echo "> Health check failed."
        exit 1
    fi
    sleep 10
done
새로 띄운 WAS가 완전히 실행되기까지 health check 하는 스크립트이다.
- switch.sh
# switch.sh

#!/bin/bash

# Crawl current connected port of WAS
CURRENT_PORT=$(cat /home/ec2-user/service_url.inc  | grep -Po '[0-9]+' | tail -1)
TARGET_PORT=0

echo "> Nginx currently proxies to ${CURRENT_PORT}."

# Toggle port number
if [ ${CURRENT_PORT} -eq 8081 ]; then
    TARGET_PORT=8082
elif [ ${CURRENT_PORT} -eq 8082 ]; then
    TARGET_PORT=8081
else
    echo "> No WAS is connected to nginx"
    exit 1
fi

# Change proxying port into target port
echo "set \$service_url http://127.0.0.1:${TARGET_PORT};" | tee /home/ec2-user/service_url.inc

echo "> Now Nginx proxies to ${TARGET_PORT}."

# Reload nginx
sudo service nginx reload

echo "> Nginx reloaded."- nginx 리로드를 통해 서비스하는 포트를 스위칭하는 스크립트이다.
- sudo service nginx reload 는 nginx 서버의 재시작 없이 바로 새로운 설정값으로 서비스를 이어나갈 수 있도록 한다.
- sudo service nginx restart 는 말그대로 서버의 shutdown 이후 재시작하는 명령이므로 의도하지 않았다면 주의해야 한다.
- tee
- 출력 내용을 파일로 만들어주는 커맨드이다.
- 새로 띄운 WAS의 포트를 nginx가 읽을 수 있도록 service_url.inc에 내용을 덮어쓴다.
이제 모든 준비가 끝났다.
현재 ec2 상에는 아무런 was가 띄어있지 않으므로 8081 포트의 was를 띄어보자.
<혹여나 Nginx가 꺼져있을수도 있으니 다시 start하고 아래의 명령어를 치자.>
nohup java -jar -Dserver.port=8081 /home/ec2-user/cicd_hwan/build/libs/cicd_hwan-0.0.1-SNAPSHOT.jar &
이제 EC2의 퍼블릭 DNS로 접속하면
위와 같이 원하는 문자열을 return 하는 모습을 볼 수 있다.
이제 무중단 배포를 해보자.
# application.yml
version: 2.0
yml에서 설정한 버전을 2.0으로 올리고, 위에서 작성한 스크립트 파일을 push하고, 새로고침을 계속하면 version이 업데이트 된다.
근데 나의 경우 계속 재배포해도 버전업이 되지 않아서 /opt/codedeploy-agent/deployment-root 에서 deployment-logs/ 안에 log 파일을 확인하니,
tee: /home/ec2-user/service_url.inc: Permission denied 에러가 발생했다.
따라서 쓰기 권한을 전달하고 재 진행해봤다.