현재 진행중인 프로젝트에서 조회를 하는 부분에 대해서는 @Transactional 을 read-only 로 설정하여서 조금의 성능을 향상시켰었다. 하지만, 서비스에서 가장 많은 트래픽이 몰리는 서비스가 조회서비스이므로 매번 DB에서 조회해서 가져오는 행위는 불필요하다고 생각했다.
따라서 인메모리 데이터 구조 저장소인 Redis를 활용하여 캐시를 적용하고, 읽기 성능을 향상시켜보겠다.
그전에! 몇가지만 알고 넘어가려고 한다.
Redis란?
-
Key, Value 구조의 비정형 데이터 저장 및 관리할 수 있는 비관계형 데이터 베이스 관리 시스템.
-
메모리에서 데이터를 처리하는 In-Memory DB
-
String, Lists, Sets, Sorted Sets, Hashes 자료 구조를 지원.
-
싱글 스레드 구조.(하지만, get, set의 경우 초당 10만개 이상 처리가능)
Redis를 쓰는 이유?
일반적인 DB는 물리 디스크에 직접 쓰기 때문에, 서버가 다운돼도 데이터가 그대로 있지만, 매번 디스크에 접근해야하므로 사용자가 증가하면 부하가 걸리고 느려진다.
따라서 이러한 DB부하를 줄이기 위해 캐시 서버인 Redis를 사용하는 것이다.
한번 읽어온 데이터를 임의의 공간에 저장해서, 다음에는 DB를 조회하는 것이 아닌, 캐시를 읽어 오는 것이므로 속도도 빠르고, DB부하도 줄인다.
Redis 사용시 주의할 점
- 서버가 장애 발생시 해당 데이터는 유실될 수 있다.
- 메모리 관리가 필요하다.
- 싱글스레드 이므로 시간이 오래걸리는 요청은 피해야한다.
캐시 사용 경우
- 캐시는 읽기 성능을 향상시킬 수 있지만, 데이터가 update 될 때마다 캐시도 함께 update 해줘야 하고, 데이터가 많이 쌓이면 side effect 가 발생할 수 있다.
따라서,
- 자주 변경되지 않는 데이터
- update가 자주 일어나면, 캐시 삭제 및 DB 접근 횟수가 증가하고, 악영향을 끼칠 수 있다.
- 자주 조회되는 데이터
- 조회되는 만큼 DB에 접근을 줄이므로 성능 개선이 된다.
캐싱 전략
로컬 캐싱(Local Caching)
로컬 캐싱을 서버 내부 저장소에 캐시 데이터를 저장하는 방법.
장점
- 글로벌 캐싱에 비해 빠르다.
단점
- 서버간 데이터 공유가 안된다.
- 각 서버의 캐시가 서로 다른 상태를 가질 수 있기 때문에, 일관성 문제가 발생할 수 있다.
- 서버별 중복된 캐시 데이터로 인한 서버 자원 낭비
- 힙 영역에 저장된 데이터로 발생하는 GC 문제
글로벌 캐싱(Global Caching)
별도의 캐시 서버를 두어 각 캐시 서버를 활용
장점
- 로컬 캐싱의 단점을 해결한다.
단점
- 캐시 서버로 트래픽이 발생하므로 로컬 캐싱에 비해 느릴 수 있다.
캐싱 적용
나는 현재 진행중인 프로젝트에서 상품 상세 조회부분에 글로벌 캐싱을 적용하려고 한다. 그 이유는 확장 가능한 설계를 고려한다고 가정하고 진행한다.
기존의 상품 조회 부분의 코드이다.
	@Transactional(readOnly = true)
    @Timer
    public DataProductResponse.findDataProduct findDataProduct(Long dataProductId){
        DataProduct dataProduct = dataProductRepository.findById(dataProductId).orElseThrow(() -> new CustomException(Result.NOT_FOUND_DATA_PRODUCT));

        List<ProductCategory> productCategories = dataProduct.getProductCategories();
        List<String> categoryNames = new ArrayList<>();
        List<Long> categoryIds = new ArrayList<>();
        extractCategoryDetails(productCategories, categoryNames,categoryIds);

        List<ExampleImage> exampleImages = dataProduct.getExampleImages();
        List<String> imageUrls = new ArrayList<>();
        for (ExampleImage exampleImage : exampleImages) {
            imageUrls.add(exampleImage.getImageUrl());
        }

        DataProductResponse.findDataProduct response = createFindDataProduct(dataProductId, dataProduct, categoryNames, categoryIds, imageUrls);
        return response;
    }
단순히 @Transactional readOnly 처리만 진행했다.
그래서 조회 요청을 보내면 항상 아래와 같은 시간이 걸리게 된다.

28ms 밖에 안걸린다. 상당히 짧은 시간이지만, 해당 요청을 많은 사용자가 동시에 요청하다 보면 트래픽이 몰리게 되고, 응답시간이 오래걸릴 수 있다. 따라서 해당 조회에 캐싱을 적용하겠다.
적용 포인트
- 해당 요청은 똑같은 데이터를 반환한다.
- 업데이트가 자주 발생하지 않는다.
- 자주 조회되는 데이터이다.
Redis 캐시 설정
- redis 의존성을 추가한다.
implementation 'org.springframework.boot:spring-boot-starter-data-redis'- yml에 host,port 설정
spring:
  redis:
    host:localhost
port:6379- 캐시 매니저 등록
캐시매니저를 등록하는 이유는 기본적으로 스프링은 캐시 저장소로 JDK의 ConcurrentHashMap을 사용하므로 Redis를 사용하기 위해 캐시 매니저를 Bean으로 등록해줘야한다.
@EnableCaching 어노테이션을 이용하면 @Cacheable, @CacheEvict 등의 다양한 캐시 어노테이션을 지원해준다. 또한, Spring AOP를 통해 캐싱 기능을 추상화 시켜줘서 별도의 로직이 필요없다.
/** @EnableCaching :해당 애플리케이션에서 캐싱을 이용하겠다는 명시를 처리해줘야 한다.
해당 어노테이션을 적용하게 되면 @Cacheable 라는 어노테이션이 적용된 메서드가 실행될 때 마다
AOP의 원리인 후처리 빈에 의해 해당 메소드에 프록시가 적용되어 캐시를 적용하는 부가기능이 추가되어 작동하게 된다.
 */
@RequiredArgsConstructor
@EnableCaching
@Configuration
public class CacheConfig {

    // ttl 가져오기
    private final CacheProperties cacheProperties;

    @Value("${spring.redis.host}")
    private String redisHost;

    @Value("${spring.redis.port}")
    private int redisPort;

    // Redis Client 설정(자바 표준은 Jedis이지만, 비동기적으로 우수한 성능을 자랑하는 Lettuce 사용)
    @Bean(name = "redisCacheConnectionFactory") // 레디스를 관심사에 따라 여러개 만든다면 네이밍을 지정해야 한다.
    public RedisConnectionFactory redisCacheConnectionFactory() {
        LettuceConnectionFactory lettuceConnectionFactory = new LettuceConnectionFactory(redisHost, redisPort);
        return lettuceConnectionFactory;
    }

    /*
     * Jackson2는 Java8의 LocalDate의 타입을 알지못해서 적절하게 직렬화해주지 않는다.
     * 때문에 역직렬화 시 에러가 발생한다.
     * 따라서 적절한 ObjectMapper를 Serializer에 전달하여 직렬화 및 역직렬화를 정상화 시켰다.
     */
    private ObjectMapper objectMapper() {

        // jackson 2.10이상 3.0버전까지 적용 가능
        PolymorphicTypeValidator typeValidator = BasicPolymorphicTypeValidator
                .builder().allowIfSubType(Object.class)
                .build();

        ObjectMapper mapper = new ObjectMapper();
        mapper.disable(SerializationFeature.WRITE_DATES_AS_TIMESTAMPS);
        mapper.registerModule(new JavaTimeModule());
        // GenericJackson2JsonRedisSerializer 직렬화시 클래스 타입을 함께 정보하는데,
        // ObjectMapper의 경우 직렬/역직렬화시 클래스 타입을 포함하지 않으므로, 직렬화시 데이터에 type 정보가 존재하지 않음.
        // 따라서 역직렬화 시 LinkedHashMap으로 역직렬화 되기 때문에 에러가 난다.
        // 따라서 activateDefaultTyping를 통해 클래스 타입도 직/역직렬화 한다.
        mapper.activateDefaultTyping(typeValidator, ObjectMapper.DefaultTyping.NON_FINAL);
        return mapper;
    }

    //RedisCacheManager에 옵션을 부여할 수 있는 RedisCacheConfiguration 오브젝트
    private RedisCacheConfiguration redisCacheDefaultConfiguration() {
        RedisCacheConfiguration redisCacheConfiguration = RedisCacheConfiguration
                .defaultCacheConfig()
                .serializeKeysWith(RedisSerializationContext.SerializationPair
                        .fromSerializer(new StringRedisSerializer()))
                .serializeValuesWith(RedisSerializationContext.SerializationPair
                        .fromSerializer(new GenericJackson2JsonRedisSerializer(objectMapper())));
        return redisCacheConfiguration;
    }

    /*
     * properties에서 가져온 캐시명과 ttl 값으로 RedisCacheConfiguration을 만들고 Map에 넣어 반환한다.
     */
    private Map<String, RedisCacheConfiguration> redisCacheConfigurationMap() {
        Map<String, RedisCacheConfiguration> cacheConfigurations = new HashMap<>();
        for (Map.Entry<String, Long> cacheNameAndTimeout : cacheProperties.getTtl().entrySet()) {
            cacheConfigurations
                    .put(cacheNameAndTimeout.getKey(), redisCacheDefaultConfiguration().entryTtl(
                            Duration.ofSeconds(cacheNameAndTimeout.getValue())));
        }
        return cacheConfigurations;
    }

    // Redis 서버 분리로 config가 여럿 잇으면, 아래와 같이 Bean name 옵션과 Qualifier로 명시하여 주입
    @Bean
    public CacheManager redisCacheManager(@Qualifier("redisCacheConnectionFactory") RedisConnectionFactory redisConnectionFactory) {
        RedisCacheManager redisCacheManager = RedisCacheManager.RedisCacheManagerBuilder
                .fromConnectionFactory(redisConnectionFactory)
                .cacheDefaults(redisCacheDefaultConfiguration())
                .withInitialCacheConfigurations(redisCacheConfigurationMap()).build();
        return redisCacheManager;
    }
}
위에 주석으로 적었지만, 중요한 부분을 다시 집고 넘어가려고 한다.
-
java.time.LocalDateTime not Supported
fromSerializer(new GenericJackson2JsonRedisSerializer(objectMapper())코드를 보면, 직렬화를 해서 보내는데, 이때 GenericJackson2JsonRedisSerializer는 LocalDate를 역직렬화 하지 못하므로 ObjectMapper를 커스텀 하게 설정했다.
-
LinkedHasmap cannot be cast to class DTO Object
-
ObjectMapper에 설정한 activateDefaultTyping()이 없을 때 발생한다.
-
원인으로는 Redis에 저장된 데이터에 class type이 존재하지 않았던 것이다.
-
원래 위와 같이 타입이 저장되어야 하지만, 없었다.
-
GenericJackson2JsonRedisSerializer가 기본적으로 직렬화 시 class type(@class 속성)을 함께 저장한다. 그러나 GenericJackson2JsonRedisSerializer가 custom한 ObjectMapper를 사용할 때는 다르다.
-
즉, Custom ObjectMapper 사용시 직렬화/역지렬화시 클래스 타입을 포함하여 저장하지 않으므로, type을 역질렬화시 모르기 때문에 발생한것이다.
-
objectMapper에
mapper.activateDefaultTyping(typeValidator, ObjectMapper.DefaultTyping.NON_FINAL);를 추가하여 클래스 타입을 포함한다.
-
-
또한 일반적으로 캐싱시 Key별로 다른 timeout을 설정하기 위해 캐시매니저를 여러개 생성하지만, 자원 낭비가 발생하므로 yml파일을 통해 Key별로 동적으로 설정할 수 있도록 한다.
해당 캐싱 TTL 설정의 경우 CacheProperties 클래스를 정의한다.
@Getter
@ConfigurationProperties(prefix = "cache.redis")
public class CacheProperties {

    private final Map<String, Long> ttl = new HashMap<>();
}
위의 prefix를 따라 yml에 설정을 하면 해당 timeout을 가지고 서비스 로직에 적용할 수 있다.
캐싱 처리하기
Spring AOP를 통해 쉽게 Cache를 적용할 수 있다.
해당 과정은 모든 스프링 빈에서 public 메소드에 캐싱 어노테이션이 있는지 검사하는 빈 후처리기를 트리거 한다. 그 후 동적 프록시를 이용하여 어노테이션이 붙은 메소드의 호출을 가로채고 캐싱 관련 동작을 수행한다.
- @Cacheable
해당 어노테이션은 조회가 일어날때 캐시 저장소에 해당 key가 있는 지 확인하고, 없으면 DB조회, 있으면 해당 value를 반환한다.
	@Cacheable(value = "product", key = "#dataProductId")
    @Transactional(readOnly = true)
    @Timer
    public DataProductResponse.findDataProduct findDataProduct(Long dataProductId){
        DataProduct dataProduct = dataProductRepository.findById(dataProductId).orElseThrow(() -> new CustomException(Result.NOT_FOUND_DATA_PRODUCT));

        List<ProductCategory> productCategories = dataProduct.getProductCategories();
        List<String> categoryNames = new ArrayList<>();
        List<Long> categoryIds = new ArrayList<>();
        extractCategoryDetails(productCategories, categoryNames,categoryIds);

        List<ExampleImage> exampleImages = dataProduct.getExampleImages();
        List<String> imageUrls = new ArrayList<>();
        for (ExampleImage exampleImage : exampleImages) {
            imageUrls.add(exampleImage.getImageUrl());
        }

        DataProductResponse.findDataProduct response = createFindDataProduct(dataProductId, dataProduct, categoryNames, categoryIds, imageUrls);
        return response;
    }
따라서 기존의 상품 상세 조회 로직에 해당 어노테이션을 붙혀준다.
- @CacheEvict
캐싱한 값들을 Redis에서 제거하는 역할을 한다. 캐싱된 데이터가 업데이트 되었을 때 원본 저장소인 DB와 캐시 저장소의 데이터의 일관성을 맞추기 위해 업데이트 되는 로직에 붙힌다.
	@CacheEvict(value = "product", key = "#dataProductId")
    @Transactional
    public void updateProduct(Long dataProductId, UpdateDataProduct updatedProduct) {

 		//update 로직
}
이제 한번 조회를 진행해보자.

맨 위의 로그가 처음 DB에서 데이터를 조회한것을 AOP를 이용해 시간을 측정한 것이다.
그리고 이후에는 DB로 부터 조회를 하지 않고 캐시에서 바로 가져오므로 별도의 로그가 찍히지 않는 것을 볼 수 있다.(동적 프록시를 이용하여 어노테이션이 붙은 메소드의 호출을 가로채고 캐싱 관련 동작을 수행한다.)
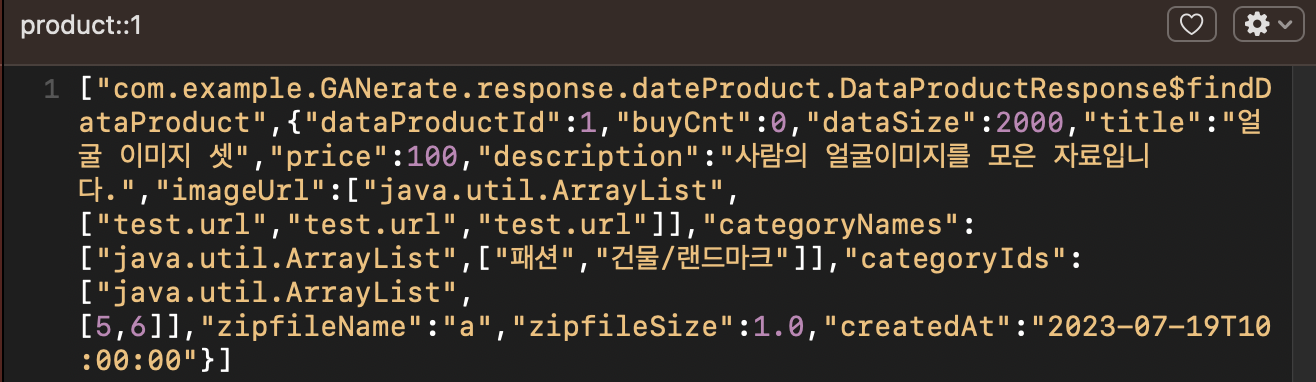
Redis 저장소를 확인해보면
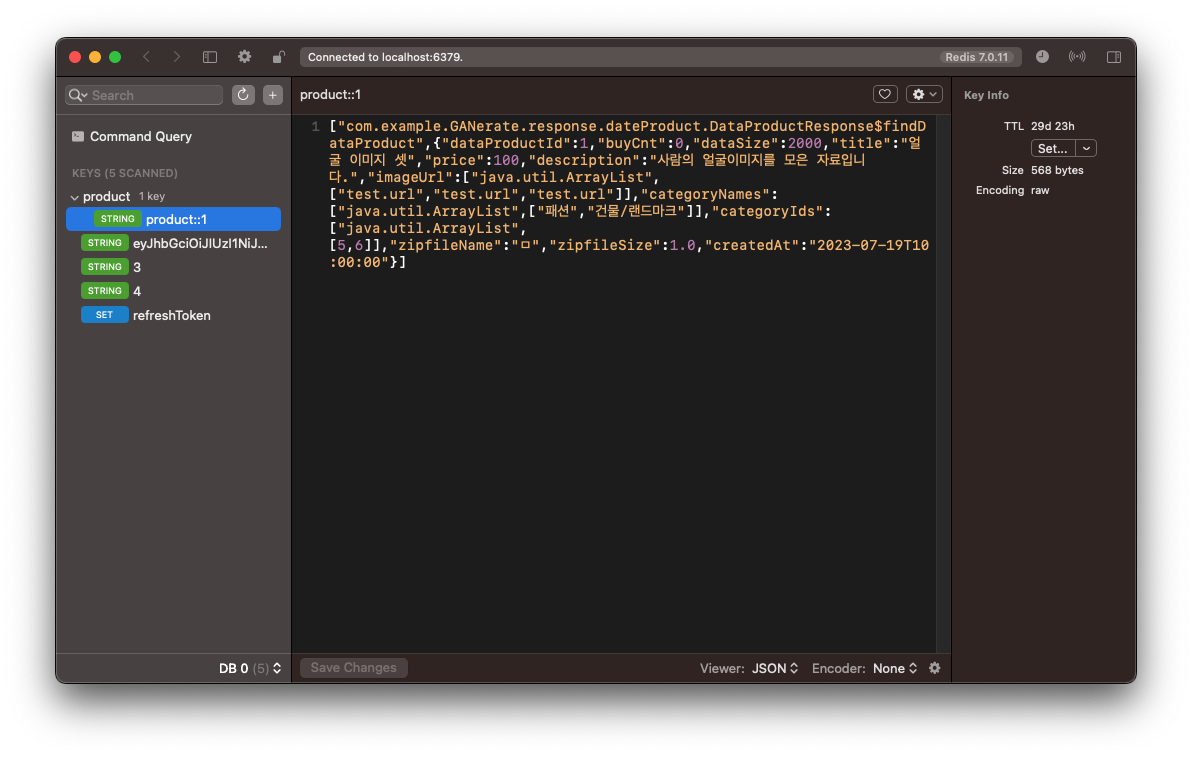
위와 같이 타입과 json 형태 그대로 직렬화되어 저장된것을 확인 할 수 있다.