Part 1 - Sequelize 및 CLI 도구 이용
이번 스프린트는 bitly 처럼 긴 url을 짧게 만들어주는 어플리케이션이다.
예를들어 지금 내 블로그 글 주소도 https://bit.ly/3e1o8Qk 이정도로 줄여준다.
💐 시작하기
-
git clone,npm install을 한다. -
Sequelize ORM 통해 sequelize 설치
npm install --save sequelize
package.json에 최신버전(v6)으로 설치됐는지 확인한다.
dependencies항목에 추가되어 있다. -
Sequelize - Migrations 통해 sequelize-cli 를 설치
npm install --save-dev sequelize-cli
migration을 cli로 할수있게 돕는 툴이다.
npx sequelize-cli --help명령어를 통해 명령종류 파악가능
💐 ORM 설정
공식문서 항상 참고하기!
- bootstraping 하기
npx sequelize-cli init하면 폴더들이 생성된다.
- config, contains config file, which tells CLI how to connect with database
- models, contains all models for your project
- migrations, contains all migration files
- seeders, contains all seed files
- config.json 가서 비밀번호를 변경하고 시작한다.(sequelize는 .env가 없음)
{
  "development": {
    "username": "root",
    "password": null, // 변경해주기
    "database": "database_development",
    "host": "127.0.0.1",
    "dialect": "mysql"
  },
  "test": {
    "username": "root",
    "password": null,
    "database": "database_test",
    "host": "127.0.0.1",
    "dialect": "mysql"
  },
  "production": {
    "username": "root",
    "password": null,
    "database": "database_production",
    "host": "127.0.0.1",
    "dialect": "mysql"
  }
}
개발용, 테스트용, 배포용 환경중 개발용 환경을 기본적으로 사용한다.
models폴더 index.js 를 보면
const env = process.env.NODE_ENV || 'development'; 해당 코드를 확인할 수 있다.
export NODE_ENV=production 하면 다른 환경으로 바꿀 수 있다.
💐 모델 생성
- 데이터베이스 생성
mysql -u root -pmysql 을 실행
CREATE DATABASE database_development;DB생성
USE database_development;해당 DB를 사용 - 모델 생성 (공식문서 예제확인)
We will use model:generate command.
model:generate명령어로 모델을 만들것이다.
This command requires two options:
이 명령어는 두가지 옵션을 요구한다.
- name: the name of the model;
이름 : 모델의 이름 - attributes: the list of model attributes.
속성 : 모델속성의 목록
Let's create a model named User.
User이라는 이름의 모델을 만들어보자
npx sequelize-cli model:generate --name User --attributes firstName:string,lastName:string,email:string
This will:
Create a model file user in models folder;
이것은 models 폴더안에 user 모델파일을 생성할 것이다.
Create a migration file with name like XXXXXXXXXXXXXX-create-user.js in migrations folder.
이것은 예를들어 XXXXXXXXXXXXXX-create-user.js 라는 이름의 migration 파일을 만들것이다.
- 모델 생성
우리는 모델이름을 url, 속성은 url, title, visits로 만든다.
npx sequelize-cli model:generate --name url --attributes url:string,title:string,visits:integer
id, createdAt, updatedAt 필드는 자동으로 생성된다.
models 폴더안에url.js생성된거 확인가능
migration 폴더안에 날짜-create-url.js확인가능
💐 마이그레이션 (데이터베이스에 해당 테이블 생성)
-
마이그레이션
npx sequelize-cli db:migratemysql로 테이블 확인가능 -
수정할 사항 있는 경우(기본값 등)
npx sequelize-cli db:migrate:status해서 상태가up이면
npx sequelize-cli db:migrate:undo로 실행취소 ,down으로 해놓고 수정후 다시 1번 명령어 실행
models/url.js 에서 init() 부분 내용 수정하고,
migrations/ 파일에서도 내용 수정. (두 군데 다 하는 게 좋음)
스키마 변경이 있을 때마다 마이그레이션을 실행해야함.
여기까지하면 데이터베이스 준비 완료
part2는 직접 코드에 주석을 달아가면서 공부했다.
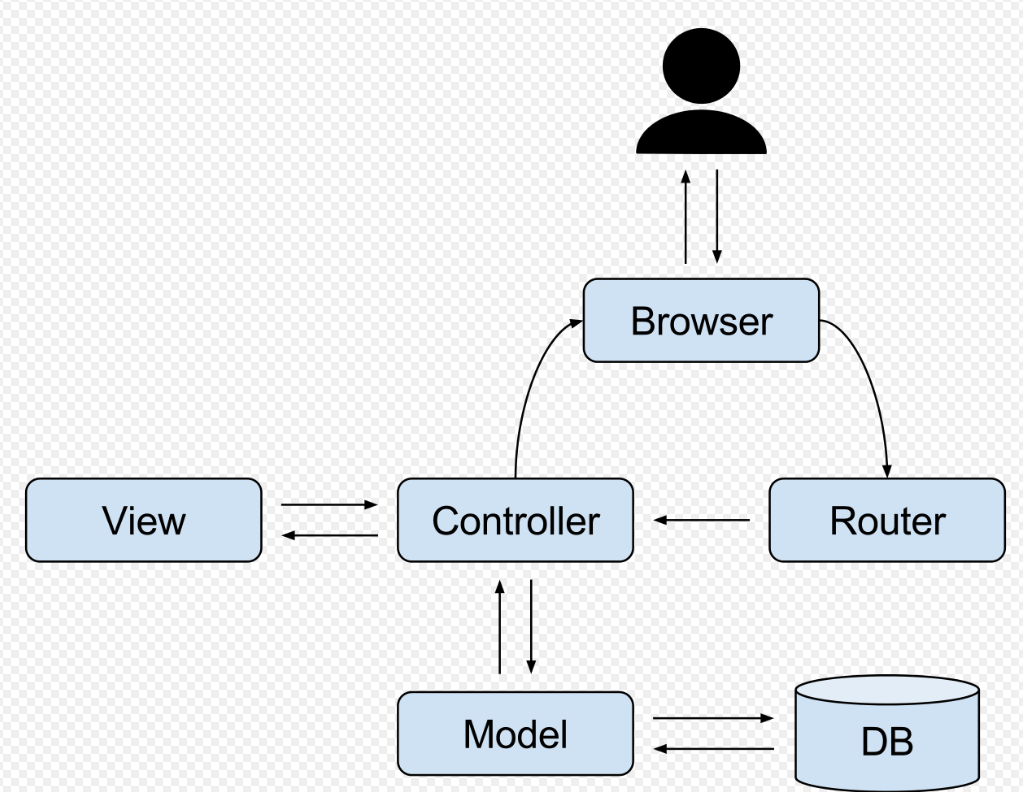
- controller : 입력값 받음, 요청진행, model한테 데이터받음
- model : 데이터조절, DB와 소통
💐 sequelize 기본 메소드
- findAll()
You can read the whole table from the database with the findAll method:
(findAll 메소드로 DB의 전체테이블을 조회할 수 있다)
// Find all users
const users = await User.findAll();
console.log(users.every(user => user instanceof User)); // true
console.log("All users:", JSON.stringify(users, null, 2));
//SELECT * FROM ...- findOrCreate()
The method findOrCreate will create an entry in the table unless it can find one fulfilling the query options.
(findOrCreate 메소드는 해당데이터가 없는경우에 엔트리를 테이블에 추가한다)
In both cases, it will return an instance (either the found instance or the created instance) and a boolean indicating whether that instance was created or already existed.
(불리안으로 이미 있었는지, 새로만들어졌는지 알 수 있다)
Let's assume we have an empty database with a User model which has a username and a job.
(비어있는 데이터베이스로 예제를 보여주겠다)
const [user, created] = await User.findOrCreate({
  where: { username: 'sdepold' },
  defaults: {
    job: 'Technical Lead JavaScript'
  }
});
console.log(user.username); // 'sdepold'
console.log(user.job); // This may or may not be 'Technical Lead JavaScript'
console.log(created); // The boolean indicating whether this instance was just created
if (created) {
  console.log(user.job); // This will certainly be 'Technical Lead JavaScript'
}- findOne()
The findOne method obtains the first entry it finds (that fulfills the optional query options, if provided).
(findOne 메소드는 조건을 만족하는 첫번째 엔트리를 찾아낸다)
const project = await Project.findOne({ where: { title: 'My Title' } });
if (project === null) {
  console.log('Not found!');
} else {
  console.log(project instanceof Project); // true
  console.log(project.title); // 'My Title'
}- update()
// Change everyone without a last name to "Doe"
await User.update({ lastName: "Doe" }, {
  where: {
    lastName: null
  }
});