1. 요청 파라미터 알아보기
1. 요청(request) 파라미터란?
요청은 클라이언트에서 서버로 전달되는 정보이다. 요청은 요청라인, 요청헤더, 요청 본문으로 구성된다.
요청라인: 서버에 무엇을 하고 싶은지 알려주는 역할
GET /index.html HTTP/1.1 : GET방식으로 해당 페이지에 요청요청헤더: 서버에 추가적인 정보를 제공
User-Agent: Chrome요청본문: 서버에 보내고 싶은 데이터 본체
주로 POST와 함께, 사용자가 입력한 데이터를 보낸다.
2. 요청파라미터를 휙득하는 법
- @RequestParam에너테이션을 이용해 파라미터를 하나하나씩 휙득 가능하다,
- Form 클래스 이용해 클래스 내의 변수에 대한 값을 자동으로 저장해 준다.
주로 2번방법을 더 많이 사용한다.
3. 요청파라미터를 사용하는 프로그램 만들기-(Get구현)
(0) 사전 프로그램 세팅
의존성 추가
1. Spring Boot DevTools
2. Thymeleaf
3. Spring Web
4. Lombok
빌드 세팅
1. 설정-빌드도구-gradle-gradle jvm에서 java버전 변경하기.
2. 프로젝트 구조- 프로젝트설정-프로젝트SDK에서 java버전 변경하기.
(1) 컨트롤러 만들기
@Controller
public class RequestParamController {

	// GET 및 URL(/show)
	@GetMapping("show")
	public String showView() {
		// 표시할 뷰 이름
		return "input";
	}
}

#### 해석
컨트롤러를 만들어 Get방식으로 localhost:8080/show 로 접속하면, showView()함수가 실행
return은 이 함수를 리턴할 이름이다.
(2) 뷰(입력화면) 만들기
<!DOCTYPE html>
<html xmlns:th="http://www.thymeleaf.org">
<head>
<meta charset="UTF-8">
<title>RequestParam</title>
</head>
<body>
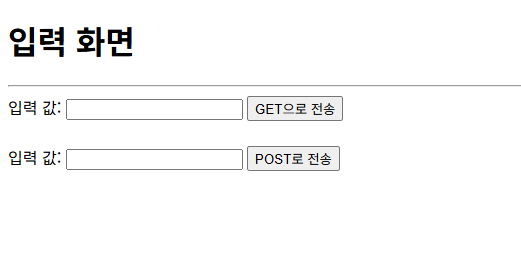
<h1>입력 화면</h1>
<hr>
<form action="./output.html" method="get">
<label for="get-value">입력 값:</label>
<input type="text" id="get-value" name="val">
<button type="submit">GET으로 전송</button>
</form>
<br/>
<form action="./output.html" method="post">
<label for="get-value">입력 값:</label>
<input type="text" id="get-value" name="val">
<button type="submit">POST로 전송</button>
</form>
</body>
</html>
#### 해석
<form action="./output.html" method="get">: form태그는 웹에서 사용자 입력을
서버로 전송하는데 사용하는 태그이다.
action= 데이터를 어디로 보낼지 지정한다.
method= get방식으로 전송함을 의미한다.
<label for="get-value">입력 값:</label> :라벨 태그는 코드에 대한 설명을 하는 태그다.
for를 통해 특정 id와 연결하여, 그 id가 담긴 태그로 (마우스 클릭시)이동할 수 있다.
<input type="text" id="get-value" name="val"> :텍스트 상자를 넣는다. 또한,이 텍스트상자의
id(고유식별자)를 get-value라고 하고, name(변수명)을 val로 한다.
<button type="submit">GET으로 전송</button> // 버튼을 넣는다.
결과
(3) 뷰(출력화면) 만들기
<!DOCTYPE html>
<html xmlns:th="http://www.thymeleaf.org">
<head>
    <meta charset="UTF-8">
    <title>RequestParam</title>
</head>
<body>
<h1>출력 화면</h1>
<hr>
<h2 th:text="${value}">전송된 값이 표시됩니다</h2> //아직 표시 X
<a href="./input.html">입력 화면으로 이동</a>
</body>
</html>
실행방법은 input.html에서 다음에서 열기 -> 연결된 애플리케이션으로 열기를 클릭하면 된다.
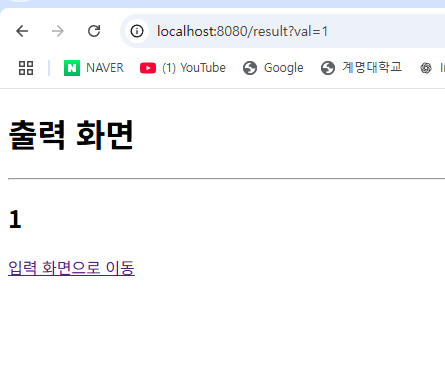
결과
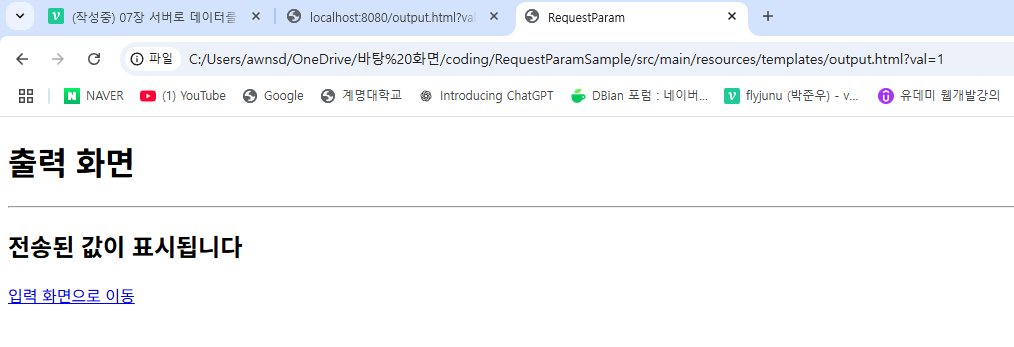
입력된 html에서 받아온 결과가 ?뒤에 val=1 이라는 정보가 나타났다.
이는 input.html에서 input텍스트 박스의 name이 val이며, 그 name을 받아오기 때문이다.
4. 요청 파라미터를 사용하는 프로그램 완성하기
(1) input.html 수정
<!DOCTYPE html>
<html xmlns:th="http://www.thymeleaf.org">
<head>
  <meta charset="UTF-8">
  <title>RequestParam</title>
</head>
<body>
<h1>입력 화면</h1>
<hr>
<form action="./output.html" th:action="@{/result}" method="get">
  <label for="get-value">입력 값:</label>
  <input type="text" id="get-value" name="val">
  <button type="submit">GET으로 전송</button>
</form>
<br/>
<form action="./output.html" th:action="@{/result}" method="post">
  <label for="get-value">입력 값:</label>
  <input type="text" id="get-value" name="val">
  <button type="submit">POST로 전송</button>
</form>
</body>
</html>

#### 해석
<form action="./output.html" th:action="@{/result}" method="get">:

앞의 일반 action 구문은, 정적인 html페이지로 데이터를 보내겠다고 선언
th:action은 동적인 html페이지로 데이터를 보내겠다고 선언한다.
즉, 개발시에 서버 주소가 http://localhost:8080/main 제품을 출시하며 변경
되어도,
타입리프가 동적으로 주소를 변경해준다. th:가 적인 구문이 우선적용된다.
(2) output.html 수정
<!DOCTYPE html>
<html xmlns:th="http://www.thymeleaf.org">
<head>
    <meta charset="UTF-8">
    <title>RequestParam</title>
</head>
<body>
<h1>출력 화면</h1>
<hr>
<h2 th:text="${value}">전송된 값이 표시됩니다</h2>
<a href="./input.html" th:href="@{/show}">입력 화면으로 이동</a>
</body>
</html>

#### 해석
th:href="@{/show} : 타임리프가 동적으로 이동할 URL을 만들어준다.
(3) 컨트롤러 수정
@Controller
public class RequestParamController {

    // GET 및 URL(/show)
    @GetMapping("show")
    public String showView() {
        // 표시할 뷰 이름
        return "input";
    }

    // GET 및 URL(/result)
    @GetMapping("result")
    public String showResultGet(
            @RequestParam String val, Model model) {
        // 모델에 전송된 값 설정
        model.addAttribute("value", val);
        // 표시할 뷰 이름
        return "output";
    }

    // POST 및 URL(/result)
    @PostMapping("result")
    public String showResultPost(
            @RequestParam String val, Model model) {
        // 모델에 전송된 값 설정
        model.addAttribute("value", val);
        // 표시할 뷰 이름
        return "output";
    }
}

#### 해석
public String showResultGet(
            @RequestParam String val, Model model)
컨트롤러의 인수로 Model과 @RequestParam String val이 추가되었다.

@RequestParam 이란?
HTTP요청을 메서드의 인수로 받을 수 있다. 이 때 인수인 val은 텍스트 상자의 name과 같아야한다.
input html의 val 텍스트 상자값을 받아와, model.addAttribute("value", val);
을 사용해 model에 추가한다.
결과
정리
실제 spring실행 순서와 다르지만(컨트롤러가 모델을 먼저 만드는 등), 코드의 논리순서는 아래와 같다.

1. input.html에서 서버에 val이라는 이름으로, 데이터 전송
2. output.html에서 모델의 <h2 th:text="${value}"> value변수를 출력하기 위해
컨트롤러에서 작성한 모델 조회
3. 함수의 인자인 @RequestParam String val 를 통해 모델을 만들 때 input의 val텍스트를 참조
하도록 선언
4. 참조된 모델을 이용해 output.html에서 결과 출력
2. 여러개의 요청 파라미터 전송하기
(1) 컨트롤러 만들기
public class RequestParamSample {
// GET 및 URL(/multiple)
@GetMapping("multiple")
public String showView() {
// 반환값으로 뷰 이름을 반환
return "entry";
@PostMapping("confirm")
public String confirmView(Model model,
@RequestParam String name,
@RequestParam Integer age,
@DateTimeFormat(iso = DateTimeFormat.ISO.DATE) @RequestParam LocalDate birth) {
// Model에 저장
model.addAttribute("name", name);
model.addAttribute("age", age);
model.addAttribute("birth", birth);
// 반환값으로 뷰 이름을 반환
return "confirm";
}
}
#### 해석
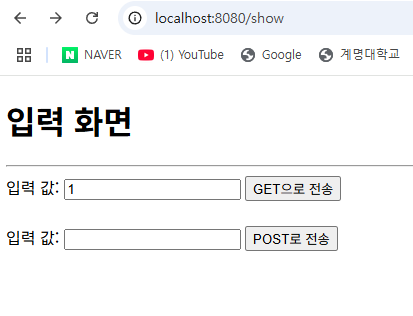
localhost:8080/entry 에서 get방식으로 접속하면, 아래 함수를 실행.
localhost:8080/confirm 에서 post방식으로 접속하면, 아래 함수를 실행.
@RequestParam String name : 뷰에서 지정한 name이라는 textbox의 내용을 인자로 받는다.
@DateTimeFormat(iso = DateTimeFormat.ISO.DATE) : yyyymmdd의 형식으로 데이터를 받는다.
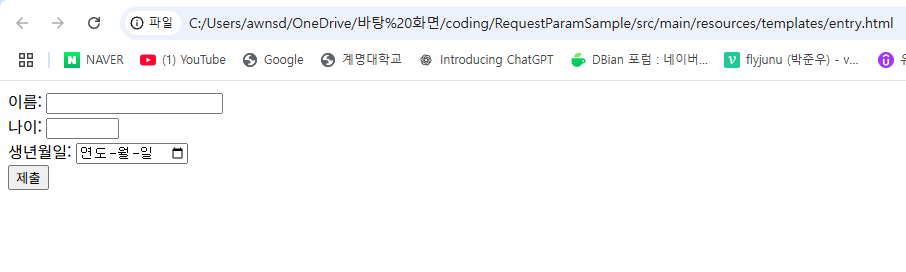
model.addAttribute("name", name); 받은 인자를 모델에 저장한다.(2) 입력 뷰 만들기
<!DOCTYPE html>
<html xmlns:th="http://www.thymeleaf.org">
<head>
  <meta charset="UTF-8">
  <title>입력 화면</title>
</head>
<body>
<form th:action="@{/confirm}" method="post">
  <div>
    <label for="name">이름: </label>
    <input type="text" name="name">
  </div>
  <div>
    <label for="age">나이: </label>
    <input type="number" name="age" min="1" max="100">
  </div>
  <div>
    <label for="birth">생년월일: </label>
    <input type="date" name="birth">
  </div>
  <input type="submit" value="제출">
</form>
</body>
</html>

#### 해석
<form th:action="@{/confirm}" method="post"> :
아래의 데이터가 입력되면, th:action= /confirm URL로 이동한다.

<label for="name">이름: </label>
<input type="text" name="name">
이름 : text박스 형태로 만들고, 텍스트 박스의 이름은 name이 된다.

<input type="number" name="age" min="1" max="100">:
type=number를 작성하면, 숫자 입력 박스가 생성되며, max와 min을 통해 입력값을 제한할 수 있다.

<input type="date" name="birth">
type=date를 작성하면, 날짜 입력란이 생성된다.
(3) 출력 뷰 만들기
<!DOCTYPE html>
<html xmlns:th="http://www.thymeleaf.org">
<head>
<meta charset="UTF-8">
<title>확인 화면</title>
</head>
<body>
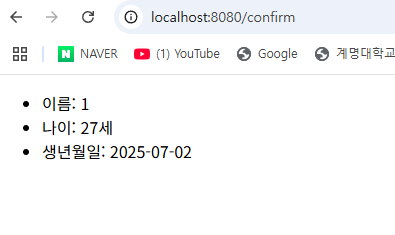
<ul>
<li>이름:[[${name}]] </li>
<li>나이: [[${age}]]세</li>
<li>생년월일: [[${birth}]]</li>
</ul>
</body>
</html>결과
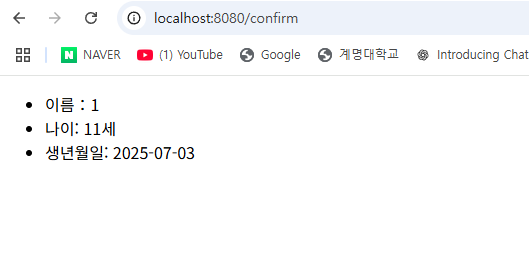
이 때 모든 데이터를 입력하지 않고 전송하면 Null을 입력한것이기에 Error발생
3. Form 태그를 이용한 입력값 저장
스프링 MVC에서 HTML에서 전송된 데이터를 자바 객체로 받기위한 클래스이다.
주로, 컨트롤러의 요청 핸들러 메소드에서 사용된다. 이를 이용해 자바 객체로 데이터를 저장할 수 있다. Form클래스를 만들기 위해서는, 컨트롤러의 인자로 클래스 타입을 받으면 된다.
(1) Form 클래스 설정
Form이라는 패키지를 새로 만들고 그안에 SampleForm자바 클래스를 넣었다.
@Data
public class SampleForm {
    private String name;
    private Integer age;
    @DateTimeFormat(iso = DateTimeFormat.ISO.DATE)
    private LocalDate birth;
}

#### 해석
@Data : 롬복의 기능으로 Getter, Setter를 자동 생성한다.
@DateTimeFormat(iso = DateTimeFormat.ISO.DATE) : 날짜형식을 YYYY-mm-dd로 받도록 지정
(2) 컨트롤러 만들기
@Controller
public class RequestParamMultipleController {

    // GET 및 URL(/multiple)
    @GetMapping("multiple")
    public String showView() {
        // 반환값으로 뷰 이름을 반환
        return "entry";
    }

    // ▽▽▽▽▽ 예제 7.12 ▽▽▽▽▽
    //  POST 및 URL(/confirm)
    //		@PostMapping("confirm")
    //		public String confirmView(Model model,
    //				@RequestParam String name,
    //				@RequestParam Integer age,
    //				@DateTimeFormat(iso = DateTimeFormat.ISO.DATE) @RequestParam LocalDate birth) {
    //			// Model에 저장
    //			model.addAttribute("name", name);
    //			model.addAttribute("age", age);
    //			model.addAttribute("birth", birth);
    //			// 반환값으로 뷰 이름을 반환
    //			return "confirm";
    //		}

    // POST 및 URL(/confirm)
    @PostMapping("confirm")
    public String confirmView(SampleForm f) { //자바의 클래스 타입을 인자로 받는다.
        // 반환값으로 뷰 이름을 반환
        return "confirm2";
    }
    // △△△△△ 예제 7.12 △△△△△
}
#### 해석
Form 클래스를 사용함으로, model에 직접 객체를 추가하지 않아도 된다.
(3) 출력 뷰 만들기
<!DOCTYPE html>
<html xmlns:th="http://www.thymeleaf.org">
<head>
	<meta charset="UTF-8">
	<title>확인 화면:Form 클래스 사용</title>
</head>
<body>
	<ul th:object="${sampleForm}">
		<li>이름: [[*{name}]] </li>
		<li>나이: [[*{age}]]세</li>
		<li>생년월일: [[*{birth}]]</li>
	</ul>
</body>
</html>

#### 해석
<ul th:object="${sampleForm}">
ul : list를 감싸기 위한 태그로, 리스트에 순서가 없을때 사용
th:object="${sampleForm} : 태그 내부에서 지정된 객체(SampleForm 클래스)의 정보 출력
또한,
뷰측에서 설정한 데이터를 가지고, Form클래스를 지정한다.

이 때, 첫글자가 소문자인 이유는, Form클래스는 자동으로 모델에 저장되는데, 특별히 이름을
지정하지 않으면 모델에 소문자로 시작하는 형태로 저장되기 때문이다.
따라서, 컨트롤러에 model 이라는 인수도 작성할 필요 없다.
결과
3. URL에 내장된 값 받기
(0) 사전 프로그램 세팅
의존성 추가
1. Spring Boot DevTools
2. Thymeleaf
3. Spring Web
빌드 세팅
1. 설정-빌드도구-gradle-gradle jvm에서 java버전 변경하기.
2. 프로젝트 구조- 프로젝트설정-프로젝트SDK에서 java버전 변경하기.
(1) 컨트롤러 만들기
@Controller
public class PathVariableController {
// GET 및 URL(/show)
@GetMapping("show")
public String showView() {
// 반환값으로 뷰 이름을 반환
return "show";
}
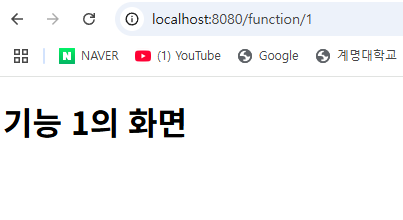
// GET 및 URL(/function/{no})
// ※{no}는 동적으로 값이 바뀝니다.
@GetMapping("/function/{no}")
public String selectFunction(@PathVariable Integer no) {
// 뷰 이름 초기화
String view = null;
switch (no) {
case 1:
view = "pathvariable/function1";
break;
case 2:
view = "pathvariable/function2";
break;
case 3:
view = "pathvariable/function3";
break;
}
// 반환값으로 뷰 이름을 반환
return view;
}
}
#### 해석
@GetMapping("/function/{no}") : Get방식으로 데이터를 받을 때, {no}는 @PathVariable
로 받는 인수에 따라 다른 결과 사이트로 이동할 수 있다.
(2) 입력 뷰 만들기
<!DOCTYPE html>
<html xmlns:th="http://www.thymeleaf.org">
<head>
<meta charset="UTF-8">
<title>URL 임베딩과 버튼 판별</title>
</head>
<body>
<div>
<!-- URL에 값 삽입 -->
<h3><a th:href="@{/function/1}">기능-1</a></h3>
<h3><a th:href="@{/function/2}">기능-2</a></h3>
<h3><a th:href="@{/function/3}">기능-3</a></h3>
<!-- 같은 form 태그 안에 있는 여러 개의 버튼 -->
<form th:action="@{/send}" method="post">
<input type="submit" value="버튼 A" name="a">
<input type="submit" value="버튼 B" name="b">
<input type="submit" value="버튼 C" name="c">
</form>
</div>
</body>
</html>
#### 해설
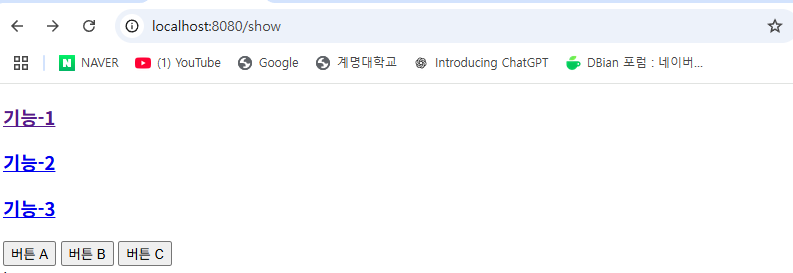
<h3><a th:href="@{/function/1}">기능-1</a></h3>
th:href : 기능-1을 누르면 function/1로 이동하도록 링크를 만든다.
<form th:action="@{/send}" method="post"> : /send 주소로, 아래 데이터를 보낸다.
<input type="submit" value="버튼 A" name="a"> : a로 보낸다.
결과
(3) 컨트롤러 수정(기능 만들기)
@Controller
public class PathVariableController {
// GET 및 URL(/show)
@GetMapping("show")
public String showView() {
// 반환값으로 뷰 이름을 반환
return "show";
}
// GET 및 URL(/function/{no})
// ※{no}는 동적으로 값이 바뀝니다.
@GetMapping("/function/{no}")
public String selectFunction(@PathVariable Integer no) {
// 뷰 이름 초기화
String view = null;
switch (no) {
case 1:
view = "pathvariable/function1";
break;
case 2:
view = "pathvariable/function2";
break;
case 3:
view = "pathvariable/function3";
break;
}
// 반환값으로 뷰 이름을 반환
return view;
}
// ▽▽▽▽▽ 예제 7.18 ▽▽▽▽▽
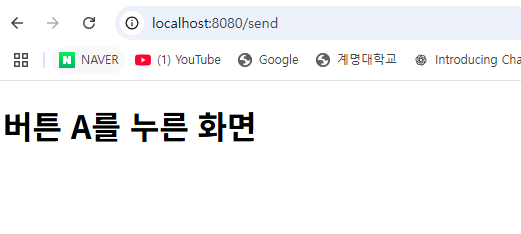
/** "버튼 A" 누르기 처리 */
@PostMapping(value = "send", params = "a")
public String showAView() {
// 반환값으로 뷰 이름을 반환
return "submit/a";
}
/** "버튼 B" 누르기 처리 */
@PostMapping(value = "send", params = "b")
public String showBView() {
// 반환값으로 뷰 이름을 반환
return "submit/b";
}
/** "버튼 C" 누르기 처리 */
@PostMapping(value = "send", params = "c")
public String showCView() {
// 반환값으로 뷰 이름을 반환
return "submit/c";
}
// △△△△△ 예제 7.18 △△△△△
}
#### 해석
@PostMapping(value = "send", params = "a") : 입력에서 a라는 데이터를 받으면, 아래 함수를 실행한다.
return "submit/a" : return할 페이지
결과