트리 순회 소개
오늘 배우는건 어떤 트리에서든지 사용할 수 있는 개념이다.
트리를 순회하는데 두가지 방식
- 트리에 있는 각 요소를 모두 거쳐가는 방법이 여러가지가 있다.
- 이 접근법들은 트리가 어떻게 생겼는지와 데이터가 어떻게 분포하고 있는지에 따라서 다른 효과를 가진다.
-
너비 우선
-
깊이 우선
- 정위 순회
- 전위 순회
- 후위 순회
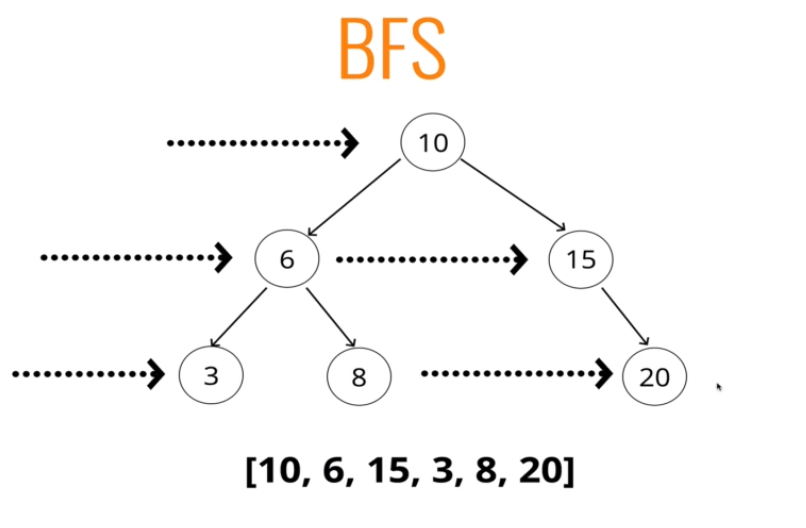
너비 우선 탐색 소개 (BFS)
자식 노드를 보기 전에 먼저 형제 노드를 다 보는것이다.
- 리스트나 배열을 가지고 큐를 만들고 그 요소들을 추척한다.
     10
  6      15
3   8       20
queue : []
visited : [10,6,15,3,8,20]너비 우선 탐색 솔루션
class Node{
	constructor(value){
    	this.value = value; // 각 노드는 값을 가진다.
      	this.left = null;  // left 값과
      	this.right = null; // right 값
    }
 }

class BinarySearchTree{
	constructor(){
    	this.root = null; // 딱 하나의 중요한 프로퍼티를 가진다. 루트!
    }
    insert(value){
    	let newNode = new Node(value);
      	if(this.root === null){
        	this.root = newNode;
          	return this;
        }else{
          let current = this.root;
          while(true){
          	if(value < current.value){
            	if(current.left === null){
                	current.left = newNode;
                   return this;
                }
              current = current.right;
            }
          }
    }
      // 값, 노드를 출력하는 find
      find(value){
      	if(this.root === null) return false;
        let current = this.root,
        found = false;
        while(!found && current){
        	if(value < current.value){
            	current = current.left;
            }else if(value > current.value){
            	current = current.right;
            }else{
            	found = true;
            }
        }
        if(!found) return undefined; // 값에 이 트리에 없다면
        return current;
      }
      // 참과 거짓을 출력하는 contains고
      contains(value){
      	if(this.root === null) return false;
        let current = this.root,
        found = false;
        while(!found && current){
        	if(value < current.value){
            	current = current.left;
            }else if(value > current.value){
            	current = current.right;
            }else{
            	return true;
            }
        }

        return false;
      }

      BFS(){
      	let data = [],
            queue = [],
            node = this.root
        queue.push(node)
        while(queue.length>0){
        	node = queue.shift() //선입선출
          data.push(node.value) // 출력할 목록에 node를 더하는것
          if(node.left) queue.push(node.left);
          if(node.right) queue.push(node.right);
        }
        return data // 데이터에는 지금까지 거쳐온 변수들이 저장되어있음

        //QUEUE : [15,3,8]
        //DATA: [10,6]

        //  10
       // 6   15
    //  3  8     20
      }
}
깊이 우선 탐색 소개 - 전위 순회
깊이 우선 탐색에는 세가지 종류가 있다. DFS알고리즘이다.
- 모든 노드를 방문하거나 순회할 때 형제 노드로 넘어가기 전에 수직으로 트리의 끝까지 내려간다는 뜻이다.
- 어떤 노드든지 결국에 , 언젠가 노드 자체에 도달해야만 한다.
- 리스트를 만들든 그것을 출력을 하든 상관없이 노드를 직접 리스트에 담아서 출력을 하는 것이다.
- 왼쪽 전체와 오른쪽 전체를 돌아야 한다는 뜻이다.
- 어느 시점에 특정 노드를 방문해야 하고, 왼쪽을 순회하고, 오른쪽을 순회해야 한다.
- 이 세 가지 방식이 코드에 있는 순서에 따라서 말 그대로 복사해 위에 붙여 넣거나 아래에 붙여넣거나 하는 식으로 바꾸는 것이 결과를 바꾼다.
전위탐색 (preorder)
: 왼쪽 전체를 순회하고 나서 오른쪽 전체를 순회하는 방식
의사코드
- 우리가 방문했던 것들을 저장하는 변수를 만들것이다.
- 그리고 맨 마지막에는 이 변수를 출력할 것이다. 이름은 data나 visited등
- current라는 이름의 변수를 만들어 거기에 트리의 루트를 저장해준다.
- 그다음, 두번째 헬퍼 함수를 만든다. 이 함수가 하는 일은 그냥 노드의 값을 변수에 넣어서 저장하는 것이다. 마지막에 출력할 변수다.
- 노드를 방문해서 배열이나 리스트에 그 값을 추가해준다.
- 그리고 그것이 왼쪽 값을 가지면, 재귀 방식으로 헬퍼 함수를 다시 호출한다. 오른쪽에 대해서도 똑같이 한다.
- 그러니까 기본적으로 이 헬퍼 함수는 주어진 노드에 대해 호출된다. 시작은 루트다.
- 노드를 우리가 관찰해야 하는 리스트에 넣는다. (마지막에 출력하는 결과)
깊이 우선 탐색 솔루션 - 전위 순회
class Node{
	constructor(value){
    	this.value = value; // 각 노드는 값을 가진다.
      	this.left = null;  // left 값과
      	this.right = null; // right 값
    }
 }

class BinarySearchTree{
	constructor(){
    	this.root = null; // 딱 하나의 중요한 프로퍼티를 가진다. 루트!
    }
    insert(value){
    	let newNode = new Node(value);
      	if(this.root === null){
        	this.root = newNode;
          	return this;
        }else{
          let current = this.root;
          while(true){
          	if(value < current.value){
            	if(current.left === null){
                	current.left = newNode;
                   return this;
                }
              current = current.right;
            }
          }
    }
      // 값, 노드를 출력하는 find
      find(value){
      	if(this.root === null) return false;
        let current = this.root,
        found = false;
        while(!found && current){
        	if(value < current.value){
            	current = current.left;
            }else if(value > current.value){
            	current = current.right;
            }else{
            	found = true;
            }
        }
        if(!found) return undefined; // 값에 이 트리에 없다면
        return current;
      }
      // 참과 거짓을 출력하는 contains고
      contains(value){
      	if(this.root === null) return false;
        let current = this.root,
        found = false;
        while(!found && current){
        	if(value < current.value){
            	current = current.left;
            }else if(value > current.value){
            	current = current.right;
            }else{
            	return true;
            }
        }

        return false;
      }

      BFS(){
      	let data = [],
            queue = [],
            node = this.root
        queue.push(node)
        while(queue.length>0){
        	node = queue.shift() //선입선출
          data.push(node.value) // 출력할 목록에 node를 더하는것
          if(node.left) queue.push(node.left);
          if(node.right) queue.push(node.right);
        }
        return data // 데이터에는 지금까지 거쳐온 변수들이 저장되어있음

        //QUEUE : [15,3,8]
        //DATA: [10,6]

        //  10
       // 6   15
    //  3  8     20
      }

      DFSPreOrder(){
        let data = [];
        let current = this.root;
        function traverse(node){
        	data.push(node.value);
          if(node.left) traverse(node.left);
          if(node.right) traverse(node.right);

        }
        traverse(current)
        return data;
      }
}
결과는 [10,6,3,8,15,20]
- 작동하는 방식은 노드를 방문하고, 왼쪽 전체를 순회한 다음에 오른쪽 전체를 순회하는 것이다.
- 여기서는 재귀형 함수를 사용했다.
깊이 우선 탐색 소개 - 후위 순회
PostOreder
후위 탐색을 보겠다. 위에서 한걸 약간 순서만 바꾸면 된다. 그러나, 실제 결과로 나오는 순서에는 아주 큰 차이가 발생한다.
- 노드에 달린 전체 가지인 왼쪽과 오른쪽은 먼저 순회한다. 그러고나서 노드를 방문한다.
- 왼쪽을 먼저 보고 왼쪽을 끝까지 확인한 다음에 오른쪽을 끝까지 순회하고 그다음에 노드를 확인하는 것이다.
- 후위 탐색에서는 루트가 가장 마지막으로 방문하는 노드가 된다.
- 어떤 노드이든지 모든 자식을 방문한 뒤에 해당 노드를 방문하게 되는 것이다.
의사코드
- 인수를 입력하지 않는 함수를 만든다.
- 우리가 방문한 노드들의 값을 저장할 배열이나 리스트를 만들어서 맨 마지막에 출력할 것이다.
- 노드를 입력하는 헬퍼 함수를 만들고
- 밑 세단계를 재귀함수로 실행할 것이다.
- left 프로퍼티가 있다면 헬퍼함수를 해당 프로퍼티에 대해 호출하고
- right 프로퍼티가 있다면 헬퍼함수를 해당 프로퍼티에 대해 호출하고
- 방문한 값들을 저장하는 변수에 push한다. 그 다음에는 current 변수에 대해 헬퍼 함수를 호출한다.
- 마지막으로 값이 들어있는 배열을 출력한다.
깊이 우선 탐색 소개 - 후위 순회
class Node{
	constructor(value){
    	this.value = value; // 각 노드는 값을 가진다.
      	this.left = null;  // left 값과
      	this.right = null; // right 값
    }
 }

class BinarySearchTree{
	constructor(){
    	this.root = null; // 딱 하나의 중요한 프로퍼티를 가진다. 루트!
    }
    insert(value){
    	let newNode = new Node(value);
      	if(this.root === null){
        	this.root = newNode;
          	return this;
        }else{
          let current = this.root;
          while(true){
          	if(value < current.value){
            	if(current.left === null){
                	current.left = newNode;
                   return this;
                }
              current = current.right;
            }
          }
    }
      // 값, 노드를 출력하는 find
      find(value){
      	if(this.root === null) return false;
        let current = this.root,
        found = false;
        while(!found && current){
        	if(value < current.value){
            	current = current.left;
            }else if(value > current.value){
            	current = current.right;
            }else{
            	found = true;
            }
        }
        if(!found) return undefined; // 값에 이 트리에 없다면
        return current;
      }
      // 참과 거짓을 출력하는 contains고
      contains(value){
      	if(this.root === null) return false;
        let current = this.root,
        found = false;
        while(!found && current){
        	if(value < current.value){
            	current = current.left;
            }else if(value > current.value){
            	current = current.right;
            }else{
            	return true;
            }
        }

        return false;
      }

      BFS(){
      	let data = [],
            queue = [],
            node = this.root
        queue.push(node)
        while(queue.length>0){
        	node = queue.shift() //선입선출
          data.push(node.value) // 출력할 목록에 node를 더하는것
          if(node.left) queue.push(node.left);
          if(node.right) queue.push(node.right);
        }
        return data // 데이터에는 지금까지 거쳐온 변수들이 저장되어있음

        //QUEUE : [15,3,8]
        //DATA: [10,6]

        //  10
       // 6   15
    //  3  8     20
      }

      DFSPreOrder(){
        let data = [];
        let current = this.root;
        function traverse(node){
        	data.push(node.value);
          if(node.left) traverse(node.left);
          if(node.right) traverse(node.right);

        }
        traverse(current)
        return data;
      }
}

  	DFSPostOrder(){
    	let data = [];
      function traverse(node){
      	if(node.left) traverse(node.left)
        if(node.right) traverse(node.right)
        data.puah(node.value);
      }
      traverse(this.root);
      return data;
    }
// 결과 [3,8,6,20,15]
깊이 우선 탐색 소개- 정위 순회 (InOrder)
1) 어느 시점에서든 노드를 방문해야 한다.
2) 왼쪽 전체를 순회해야 한다.
3) 오른쪽 전체를 순회해야 한다.
정위탐색에서는 먼저 왼쪽 전체를 순회하고 노드를 방문하고 그다음, 오른쪽 전체를 순회한다.
의사코드
기본적으로 위와 같은 의사코드다.
- 헬퍼 함수가 왼쪽을 먼저 가서 왼쪽을 재귀형으로 순회한다.
- 그리고 노드의 값을 변수에 넣는다.
- 그러고나서 오르쪽을 순회한다.
- 마지막 목표는 다른 메소드들과 마찬가지로 리스트나 배열에 우리가 방문한 순서대로 값을 넣어서 만드는 것이다.
//결과 [3,6,8,10,15,20]
깊이 우선 탐색 솔루션 - 정위 순회
class Node{
	constructor(value){
    	this.value = value; // 각 노드는 값을 가진다.
      	this.left = null;  // left 값과
      	this.right = null; // right 값
    }
 }

class BinarySearchTree{
	constructor(){
    	this.root = null; // 딱 하나의 중요한 프로퍼티를 가진다. 루트!
    }
    insert(value){
    	let newNode = new Node(value);
      	if(this.root === null){
        	this.root = newNode;
          	return this;
        }else{
          let current = this.root;
          while(true){
          	if(value < current.value){
            	if(current.left === null){
                	current.left = newNode;
                   return this;
                }
              current = current.right;
            }
          }
    }
      // 값, 노드를 출력하는 find
      find(value){
      	if(this.root === null) return false;
        let current = this.root,
        found = false;
        while(!found && current){
        	if(value < current.value){
            	current = current.left;
            }else if(value > current.value){
            	current = current.right;
            }else{
            	found = true;
            }
        }
        if(!found) return undefined; // 값에 이 트리에 없다면
        return current;
      }
      // 참과 거짓을 출력하는 contains고
      contains(value){
      	if(this.root === null) return false;
        let current = this.root,
        found = false;
        while(!found && current){
        	if(value < current.value){
            	current = current.left;
            }else if(value > current.value){
            	current = current.right;
            }else{
            	return true;
            }
        }

        return false;
      }

      BFS(){
      	let data = [],
            queue = [],
            node = this.root
        queue.push(node)
        while(queue.length>0){
        	node = queue.shift() //선입선출
          data.push(node.value) // 출력할 목록에 node를 더하는것
          if(node.left) queue.push(node.left);
          if(node.right) queue.push(node.right);
        }
        return data // 데이터에는 지금까지 거쳐온 변수들이 저장되어있음

        //QUEUE : [15,3,8]
        //DATA: [10,6]

        //  10
       // 6   15
    //  3  8     20
      }

      DFSPreOrder(){
        let data = [];
        let current = this.root;
        function traverse(node){
        	data.push(node.value);
          if(node.left) traverse(node.left);
          if(node.right) traverse(node.right);

        }
        traverse(current)
        return data;
      }
}

  	DFSPostOrder(){
    	let data = [];
      function traverse(node){
      	if(node.left) traverse(node.left)
        if(node.right) traverse(node.right)
        data.puah(node.value);
      }
      traverse(this.root);
      return data;
    }

  DFSInOrder(){
  	let data = [];
    function traverse(node){
      node.left && traverse(node.left)
      data.push(node.value)
      node.right && traverse(node.right)
      // data.push(node.value) 여기에도 작성해야 하는줄 알았는데 쌤은 안씀
    }
    traverse(this.root);
    return data;
  }
너비 우선 탐색과 깊이 우선 탐색은 언제 사용되는가?
어떤 것이 더 나은지, 어떤 것을 사용해야 하는지를 다뤄보자.
=> 상황에 따라 다르다.
일반적인 너비 우선 탐색과 깊이 우선 탐색 비교
만약에 트리가 아주 넓은 모양의 구조라면, 너비 우선은 큐를 저장하는데 더 많은 공간을 차지한다.
아주 깊고 긴 트리라면 깊이 우선이 더 많은 공간을 사용한다.
깊이 우선 탐색의 서로 다른 종류를 언제 사용해야 하는가?
사실, 다른 것들에 비해서 하나를 골라 사용해야 하는 좋은 예시 상황은 없다
정위
그래도 예시를 좀 들어보자)
[3,6,8,10,15,20] => 이건 정위순회인 것을 알 수 있다.
- 잘 보면 오름차순이다.
- 부모 노드보다 큰것은 오른쪽에 작은것은 왼쪽에 있다.
- 우리가 하고 있는 작업에 따라서 유용할 수 있다.
- 예를들어, 리스트를 받아서 데이터베이스에 넣어야 하는것
순서대로 무언가 작업을 해야 할 때
전위
[10,6,3,8,15,20]
- 작동방식은 노드를 먼저 방문하고 왼쪽보고 오른쪽 본다.
- 트리를 복사하거나 평탄화해서 저장하는 경우. 그러니까, 파일이나 데이터 베이스 같은 곳에 저장을 했다가 나중에 연쇄구조로 다시 만들어 낼 때 도움이 된다.
결론
- 위 두가지 상황은 특정한 유형이 더 사용될 필요가 있는 것들이다.
그러나 바꾸긴 쉬워 코드 한줄만 바꾸면 되니까
더 중요한 것은 깊이 우선을 선택하냐 너비 우선을 선택하냐 일 것이다.
복습
- 트리는 비선형 구조다. 루트와 자식 노드들을 가지고 있다.
- 이진 트리는 아무런 종류의 값을 가질 수 있지만, 각 노드는 최대 두개의 자식을 가질 수 있다.
- 이진 탐색 트리는 이진 트리의 특별한 경우다.
트리가 있고, 그 중에 이진트리가 있고, 그 중에 다시 이진 탐색 트리가 있는 것이다. - 이진 탐색 트리는 일종의 순서를 가지는, 정렬된 트리다. 부모의 왼쪽에 있는 모든 노드는 부모보다 작고, 오른쪽에 있는 모든 노드는 크다. 그러니까, 이진 탐색 트리는 비교가 가능한 데이터 종류에만 사용할 수 있다.
- 너비 우선 탐색과 깊이 우선 탐색으로 트리를 탐색하거나 순회하는 방법을 배웠다. 깊이 우선에는 세가지 종류가 있다. 정위, 후위, 전위

강의 기록 블로그