인터페이스의 요소
-
상수 : 선언된 모든 변수는 상수로 처리됩니다.
-
메서드 : 인터페이스에 모든 메서드는 추상 메서드입니다.
-
디폴트 메서드 : 구현코드가 없는 인터페이스에서 공통적으로 구현되야 하는 메서드가 있는 경우 추상클래스의 구현메서드 처럼 기본적인 구현을 가지는 메서드입니다. 기본 구현을 가지고 있다고 해도 실제 구현하는 클래스에서 재정의 할 수 있습니다.
-
정적 메서드 : static키워드가 붙는 메서드로 인스턴스 생성과 상관없이 인터페이스 타입으로 호출하는 메서드입니다. 인스턴스를 사용하기 위해 클래스를 만들고 인스턴스를 생성하는 과정을 생략하고 바로 사용할 수 있게 구현해놓은 메서드입니다.
-
private 메서드 : 인터페이스 내에서만 사용가능한 메서드이고 디폴트 메서드나 정적메서드에 사용하기 위해 작성되는 메서드 입니다. 인터페이스를 구현하는 클래스쪽에서 재정의하거나 사용할 수 없고 디폴트나 정적메서드를 통해서만 사용 가능합니다.
예제
public interface Calc {

	double PI = 3.14; //나중에 상수가됨
	int ERROR = -9999999;

	int add(int num1, int num2);
	int substract(int num1, int num2);
	int times(int num1, int num2);
	int divide(int num1, int num2);
	//디폴트 메서드
	default void description() {
		System.out.println("정수 계산기를 구현합니다.");
		myMethod(); //private 메서드 사용
	}
	//static메서드
	static int total(int[] arr) {
		int total = 0;

		for(int i :arr) {
			total+= i;
		}
		mystaticMethod();//private static 메서드 사용
		return total;
	}
	//private 메서드
	private void myMethod() {
			System.out.println("private method");
}
	//private static 메서드
	private static void mystaticMethod() {
		System.out.println("private static method");
	}

}
기존의 Calc 메서드 안에 인터페이스의 요소들을 추가해서 실습해보도록 하겠습니다.
-
default 메서드 description()은 구현문을 가진 메서드로 implements하는 클래스들에서도 기본적으로 적용이 되는 메서드입니다.
-
static메서드(정적메서드) total()은 인스턴스의 생성없이 사용할 수 있는 메서드로 인터페이스명을 타입으로 하여 실행할 수 있습니다.
-
private 메서드 myMethod는 인터페이스 내에서만 사용가능한 메서드로 description()안에 사용되었습니다.
-
private static 메서드는 인터페이스 내에서만 사용가능하고 static 키워드가 있기에 static 메서드안에서만 사용가능하기 때문에 total에 사용되었습니다.
public class CalcTest {

	public static void main(String[] args) {

		Calc calc = new CompleteCalc();
		int n1 = 10;
		int n2 = 2;

		System.out.println(calc.add(n1, n2));
		System.out.println(calc.substract(n1, n2));
		System.out.println(calc.times(n1, n2));
		System.out.println(calc.divide(n1, n2));
		//default 메서드사용
		calc.description();

		int[] arr = {1,2,3,4,5};
		//static 메서드 사용
        int sum = Calc.total(arr);
		System.out.println(sum);

	}
}
//결과
12
8
20
5
정수 계산기를 구현합니다.
private method
private static method
15-
calc는 CompleteCalc의 인스턴스이고 description();은 CompleteCalc에 구현되어있지 않지만 default 메서드이기 때문에 사용이 가능합니다. default메서드는 재정의가 가능하기 때문에 CompleteCalc에서 override한다면 다른결과 값이 나오게 됩니다.
-
static 메서드 total은 따로 인스턴스 생성없이 인터페이스명인 Calc.total로 바로 사용할 수 있습니다.
마지막으로 private 메서드와 private static메서드도 각각 defalt메서드와 static 메서드안에서 사용되고 있음을 결과값에서 확인할 수 있습니다.
여러개의 인터페이스 구현하기
-
인터페이스는 구현 코드가 없으므로 하나의 클래스가 여러 인터페이스를 구현 할 수 있습니다.
-
하지만 다른 인터페이스의 디폴트 메서드 이름이 중복되는 경우 에러가 발생하니 재정의해줄 필요가 있습니다.
public interface Buy {

	void buy();

	default void order() {
		System.out.println("구매 주문");
	}

}
public interface Sell {

	void sell();

	default void order() {
		System.out.println("판매 주문");
	}
}
2개의 인터페이스를 각각 buy와 sell이란 이름으로 만들고 동일한 이름의 default 메서드 order를 만듭니다.
public class Customer implements Buy, Sell {

	@Override
	public void sell() {
		System.out.println("customer sell");

	}

	@Override
	public void buy() {
		System.out.println("customer buy");
	}

	public void order() {
		System.out.println("customer order");
	}

	public void sayHello() {
		System.out.println("hello");
	}
}-
구매와 판매를 동시에하는 고객을 구현하기 위해 Buy와 Sell 두 인터페스를 모두 implements 합니다.
-
각각의 인터페이스에 있던 sell()과 buy()를 구현하는데는 문제가 없지만 이름이 같았던 order()는 재정의가 필요하다고 에러메세지가 떠서 재정의를 해줍니다.
-
마지막으로 Customer에서만 사용할 수 있는 sayHello()를 추가하고 마칩니다.
public class CustomerTest {

	public static void main(String[] args) {

		Customer customer = new Customer();
		customer.buy();
		customer.sell();
		customer.order();
		customer.sayHello();

		Buy buyer = customer;
		buyer.buy();
		buyer.order();

		Sell seller = customer;
		seller.sell();
		seller.order();

	}

}
//결과
customer buy
customer sell
customer order
hello
customer buy
customer order
customer sell
customer order-
실행을 위해 Test클래스를 만들고 Customer 인스턴스를 생성해 buy(),sell(),order(),sayHello()메소드를 사용합니다.
-
각각 Buy와 Sell에 인스턴스를 생성해 사용한 결과 각각의 메서드가 실행한것을 확인 할 수 있습니다.
-
1개의 클래스만 상속이 가능한 것과는 다르게 인터페이스는 여러개도 구현이 가능하고 중복될 수 있는 default 메서드만 유의해서 사용하면 된다는것을 알 수 있습니다.
인터페이스의 상속
- 인터페이스간에도 상속이 가능합니다. 구현부가 없으므로 extends 뒤에 여러 인터페이스를 상속받을수 있습니다. 이런 인터페이스 간의 상속을 타입 상속(type inheritance)라고 합니다. 아래의 클래스 관계도를 예제로하여 더 알아보도록 하겠습니다.
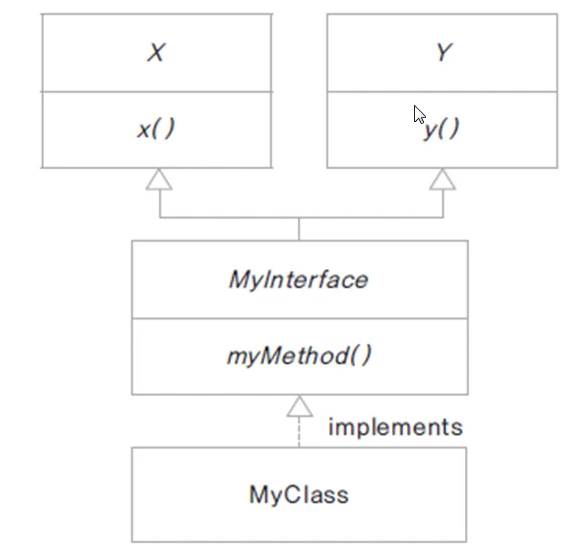
public interface X {

	void x();
}
public interface Y {
	void y();

}
X, Y 두개의 인터페이스가 있습니다.
public interface MyInterface extends X, Y{

	void myMethod();
}
MyInterFace는 X와 Y 인터페이스를 extends하는 인터페이스입니다.

public class MyClass implements MyInterface {

	@Override
	public void x() {
		// TODO Auto-generated method stub

	}

	@Override
	public void y() {
		// TODO Auto-generated method stub

	}

	@Override
	public void myMethod() {
		// TODO Auto-generated method stub

	}
}- MyClass는 MyInterface를 구현하는 클래스이고 구현해야될 메서드는 MyinterFace에 myMethod() 뿐 아니라 상속받은 x()와 y()까지 입니다. 간단한 예제이지만 인터페이스간에도 상속이 일어날 수 있음을 알 수 있습니다.
인터페이스 구현과 클래스 상속 함께 사용하기
인터페이스 구현과 클레스 상속을 함께 하는 경우에 대해서 예제를 통해서 알아보도록 하겠습니다. 아래의 관계도에서 BookSelf는 Shlef라는 클래스를 상속하고 Queue 인터페이스를 구현을 동시에 합니다.
import java.util.ArrayList;

public class Shelf {

	protected ArrayList<String> shelf;

	public Shelf() {
		shelf = new ArrayList<String>();
	}

	public ArrayList<String> getShelf(){
		return shelf;
	}

	public int getCount() {
		return shelf.size();
	}
}-
상위 클래스인 Shelf를 생성하고 ArrayList을 선언하여 입력한 책을 보관할 수 있게 합니다.
-
Shelf 생성자 안에 ArrayList의 생성자를 두고 getShelf()와 getCount()메서드를 만듭니다. 복습으로 .size는 현재 배열안에 들어있는 값이 몇개인지 알려주는 메서드입니다.
public interface Queue {

	void enQueue(String title);
	String deQueue();

	int getSize();
}
Queue인터페이스를 만들고 책을 넣을 수 있는 enQueue()와 뺄 수 있는 deQueue()메서드를 생성합니다.
public class Bookshelf extends Shelf implements Queue {

	public void enQueue(String title) {
		shelf.add(title);
	}

	public String deQueue() {

		return shelf.remove(0);
	}

	public int getSize() {
		return getCount();
	}

}
BookShelf 클래스를 만들고 extends Shelf와 implements Queue를 동시에 적음으로 상속과 인터페이스 구현을 함께 합니다. enQueue()에 shelf.add(title)로 책을 축가하는 기능을 추가하고 deQueue()를 통해 .remove(0)사용함으로 배열에 첫번째 부터 지워주는 기능을 하게 합니다. 마지막으로 getSize()메서드를 통해 책장에 책이 얼마나 있는지 확인하는 기능을 추가합니다.
public class BookshelfTest {

	public static void main(String[] args) {

		Queue bookQueue = new Bookshelf();
		bookQueue.enQueue("태백산맥1");
		bookQueue.enQueue("태백산맥2");
		bookQueue.enQueue("태백산맥3");

		System.out.println(bookQueue.deQueue());
		System.out.println(bookQueue.deQueue());
		System.out.println(bookQueue.deQueue());
	}

}
 //결과
태백산맥1
태백산맥2
태백산맥3- Test클래스를 만들고 Bookshlf인스턴스를 생성하는데 Shelf로 해도되고 Queue로 해도 되지만 기능적인 면에서 Queue인터페이스를 타입으로하고 인스턴스를 생성합니다. 복습으로 Shlef 인스턴스를 생성 안해도
- ArrayLIst이 생성되는 이유는 BookShelf 생성이전에 상위 클랙스인 Shelf를 자동으로 생성하기 때문입니다. 이후 .enQueue 메서드로 책을 3권 추가하고 deQueue()메서드로 책을 한권씩 빼보면 배열에 앞에서부터 하나씩 빠지는걸 확인 할 수 있습니다.
인터페이스에 대한 많은 내용이 있었지만 무엇보다 중요한건 인터페이스가 무엇이고 왜쓰이는지, 그것을 설계하는것은 어떤것인지를 알면 좋을 것 같습니다.