
오랜만에 이 카테고리로 글을 올리네요. 사실 이 토이 프로젝트는 8월에 이미 완성되었습니다. 이후로 계속해서 사용하고 있구요. Security-JWT-Redis로 이어지는 인증/인가 단계와, 낮은 수준의 DDD 리팩토링이 추가되었습니다. 이번 글에서는 인증 부분에 대한 내용을 작성해보겠습니다.
먼저 SecurityConfig 클래스 설정 부분을 보겠습니다. 첫 번째로 아무것도 설정하지 않은 상태에서 구현한 JwtAuthenticationFilter와 JwtAuthorizationFilter를 등록합니다. 그리고 로그인 시 JWT 방식을 사용하기 때문에 세션관리상태를 STATLESS로 설정해준 다음 리소스 별 접근 권한을 설정합니다. 코드로 보겠습니다.
@Configuration
@RequiredArgsConstructor
public class SecurityConfig {

    private final RefreshTokenRepository refreshTokenRepository;
    private final MemberRepository memberRepository;
    private final AccessDeniedHandler customAccessDeniedHandler;

    // 로그인 시큐리티 설정
    @Bean
    public SecurityFilterChain securityFilterChain(HttpSecurity http) throws Exception {
        http
                .apply(new CustomSecurityFilterManager());
        http
                .csrf().disable()
                .sessionManagement().sessionCreationPolicy(SessionCreationPolicy.STATELESS);
        http
                .httpBasic();
        http
                .formLogin()
                .loginPage("/login");
        http
                .authorizeHttpRequests()
                .antMatchers("/", "/join", "/login", "/logout", "/api/join", "/api/login", "/api/checkId", "api/refreshToken", "/error")
                .permitAll()
                .antMatchers("/book2")
                .hasRole("ADMIN")
                .anyRequest()
                .authenticated();
        http
                .exceptionHandling()
                .accessDeniedHandler(customAccessDeniedHandler);

        return http.build();
    }


    // JWT 필터 등록
    public class CustomSecurityFilterManager
            extends AbstractHttpConfigurer<CustomSecurityFilterManager, HttpSecurity> {

        @Override
        public void configure(HttpSecurity builder) throws Exception {
            AuthenticationManager authenticationManager = builder.getSharedObject(AuthenticationManager.class);
            builder.addFilter(new JwtAuthenticationFilter(authenticationManager, new JwtService(refreshTokenRepository, memberRepository)));
            builder.addFilter(new JwtAuthorizationFilter(authenticationManager, new JwtService(refreshTokenRepository, memberRepository)));
            super.configure(builder);
        }
    }


    // 정적 리소스 시큐리티에서 제외
    @Bean
    public WebSecurityCustomizer webSecurityCustomizer() {
        return web -> {
            web.ignoring().requestMatchers(PathRequest.toStaticResources().atCommonLocations());
        };
    }


    // 패스워드 암호화
    @Bean
    public BCryptPasswordEncoder bCryptPasswordEncoder() {
        return new BCryptPasswordEncoder();
    }
}
위 부분은 모든 걸 구현한 상태에서 최종 설정하는 부분이기 때문에 내부적으로 어떻게 설계되었는지 알아볼 필요가 있습니다. 먼저 JwtAuthenticationFilter와 JwtAuthorizationFilter를 살펴볼텐데요, 기본적으로 AuthenticationFilter는 인증과 관련된 역할을, AuthorizationFilter은 인증 이후 권한과 관련된 역할을 합니다. 그리고 두 구현체는 각각 UsernamePasswordAuthenticationFilter와 BasicAuthenticationFilter 클래스를 상속받아 사용하게 됩니다. 흐름도를 정리한 표는 아래와 같습니다.
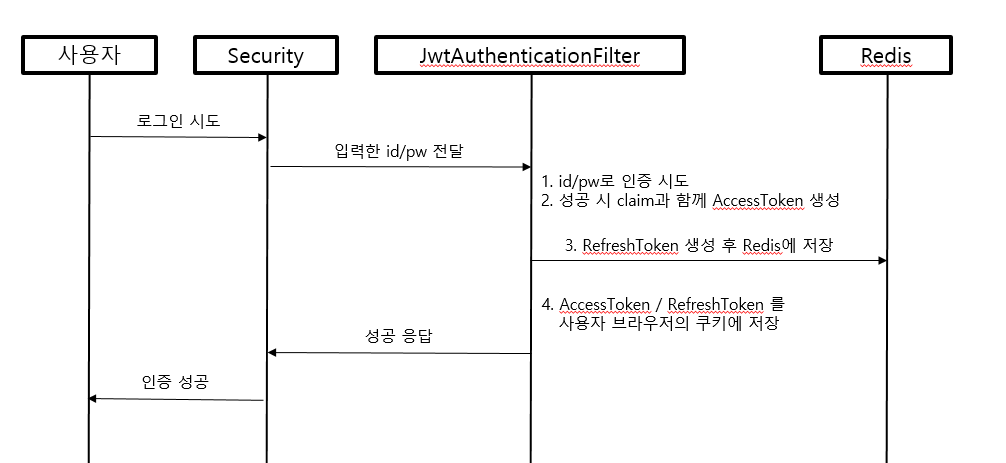
가장 먼저 로그인 과정에서의 JwtAuthenticationFilter의 인증 흐름도입니다.
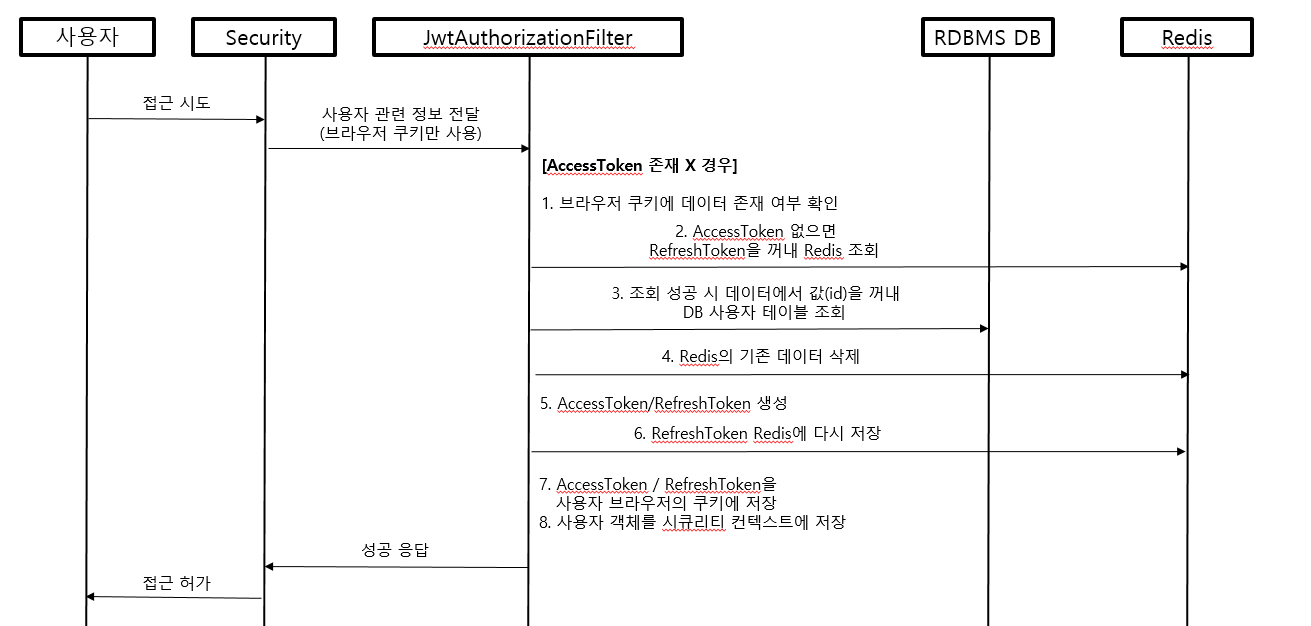
다음 리소스 접근 권한 과정에서의 JwtAuthorizationFilter의 허가 흐름도입니다. 두 경우로 나뉘는데요, 먼저 AccessToken이 유효할 때의 경우입니다.

그리고 AccessToken이 만료되어 사라졌을 경우입니다.
이 흐름도를 머리에 정리한 후 이제 코드를 보겠습니다. 내용이 많아 이번 글에서는 JwtAuthenticationFilter의 코드만 살펴보겠습니다. 위 흐름도와 코드마다 주석이 달려 있기 때문에 자세한 설명은 넘어가겠습니다.
public class JwtAuthenticationFilter extends UsernamePasswordAuthenticationFilter {

    private final AuthenticationManager authenticationManager;
    private final JwtService jwtService;

    public JwtAuthenticationFilter(AuthenticationManager authenticationManager, JwtService jwtProcess) {
        super(authenticationManager);
        setFilterProcessesUrl("/api/login");
        this.authenticationManager = authenticationManager;
        this.jwtService = jwtProcess;
    }


    // 로그인 시 동작된다.
    @Override
    public Authentication attemptAuthentication(HttpServletRequest request,
                                                HttpServletResponse response) throws AuthenticationException {

        ObjectMapper objectMapper = new ObjectMapper();

        try {
            // 로그인 요청 시 들어온 데이터를 Dto로 변환한다.
            LoginRequestDto loginDto = objectMapper.readValue(request.getInputStream(), LoginRequestDto.class);

            // 강제 로그인을 시킨다.
            // UsernamePasswordAuthenticationToken는 Authentication 객체를 상속한 객체다.
            UsernamePasswordAuthenticationToken authenticationToken = new UsernamePasswordAuthenticationToken(
                    loginDto.getUsername(), loginDto.getPwd());

            // 시큐리티 내부 로직으로 authenticate()는 UserDetailsService의 loadUserByUsername()을 호출한다.
            return authenticationManager.authenticate(authenticationToken);
        } catch (IOException e) {
            throw new InternalAuthenticationServiceException(e.getMessage());
        }
    }


    // 위 attemptAuthentication()가 성공해서 Authentication 객체를 반환하면 호출된다.
    @Override
    protected void successfulAuthentication(HttpServletRequest request, HttpServletResponse response,
                                            FilterChain chain, Authentication authResult) throws IOException, ServletException {

        // 액세스/리프레시 토큰을 생성한다.
        CustomUserDetails userDetails = (CustomUserDetails) authResult.getPrincipal();
        Optional<Member> member = Optional.ofNullable(userDetails.getMember());
        String accessToken = jwtService.generateAccessToken(member);
        String refreshToken = jwtService.generateRefreshToken(member);

        // 생성한 액세스/리프레시 토큰을 브라우저 쿠키에 저장한다.
        CookieUtil.addCookie(response, "accessToken", accessToken, JwtConstant.ACCESS_TOKEN_MAX_AGE, true, true);
        CookieUtil.addCookie(response, "refreshToken", refreshToken, JwtConstant.REFRESH_TOKEN_MAX_AGE, true, true);

        // 프론트에 응답한다.
        CustomResponseUtil.success(response, accessToken, "로그인 성공");
    }


    // attemptAuthentication에서 try-catch에 걸려서 예외를 던질 때 호출된다. (로그인 실패 시)
    @Override
    protected void unsuccessfulAuthentication(HttpServletRequest request, HttpServletResponse response, AuthenticationException failed) throws IOException, ServletException {
        CustomResponseUtil.fail(response, HttpStatus.UNAUTHORIZED, "로그인 실패");
    }
}
@Service
@RequiredArgsConstructor
public class JwtService {
private final RefreshTokenRepository refreshTokenRepository;
private final MemberRepository memberRepository;
// 액세스 토큰을 생성한다.
public String generateAccessToken(Optional<Member> userDetails) {
Date now = new Date();
Date expiration = new Date(now.getTime() + JwtConstant.ACCESS_TOKEN_EXPIRATION_TIME);
return JWT.create()
.withSubject("accountBook")
.withIssuedAt(now)
.withClaim("mid", userDetails.get().getMid())
.withClaim("role", userDetails.get().getRole().toString())
.withExpiresAt(expiration)
.sign(Algorithm.HMAC256(JwtConstant.SECRET));
}
// 리프레시 토큰을 생성하고 Redis에 저장한다.
public String generateRefreshToken(Optional<Member> userDetails) {
RefreshToken refreshToken = new RefreshToken(UUID.randomUUID().toString(), userDetails.get().getMid());
refreshTokenRepository.save(refreshToken);
return refreshToken.getRefreshToken();
}
}@Service
public class CookieUtil {
// 사용자의 브라우저에 쿠키를 담는다.
public static void addCookie(HttpServletResponse response, String name, String value, int maxAge, boolean httpOnly, boolean secure) {
Cookie cookie = new Cookie(name, value);
cookie.setPath("/");
cookie.setMaxAge(maxAge);
cookie.setHttpOnly(httpOnly);
cookie.setSecure(secure);
response.addCookie(cookie);
}
}위와 같이 세션 방식을 사용하지 않고 JWT 방식을 사용함으로써 사용자의 편의성을 높여주고, 동시에 토큰 관리에 InMemory DB인 Redis를 사용함으로써 속도와 만료시간을 설정할 수 있다는 이점을 가지게 됩니다.
이번 글에서는 전체적인 구성과 JwtAuthenticationFilter에 대해 알아보았는데요, 다음 글에서는 JwtAuthorizationFilter와 Redis에 대해 더 자세한 설명을 해보겠습니다.
