
- 참고자료
이 포스팅의 내용을 이해하려면 HTTP/1.1 이하의 지식이 필요함.
들어가면서
최근에 내가 있을 둥지를 옮기고자, 네트워크 & 인프라 관련 자격증을 공부하고 있다. HTTP 를 이론적으로 알고 있지만, 사실 그동안 내가 개발해온 프로토콜이 HTTP/1.1 인지 HTTP/2 혹은 HTTP/3 인지는 별 관심이 없었다.
나의 관심과는 무관하게, 2024년 현재 HTTP/3 로 운영하는 사이트까지 존재한다. 우리가 자주 들어가는 나무위키는 HTTP/3 연결을 지원한다. (그래서 빨라진건가...) 그리고 추후 서술할 HTTP/2 이상에서 도입된 멀티플렉싱 기술 때문인지, 대부분의 CDN 서비스에서는 H/2 이상을 사용하고 있는듯 하다.
이번 공부를 하면서 알게되었는데, 내가 배포한 서비스에서 AWS 와 같은 클라우드를 사용했더니 나도 모르게 HTTP/2 를 사용하고 있더라... ㅋ...
💡 Tip
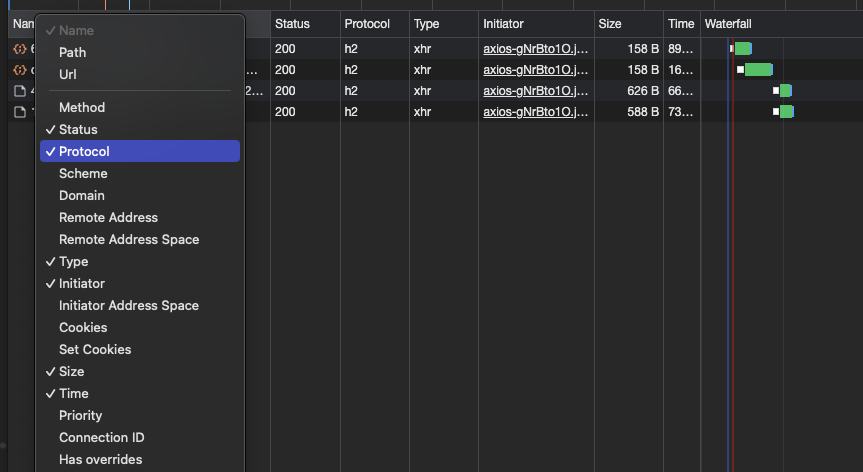
크롬 네트워크 탭에 들어가서 오른쪽 클릭을 해보면 protocols 를 활성화 할 수 있다!
HTTP/2 를 사용만해도 속도가 평균 10% 이상 빨라진다고 하니 도전해볼만 하다!
HTTP/2 등장 배경
2009년, 구글의 미친 천재들은 HTTP 의 속도를 개선하기 위해 SPDY('스피디') 라는 프로토콜을 개발하게 된다. 이를 지켜보던 HTTP 작업 그룹이 감명을 받았는지, 마침내 2012년 SPDY 기반에 HTTP/2 초안을 만들어내는데...
HTTP/1.1 과의 차이점
2 버전으로 업그레이드 될 때, 4가지 부분에서 개선되었다.
- 프레임
- 스트림과 멀티플렉싱
- 헤더 압축
서버 푸시🚨
프레임
HTTP/1.1 과 가장 크게 변경된 점은 텍스트 기반 프로토콜에서 바이너리 기반 프로토콜로 변화했다는 점이다.
HTTP/2 의 메세지는 모두 프레임에 담겨 전송된다. 프레임은 8 바이트 크기의 헤더로 시작하여, 최대 16383 바이트 크기를 가진다.
정확한 구조는 RFC7540 - 6. Frame Definitions 에서 확인 가능하다.
스트림과 멀티플렉싱
HTTP/2 는 스트림(stream) 이라고 하는 가상화된 소켓을 만들어 통신한다. 이러한 스트림을 통해 서버와 클라이언트 사이에 데이터를 동시에 양방향으로 교환할 수 있다. HTTP/2의 스트림은 독립적으로 운영되므로, 여러 요청과 응답이 같은 연결 내에서 동시에 일어나며, 이를 통해 효율성과 성능을 향상시킨다.
헤더 압축
HTTP/1.1 에서 헤더는 압축되지 않았다. 요청 자체가 많지 않았던 과거의 웹 환경과 다르게, 요즘에는 하나의 페이지에서 수많은 요청을 보내므로 실제로 오버헤드 이슈가 발생할 수 있다.
이를 개선하기 위해, HTTP/2 에서는 HTTP 메세지의 헤더를 HPack 방식으로 압축하여 분할 전송한다.
정확한 압축 방식은 RFC7541 를 참고하면 된다.
서버 푸시
HTTP/2 은 서버가 하나의 요청에 대해 응답으로 여러 개의 리소스를 보낼 수 있도록 해준다.
이 기능은 다음과 같은 상황에서 유리하다.
- HTML 문서가 링크하고 있는 이미지, css, js 를 미리 보내준다.
🚨 인줄 알았으나! 🚨
이런 저런 사정으로, 현재 이 기능을 지원하는 브라우저는 없다. 해당 기능을 사용할 경우, Error [ERR_HTTP2_PUSH_DISABLED]: HTTP/2 client has disabled push streams 에러를 확인할 수 있다.
Node.js 로 HTTP/2 구현하기
(참고) Node 21 을 사용하고 있으며, package.json 에 "type": "module" 을 사용함
SSL/TLS
현대의 웹 브라우저들은 보안상의 이유로 HTTP/2 연결에 SSL/TLS를 요구한다. 따라서, HTTP/2 웹 서버를 운영하려면 SSL 인증서가 필수다.
실습 환경에서는 openssl 을 이용하여 자체 서명을 진행한다. 운영 환경에서는 인증 기관(Certificate Authority, CA)에서 발급한 인증서가 필요하다. 실습을 위해 아래와 같은 커맨드를 입력한다.
openssl req -x509 -newkey rsa:2048 -nodes -sha256 -subj '/CN=localhost' -keyout <key 경로>.pem -out <cert 경로>.pem
두개의 pem 파일을 만들었다면, 성공이다.
key 와 cert 파일은 다음과 같이 세팅한다. (경로는 적절하게 변경 바란다.)
const serverOptions = {
  key: fs.readFileSync(path.join(import.meta.dirname, '이름.pem')),
  cert: fs.readFileSync(path.join(import.meta.dirname, '이름.pem')),
}
http2 모듈
http2 서버를 만들 때 중요한 포인트는 기존 node:http 모듈이 아닌 node:http2 모듈을 import 해야한다.
import * as http2 from 'node:http2'

// ...set options

const server = http2.createSecureServer(serverOptions)
http2 의 연결은 스트림을 이용하여 연속적이기 때문에, websocket 처럼 이벤트를 처리하는 방식으로 이루어진다.
// 에러 처리
server.on('error', err => console.error(err))

// 스트림 처리
server.on('stream', (stream, headers) => {
  // ...
})
헤더 설정
server.on('stream', (stream, headers) => {
  // 응답 헤더 설정
  stream.respond({
    'content-type': 'text/plain; charset=utf-8',
    ':status': 200,
  })
}
:status 처럼 :(colon) 이 붙는 헤더를 pseudo header 라고 한다. 이는 HTTP/2 에서만 사용되고, HTTP/1.1 에서는 사용되지 않는다. pseudo header 는 소문자를 사용하기 때문에, 일관성 유지를 위해 다른 헤더들도 소문자로 작성한다고 한다.
응답 본문 보내기
const pathValue = headers[':path']

stream.respond({
  'content-type': 'text/plain; charset=utf-8',
  ':status': 200,
})

const responseBody = `Hello, HTTP/2 world! Requested path: ${pathValue}`

stream.end(responseBody)
응답 본문은 .write(), .end() 등의 메서드를 이용하여 보낼 수 있다.
.end() 를 사용하게 되면 응답을 보낸 뒤 연결을 종료한다.

파일 보내기
stream.respondWithFile(path.join(import.meta.dirname, 'index.html'), {
  'content-type': 'text/html; charset=utf-8',
})
파일 전송은 .respondWithFile() 을 사용한다.

코드 전문
import * as http2 from 'node:http2'
import * as fs from 'node:fs'
import * as path from 'node:path'

// SSL/TLS 인증서와 개인 키 경로
const serverOptions = {
  key: fs.readFileSync(path.join(import.meta.dirname, 'privkey.pem')),
  cert: fs.readFileSync(path.join(import.meta.dirname, 'cert.pem')),
}

// HTTP/2 서버 생성
const server = http2.createSecureServer(serverOptions)

server.on('error', err => console.error(err))

server.on('stream', (stream, headers) => {
  // 스트림은 요청과 응답을 다루는 객체입니다.
  // 클라이언트로부터 요청 경로를 가져옵니다.
  const pathValue = headers[':path']

  if (pathValue === '/') {
    // 간단한 응답 메시지
    const responseBody = `Hello, HTTP/2 world! Requested path: ${pathValue}`

    // 응답 헤더 설정
    stream.respond({
      'content-type': 'text/plain; charset=utf-8',
      ':status': 200,
    })

    // 응답 본문 보내기
    stream.end(responseBody)
  } else if (pathValue === '/html') {
    stream.respondWithFile(path.join(import.meta.dirname, 'index.html'), {
      'content-type': 'text/html; charset=utf-8',
    })
  } else {
    // 404 처리
    stream.respond({
      'content-type': 'text/plain; charset=utf-8',
      ':status': 404,
    })

    stream.end('404 NOT FOUND')
  }
})

// 서버가 8443 포트에서 수신하도록 설정
server.listen(8443, () => {
  console.log('Server is running on https://localhost:8443')
})
Express 에서 HTTP/2 구현하기
SSL/TLS
이전에 설명했던 방식과 동일하다.
Express 코드 작성
import express from 'express'
import * as http2 from 'node:http2'
import * as fs from 'node:fs'
import * as path from 'node:path'

const app = express()

app.get('/', (req, res) => {
  res.send('Hello, HTTP/2 with Express!')
})

const options = {
  key: fs.readFileSync(path.join(import.meta.dirname, 'key.pem')),
  cert: fs.readFileSync(path.join(import.meta.dirname, 'cert.pem')),
}

const server = http2.createSecureServer(options, app)

server.listen(3000, () => {
  console.log('Server is running on https://localhost:3000')
})
일반적으로 알려진 가장 간단한 express 예제를 http2 모듈을 이용해 작성해본다.
하지만 위 코드를 실행하면, 클라이언트 연결 과정에서 다음과 문제점이 발생한다.
node:events:497
      throw er; // Unhandled 'error' event
      ^

TypeError: Cannot read properties of undefined (reading 'readable')
    at IncomingMessage._read (node:_http_incoming:214:19)
    at Readable.read (node:internal/streams/readable:737:12)
    at resume_ (node:internal/streams/readable:1255:12)
    at process.processTicksAndRejections (node:internal/process/task_queues:82:21)
Emitted 'error' event on IncomingMessage instance at:
    at emitErrorNT (node:internal/streams/destroy:169:8)
    at errorOrDestroy (node:internal/streams/destroy:238:7)
    at Readable.read (node:internal/streams/readable:739:7)
    at resume_ (node:internal/streams/readable:1255:12)
    at process.processTicksAndRejections (node:internal/process/task_queues:82:21)

Node.js v21.6.2
Express 는 아직 HTTP/2 를 공식적으로 지원하지 않는다. (5가 나오지 않는거 보면 영원히 지원하지 않을 가능성이 있다. 😔)
해결책 1 (spdy 모듈 활용)
구글의 spdy 프로토콜을 node 버전으로 구현한 모듈이 있다.
npm install spdyimport express from 'express'
import spdy from 'spdy'
import * as fs from 'node:fs'
import * as path from 'node:path'
const app = express()
app.get('/', (req, res) => {
res.send('Hello, HTTP/2 with Express!')
})
const options = {
key: fs.readFileSync(path.join(import.meta.dirname, 'key.pem')),
cert: fs.readFileSync(path.join(import.meta.dirname, 'cert.pem')),
}
const server = spdy.createServer(options, app)
server.listen(3000, () => {
console.log('Server is running on https://localhost:3000')
})- 장점: node 에서 가장 유명한 http/2 구동 방식이다.
- 단점: node 의 공식 http2 모듈을 사용하지 않는다.
해결책 2 (http2-express-bridge 모듈 활용)
http2 를 사용해도 문제가 없도록 express app 을 만들어주는 모듈이 있다.
npm install http2-express-bridgeimport express from 'express'
import http2Express from 'http2-express-bridge'
import * as http2 from 'node:http2'
import * as fs from 'node:fs'
import * as path from 'node:path'
const app = http2Express(express)
app.get('/', (req, res) => {
res.send('Hello, HTTP/2 with Express!')
})
const options = {
key: fs.readFileSync(path.join(import.meta.dirname, 'key.pem')),
cert: fs.readFileSync(path.join(import.meta.dirname, 'cert.pem')),
}
const server = http2.createSecureServer(options, app)
server.listen(3002, () => {
console.log('Server is running on https://localhost:3002')
})- 장점: node 의 공식 http2 모듈을 사용할 수 있다.
- 단점: 주간 다운로드수가 3000건을 넘지 않는다.
예제 링크 (Github)

좋은글 감사합니다! 덕분에 지식+1됐어요