스프링 시큐리티를 통해 인증/인가 환경을 구축해보았다. (해당 글은 [여기])
라이브러리 추가만으로 자체 login/logout이 제공, 기존의 폼들은 모두 인증을 거치도록 환경이 변했으며,
SecurityConfig와 UserDetailsService를 통해 인증 환경에 대한 커스텀도 가능했다.
이렇듯 스프링 시큐리티는 인증/인가 환경을 대신 구성해준다.
반대로 개발자가 모르는 많은 일들을 시큐리티가 대신 처리하고 있다는 뜻이기도 한데,
이번에는 스프링 시큐리티가 어떻게 인증환경을 구성하며, 처리하는 지에 대해 알아보려 한다.
📖 인증정보를 담고 있는 객체들
Principal
인증 주체(내가 누구인지)에 대한 정보를 담고 있는 객체
/**
 * 회원 페이지 (인증필요, USER 이상의 권한 접근 가능)
 */
 @GetMapping("/user")
 public String user(Model model, Principal principal) {
    // Principal을 통해 인증 주체가 누구인지 알 수 있다.
    model.addAttribute("username", principal.getName());
    return "/user";
}<title>User 페이지</title>
</head>
<body>
<h1>회원 화면</h1>
{{username}} 님 환영합니다.
</body>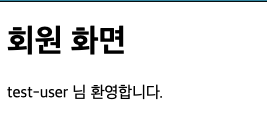
위처럼 인증을 거치게 되면 인증주체에 대한 정보는 Principal 객체에 담긴다.
(UserDetailsService에서 리턴한 UserDetails 정보..)
하지만 Principal은 스프링시큐리티가 제공하는 인증정보의 한 부분이며,
스프링시큐리티는 인증에 대한 모든정보를 아래와 같은 상태로 제공한다.
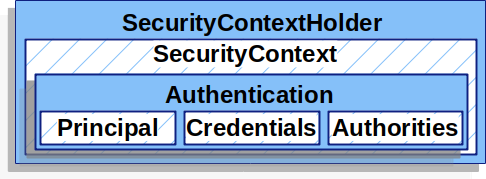
Authentication
실질적으로 인증정보를 담고 있는 객체
Authentication객체의 구성
Principal- '내가 누구인지'에 대한 정보를 담은 객체
- 로그인_ID에 해당하는 값을 담고 있다.
Credentials- 인증자격에 대한 정보를 담은 객체
- 비밀번호와 같은 암호 값을 담고 있다.
Authorities- 현재 유저의 권한(ROLE)정보를 담은 객체
SecurityContextHolder
시큐리티가 최종적으로 제공하는 객체
인증에 대한 정보는 Authentication객체에 있다.
하지만 시큐리티는 최종적으로 SecurityContextHolder를 통해 이를 제공하는데, 무슨 이유일까?
Thread-local
SecurityContextHolder는 SecurityContext객체를 Thread-local로 제공,
같은 스레드에서는 매개로 주고받지 않아도 언제든지 인증정보에 접근할 수 있다.
@Service
public class xxxService {

    /**
     * SecurityContextHolder를 통해 인증정보가 공유되는 지 테스트
     */
    public void user() {
    	// SecurityContextHolder를 통해 인증정보 가져오기
        Authentication authentication = SecurityContextHolder.getContext().getAuthentication();

        // authentication의 인증정보 가져오기 (principal, authorities)
        Object principal = authentication.getPrincipal();
        Collection<? extends GrantedAuthority> authorities = authentication.getAuthorities();

        // 인증여부 가져오기
        boolean authenticated = authentication.isAuthenticated();
    }

---------------------------------

/**
 * 컨트롤러에서 'user()' 호출
 */
 @GetMapping("/user")
 public String user(Model model, Principal principal) {
    xxxService.user(); // 'user()' 호출
    model.addAttribute("username", principal.getName());
    return "/user";
 }
'user()'의 인증정보를 로그로 출력한 결과
principal : org.springframework.security.core.userdetails.User@b6e8d426: Username: test-user; Password: [PROTECTED]; Enabled: true; AccountNonExpired: true; credentialsNonExpired: true; AccountNonLocked: true; Granted Authorities: ROLE_USER
authorities : [ROLE_USER]
authenticated : true
시큐리티는 인증에 대한 요청/결과 값을 Authentication 객체에 담아 처리한다.
하지만 인증에 대한 결과정보는 최종적으로 SecurityContextHolder 객체로 감싸져 제공되는데,
SecurityContextHolder는 내부의 SecurityContext(Authentication)객체를 Thread-local로 제공,
같은 스레드에서는 SecurityContextHolder를 통해 어디서든 인증정보에 접근이 가능하다.
📖 인증처리 흐름과 구조
1. 인증은 어디서 처리될까?
스프링 시큐리티는 수 많은 클래스 및 인터페이스들로 이루어져 있다.
이 클래스들은 인증환경을 구성하기 위한 각각의 역할이 있으며,
인증처리 역시 관련 시큐리티 클래스들이 적절하게 호출되어 구현된 것이다.
AuthenticationManager 인터페이스
- 인증 처리 관련 인터페이스
authenticate(Authentication authentication)메서드를 통해 인증을 구현한다.
ProviderManager 클래스
AuthenticationManager의 구현체- 실제 인증을 처리한다.
인증처리 흐름
[ProviderManager > authenticate(Authentication)]
- 인자로 받은 로그인 정보로
userDetailsService의 User정보를 가져온다. - 가져온 정보에 대한 유효성 검증(계정잠김, 만료여부 등)
- 이상이 없다면
Authentication객체로 리턴
물론 처리 과정에서 다른 클래스들을 거치기도 한다.
예를 들면..
DaoAuthenticationProvideruserDetailsService접근할 때
AbstractUserDetailsAuthenticationProvider- 유효성 검증 할 때
2. 인증은 어디서 호출될까?
시큐리티 클래스를 통해 인증 로직을 구현했다면, 이를 적절하게 호출하는 것은 스프링 시큐리티 필터들의 몫이다.
인증처리 역시 아래와 같은 관련 필터들이 존재한다.
UsernamePasswordAuthenticationFilter 필터
- 폼 인증을 처리하는 시큐리티 필터
- 해당 필터에서
AuthenticationManager를 호출 - 인증 후 받은
Authentication객체를SecurityContextHolder로 포장한다.
SecurityContextPersistenceFilter 필터
- 인증된
SecurityContext를 세션에 캐시하는 필터
- 인증 전 세션에 인증정보가 있는 지 체크
- 세션에 정보가 있으면 복구해서 재사용(로그인 유지)
- 세션에 정보가 없으면 인증을 실행한다.
인증 흐름
SecurityContextPersistenceFilter에서 로그인이 됐는 지 세션체크 (있으면 세션정보로 로그인처리)- [1]이 없는 경우
UsernamePasswordAuthenticationFilter로 폼인증 시작 (AuthenticationManager) 호출 ProviderManager(&AuthenticationManager)를 통해 인증처리UsernamePasswordAuthenticationFilter를 통해SecurityContextHolder객체로 리턴SecurityContextPersistenceFilter를 통해 인증정보를 세션에 담는다.
3. 인가처리
인가처리 역시 필터가 관련 기능을 호출하여 구현된다.
FilterSecurityInterceptor 필터
- 시큐리티의 필터 중 가장 마지막에 호출되는 필터
AccessDecisionManager를 통해 인가 혹은 예외를 던진다.
AccessDecisionManager 인터페이스
- 인가 처리 관련 인터페이스
- 인가 결정을 내리는 인터페이스로 3가지 구현체를 제공
- Voter : 의사결정을 내리는데 사용되는 수단
AffirmativeBased- 여러 Voter중에 하나라도 충족하면 허용
- 기본전략
ConsensusBased: 다수결UnanimousBased: 만장일치
decide()메서드를 통해 인가로직 구현supports(ConfigAttribute attribute)- hasRole(), permitAll()과 같은 설정을 확인하는 메서드
📖 스프링 시큐리티 필터
스프링 시큐리티의 인증/인가 환경은 시큐리티의 다양한 필터들이 동작하며 이루어낸 결과다.
시큐리티 환경을 커스텀하는 방법도 결국은 이 필터들을 커스텀하거나, 새로운 필터를 직접 구현해야한다.
그렇다면 이 필터들은 어떻게 호출되는 것일까?
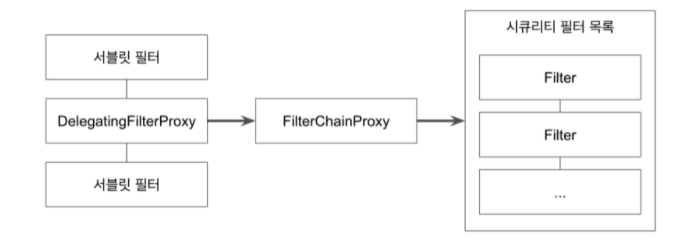
DelegatingFilterProxy
- 클라이언트의 요청을 가로채서
FilterChainProxy에 위임 - 스프링 부트에서는 관련부분이 자동설정 됨
FilterChainProxy
- 필터들의 모음인
FilterChain을 가져온다.
(SecurityConfig 설정대로 필터를 가져온다.)
시큐리티가 기본적으로 제공하는 필터들
설정에서 특정 필터를 비활성하거나, 사용자 정의 필터를 추가하지 않는다면,
시큐리티는 기본적으로 아래의 15개의 필터를 활성화 한다.
(굵은 글씨는 위에서 언급된 필터들)
- WebAsyncManagerIntergrationFilter
- SecurityContextPersistenceFilter
- HeaderWriterFilter
- CsrfFilter
- LogoutFilter
- UsernamePasswordAuthenticationFilter
- DefaultLoginPageGeneratingFilter
- DefaultLogoutPageGeneratingFilter
- BasicAuthenticationFilter
- RequestCacheAwareFtiler
- SecurityContextHolderAwareReqeustFilter
- AnonymouseAuthenticationFilter
- SessionManagementFilter
- ExeptionTranslationFilter
- FilterSecurityInterceptor
참고