배치성 작업을 위해서 spring에서는 spring-batch라는 프레임워크를 제공하고 있다.
spring boot를 사용할 경우 아래 의존성을 추가해주면 간단히 사용할 수 있다.
implementation("org.springframework.boot:spring-boot-starter-batch")spring batch 특징
- spring사용자들이 익숙한 설정들을 이용해서 편리하게 batch기능을 설정할 수 있다.
- 다양한 writer와 reader등을 제공한다.
- 대용량 프로세스를 처리하는데 필요한 로깅, 검증, 청크 등을 지원해서 비즈니스 로직에 집중하도록한다.
- 별도의 스케쥴러를 지원하지는 않지만, 외부 스케쥴러에 연동해서 사용 가능하다. (spring-cloud-task를 이용해도 좋다)
Architecture
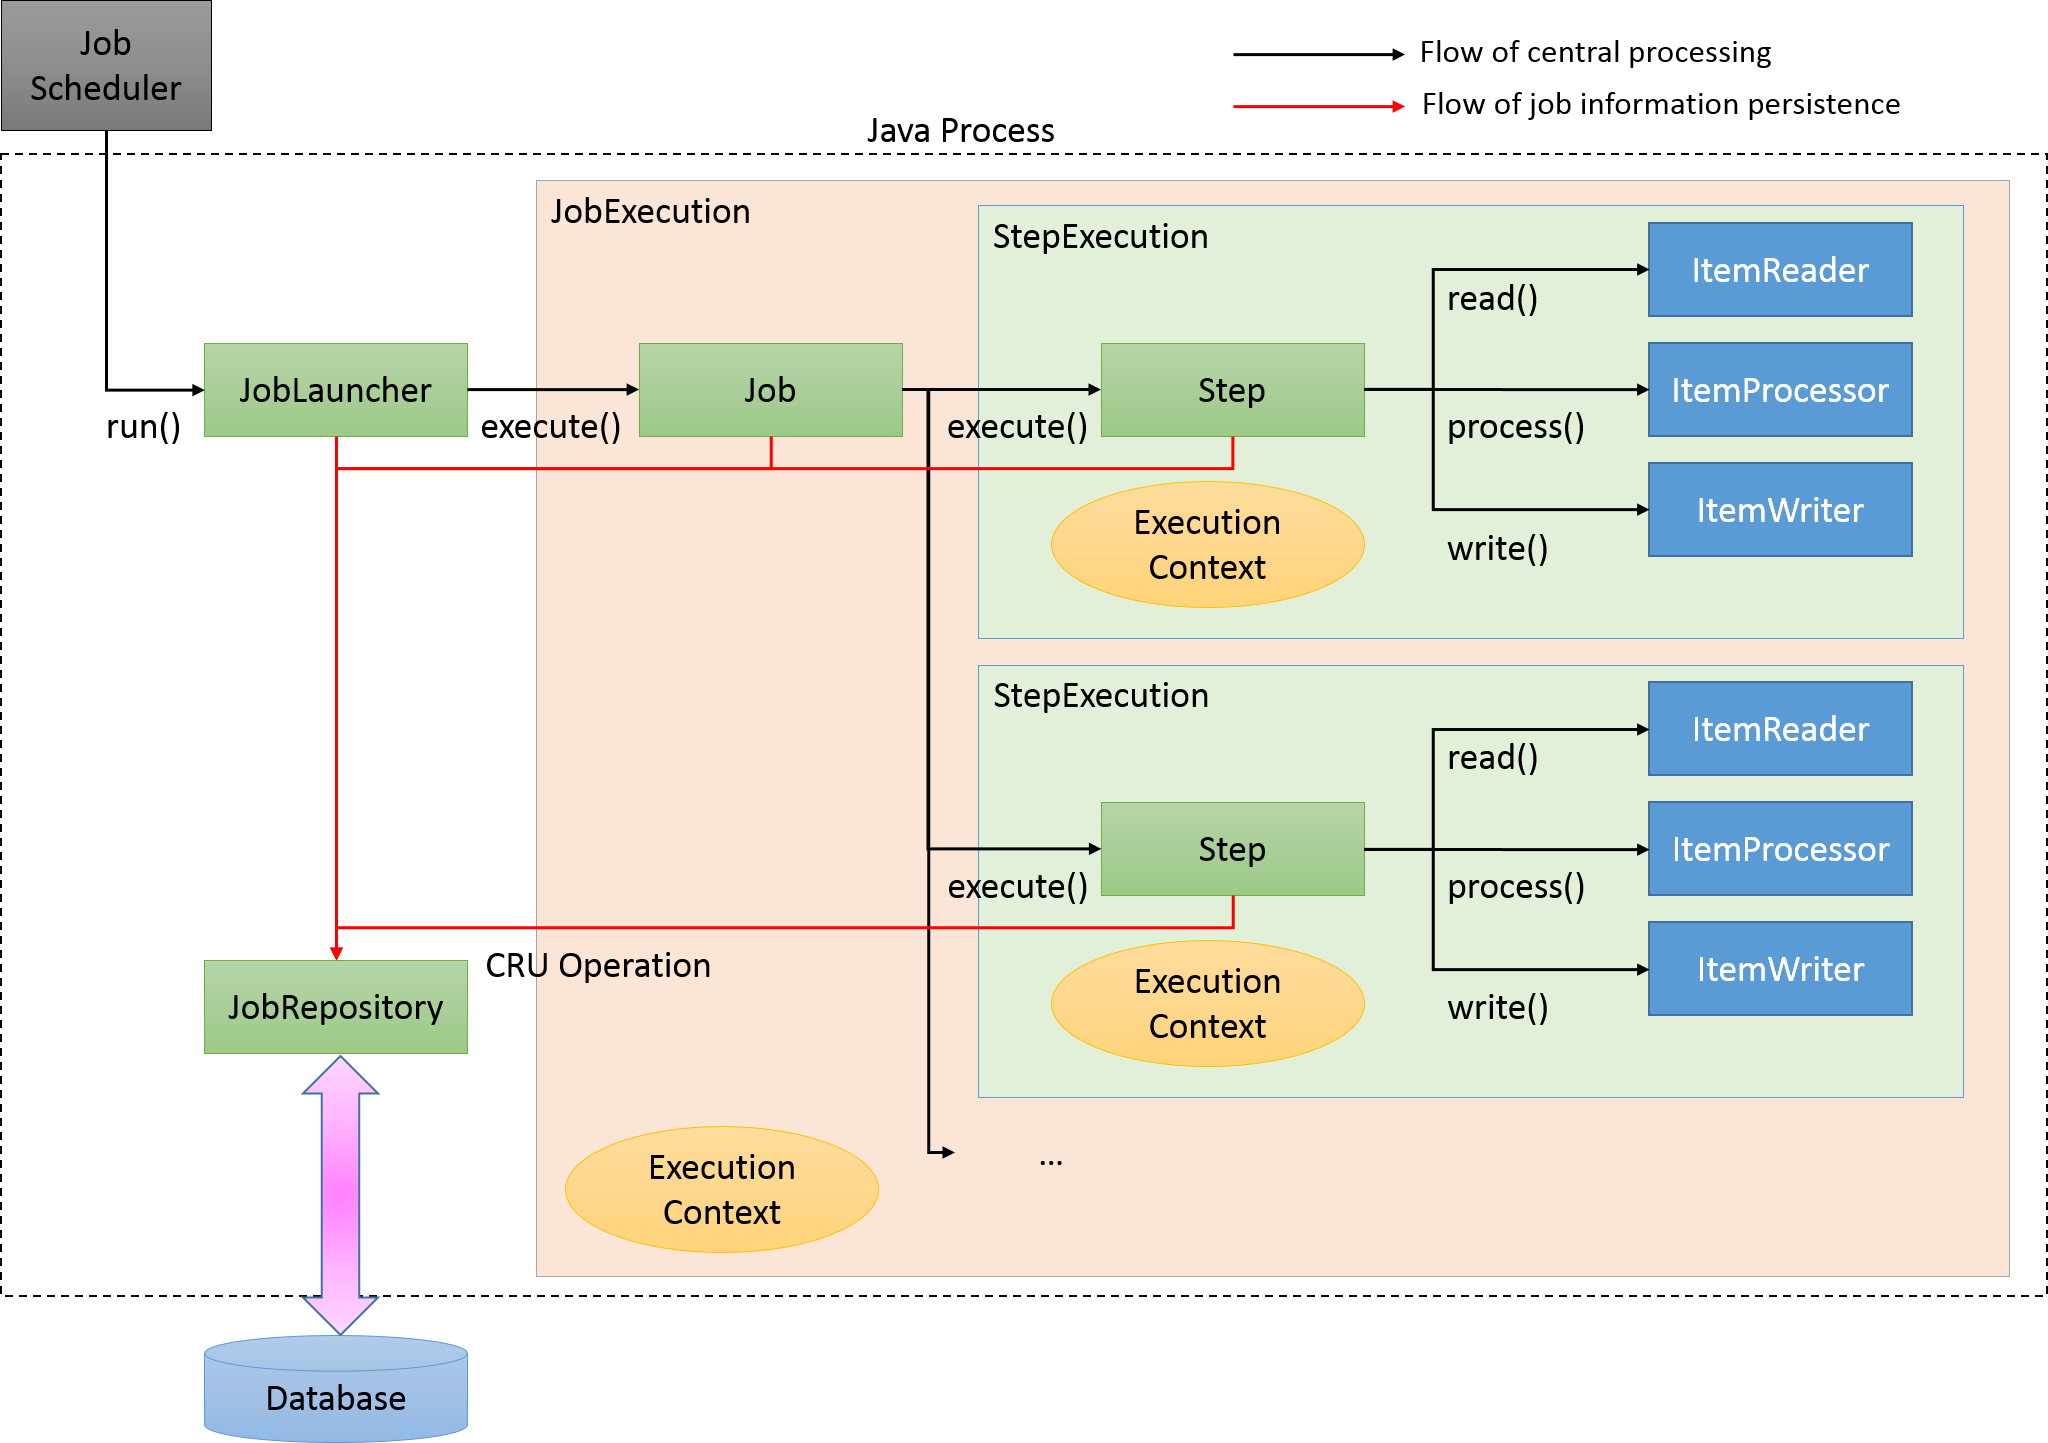
인터넷을 찾다가 발견한 그림중에 가장 잘 나타내는것 같아서 가져왔다.

Job - Step - Tasklet 으로 구성이 되어있으며
Job : Step = 1 : N
Step : Tasklet = 1 : 1
의 관계를 가진다. 실행은 Job단위로 할 수 있다.
예제와 함께 개념들을 배워보자
@EnableBatchProcessing
@Configuration
class BatchConfiguration(
    private val jobBuilderFactory: JobBuilderFactory,
    private val stepBuilderFactory: StepBuilderFactory
) {
    @Bean
    fun printJob(): Job {
        return jobBuilderFactory.get("print-job")
            .start(alphabetPrintStep())
            .build()
    }

    @Bean
    fun alphabetPrintStep(): Step {
        val chuckSize = 3
        return stepBuilderFactory.get("alphabet-print-step")
            .chunk<String, String>(chuckSize)
            .reader(alphabetReader())
            .processor(duplicateItemProcessor())
            .writer(printItemWriter())
            .build()
    }

    fun alphabetReader() = ListItemReader(listOf("A", "B", "C", "D", "E", "F"))

    fun duplicateItemProcessor() = ItemProcessor<String, String> { string ->
        "$string$string"
    }

    fun printItemWriter() = ItemWriter<String> { list ->
        println(list.joinToString())
    }
}
실행결과
2021-04-16 21:44:20.448  INFO 82026 --- [           main] o.s.b.c.l.support.SimpleJobLauncher      : Job: [SimpleJob: [name=print-job]] launched with the following parameters: [{}]
2021-04-16 21:44:20.481  INFO 82026 --- [           main] o.s.batch.core.job.SimpleStepHandler     : Executing step: [alphabet-print-step]
AA, BB, CC
DD, EE, FF
2021-04-16 21:44:20.504  INFO 82026 --- [           main] o.s.batch.core.step.AbstractStep         : Step: [alphabet-print-step] executed in 23ms
@EnableBatchProcessing
배치 동작에 필요한 기본적인 설정들을 등록해준다.
JobBuilderFactory, StepBuilderFactory 들을 주입받을 수 있는것도 이 어노테이션을 설정하면서 자동으로 빈이 등록되기 때문이다.
StepBuilderFactory
이 클래스를 통해서 Step을 생성할 수 있다.
tasklet으로 단순 작업을 추가할 수 있으며, 더 세분화하여 처리하는 경우에는 위에서 언급했던 reader, processor, writer의 개념으로 나뉘어 등록할 수 있다.
처리한 결과를 write하는 경우 한건마다 DB나 외부 저장소를 호출하게 되면 성능에 영향이 있을수밖에 없다. 그래서 chunk기능을 제공하며, writer에서 chunk단위로 한번에 모아서 처리하도록 한다.
실행 결과부분을 보면 동작하는 방식을 알 수 있다.
Reader / Writer
배치에 사용되는 데이터를 어디서 가져오고, 처리한 결과를 어디에 저장할지를 spring batch에서는 다양한 형태로 제공하고 있다.
reader/writer 목록에 다양하게 나와있으니까 필요한 것을 취사선택해서 사용하면 된다.
JobLauncherApplicationRunner
위 설정을 등록하고 앱을 실행하면 자동으로 설정돈 모든job이 실행된다.
Starter에서 자동으로 등록한 JobLauncherApplicationRunner가 Job을 실행시키기 때문이다.
만약 원하는 Job만 선택해서 실행하고 싶다면 --spring.batch.job.names=print-job 처럼 옵션을 줘서 선택할 수 있다.
이게 싫다면 spring.batch.job.enabled=false를 설정하면 된다.
이렇게되면 직접 job을 등록해줘야 한다.
아래는 JobLauncher를 직접 사용해서 배치를 실행하는 코드이다.
@EnableBatchProcessing
@SpringBootApplication
class BatchStudyApplication(
    private val jobLauncher: JobLauncher,
    private val printJob: Job
) {

    @Bean
    fun runner() = ApplicationRunner {
        jobLauncher.run(
            printJob, JobParametersBuilder()
                .toJobParameters()
        )
    }
}
JobParameters
배치를 실행할때 외부로부터 파라미터를 받고 싶은 경우가 있다.
이럴때 jobParameters를 이용하면 Bean생성시 외부의 파라미터를 주입받을 수 있다.
위 예제를 조금 변형시켜보자.
@Bean
fun alphabetPrintStep(@Value("#{jobParameters['alphabets']}") alphabets: String): Step {
    val chuckSize = 3
    return stepBuilderFactory.get("alphabet-print-step")
        .chunk<String, String>(chuckSize)
        .reader(alphabetReader(alphabets))
        .processor(duplicateItemProcessor())
        .writer(printItemWriter())
        .build()
}

fun alphabetReader(alphabets: String) = ListItemReader(alphabets.split(","))
코드를 변경하고 어플리케이션 실행시 alphabets=a,b,c,d처럼 파라미터를 설정해보았지만, 이렇게만 하면 아래 에러가 발생하면서 주입에 실패한다.
Caused by: org.springframework.beans.factory.BeanExpressionException: Expression parsing failed; nested exception is org.springframework.expression.spel.SpelEvaluationException: EL1008E: Property or field 'jobParameters' cannot be found on object of type 'org.springframework.beans.factory.config.BeanExpressionContext' - maybe not public or not valid?jobParameters가 아직 생성되지 않았기 때문인데, 정상적으로 주입받기 위해서는 jobParameters를 사용하려는 곳에서@JobScope을 지정해줘야 한다.
@Bean
@JobScope
fun alphabetPrintStep(@Value("#{jobParameters['alphabets']}") alphabets: String): Step {
    val chuckSize = 3
    return stepBuilderFactory.get("alphabet-print-step")
        .chunk<String, String>(chuckSize)
        .reader(alphabetReader(alphabets))
        .processor(duplicateItemProcessor())
        .writer(printItemWriter())
        .build()
}
이제 정상적으로 실행되는것을 볼 수 있다.
JobScope
그럼 JobScope이 하는 역할이 무엇이길래 파라미터를 사용할 수 있도록 해준걸까?
Convenient annotation for job scoped beans that defaults the proxy mode, so that it doesn't have to be specified explicitly on every bean definition. Use this on any @Bean that needs to inject @Values from the job context, and any bean that needs to share a lifecycle with a job execution (e.g. an JobExecutionListener). E.g.
JobScope에 달려있는 설명인데, Proxy모드로 Bean을 생성하도록 하며 job execution과 함께 라이프사이클을 공유한다고 되어있다.
일반적으로 spring에서 @Bean을 생성하면 초기화 과정에서 singleton으로 생성되지만, 이 어노테이션이 달려있으면 일단 proxy로 객체를 생성하고 실제 bean객체를 나중에 job실행단계에서 생성한다.
코드를 보며 이해해보자.
@Bean
fun printJob(alphabetPrintStep: Step): Job {
    return jobBuilderFactory.get("print-job")
        .start(alphabetPrintStep)    // <--- 이 부분에서 alphabetPrintStep는 프록시 객체형태이다.
        .build()
}

@Bean
@JobScope
// 이 부분은 나중에 job execution단계에서 실제로 실행된다고 볼 수 있다.
fun alphabetPrintStep(@Value("#{jobParameters['alphabets']}") alphabets: String): Step {
    val chuckSize = 3
    return stepBuilderFactory.get("alphabet-print-step")
        .chunk<String, String>(chuckSize)
        .reader(alphabetReader(alphabets))
        .processor(duplicateItemProcessor())
        .writer(printItemWriter())
        .build()
}
JobListener
Job의 전/후에 공통적으로 처리해야 할 일이 있을때 사용되는 인터페이스.
ElapsedTimeListener
class ElapsedTimeListener : JobExecutionListenerSupport() {
    override fun beforeJob(jobExecution: JobExecution) {
        println(System.currentTimeMillis())
    }

    override fun afterJob(jobExecution: JobExecution) {
        println(System.currentTimeMillis())
    }
}
BatchConfiguration
@Bean
fun printJob(alphabetPrintStep: Step): Job {
    return jobBuilderFactory.get("print-job")
        .start(alphabetPrintStep)
        .listener(elapsedTimeListener())
        .build()
}
2021-04-16 23:53:05.844 INFO 91212 --- [ main] o.s.b.a.b.JobLauncherApplicationRunner : Running default command line with: [alphabets=a,b,c,d]
2021-04-16 23:53:05.959 INFO 91212 --- [ main] o.s.b.c.l.support.SimpleJobLauncher : Job: [SimpleJob: [name=print-job]] launched with the following parameters: [{alphabets=a,b,c,d}]
1618584785990
2021-04-16 23:53:06.042 INFO 91212 --- [ main] o.s.batch.core.job.SimpleStepHandler : Executing step: [alphabet-print-step]
aa, bb, cc
dd
2021-04-16 23:53:06.065 INFO 91212 --- [ main] o.s.batch.core.step.AbstractStep : Step: [alphabet-print-step] executed in 22ms
1618584786069
2021-04-16 23:53:06.071 INFO 91212 --- [ main] o.s.b.c.l.support.SimpleJobLauncher : Job: [SimpleJob: [name=print-job]] completed with the following parameters: [{alphabets=a,b,c,d}] and the following status: [COMPLETED] in 86ms