캡틴판교 장기효님의 Vue.js시작하기 인프런 강의를 수강하고 내용을 정리했다.
매일 20분 야금야금 Vue.js 화이팅.
IDE: Visual Studio Code
크롬 뷰 개발자 도구: Vue.js devtools
computed 속성
특정 값을 기준으로 새로운 값을 계산해낸다.
num값이 바뀌면 num에 2를 곱해서 doubleNum 값을 세팅한다.
validation이나 간단한 연산에 적합하다.

new Vue({
el: '#app',
data: {
num: 10
},
computed: {
doubleNum: function() {
return this.num * 2;
}
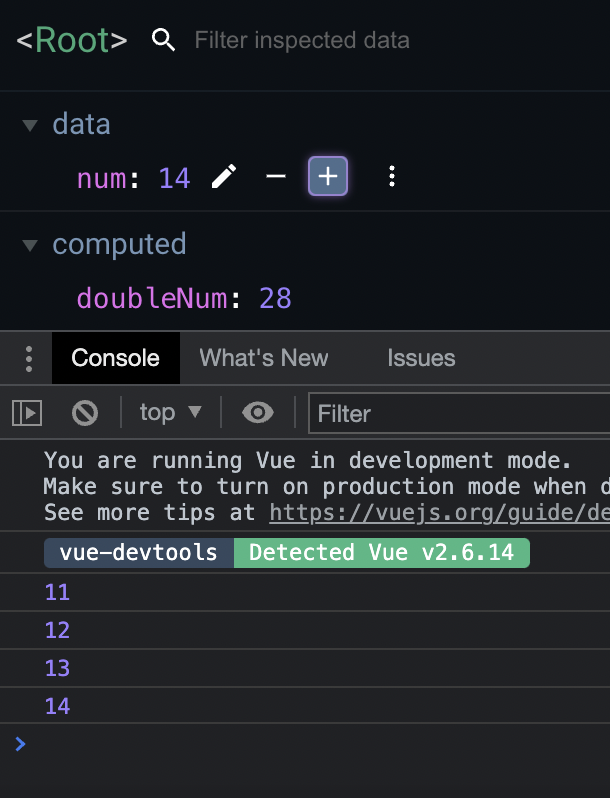
},개발자 도구에서 +를 클릭하여 num값을 증가시켜보자.
num값의 2배가 계산되어 doubleNum값도 같이 변한다.
watch 속성
특정 값에 관련된 메서드를 동작시킬 때 watch 속성을 쓴다.
어떤 값이 변함에 따라 연산 뿐만 아니라 어떤 로직이 필요할 때, watch가 값과 메서드를 엮어준다.
아래 코드의 watch 내부에 선언된 function을 보자.
이전 값과 갱신된 값을 인자로 받는다. 그리고 메서드를 호출해서 콘솔에 출력한다.
      data: {
        num: 10
      }
      watch: {
        num: function(newValue, oldValue) {
          this.fetchUserByNumber(newValue);
        }
      },
      methods: {
        fetchUserByNumber: function(num) {
          console.log(num);
        }
      }
아래 공식문서를 읽어보고 watch와 computed의 차이를 확인하자.
watch 속성과 computed 속성 차이점에 관한 공식 문서 링크
[전체 코드] watch속성과 computed속성
<!DOCTYPE html>
<html lang="en">
<head>
  <meta charset="UTF-8">
  <meta name="viewport" content="width=device-width, initial-scale=1.0">
  <meta http-equiv="X-UA-Compatible" content="ie=edge">
  <title>Document</title>
</head>
<body>
  <div id="app">
    {{ num }}
  </div>

  <script src="https://cdn.jsdelivr.net/npm/vue/dist/vue.js"></script>
  <script>
    new Vue({
      el: '#app',
      data: {
        num: 10
      },
      computed: {
        doubleNum: function() {
          return this.num * 2;
        }
      },
      watch: {
        num: function(newValue, oldValue) {
          this.fetchUserByNumber(newValue);
        }
      },
      methods: {
        fetchUserByNumber: function(num) {
          console.log(num);
          //axios.get(num);
        }
      }
    });
  </script>
</body>
</html>
클래스 바인딩에 computed 속성을 적용해보자
v-bind:class 디렉티브는 일반 class 속성과 공존할 수 있다.
예제를 통해 이해해보자.
class 속성을 하나 선언해 놓고, v-bind:class 디렉티브도 만들어 놓자.
특정 boolean 데이터 값에 따라 class 속성을 사용할지 말지를 제어할 수 있다.
아래 코드 처럼 데이터를 랜더링 할 수 있다.
1. waning이라는 style을 정의한다.
  <style>
  .warning {
    color: red;
  }
  </style>
2. 뷰 인스턴스에 boolean 데이터인 isError를 선언한다.
    new Vue({
      el: '#app',
      data: {
        isError: false
      }
    })
3. v-bind:class 디렉티브를 활용하여 isError가 true일 때만 warning 이라고 정의한 style을 적용한다.
  <div id="app">
    <p v-bind:class="{warning: isError}">Hello</p>
  </div>
4. 개발자도구에서 확인한다.
isError 를 토글해보자.

isError가 True일 때만 Hello글자가 빨강색 스타일이 적용된다.

computed 속성으로 클래스바인딩
1. computed 속성에 함수를 작성한다.
isError가 true라면 warning 스타일을 적용하고, false라면 null 적용 안 한다.
    new Vue({
      el: '#app',
      data: {
        // cname: 'blue-text',
        isError: false
      },
      computed: {
        errorTextColor: function() {
          return this.isError ? 'warning' : null;
        }
      }
    });
2. computed 변수를 클래스에 바인딩한다.
  <div id="app">
    <p v-bind:class="errorTextColor">Hello</p>
  </div>
3. 개발자 도구에서 computed 속성 확인하기
처음에는 isError가 False라서 errorTextColor값은 null이다.

isError가 True일 때, errorTextColor값은 "warning"이 되면서 스타일이 적용된다.

삼항연산자 : if-else문을 간단하게 줄인것
[조건문] ? [true일때 리턴값] : [false일때 리턴값]
return this.isError ? 'warning' : null;if-else문으로 바꾼건 아래와 같다.
        errorTextColor: function() {
          if (isError) {
              return 'warning'
          } else {
              return null;
          }
        }
[전체 코드] computed 속성으로 클래스바인딩
<!DOCTYPE html>
<html lang="en">
<head>
  <meta charset="UTF-8">
  <meta name="viewport" content="width=device-width, initial-scale=1.0">
  <meta http-equiv="X-UA-Compatible" content="ie=edge">
  <title>Document</title>
  <style>
  .warning {
    color: red;
  }
  </style>
</head>
<body>
  <div id="app">
    <p v-bind:class="errorTextColor">Hello</p>
  </div>

  <script src="https://cdn.jsdelivr.net/npm/vue/dist/vue.js"></script>
  <script>
    new Vue({
      el: '#app',
      data: {
        isError: false
      },
      computed: {
        errorTextColor: function() {
          return this.isError ? 'warning' : null;

        }
      }
    });
  </script>

</body>
</html>
다음 시간에는 프로젝트 생성 도구 Vue CLI를 배운다.