캡틴판교님의 Vue.js 중급 강좌 - 웹앱 제작으로 배워보는 Vue.js, ES6, Vuex강의를 정리했습니다.
매일 20분 야금야금 Vue.js 중급 화이팅.
IDE: Visual Studio Code
크롬 뷰 개발자 도구: Vue.js devtools
TodoList 컴포넌트의 3가지 기능
- 할 일을 목록에 표시 [이번 포스트]
- 할 일 하나를 삭제 [이번 포스트]
- 할 일 완료 표시
[1. 할 일 목록 표시]
TodoInput 컴포넌트에서 데이터를 입력받아서 localStorage에 저장했다.
localStorage에 저장한 데이터를 TodoList 컴포넌트에 표시하자.
데이터를 동적으로 목록에 출력
1. created 속성 이용하기
인스턴스가 생성되자마자 실행할 로직을 created 속성에 정의할 수 있다.
화면이 뜨자마자 데이터가 노출되야 하니까 created 속성에 데이터 출력 로직을 작성하자.
2. localStorage 에서 데이터를 가져와서 todoItems 배열에 저장
데이터를 담을 todoItems 배열을 선언한다.
  data: function(){
    return {
      todoItems: []
    }
  }
localStorage.key(i) 로 데이터에 접근하자.
export default {
  data: function(){
    return {
      todoItems: []
    }
  },
  created: function(){
    if (localStorage.length > 0) {
      for(var i = 0; i< localStorage.length; i++){
        if (localStorage.key(i) !== 'loglevel:webpack-dev-server') {
          this.todoItems.push(localStorage.key(i))
        }
      }
    }
  }
}
webpack이 자동 주입하는 'loglevel:webpack-dev-server'는 제외하고, 저장했다.
라이프 사이클 이해를 위해 참고할 포스팅
뷰 라이프 사이클 공식 문서
뷰2.0 라이프사이클 creation, mounting, updating, destruction
3. template에 v-bind 로 데이터바인딩
v-bind로 배열을 바인딩하고, v-for 반복문으로 li태그를 출력하자.
v-for 예시 2가지
<ul id="example-1">
  <li v-for="item in items">
    {{ item.message }}
  </li>
</ul>
아이템의 index를 넘길 수 있다.
<ul id="example-2">
  <li v-for="(item, index) in items">
    {{ parentMessage }} - {{ index }} - {{ item.message }}
  </li>
</ul>
todoItems 배열에서 꺼낸 데이터를 todoItem이라 하고,
todoItem의 key를 바인딩 해서 {{ }} 화면에 출력한다.
<template>
<div>
<ul>
<li v-for="todoItem in todoItems" v-bind:key="todoItem">
{{ todoItem }}
</li>
</ul>
</div>
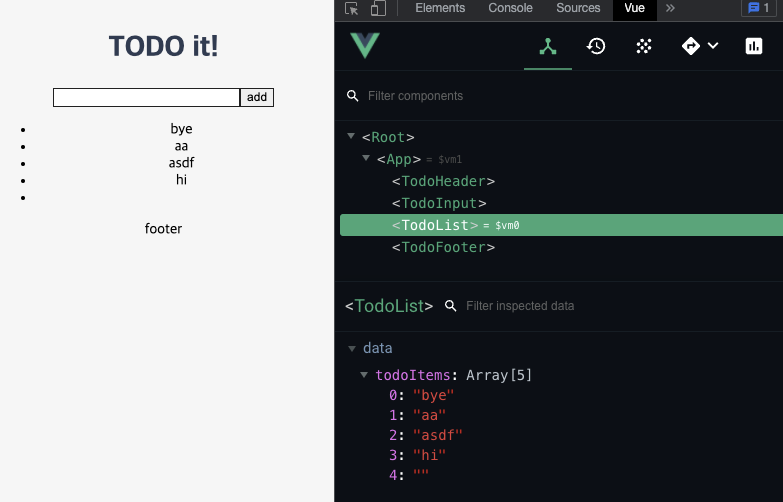
</template> 4. 브라우저 에서 개발자도구에서 확인
TodoList 컴포넌트의 todoItems 배열에 데이터가 추가되고 리스트도 노출된다.
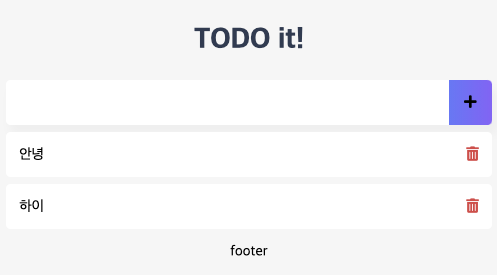
TodoList 컴포넌트 스타일링 후 코드.
뷰 파일 하단에 style이 있다. 이 쪽에 코딩한다.
할 일을 각각 삭제하기 위해 휴지통 아이콘을 찾아서 넣는다.
<template>
  <div>
    <ul>
      <li v-for="todoItem in todoItems" v-bind:key="todoItem">
        {{ todoItem }}
      <span class="removeBtn" v-on:click="removeTodo">
        <i class="fas fa-trash-alt"></i>
      </span>
      </li>
    </ul>
  </div>
</template>

<script>

export default {
  data: function(){
    return {
      todoItems: []
    }
  },
  methods: {
    remoteTodo: function(){
    }
  },
  created: function(){
    if (localStorage.length > 0) {
      for(var i = 0; i< localStorage.length; i++){
        if (localStorage.key(i) !== 'loglevel:webpack-dev-server') {
          this.todoItems.push(localStorage.key(i))
        }
      }
    }
  }
}
</script>

<style scoped>
ul {
  list-style-type: none;
  padding-left: 0px;
  margin-top: 0;
  text-align: left;
}
li {
  display: flex;
  min-height: 50px;
  height: 50px;
  line-height: 50px;
  margin: 0.5rem 0;
  padding: 0 0.9rem;
  background: white;
  border-radius: 5px;
}
.checkBtn {
  line-height: 45px;
  color: #62acde;
  margin-right: 5px;
}
.checkBtnCompleted {
  color: #b3adad;
}
.textCompleted {
  text-decoration: line-through;
  color: #b3adad;
}
.removeBtn {
  margin-left: auto;
  color: #de4343;
}
</style>
[2. 할 일 삭제 기능]
목록에서 내가 지우려는 아이템이 몇 번째 아이템인지 식별하도록 만들자
1. index를 이용하여 특정 아이템만 삭제
v-for는 각 아이템에 내부적으로 index를 부여한다.
해당 아이템을 클릭 했을 때 index를 인자로 넘긴 removeTodo() 메서드를 연결하자.
template 의 v-for문을 아래처럼 작성
    <ul>
      <li v-for="(todoItem, index) in todoItems" v-bind:key="todoItem">
        {{ todoItem }}
      <span class="removeBtn" v-on:click="removeTodo(todoItem, index)">
        <i class="fas fa-trash-alt"></i>
      </span>
      </li>
    </ul>
개발자도구에서 확인
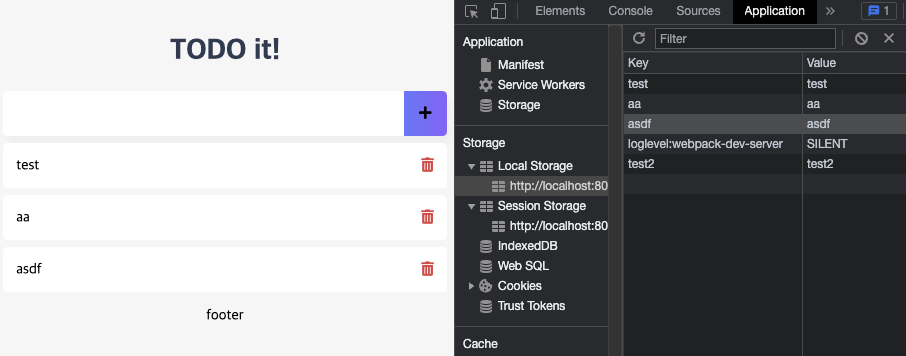
2. removeTodo(): localStorage에서 아이템 지우기
localStorage.removeItem() 를 이용하자.
    removeTodo: function(todoItem, index){
      console.log(todoItem, index);
      localStorage.removeItem(todoItem);
    }
3. removeTodo(): 배열에서도 지우기
자바스크립트 배열 api인 splice() 는 배열 요소를 변경한다.
배열의 기존 요소를 삭제 또는 교체하거나 새 요소를 추가하여 배열의 내용을 변경합니다.
splice() 기존 요소를 변경 하여 새로운 배열을 리턴해준다.
MDN splice()
    removeTodo: function(todoItem, index){
      console.log(todoItem, index);
      localStorage.removeItem(todoItem);
      this.todoItems.splice(index, 1);
    }
다음 시간에는 '할 일 완료 표시'를 끝으로 TodoList 컴포넌트 기능을 마무리한다.