[NestJS] Implementing 2FA using OTP (feat. QR & Google-Authenticator )

시작하기에 앞서
이번 포스팅은 이전 포스팅에 이어서 nestjs를 통한 인증 과정에 포함된다. 우린 단순 로그인 로그아웃을 넘어 조금 더 심화적 구현을 알아본다.
※ 시리즈 참고
NestJS _ Authentication (advanced part) ✔
위 시리즈에서 진행됩니다. 이전 포스팅은 "Refresh Token" 구현하기였습니다. 해당 코드에 이어서 진행되니, 필요한 부분은 미리 참조 바랍니다.
지난 포스팅 "Refresh-Token 구현하기"에 이어서 이번 포스팅에선 "2FA(Two-Factor Authentication): 2단계 인증" 을 추가로 구현해보고자 한다.
보안엔 끝이없고, 2FA를 도입한다하더라도 항상 취약점에서 보안은 뜷리기 마련이다. 하지만, 필요에 따라 분명히 필요한 인증 고도화 작업임은 분명하고, 이번 포스팅에선 "OTP(One Time Password)"를 이용하여 nestjs에서 어떻게 "2FA"를 구현할 수 있는가에 관해 알아볼 예정이다.
💥 2FA(Two-Factor Authentication)와 OTP(One-Time Password
코드를 통한 구현에 바로 들어가기에 앞서 2FA란 무엇이고, 그 중에서도 OTP란 방법에 대해서 간략히 알아보는 시간을 가져보자.
> 2FA에 대한 정의 및 설명
인증은 컴퓨터 시스템이나 온라인 계정으로의 접근 권한(Access)을 구축할 때 사용자의 신원을 검증하는 프로세스이다.
인증(인증자 및 인증토큰)에는 "3가지" 주요 범주가 존재한다. (추가로 "사용자가 있는 곳" 또한 범주로 포함시킬수도 있다)
- 사용자가 갖고 있는 것: 물리적 액세스 카드, 스마트폰이나 기타 장치 또는 디지털 인증서
- 사용자가 알고 있는 것: 핀 코드 또는 비밀번호
- 사용자 자신에 관한 것: 지문이나 망막 스캔 같은 생체 인식
일반적인, 혹은 과거의 기본 인증은 알고 있듯이 아이디와 비밀번호와 같은 "사용자가 알고 있는 것"에만 기대어 진행되었다. 하지만 이러한 조합으로만의 인증을 수행할 경우, 굉장히 보안에 취약하게 된다. 우리는 이로 인해 추가적 인증 조합을 더하여 보안을 강화할 수 있다.
이러한 해킹 불가능한 인증수단에 대한 논의로 부터 "2FA"의 개념이 도입되었고, 현재 우리가 흔히 볼 수 있는 OTP, SMS, E-mail등과 같은 방법으로 보여지고 있다.
물론, "2FA"를 통한 추가 인증 수단을 사용한다고 해서 완벽한 보안은 아닐 것이다. 기술적, 물리적으로 다양한 악성 공격자는 존재할 것이다. 이러한 추가적 내용은 이번 포스팅에선 다루지 않겠다.
> Authenticator Application && OTP
이번 포스팅의 2FA 구현에서, 우린 OTP 를 통한 사용법을 알아볼 것이다. 그 전에 간단히 짚고 넘어가보자.
흔히, 우린 2단계 추가 인증으로 SMS(문자 메시지), 음성 메시지, 푸시 알림 등의 경우를 많이 접하게 된다. 혹은, E-mail을 통한 추가 인증또한 빈번히 사용하게 된다.
하지만, 이메일의 경우 이메일 자체의 해킹위협이 존재하고 휴대전화 인증 또한 이메일보단 좋지만 여전히 취약점이 드러난다.
아래에선 SMS 문자메시지의 특정 취약점에 대해 설명한다. 해당 내용은 참고만 하도록 하겠다.
"
일반적으로 인증자 앱은 SMS 문자메시지로 코드를 전송받는 방식보다 조금 더 안전한 것으로 여겨지고 있습니다. 그 이유는 엄밀히 말하면 SMS 문자메시지는 사용자가 가지고 있는 것이라기보다는 사용자에게 전송된 것이기 때문이죠. 그렇기 때문에 해커가 통신사를 속여 휴대폰 번호를 다른 장치로 포트하게 할 가능성도 작긴 하지만 여전히 남아 있으며, 이러한 사기 수법을 '심 스와프(SIM swap)'라고 부릅니다. 해커가 이미 비밀번호를 탈취한 상태라고 가정하면, 심 스와프를 통해 사용자 계정으로 액세스할 수 있게 됩니다. 하지만 인증자 앱에서 생성된 인증 코드는 보통 20~30초 안에 빠르게 만료되고 앱 밖으로 절대 유출되지 않습니다.
"
(Dropbox 자료 참고 --> 여기 클릭)
모든 사례, 모든 서비스에 적용되는 것은 아니겠지만 위와 같은 이유로 "인증자 앱(Authenticator App)"을 통한 "OTP"를 사용하게 된다.
"인증자 앱"은 디지털 인증 코드를 생성하는 휴대폰 앱을 말한다. 웹사이트나 애플리케이션에 로그인 할 때 앱에 생성된 코드를 사용해 신원을 확인하는 방식이다. 우리가 진행할 코드에서 사용되는 "Google Authenticator"가 이에 해당하는 대표적 인증자 앱이다.
위에서도 설명되었지만 인증자 앱에서 생성된 OTP는 일정한 시간 동안만 유효하다. 이로 인해, 악성 공격자가 OTP를 탈취한 경우에도 제한된 시간 내에 접속을 해야 인증에 성공할 수 있다. 물론, 예를들어 QR 코드라고 한다면 악성 공격자가 QR 코드에 직접 접근하여 인증 코드를 얻어내고 스스로 발급까지 해버린다면 소용이 없겠지만, 이는 사실 사용자의 기기 또는 계정에 대한 물리적 접근이 필요한 매우 어려운 케이스이다.
우린, 이렇게 OTP를 이용해 조금 더 보안을 강화한 "2FA"를 구현할 수 있다.
이제, 본격적으로 nestjs와 OTP, Google-Authenticator를 활용해 "Two-Factor Authentication"을 구현해보도록 하자.
💥 OTP를 통한 2FA 설계및 구현 [NestJS]
글의 서두에서도 언급하였다시피, 지금부터 진행할 코드는 access-token과 refresh-token을 토대로 한, 1차 인증에 대한 기능이 구현된 코드를 바탕으로 수행한다. (이전 내용에 대한 링크는 상단에 있습니다)
코드에 들어가기에 앞서, nestjs를 통한 OTP 구현 코드를 찾던 중 도움이 된 글이 있어 공유한다. 이번 포스팅또한 해당 글의 코드를 참조하여 진행하였다.
api-nestjs-two-factor-authentication
> 설계 및 구축 진행 순서
2차 인증 요소를 구축하는데 있어서 다양한 관점에 따른, 혹은 서비스및 고객의 요구 사항에 따른 다양한 설계가 있을 것이다. 이번 포스팅에선 흔히, 제시되는 일반적 2FA의 요구 설계를 바탕으로 진행한다.
[진행 과정]
- (base) access-token과 refresh-token을 통한 1차인증 구축 (이전 포스팅 참조)
- 2FA secret-key 및 otp 계정 추가를 위한 url을 생성하고, 현재 stream에
QR코드 이미지를 생성- 유저에게 2FA 인증 수단을 사용할지에 대한 api 생성. 해당 2FA 사용여부를 데이터베이스에 저장.
- 인증 앱에서 발급받은 인증 코드를 통한 2FA 검증 후, 유효할 시 액세스 토큰 생성및 쿠키 생성
- 2FA 가드 생성을 통한 접근 권한 테스트
위의 순서를 토대로 진행하며, 필요한 로직 및 api를 추가로 구체화하는 과정을 수행한다.
> QR 이미지 생성 (otplib에 의존한다)
✔ 2FA - Controller
// twoFactorAuthentication.controller.ts

import { TwoFactorAuthenticationService } from "./twoFactorAuthentication.service";
import { Body, ClassSerializerInterceptor, Controller, Post, Req, Res, UseGuards, UseInterceptors } from "@nestjs/common";
import { Response } from "express";
import { JwtAccessAuthGuard } from "../guard/jwt-access.guard";
import RequestWithUser from "../interfaces/requestWithUser.interface";


@Controller('2fa')
@UseInterceptors(ClassSerializerInterceptor)
export class TwoFactorAuthenticationController {
  constructor(
    private readonly twoFactorAuthenticationService: TwoFactorAuthenticationService,
  ) {}

  @Post('generate')
  @UseGuards(JwtAccessAuthGuard)
  async register(@Res() res: Response, @Req() request: RequestWithUser) {
    const { otpAuthUrl } = await this.twoFactorAuthenticationService.generateTwoFactorAuthenticationSecret(request.user);

    return await this.twoFactorAuthenticationService.pipeQrCodeStream(res, otpAuthUrl);
  }

}
위의 register 핸들러 함수는 QR 이미지를 클라이언트에게 전송하기 위한 함수이다. 여기서 중요한 핵심은 JwtAccessAuthGuard를 함수에 주입해준다는 것이다. 즉, 해당 가드가 register 요청 runtime에 접근해 해당 요청을 가드 내부에서 설정해준 조건에 따라 평가하게 된다.
이전 포스팅의 내용을 통해 확인할 수 있지만 해당 가드는 아래와 같다.
// jwt-access.guard.ts

import { CanActivate, ExecutionContext, Injectable } from "@nestjs/common";
import { JwtService } from "@nestjs/jwt";

@Injectable()
export class JwtAccessAuthGuard implements CanActivate {
  constructor(
    private jwtService: JwtService,
  ) {}
  async canActivate(
    context: ExecutionContext,
  ): Promise<any> {
    try {
      const request = context.switchToHttp().getRequest();
      const access_token = request.cookies['access_token'];
      const user = await this.jwtService.verify(access_token);
      request.user = user;
      return user;
    } catch(err) {
      return false;
    }
  }
}
이는, JWT access-token을 통한 인증을 바탕으로 유저에게 특정 요청에 대한 권한이 있는지를 평가하게 된다.
즉, 우린 TwoAuthenticationController에서 생성한 QR을 생성 및 응답하기 위한 register 함수에 해당 가드를 주입함으로써, 해당 요청에 대한 유저의 "권한(Authorization)"이 있는지 확인받을 수 있다.
✔ 2FA - Service
// twoFactorAuthentication.service.ts

import { ConfigService } from "@nestjs/config";
import { User } from "../../users/entities/users.entity";
import { UsersService } from "../../users/users.service";
import { authenticator } from "otplib";
import { Response } from "express";
import { toFileStream } from "qrcode";
import { Injectable } from "@nestjs/common";

@Injectable()
export class TwoFactorAuthenticationService {
  constructor (
    private readonly userService: UsersService,
    private readonly configService: ConfigService
  ) {}

  public async generateTwoFactorAuthenticationSecret(user: User): Promise<object> {

    // otplib를 설치한 후, 해당 라이브러리를 통해 시크릿 키 생성
    const secret = authenticator.generateSecret();

    // accountName + issuer + secret 을 활용하여 인증 코드 갱신을 위한 인증 앱 주소 설정
    const otpAuthUrl = authenticator.keyuri(user.email, this.configService.get('TWO_FACTOR_AUTHENTICATION_APP_NAME'), secret);

    // User 테이블 내부에 시크릿 키 저장 (UserService에 작성)
    await this.userService.setTwoFactorAuthenticationSecret(secret, user.id);

    // 생성 객체 리턴
    return {
      secret,
      otpAuthUrl
    }
  }

  // qrcode의 toFileStream()을 사용해 QR 이미지를 클라이언트에게 응답
  // 이때, Express의 Response 객체를 받아옴으로써 클라이언트에게 응답할 수 있다.
  public async pipeQrCodeStream(stream: Response, otpAuthUrl: string): Promise<void> {
    return toFileStream(stream, otpAuthUrl);
  }

 }
※ // .env에서 url 생성을 위한 issuer string 값 정의
TWO_FACTOR_AUTHENTICATION_APP_NAME=otpauth://✔ UserEntity
// user.entity.ts
import { Column, Entity, PrimaryGeneratedColumn } from 'typeorm';

@Entity({name:'users'})
export class User {
  @PrimaryGeneratedColumn()
  id: number;

  // ...

  @Column({ nullable: true })
  twoFactorAuthenticationSecret: string;
}
✔ UserService
  // userService.ts
  async setTwoFactorAuthenticationSecret(secret: string, userId: number): Promise<UpdateResult> {
    return this.userRepository.update(userId, {
      twoFactorAuthenticationSecret: secret,
    });
  }
런타임의 요청 중인 유저 객체의 id에 접근해 해당 User 테이블의 otp 시크릿 키 값을 업데이트 해준다. (default: null)
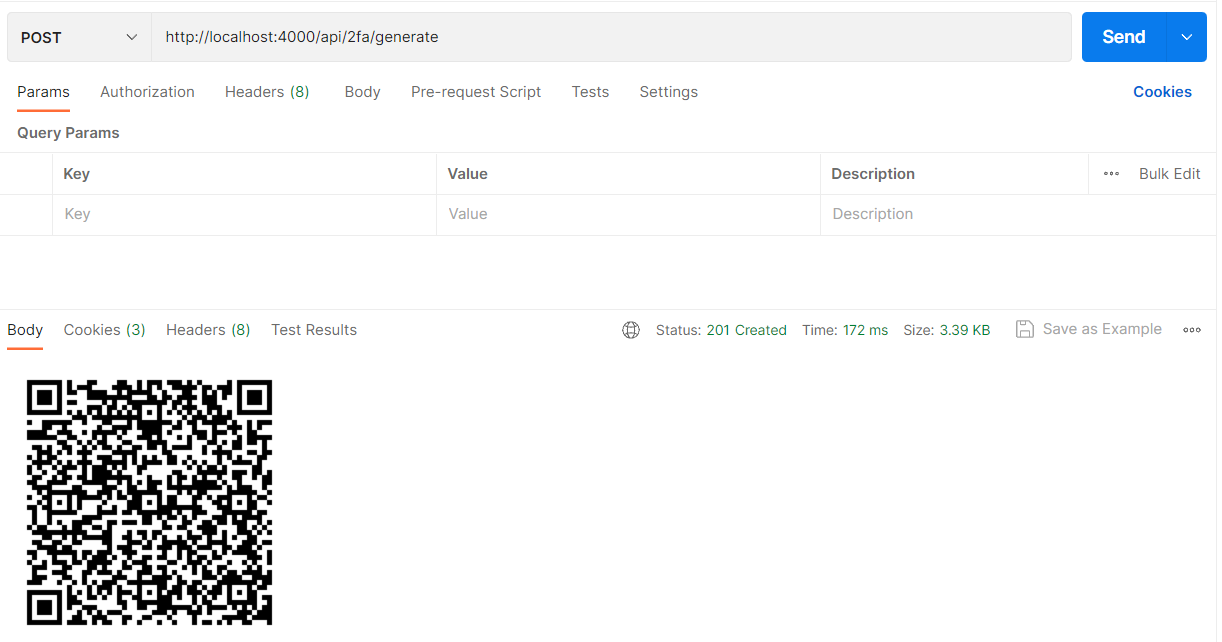
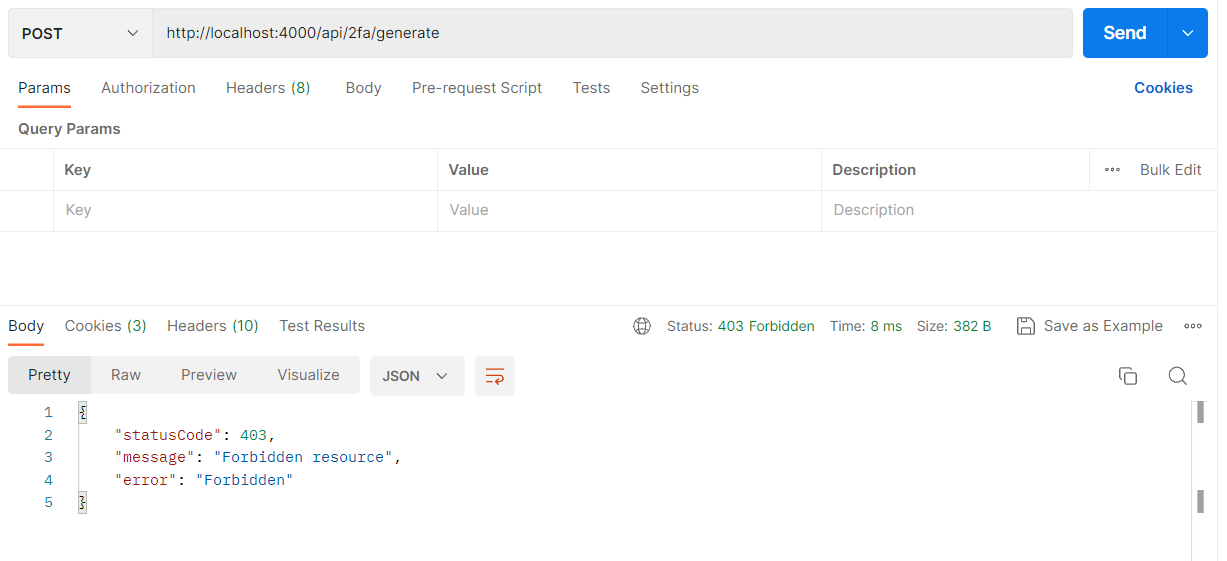
✔ Postman으로 확인하기
-
access-token을 통한 권한 인증에 성공 시
-
access-token을 통한 권한 인증에 실패 시
> 2FA 사용 여부 묻기
이것은 도메인마다, 서비스의 실행 계획에 따라 상이할 것이다. 보안이 굉장히 중요한 금융거래와 같은 서비스에선 무조건 2FA를 통한 추가 인증을 강제할 수도 있다. 물론 모든 요청에 대해선 그러지 않을 거지만....
우린 2FA 인증을 유저에게 선택하게 함으로써 조금 더 유저 친화적인 구현을 수행할 수 있다. 또한, 2FA를 사용하는 유저 역시 추후 해당 추가 인증을 원치않을 경우 취소할 수도 있게 해주어야할 것이다.
✔ 2FA - Controller
전체적 코드는 아래와 같다.
 // twoFactorAuthentication.controller.ts

  @Post('turn-on')
  @UseGuards(JwtAccessAuthGuard)
  async turnOnTwoFactorAuthentication(
    @Req() req: RequestWithUser,
    @Body() twoFactorAuthenticationCodeDto: TwoFactorAuthenticationCodeDto
  ) {
    const isCodeValidated = await this.twoFactorAuthenticationService.isTwoFactorAuthenticationCodeValid(
      twoFactorAuthenticationCodeDto.twoFactorAuthenticationCode, req.user
    );
    if (!isCodeValidated) {
      throw new UnauthorizedException('Invalid Authentication-Code');
    }
    await this.userService.turnOnTwoFactorAuthentication(req.user.id);

    return {
      msg: "TwoFactorAuthentication turned on"
    }
  }

  @Post('turn-off')
  @UseGuards(JwtAccessAuthGuard)
  async turnOffTwoFactorAuthentication(
    @Req() req: RequestWithUser,
    @Body() twoFactorAuthenticationCodeDto: TwoFactorAuthenticationCodeDto
  ) {
    const isCodeValidated = await this.twoFactorAuthenticationService.isTwoFactorAuthenticationCodeValid(
      twoFactorAuthenticationCodeDto.twoFactorAuthenticationCode, req.user
    );
    if (!isCodeValidated) {
      throw new UnauthorizedException('Invalid Authentication-Code');
    }
    await this.userService.turnOffTwoFactorAuthentication(req.user.id);

    return {
      msg: "TwoFactorAuthentication turned off"
    }
  }
클라이언트는 앞서 받은 QR 이미지를 Google Authenticator를 통해 확인한 후, 인증 코드를 발급 받을 수 있다.
그리고 해당 인증 코드를 바디에 실어 보내줌으로써 서버는 요청 받은 인증 코드를 "검증"하게 된다. 이러한 검증에 통과한 유저에게 "2FA" 사용의 "활성화", 혹은 "비활성화" 여부를 내려주게 된다. (이는 User 테이블에도 반영이 되어야할 것이다)
✔ 2FA - Service
  // twoFactorAuthentication.service.ts

  public async isTwoFactorAuthenticationCodeValid(twoFactorAuthenticationCode: string, user: User) {
    if (!user.twoFactorAuthenticationSecret) {
      return false; // 혹은 다른 예외 처리 가능
    }

    // otplib에서 불러온 authenticator의 verify 메서드를 사용해 올바른 인증 코드인지를 검증
    // 이때, 클라이언트에서 받아온 인증 코드와 서버에 저장된 시크릿 키를 사용한다.
    return authenticator.verify({
      token: twoFactorAuthenticationCode,
      secret: user.twoFactorAuthenticationSecret,
    })
  }
✔ UserEntity
// user.entity.ts

import { Column, Entity, PrimaryGeneratedColumn } from 'typeorm';

@Entity({name:'users'})
export class User {
  @PrimaryGeneratedColumn()
  id: number;

  // ...

  @Column({ nullable: true })
  twoFactorAuthenticationSecret: string;

  // 2fa 사용여부 확인
  @Column({ default: false })
  isTwoFactorAuthenticationEnabled: boolean;
}
✔ UserService
  // user.service.ts

  async turnOnTwoFactorAuthentication(userId: number): Promise<UpdateResult> {
    return await this.userRepository.update(userId, {
      isTwoFactorAuthenticationEnabled: true,
    });
  }

  async turnOffTwoFactorAuthentication(userId: number): Promise<UpdateResult> {
    return await this.userRepository.update(userId, {
      // 유저가 2fa 활성화 여부를 끄게 되면 시크릿값또한 null로 수정하여 준다.
      twoFactorAuthenticationSecret: null,
      isTwoFactorAuthenticationEnabled: false,
    })
  }
✔ JwtAccessAuthGuard 수정하기
기존의 JwtAccessAuthGuard를 수정할 필요가 있었다. 위에서 언급하였듯이, 클라이언트에서 받아온 인증 코드를 수행하는데 있어서 우린 user 테이블에서 정의한 twoFactorAuthenticationSecret에 접근할 필요가 있었다.
그리고 해당 유저는 컨트롤러에서 아래와 같이, 현재 실행컨텍스트에 위치한 request의 user로써 받아올 수 있었다. (req.user)
	// turn-on || turn-off

    const isCodeValidated = await this.twoFactorAuthenticationService.isTwoFactorAuthenticationCodeValid(
      twoFactorAuthenticationCodeDto.twoFactorAuthenticationCode, req.user
    );
하지만, 지금 사용하고 있는 JwtAccessAuthGuard는 access_token 검증을 위해 user 객체를 Payload 객체로 받아와 준 상태였다.
즉, 일반적 1차 인증을 위해 request의 user 객체를 불러오는 과정에서는 액세스 토큰 검증 및 user.id 호출을 동시에 수행할 수 있는 Payload 객체가 필요하였다.
// jwt-access.guard.ts

@Injectable()
export class JwtAccessAuthGuard implements CanActivate {
  constructor(
    private jwtService: JwtService,
  ) {}
  async canActivate(
    context: ExecutionContext,
  ): Promise<any> {
    try {
      const request = context.switchToHttp().getRequest();
      const access_token = request.cookies['access_token'];
      const user = await this.jwtService.verify(access_token);

      // 실행컨텍스트의 user를 Payload 객체와 동일시 한다.
      request.user = user;
      return user;
    } catch(err) {
      return false;
    }
  }
}
이러한 기존의 가드를 그대로 2FA 인증 코드의 검증을 위한 api에 사용하게 될 경우 user에서 온전한 유저 테이블의 컬럼 (엔터티의 속성)을 불러올 수 없는 문제가 생기게 되었다.
즉, twoFactorAuthenticationSecret, isTwoFactorAuthenticationEnabled와 같은 속성에 접근할 수 없는 상황이었다.
어떻게 수정할 수 있을까?
// jwt-access.guard.ts

import { CanActivate, ExecutionContext, Injectable } from "@nestjs/common";
import { JwtService } from "@nestjs/jwt";
import { UsersService } from "src/users/users.service";
import { Payload } from "../payload/payload.interface";
import { User } from "src/users/entities/users.entity";

@Injectable()
export class JwtAccessAuthGuard implements CanActivate {
  constructor(
    private jwtService: JwtService,
    private userService: UsersService,
  ) {}
  async canActivate(context: ExecutionContext): Promise<boolean> {
    try {
      const request = context.switchToHttp().getRequest();
      const access_token = request.cookies['access_token'];

      const decodedToken = await this.jwtService.verifyAsync(access_token);

      if (!decodedToken) {
        return false; // 액세스 토큰이 유효하지 않음
      }

      const userId = decodedToken.id;
      const user = await this.userService.findUserById(userId);

      if (!user) {
        return false; // 사용자가 존재하지 않음
      }

      // 사용자 정보를 User 엔터티로 변환하여 할당
      request.user = user;
      return true; // 인증 성공
    } catch (err) {
      return false; // 인증 실패
    }
  }
}
✔ Postman과 Google Authenticator로 확인하기
앞서 응답받은 QR 이미지와 Google Authenticator를 활용해 인증 코드를 받을 수 있다. 참고로 발급되는 인증 코드는 "시간 기반 일회용 비밀번호 (Time-Based One Time Password _TOTP )" 이다. 이를 통해 보안을 강화할 수 있다는 장점이 있다.
- 인증 활성화 api 요청

Google Authenticator를 통해 받은 인증 코드를 형식에 맞게 요청으로 보내준다.
-
데이터베이스 확인
마지막
isTwoFactorAuthenticatedEnabled를 보면 레코드 값이 true로 바뀐 것을 확인할 수 있다. --> 2fA 요청 활성화| id | firstname | lastname | email | password | currentRefreshToken | currentRefreshTokenExp | twoFactorAuthenticationSecret | isTwoFactorAuthenticationEnabled | +----+-----------+----------+------------------------+--------------------------------------------------------------+--------------------------------------------------------------+------------------------+-------------------------------+----------------------------------+ | 1 | 대규 | 남 | a01032762271@gmail.com | $2b$12$00f9wkeRc1SDnDT7p1uFmOIn8ydMVxJTvZVFZ0ogKlBJeG1fvZ7lG | $2b$10$OthY4ELDCFzGQI1OZvZo8OZ0LvFvLTvp2iDbnc0hw12xVu0TlVvZK | 2023-05-26 15:11:25 | PFFQCLAJF5HD4BLM | 1 |```
"turn-off" 시에도 동일한 원리로 수행할 수 있다.
> 검증 및 Cookie 설정
✔ 2FA - Controller
  // twoFactorAuthentication.controller.ts

  @Post('authenticate')
  @UseGuards(JwtAccessAuthGuard)
  async authenticate(
    @Req() req: any,
    @Body() twoFactorAuthenticationCodeDto: TwoFactorAuthenticationCodeDto
  ) {
    const isCodeValidated = await this.twoFactorAuthenticationService.isTwoFactorAuthenticationCodeValid(
      twoFactorAuthenticationCodeDto.twoFactorAuthenticationCode, req.user
    );

    if (!req.user.isTwoFactorAuthenticationEnabled) {
      throw new ForbiddenException('Two-Factor Authentication is not enabled');
    }

    if (!isCodeValidated) {
      throw new UnauthorizedException('Invalid Authentication-Code');
    }

    req.user.isSecondFactorAuthenticated = true;

    const tfa_accessToken = await this.authService.generateAccessToken(req.user, true);

    req.res.cookie('2fa_token', tfa_accessToken, {
      httpOnly: true,
      path: '/',
    });

    return req.user;
  }
해당 api는 2FA 인증 여부를 활성화한 유저에 한해서만 요청 허용되도록 한다. turn-on, turn-off api 요청과 동일하게 인증 코드 검증은 필수로 선행되어야한다.
여기서 중요한 부분은 해당 토큰을 cookie로써 생성해준다는 것이다. 해당 쿠키에 담을 토큰은 우리가 이전 포스팅에서도 다루었지만 "인증"을 위한 "액세스 토큰" 형식으로 담아 보내지게 된다.
우리는, 여기서 해당 액세스 토큰이 "2차 인증(2FA)를 수행하는 토큰인지 아닌지"를 구분할 수 있어야 한다. 아니, 정확히 말하면 구분할 수 있게 된다면 더 좋을 것이다.
이를 위해, 우린 Payload에 토큰의 2차 인증 수행여부를 확인하는 isSecondFactorAuthenticated 속성을 추가해줄 수 있다.
✔ Payload Interface
// payload.interface.ts

export interface Payload {
  id: number;
  email: string;
  firstName: string;
  lastName: string;
  iat?: string;
  exp?: string;
  // 액세스 토큰의 2차 인증 여부
  isSecondFactorAuthenticated?: boolean;
}
✔ AuthService (generate token)
// auth.service.ts

  async generateAccessToken(user: User, isSecondFactorAuthenticated = false): Promise<string> {
    const payload: Payload = {
      id: user.id,
      email: user.email,
      firstName: user.firstName,
      lastName: user.lastName,
      isSecondFactorAuthenticated: isSecondFactorAuthenticated,
    }
    return this.jwtService.signAsync(payload);
  }
isSecondFactorAuthenticated 의 기본값을 false로 고정한다. 앞서 컨트롤러의 핸드러 함수 내부에서 보았듯이, 인증을 통과하게되면 해당 속성을 true로 바꿔줌으로써 해당 액세스 토큰이 2차인증을 사용하는 토큰임을 확인받게 된다.
// TwoFactorAuthenticationController > authenticate

const accessToken = await this.authService.generateAccessToken(req.user, true);
✔ Postman으로 확인하기
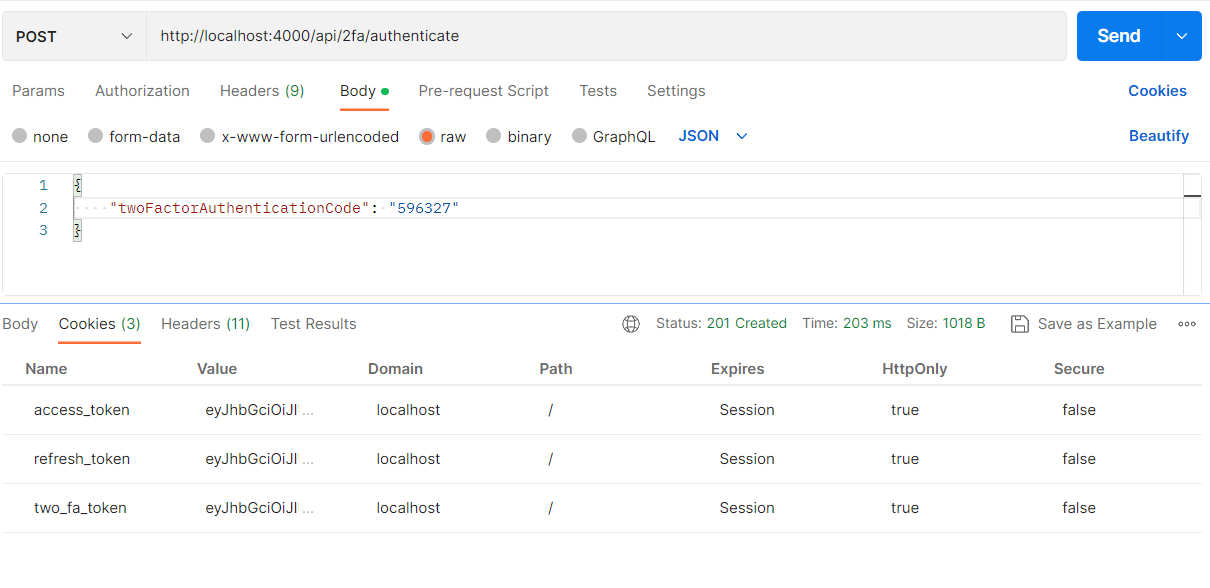
쿠키또한 잘 생성된 것을 확인할 수 있다.
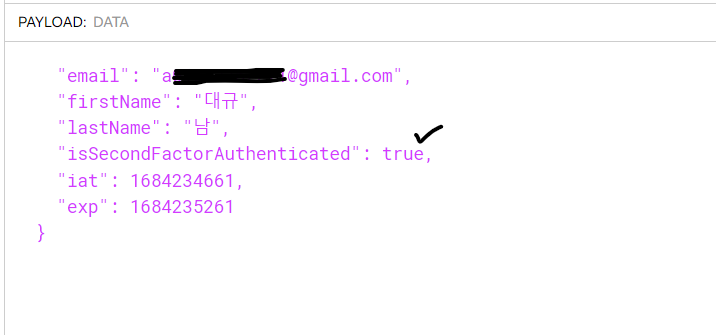
또한 console.log(tfa_accessToken); 을 통해 생성한 tfa_accessToken 값을 확인한 후, 해당 값을 jwt.io ✔ 에서 디코딩해보니 아래와 같이 isSecondFactorAuthenticated 값이 true로 변환된 것 또한 확인할 수 있다.
> 2FA 가드 설정
이제 "2FA" 인증을 활용할 차례이다. 모든 요청마다 2FA 인증을 요구할 순 없고, 또 특정 api 요청에선 분명히 2FA를 요구할 필요가 있을 것이다. 물론, "turn-on", "turn-off"를 통해 사용자에게 인증의 선택을 맡긴것도 있지만, "2FA"를 승인한 사용자라고해서 모든 API 요청에 추가 인증을 요구할 필요는 없을 것이다. UX와 보안성, 서비스의 방향성을 고려해서 특정 API에만 "2FA" 인증을 요구하는 "인가(Authorization)"를 구현할 필요가 있다.
✔ 2FA - Strategy with Passport
가드가 받은 요청을 토대로 인증을 수행하기 위한 전략 패턴을 사용하고자 한다. 이는 역시, Passport 모듈을 사용하였다.
// jwt-twoFactorStrategy.strategy.ts

import { Injectable } from "@nestjs/common";
import { PassportStrategy } from "@nestjs/passport";
import { Request } from "express";
import { ExtractJwt, Strategy } from "passport-jwt";
import { Payload } from "src/auth/payload/payload.interface";
import { UsersService } from "src/users/users.service";

@Injectable()
export class JwtTwoFactorStrategy extends PassportStrategy(
  Strategy,
  'jwt-two-factor'
) {
  constructor(
    private readonly userService: UsersService,
  ) {
    super({
      jwtFromRequest: ExtractJwt.fromExtractors([(req: Request) => {
        return req?.cookies?.two_fa_token;
      } ]),
      secretOrKey: process.env.JWT_ACCESS_SECRET
    });
  }

  async validate(payload: Payload) {
    const user = await this.userService.findUserById(payload.id);

    if (!user.isTwoFactorAuthenticationEnabled) {
      return user;
    }
    if (payload.isSecondFactorAuthenticated) {
      return user;
    }
  }
}
super() 내부에서 메서드 내부로 전달되는 옵션을 설정할 수 있다. PassportStrategy의 생성자를 이곳에서 호출하는 것이다. 여기선 JWT 전략을 설정하게 된다.
이 때, 우리가 앞서 authenticate 핸들러 함수에서 설정한 쿠키인 two_fa_token을 호출할 수 있다.
(잠깐 동안, 그럼 Refresh-Token은 "2FA" 인증과 어떻게 연관지어야하나 생각을 해보았었다. 하지만, 이것은 쓸데없는 생각이였다)
이렇게 설정된 옵션은 JWT 전략이 클라이언트의 요청에서 JWT를 추출하고, 비밀 키를 사용하여 토큰의 유효성을 검사할 수 있도록 한다.
핵심 로직은 validate() 내부에서 구현된다.
-
먼저,
Payload를 통해id값을 받아와User객체를 생성한다. -
만약
user.isTwoFactorAuthenticationEnabled === false라면, 바로user객체를 리턴하고 종료하게 된다. 이는, 2FA 활성화를 선택하지 않은 유저에 한해서 적용된다. 2FA를 활성화하지 않은 유저 또한 해당 가드를 사용할 요청에 "접근"은 할 수 있어야하기 때문이다. -
만약
user.isTwoFactorAuthenticationEnabled === true라면, 다음if문으로 넘어간다. 즉,2FA인증을 선택한 유저에 한해선2FA토큰의 추가 검증을 진행하는 것이다. 만약, 해당 토큰의 검증이 실패한다면 가드에서 요청을 막게 될 것이다.
✔ 2FA - Guard
// jwt-twoFactor.guard.ts

import { Injectable } from "@nestjs/common";
import { AuthGuard } from "@nestjs/passport";

@Injectable()
export default class JwtTwoFactorGuard extends AuthGuard('jwt-two-factor') {}
✔ 간단한 테스트 api
// test.controller.ts
import { Controller, Get, Req, UseGuards } from "@nestjs/common";
import JwtTwoFactorGuard from "./auth/2fa/guard/jwt-twoFactor.guard";
import { User } from "./users/entities/users.entity";
import { UsersService } from "./users/users.service";
@Controller('test')
export class TwoFATestController {
constructor(
private readonly userService: UsersService,
) {}
@UseGuards(JwtTwoFactorGuard)
@Get('access-2fa')
async accessWithTwoFA(
@Req() req: any,
) {
const user: User = await this.userService.findUserById(req.user.id);
return user;
}
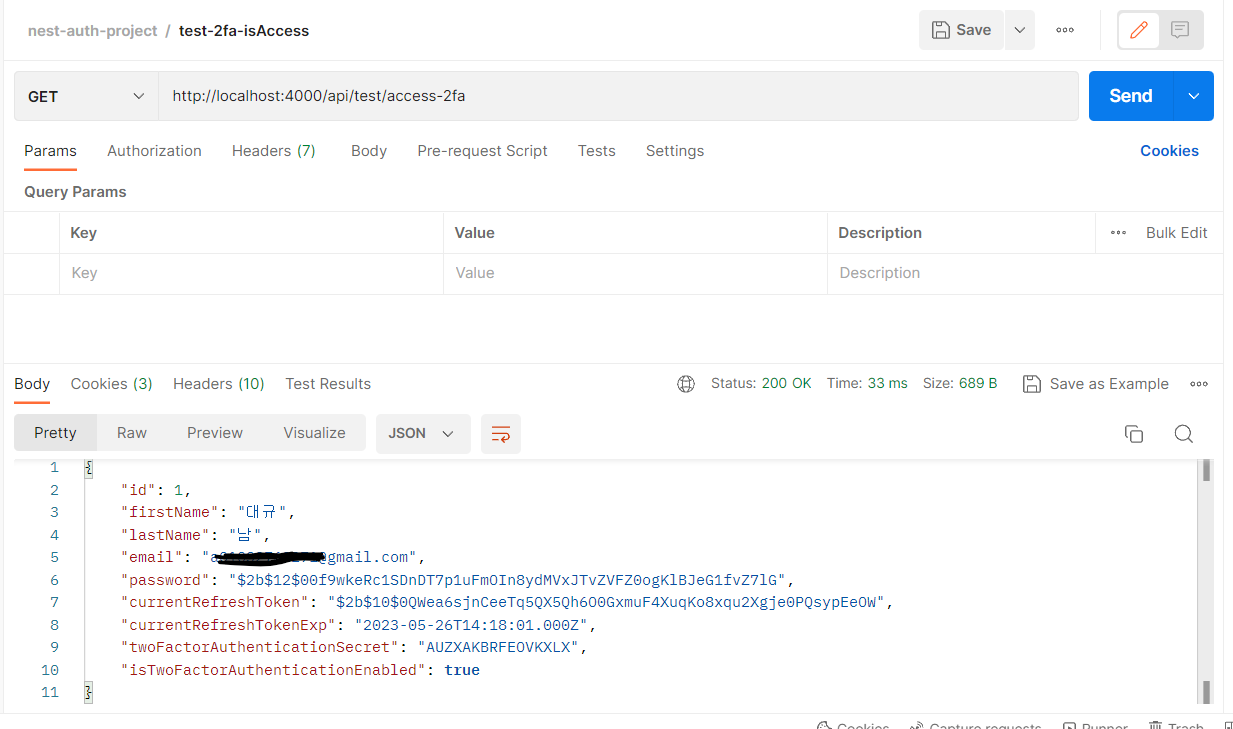
}간단한 라우트 핸들러 함수에 앞서 생성한 JwtTwoFactorGuard를 주입해본뒤 Postman에서 테스트해보자.
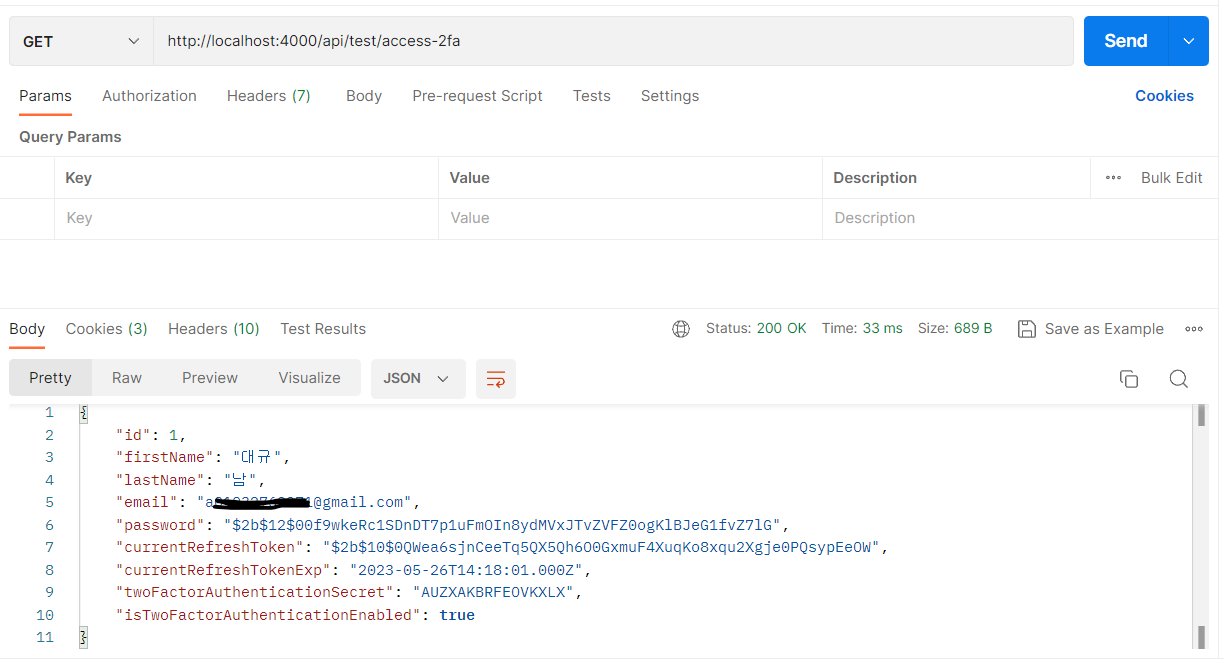
만약, 유효하지 않은 토큰의 경우 (만료시간 경과 등의 검증 실패의 이유로) 해당 요청에서 "401 UnauthorizedException"을 띄울 것이다.
🍓🍓🍓 끝!!!!!!!! 🍓🍓🍓
생각정리
지난번 "Refresh-Token" 구현하기 및 스케쥴링을 이용한 주기적 토큰 값 갱신 구현에 이어서 이번 포스팅에선 "Google Authenticator와 OTP를 활용한 2FA 구현하기"를 주제로 알아보았다. 경험해보기전엔 그냥 단순히 "QR 코드찍고, 인증코드 입력하고, 검증 마치고... 단순하지 않을까?" 생각해보았지만 나처럼 초보의 입장에선 단순하지 않았다.
nestjs를 활용한 코드적 구현은 둘째치고, 어떻게 "설계"를 해야하는가가 가장 큰 난관이였다. 구글링을 통해 잘 구현된 코드, 또한 2FA에 대한 좋은 글들이 분명 있었지만 내 것으로 만들기도 쉽지않았고, 내가 진행하고 있는 코드에 이어서 작성하는 것도 생각보다 난관이 존재하였다.
사실, 가장 해보고 싶었던 구현은 가장 서두의 2FA 개념에 대해 설명할때 아주 짤막하게 언급했었던 "사용자가 있는 곳(공간적 범주)"를 고려해 2FA를 구현해보고 싶었다. 이는 결국, "IP"가 될 것이고 IP에 따라 2FA 인증을 구현하는 케이스가 좋지 않을까 생각하였다.
하지만, 데이터베이스 설계의 관점에선 힘들지 않을거라 생각했지만 아직 프록시 서버와 같은 중계서버에 대해 추후 공부하고 난 뒤 경험하는 것을 택하였다.
아무튼, 이렇게 nestjs에 "2FA"를 특정 설계관점에 맞추어 구현해볼 수 있었다.