프로젝트 생성
- 자바와 IDE(elcipse나 IntelliJ) 사용
!유의사항: 자바 깔고나서 환경변수 설정해서 path까지 설정해줘야 정상적으로 작동 - 스프링 부트를 기반으로 스프링 프로젝트 생성
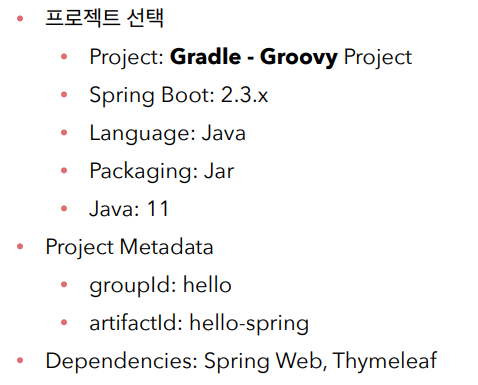
-> 해당 페이지에서 스프링 프로젝트 생성, 다운 후 파일을 ide에서 열기
- spring boot 3.X(뒤에 글자 안 붙어 있는 거가 정식 출시된 버전) & 자바 11로 실행
!. 유의사항: 내 컴퓨터에 설치되어 있는 자바 버전과 사이트에 선택하는 자바의 버전이 같아야 함.
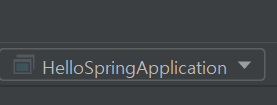
이런 식으로 ~Application이 맨 위에 제대로 떠 있어야 정상적으로 작동 가능
-동작 확인
1. 기본 메인 클래스 실행
2. ctrl + f5 통해 클래스 실행하고, chrome과 같은 페이지에서 localhost:8080 통해 동작확인
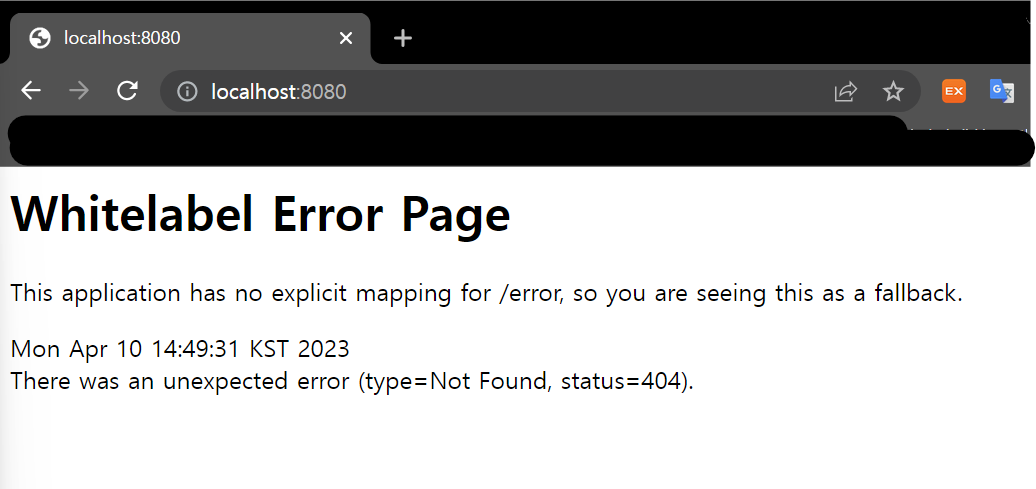
이런 식으로 에러 페이지가 떠야지 정상적으로 처리 된 것
라이브러리 살펴보기
- 위에서 스프링 부트 생성 당시, Dependencies로 Spring web과 THymeleaf을 선택했다.
=> 라이브러리 선택을 통해, 파이썬에서 불러오는 것처럼 끌어와서 쓸 수 있게 함. - 라이브러리 하나 부르면, 그에 따른 다른 library로 따라서 옴
- 라이브러리 목록
spring-boot-starter-web - spring-boot-starter-tomcat: 톰켓(웹서버)
- spring-webmvc : 스프링 웹 MVC
spring-boot-starter-thymeleaf: 타임리프 템플릿 엔지(View)
spring-boot-starter(공통)
view 환경설정
- resources/static 폴더에서 index.html 파일을 생성
<!DOCTYPE HTML>
<html>
<head>
 <title>Hello</title>
 <meta http-equiv="Content-Type" content="text/html; charset=UTF-8" />
</head>
<body>
Hello
<a href="/hello">hello</a>
</body>
</html>
이런 식으로 매우 간단한 html 코드를 작성해서 웰컴페이지 빌드
이후, ctrl+f5로 서버 재시작하면 localhost:8080 통해 hello가 뜨는 것을 확인 가능
체크)) 스프링 부트에는 워낙 방대한 내용이 있음
=> 필요한 걸 찾는 능력이 중요
=> spring.io 사이트 > projects > spring boot > 내 버전의 reference doc > 관련 폴더 하나 골러서 ctrl + f 로 찾기
- 템플릿 엔진
: 페이지에 단순 html보다 여러 동작, 반응을 줄 수 있음
ex. Thymeleaf
생성방법
- hello.hellospring 아래에 package 만들기 .controller 라는 packet 만들기
- 아래에 HelloController 클래스 만들기
- 거기에 @Controller ⇒ 웹 어플리케이션에서 \hello 들어오면 메소드를 호출해줌
- static > templates 폴더로 가서 hello.html 파일 생성
package hello.hellospring.controller;

import org.springframework.stereotype.Controller;
import org.springframework.ui.Model;
import org.springframework.web.bind.annotation.GetMapping;

@Controller
public class HelloController {
    @GetMapping("hello") //GET method 실행
    public String hello(Model model){
        model.addAttribute("data", "hello!!");
        return "hello"; //resources 폴더의 hello html 실행, by 'viewResolver'
    }
}
//###############################################################

<!DOCTYPE HTML>
<html xmlns:th="http://www.thymeleaf.org"> //불러줘야 실행 가능
<head>
 <title>Hello</title>
 <meta http-equiv="Content-Type" content="text/html; charset=UTF-8" />
</head>
<body>
<p th:text="'안녕하세요. ' + ${data}" >안녕하세요. 손님</p>
// data자리에 controller packet에서 addAttribute로 정의된 hell0!가 나옴
</body>
</html>

빌드하고 실행하기
- 서버에서 파일 빌드하고 실행하는 방법
- windows에서 powershell 열기
- 위에서 만든 프로젝트 있는 파일까지 cd 폴더명 혹은 cd . (상위 폴더로 이동) 통해서 이동
- ./gradlew build
- cd build/libs
- java -jar hello-spring-0.0.1-SNAPSHOT.jar
!이때 위에서 나온 주소 긁어서 붙이는 것
! plain 파일이 아님 - chrome에 localhost:8080이 실행되는지 확인하면서 실행 확인

열혈개발자~!!