React 유저 기능 구현
1. request에서 쿠키 사용하기
(1) Origin이란?
Origin이란 쉽게 말해 request를 보내는 사이트의 도메인이다. https://localhost:3000에서 https://도메인으로 request를 보내는 경우, 서로 다른 Origin이라는 의미에서 Cross Origin이라고 표현한다. 이런 경우 여러 가지 보안 문제가 발생할 수 있기 때문에 주의해야 한다. CORS(Cross-Origin Resource Sharing)는 웹 개발에서 자주 겪기도 하고 중요한 문제이다.
(2) Credential이란?
웹 개발에서 Credential이라고 하면 유저를 증명할 수 있는 정보들을 말한다. 예를 들어 아이디와 비밀번호라던지 서버에서 발급받은 토큰 같은 것들을 말한다. request를 보내는 상황에서는 주로 쿠키를 의미한다.
1. Axios에서 Cfredential 사용하기
Axios에서는 withCredentials라는 옵션을 불린형으로 지정할 수 있다. 이 값을 true로 설정해야만 Cross Origin에 쿠키를 보내거나 받을 수 있다. 참고로 이건 fetch() 함수에서 credentials: 'incldue'를 설정하는 것과 같다.
axios.post(
  '/auth/login',
  { email: 'sunny@sundaymorning.kr', password: 't3st!' },
  { withCredentials: true },
);
2. fetch() 함수에서 Credential 사용하기
fetch() 함수에서 request를 보낼 때 쿠키를 사용하려면 적절한 credentials 옵션을 설정해 주어야 한다.
omit: 쿠키를 사용하지 않는다. request를 보낼 때도 쿠키를 사용하지 않고, response로Set-Cookie헤더를 받았을 때에도 쿠키를 저장하지 않는다.'same-origin: 아무 옵션을 지정하지 않았을 때 기본 값이다. 같은 Origin인 경우에만 쿠키를 사용하겠다는 옵션이다. Origin은 쉽게 말해서 사이트의 도메인이라고 할 수 있다. 프론트엔드 사이트 주소와 request를 보낼 백엔드 서버의 주소가 다르다면 Cross Origin이라고 이해하면 된다.'include': 이 옵션을 사용하면 Cross Origin인 경우에도 쿠키를 사용한다.
fetch('https://주소/api/link-service/auth/login', {
  method: 'POST',
  headers: { 'Content-Type': 'application/json' },
  body: JSON.stringify({ email: 'sunny@sundaymorning.kr', password: 't3st!' }),
  credentials: 'include'
});
CORS에서 쿠키를 사용하려면 credentials: 'include'를 설정해야 한다.
2. 쿠키가 제대로 저장되지 않을 때
(1) response 헤더의 Set-Cookie 확인하기
개발자 도구의 Network 탭에서 response 헤더를 확인해 보면 된다. Headers라는 탭에서 Response Headers 안에 있는 Set-Cookie 값을 확인하면 된다.
다른 도메인을 가진 백엔드 서버에서 SameSite=Stirct라는 옵션으로 쿠키를 만든 경우를 가정하자. request를 보내는 쪽은 도메인이 localhost인데, 받는 쪽의 도메인이 달라서 쿠키가 저장되지 않은 경우이다. 이럴 때 개발자 도구에서 SameSite=Strict 옵션이지만 도메인이 다른(크로스 사이트) response이기 때문에 쿠키를 저장하지 않았다는 경고 표시를 해준다.
This attempt to set a cookie via a Set-Cookie header was blocked because it had the "SameSite=Strict" attribute but came from a cross-site response which was not the response to a top-level navigation.참고로 response로 받은 Set-Cookie 헤더는 오른쪽 상단에 있는 Cookies 탭을 사용하면 표 형태로 좀 더 편하게 확인할 수 있다.
(2) SameSite 옵션
SameSite는 request를 보내는 쪽의 도메인과 request를 받는 쪽의 도메인이 일치하는지 확인하고 쿠키의 사용을 허용하는 옵션이다. 이런 옵션은 백엔드 쪽에서 설정할 수 있다.
SameSite=None이라는 옵션을 사용하면 request를 보내는 쪽과 받는 쪽의 도메인이 다르더라도 쿠키를 저장할 수 있다. SameSite=Strict라는 옵션은 반드시 request를 보내는 쪽과 받는 쪽이 같은 도메인이어야 쿠키를 저장하고 사용할 수 있게 한다.
3. 항상 Access Token 사용하기
const instance = axios.create({
  baseURL: 'http://localhost:3000/api/',
  withCredentials: true,
});
4. 컨텍스트로 유저 데이터 관리하기
const AuthContext = createContext({
user: null,
isPending: false,
login: () => {},
logout: () => {},
updateMe: () => {},
});
export function AuthProvider({ children }) {
const [values, setValues] = useState({
user: null,
isPending: true,
});
async function getMe() {
setValues((prevValues) => ({
...prevValues,
isPending: true,
}));
let nextUser;
try {
const res = await axios.get('/users/me');
nextUser = res.data;
} finally {
setValues((prevValues) => ({
...prevValues,
user: nextUser,
isPending: false,
}));
}
}
async function login({ email, password }) {
await axios.post('/auth/login', { email, password });
await getMe();
}
async function logout() {
await axios.delete('/auth/logout');
setValues((prevValues) => ({
...prevValues,
user: null,
}));
}
async function updateMe(formData) {
const res = await axios.patch('/users/me', formData);
const nextUser = res.data;
setValues((prevValues) => ({
...prevValues,
user: nextUser,
}));
}
useEffect(() => {
getMe();
}, []);
return (
<AuthContext.Provider
value={{
user: values.user,
isPending: values.isPending,
login,
logout,
updateMe,
}}
>
{children}
</AuthContext.Provider>
);
}
export function useAuth(required) {
const context = useContext(AuthContext);
const navigate = useNavigate();
if (!context) {
throw new Error('반드시 AuthProvider 안에서 사용해야 합니다.');
}
useEffect(() => {
if (required && !context.user && !context.isPending) {
navigate('/login');
}
}, [context.user, context.isPending, navigate, required]);
return context;
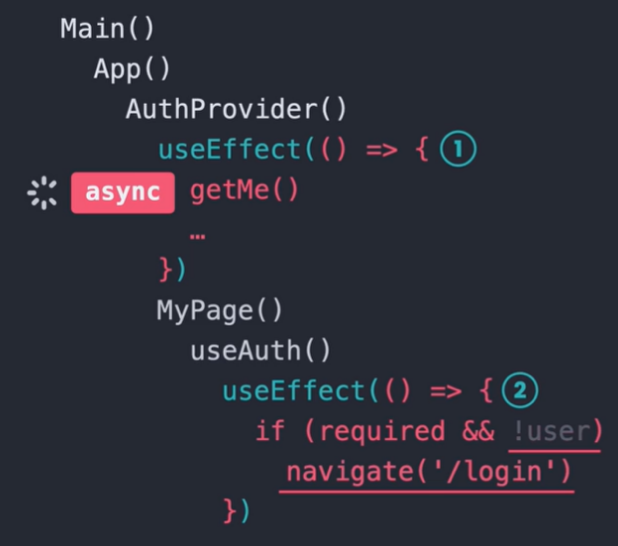
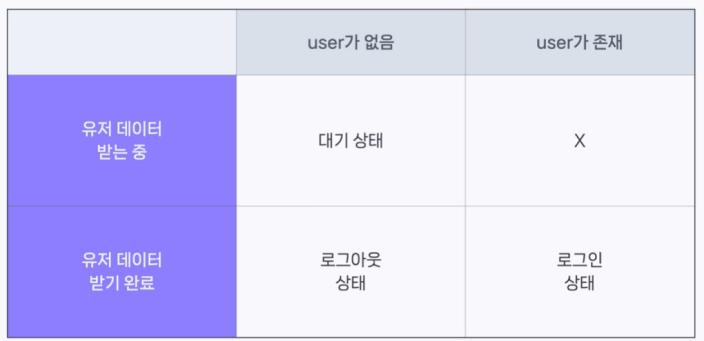
}5. 로그인 상태에 따라 리다이렉트하기
6. Refresh Token 활용하기
import axios from 'axios';

const instance = axios.create({
  baseURL: 'http://localhost:3000/api/',
  withCredentials: true,
});

instance.interceptors.response.use(res => res, async (error) => {
  const originalRequest = error.config;
  if (error.response?.status === 401 && !originalRequest._retry) {
    await instance.post('/auth/token/refresh', undefined, { _retry: true });
    originalRequest._retry = true;
    return instance(originalRequest);
  }
  return Promise.reject(error);
});

export default instance;
7. 워크플로우
(1) 회원가입

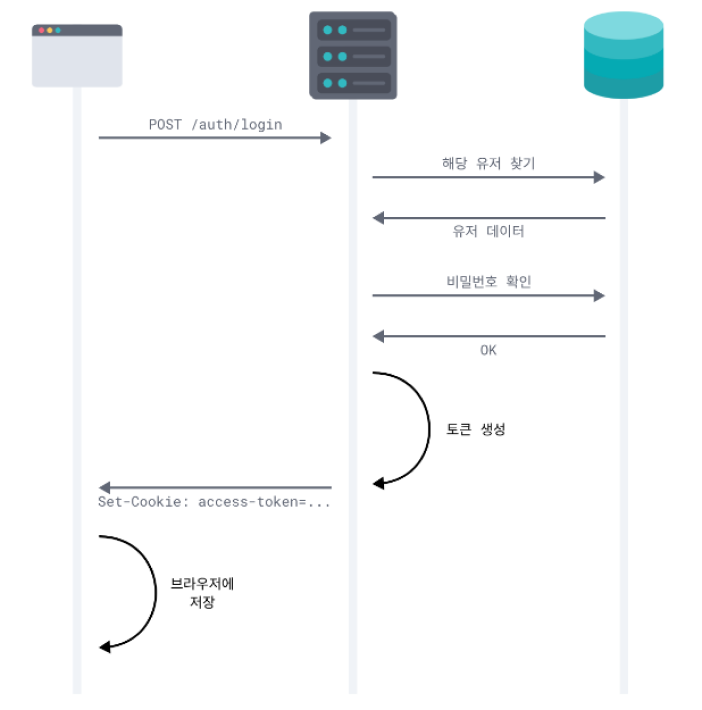
(2) 로그인
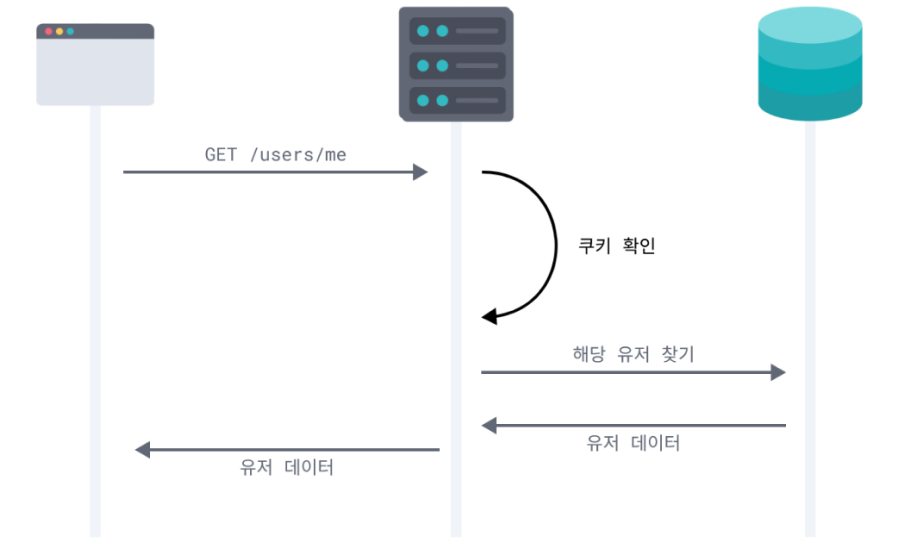
(3) 유저 데이터 가져오기
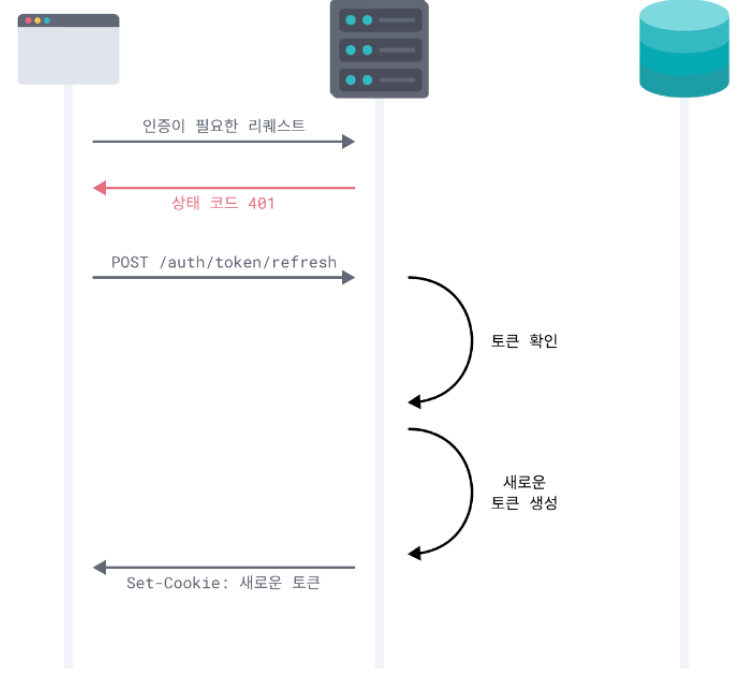
(4) 토큰 갱신하기
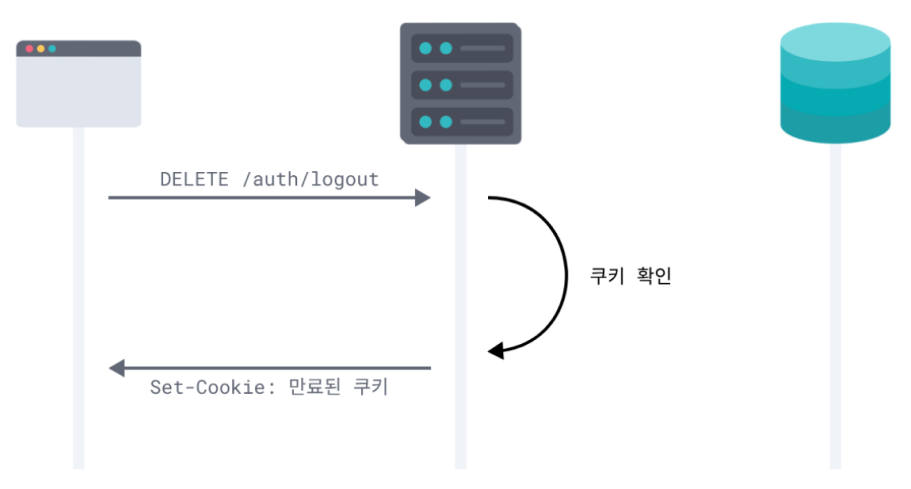
(5) 로그아웃
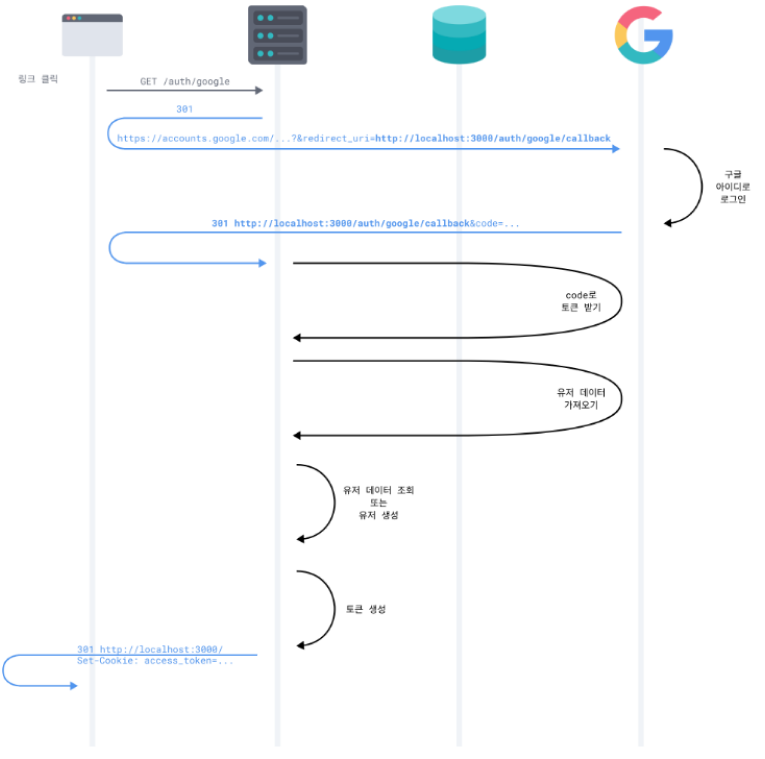
(6) 구글 로그인