React에 TypeScript 적용하기
1. React와 TypeScript
tsconfig.json 파일에서 compilerOptions에서 jsx 옵션은 타입스크립트에서 jsx 문법으로 작성된 파일들을 변환할 때 어떤 형태로 변환할지 정하는 옵션이다.
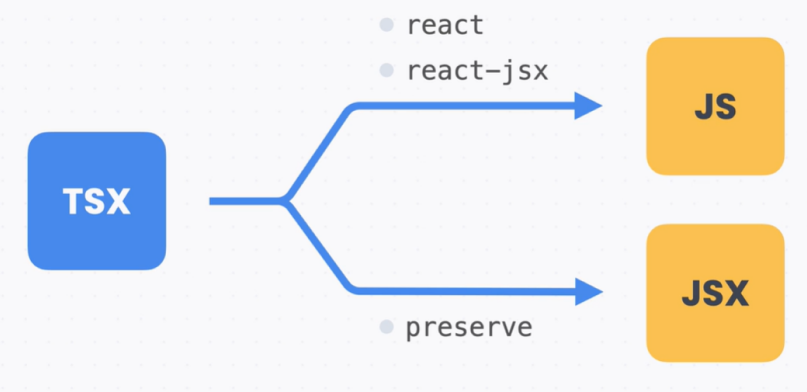
즉, 타입스크립트에서 리액트를 사용할 때 트랜스파일링 과정이 필요하며, 타입스크립트 컴파일러가 JSX를 JS로 바꿀지, JSX를 그대로 둘지는 tsconfig.json 파일에서 설정할 수 있다.
2. HTML DOM
const usernameInput = document.getElementById('username') as HTMLInputElement;
const submitButton = document.getElementById('submit') as HTMLButtonElement;

usernameInput.focus();
submitButton.addEventListener('click', handleClick);

function handleClick(e: MouseEvent) {
  e.preventDefault();
  const message = `${usernameInput.value}님 반갑습니다!`;
  alert(message);
}
3. 컴포넌트
// Button.tsx
import styles from './Button.module.css';

interface Props {
  className?: string;
  id?: string;
  children?: ReactNode;
  onClick: any;
}

export default function Button({ className = '', id, children, ...rest }: Props) {
  const classNames = `${styles.button} ${className}`;
  return (
    <button className={classNames} id={id} onClick={onClick}>
	  {children}
	</button>
  );
}

// Input.tsx
import styles from './Input.module.css';

interface Props extends InputHTMLAttributes<HTMLInputElement> {}

export default function Input({ className = '', ...rest }: Props) {
  const classNames = `${styles.input} ${className}`;
  return <input className={classNames} {...rest} />;
}
4. Hook
const formRef = useRef<HTMLFormElement>(null);useState의 경우에는 타입 추론이 일반적으로 잘 되지만, 그렇지 않을 경우에는 타입을 지정해 주어야 한다.
5. 이벤트 핸들러
function handleChange(e: ChangeEvent<HTMLInputElement>) {
  const { name, value } = e.target;
  const nextValues = {
    ...values,
    [name]: value,
  };
  setValues(nextValues);
}

function handleClick(e: MouseEvent<HTMLButtonElement>) { // SyntheticEvent
  e.preventDefault();
  const message = `${values.username}님 환영합니다`;
  alert(message);
}

// Button.tsx
...
interface Props {
  className?: string;
  id?: string;
  children?: ReactNode;
  onClick: (e: MouseEvent) => void; // MouseEventHandler<HTMLButtonElement>;
}
...
이벤트를 구체적으로 지정하지 않아도 될 때는 SyntheticEvent를 지정해 주어도 된다.
6. Context
// translate.tsx
import { createContext, useContext, useState } from 'react';

type Locale = 'ko' | 'en';

interface LocaleContextValue {
  locale: Locale;
  setLocale: (value: Locale) => void;
}

const LocaleContext = createContext<LocaleContextValue>({
  locale: 'ko',
  setLocale: () => {},
} as any);

export function LocaleContextProvider({ children }: {children: ReactNode;}) {
  const [locale, setLocale] = useState<Locale>('ko');

  return (
    <LocaleContext.Provider
      value={{
        locale,
        setLocale,
      }}
    >
      {children}
    </LocaleContext.Provider>
  );
}

const dict = {
  ko: {
    signin: '로그인',
    username: '아이디',
    'email or phone number': 'Email 또는 전화번호',
    password: '비밀번호',
    'forgot your password?': '비밀번호를 잊으셨나요?',
    'new user?': '회원이 아니신가요?',
    signup: '가입하기',
  },
  en: {
    signin: 'Signin',
    username: 'Username',
    'email or phone number': 'Email or phone number',
    password: 'Password',
    'forgot your password?': 'Forgot your password?',
    'new user?': 'New user?',
    signup: 'Signup',
  },
};

function useLocale() {
  const { locale } = useContext(LocaleContext);
  return locale;
}

export function useSetLocale() {
  const { setLocale } = useContext(LocaleContext);
  return setLocale;
}

export function useTranslate(): (key: string) => string {
  const locale = useLocale();
  const t = (key: keyof typeof dict[Locale]) => dict[locale][key];
  return t;
}
7. 타입스크립트에서 파일을 inport하는 경우
(1) CSS 파일을 위한 타입들
리액트에서 사용하는 CSS 파일은 사실 리액트에서 처리하는게 아니라 번들러에서 처리해준다. 코드에 import 문법이 있으면 그걸 가지고 파일을 불러와서 따로 처리를 해주는 식이다. 실제로 브라우저에서 실행될 때는 이런 CSS를 불러오는 import 문법은 다른 코드로 변환된다.
그런데 타입스크립트에서 CSS를 import하는 문법을 쓰려면 문제가 생긴다. 자바스크립트 파일도 아니고, 타입스크립트 파일도 아니기 때문에 블러온 변수의 타입을 알 수 없기 때문이다. 그래서 이런 경우엔 d.ts 파일을 만들어서 타입을 정의해 준다.
declare module이라는 문법은 모듈의 타입을 직접 정의하는 문법이다. 이 문법을 사용하면 아래와 같은 코드에 있는 styles 객체의 타입이 무엇인지 정의할 수 있게 된다.
import styles from './Button.module.css';

function Button({ children }) {
  // 실제로 사용하는 경우
  return <button className={styles.Button}>{ children }</button>;
}
Create React App에서는 module.css 파일을 사용하면 클래스 이름을 styles 객체로 참조할 수 있다. styles는 문자열을 속성 값으로 하는 객체이다. 그래서 타입스크립트 프로젝트에서는 아래처럼 모듈의 타입을 정의해 주고 있다.
declare module '*.module.css' {
  const classes: { readonly [key: string]: string };
  export default classes;
}

declare module '*.module.scss' {
  const classes: { readonly [key: string]: string };
  export default classes;
}

declare module '*.module.sass' {
  const classes: { readonly [key: string]: string };
  export default classes;
}
default export가 classes라는 이름으로 되어 있는데 이게 곧 styles라고 사용하던 거라고 생각하면 된다. 그 타입은 { [key: string]: string }처럼 지정이 되어 있다.아래쪽의 *.module.scss라던지 *.module.sass는 Sass라는 CSS 확장 언어의 타입들이다.
즉, 실제 CSS 파일의 처리는 번들러에서 해주지만, 타입스크립트에서는 CSS 모듈의 타입을 추론할 수 없기 때문에 타입 정의를 직접 해줘야 한다. 이런 타입 정의만 있으면 무조건 CSS 파일을 쓸 수 있는 건 아니고, 번들러의 설정이 필요하다. 이 부분은 Create React App이나 Vite, Next.js 같은 것들이 대신 해주고 있다.
(2) 이미지 파일을 위한 타입들
마찬가지로 이미지 파일을 리액트 프로젝트에서 사용할 수 있게 해주는 것도 번들러이다. 하지만 타입스크립트에서는 import문에 타입이 필요하기 때문에 declare module이라는 문법으로 타입을 지정해주고 있다. Create React App에서는 이미지 파일들을 import하면 이미지 주소를 문자열로 쓸 수 있다.
declare module '*.bmp' {
  const src: string;
  export default src;
}

declare module '*.gif' {
  const src: string;
  export default src;
}

declare module '*.jpg' {
  const src: string;
  export default src;
}

declare module '*.jpeg' {
  const src: string;
  export default src;
}

declare module '*.png' {
  const src: string;
  export default src;
}
...
참고로 항상 이렇게 되는 것은 아니다. Next.js에서는 이미지를 불러오면 객체 타입이다. 그래서 Next.js에서는 아래처럼 내부적으로 정의한 StaticImageData라는 타입으로 정의하고 있다. 실제로는 import했을 때 처리하는 건 Next.js에서 내부적으로 구현한 기능들이다.
declare module '*.jpg' {
  const content: import('../dist/shared/lib/image-external').StaticImageData

  export default content
}

declare module '*.jpeg' {
  const content: import('../dist/shared/lib/image-external').StaticImageData

  export default content
}
8. React 타입 정리 노트
(1) HTML 타입
1. HTMLElement 삽입
HTML<태그이름>Element라는 이름으로 DOM 노드에 대한 타입을 사용할 수 있다.
const usernameInput = document.getElementById('username') as HTMLInputElement;
const submitButton = document.getElementById('submit') as HTMLButtonElement;
2. 이벤트 타입
기본적으로 Event라는 타입을 쓸 수 있고, 구체적으로 -Event로 끝나는 타입을 활용하면 된다. 예를 들어 oninput 이벤틍체 대한 타입은 InputEvent이고, onclick 이벤트에 대한 타입은 MouseEvent이다.
submitButton.addEventListener('click', handleClick);

function handleClick(e: MouseEvent) {
  e.preventDefault();
  const message = `${usernameInput.value}님 반갑습니다!`;
  alert(message);
}
(2) React 타입
1. Props
인터페이스를 사용해서 타입을 지정해 준다. children의 경우 ReactNode라는 타입을 사용한다.
import { MouseEvent, ReactNode } from 'react';
import styles from './Button.module.css';

interface Props {
  className?: string;
  id?: string;
  children?: ReactNode;
  onClick: (e: MouseEvent<HTMLButtonElement>) => void;
}

const Button = ({ className = '', id, children, onClick }: Props) => {
  const classNames = `${styles.button} ${className}`;
  return (
    <button className={classNames} id={id} onClick={onClick}>
      {children}
    </button>
  );
}

export default Button;
HTML 기본 Props를 타입으로 정의하고 싶다면, 태그이름HTMLAttributes<노드타입> 형태의 타입을 상속해서 활용할 수 있다. 예를 들어 인풋 노드의 Props를 사용하고 싶다면 InputHTMLAttributes<HTMLInputElement>와 같이 쓸 수 있다.
import { InputHTMLAttributes } from 'react';
import styles from './Input.module.css';

interface Props extends InputHTMLAttributes<HTMLInputElement> {
}

export default function Input({ className = '', ...rest }: Props) {
  const classNames = `${styles.input} ${className}`;
  return <input className={classNames} {...rest} />;
}
2. Hook
useState()의 경우 초깃값만 잘 지정하면 타입이 잘 추론된다. 기본값에서 타입이 추론되지 않으면 제네릭으로 타입을 지정해준다. 특히 빈 배열을 사용할 때 주의하면 된다.
const names = useState<string[]>([]);useRef()의 경우 대상이 되는 DOM 노드의 타입을 제네릭으로 지정하고, 초깃값으로 null을 지정해주면, ref Props로 내려줄 때 타입 오류가 나지 않는다.
const formRef = useRef<HTMLFormElement>(null);3. 이벤트 핸들러
HTML 이벤트 타입과 마찬가지로 ChangeEvent, MouseEvent 같이 -Event로 끝나는 타입을 사용한다. 제네릭으로 DOM 노드 타입을 지정해 주면 이벤트 타겟의 타입을 지정할 수 있다. 이때 주의할 점은 순수 HTML 자바스크립트에서 사용하는 MouseEvent가 아니라 react 패키지에서 불러와서 사용하는 MouseEvent 타입이라는 점이다. 어떤 이벤트인지 타입을 구체적으로 지정할 필요가 없는 경우라면, SyntheticEvent라는 타입을 사용하면 된다.
import { ChangeEvent, MouseEvent, useEffect, useRef, useState } from 'react';

// ...

function handleChange(e: ChangeEvent<HTMLInputElement>) {
    const { name, value } = e.target;
    const nextValues = {
      ...values,
      [name]: value,
    };
    setValues(nextValues);
  }

  function handleClick(e: MouseEvent<HTMLButtonElement>) {
  // function handleClick(e: SyntheticEvent)처럼 쓸 수도 있음
    e.preventDefault();

    const message = `${values.username}님 환영합니다`;
    alert(message);
  }
4. Context
컨텍스트의 경우 컨텍스트 값의 타입을 제네릭으로 잘 지정해주면 된다. 이때 초깃값도 올바로 지정하는 것을 잊지말아야 한다.
type Locale = 'ko' | 'en';
interface LocaleContextValue {
  locale: Locale;
  setLocale: (value: Locale) => void;
}

const LocaleContext = createContext<LocaleContextValue>({
  locale: 'ko',
  setLocale: () => {},
});
9. Pages Router 타입
(1) 커스텀 App
_app.tsx 파일에서 웹사이트 전체에 공통적으로 렌더링되는 App이라는 컴포넌트를 만든다. 이 컴포넌트의 Props 형태는 정해져 있다. AppProps라는 타입을 next/app 패키지에서 불러와서 사용하면 된다.
// _app.tsx
import Head from 'next/head';
import { AppProps } from 'next/app';
import Header from '@/components/Header';
import '@/styles/global.css';

export default function App ({ Component, pageProps }: AppProps) {
  return (
    <>
      <Head>
        <title>Codeitmall</title>
        <link rel="icon" href="/favicon.ico" />
      </Head>
      <Header />
      <Component {...pageProps} />
    </>
  );
}
(2) 프리 렌더링
1. 정적 생성
Next.js에선 빌드 시점에 리액트 코드를 미리 렌더링해 둘 수 있다. 이런 걸 정적 생성(Static Generation)이라고 한다.
import Image from 'next/image';

export async function getStaticPaths () {
  const res = await fetch('https://learn.codeit.kr/api/codeitmall/products/');
  const data = await res.json();
  const products = data.results;
  const paths = products.map((product) => ({
    params: { id: String(product.id) },
  }));

  return {
    paths,
    fallback: true,
  };
};

export async function getStaticProps(context) {
  const productId = context.params ['id'];

  let product;
  try {
    const res = await fetch(`https://learn.codeit.kr/api/codeitmall/products/${productId}`);
    const data = await res.json();
    product = data;
  } catch {
    return {
      notFound: true,
    };
  }

  return {
    props: {
      product,
    },
  };
}

export default function ProductPage({ product }) {
  return (
    <div>
      <h1>{product.name}</h1>
      <Image
        src={product.imgUrl}
        width="480"
        height="480"
        alt={product.name}
      />
    </div>
  );
}getStaticPaths()라는 함수에선 https://learn.codeit.kr/api/codeitmall/products/라는 API 주소에 request를 보내서 상품 목록 데이터를 받는다. 이 데이터로 아이디 값들을 모아서 params값들을 만든다. 이 값을 바탕으로 getStaticProps() 함수에서는 context 값을 활용해 request를 보내서 상품 데이터를 받아온다. 이걸 product라는 이름의 Prop으로 내려주고 있다. Next.js에선 기본적으로 화살표 함수로 만든 다음 아래와 같이 GetStaticPaths, GetStaticProps 타입을 지정하는 걸 권장한다.
import { GetStaticPaths, GetStaticProps } from 'next';
// ...

export const getStaticPaths: GetStaticPaths = async () => {
  // ...

  return {
    paths,
    fallback: true,
  };
};

export const getStaticProps: GetStaticProps = async (context) => {
  // ...

  return {
    props: {
      product,
    },
  };
}
그 다음으로 페이지 타입을 정의해 보도록 하겠다. 우선 일반적인 리액트 컴포넌트의 Props 타입을 정의하듯이 Props를 정의하고, 이걸 getStaticProps() 함수의 제네릭으로 지정해 준다.
interface Props {
  product: Product;
}

export const getStaticProps: GetStaticProps<Props> = async (context) => {
  // ...
  return {
    props: {
      product,
    },
  };
};

export default function ProductPage({ product }: Props) {
  return (
    <div>
      <h1>{product.name}</h1>
      <Image
        src={product.imgUrl}
        width="480"
        height="480"
        alt={product.name}
      />
    </div>
  );
}
2. 서버사이드 렌더링
Next.js 서버에 request가 들어올 때마다 렌더링을 해서 보내주는 서버사이드 렌더링의 경우에도 비슷한 방식으로 해주면 된다. 앞에서 보았단 예시에서 서버사이드 렌더링으로 바꾼 코드이다.
import Image from 'next/image';

export async function getServerSideProps(context) {
  const productId = context.params['id'];

  let product;
  try {
    const res = await fetch(`https://learn.codeit.kr/api/codeitmall/products/${productId}`);
    const data = await res.json();
    product = data;
  } catch {
    return {
      notFound: true,
    };
  }

  return {
    props: {
      product,
    },
  };
}

export default function ProductPage({ product }) {
  return (
    <div>
      <h1>{product.name}</h1>
      <Image
        src={product.imgUrl}
        width="480"
        height="480"
        alt={product.name}
      />
    </div>
  );
}
getServerSideProps() 함수의 타입은 화살표 함수로 만든 다음에 GetServerSideProps로 지정하면 되고, 마찬가지로 Props 타입도 정의한 다음, 아래처럼 제네릭으로 지정하고, 페이지 컴포넌트에도 정의하면 된다.
interface Props {
  product: Product;
}

export const getServerSideProps: GetServerSideProps<Props> = async (context) => {
  // ...
  return {
    props: {
      product,
    },
  };
};

export default function ProductPage({ product }: Props) {
  return (
    <div>
      <h1>{product.name}</h1>
      <Image
        src={product.imgUrl}
        width="480"
        height="480"
        alt={product.name}
      />
    </div>
  );
}
(3) API 라우트
API 라우트의 타입을 살펴보면 아래와 같이 request와 response에 타입을 지정하면 된다.
import type { NextApiRequest, NextApiResponse } from 'next'

export default function handler(req: NextApiRequest, res: NextApiResponse) {
  // ...
}