브라우저와 자바스크립트
1. 브라우저도 객체다
// window : 전역 객체 (Global Object)
console.log(window);
2. DOM
// DOM (Document Object Model) = 문서 객체 모델
console.log(document); // html
DOM에 따르면, HTML 문서 내에 모든 태그들은 객체이다. DOM을 잘 활용하면 JS를 사용해서 HTML 문서 내 태그들을 객체처럼 자유롭게 다룰 수 있다.
2-1. console.dir
대부분의 브라우저에 있는 개발자 도구는 console.log와 console.dir 메소드를 지원한다. 두 메소드 모두 파라미터로 전달받은 값을 콘솔에 출력하는 역할을 한다.
const str = 'Hello';
const num = 123;
const bool = true;
const arr = [1, 2, 3];
const obj = {
  name: 'Hello',
  email: 'hello@hello.kr',
};

function func() {
  console.log("I love U");
}

console.log(str); // Hello
console.dir(str); // Hello

console.log(num); // 123
console.dir(num); // 123

console.log(bool); // true
console.dir(bool); // true

console.log(arr); // (3) [1, 2, 3]
console.dir(arr); // Array(3)

console.log(obj); // {name: "Hello", email: "hello@hello.kr"}
console.dir(obj); // Object

console.log(func); // f func() { console.log("I love U"); }
console.dir(func); // f func()
둘의 차이점에 대해 알아보자.
- 출력하는 자료형이 다르다.
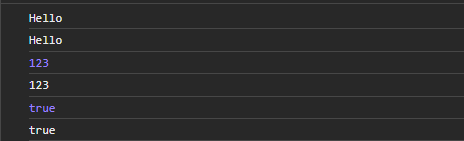
문자열, 숫자, 불린 부분을 보면 각 값을 출력할 때 dir 부분에서 출력되는 값의 색이 다르게 보일 것이다. dir 메소드는 문자열 표시 형식으로 콘솔에 출력한다.
- log는 값 자체, dir은 객체의 속성
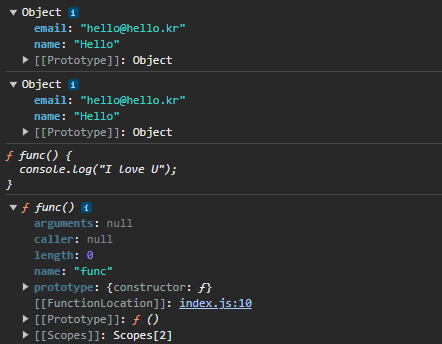
log 메소드는 파라미터로 전달받은 값을 위주로 출력하는 반면, dir 메소드는 객체의 속성을 좀 더 자세하게 출력한다. dir 메소드가 출력한 부분을 자세히 보면 객체의 유형이 먼저 출력되고, 특히 함수 부분에서는 클릭해서 펼쳤을 때 함수가 가진 속성들을 더 보여주는 모습을 확인할 수 있다. (log 메소드는 펼쳐지지 않는다.)
- log는 여러 개, dir은 하나
console.log(str, num, bool, arr, obj, func);
console.dir(str, num, bool, arr, obj, func);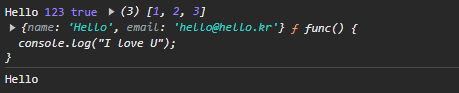
둘 사이의 차이는 파라미터로 전달할 수 있는 값의 개수에도 있다. log 메소드는 여러 값을 쉽표로 구분해서 전달하면 전달받은 모든 값을 출력하는 반면, dir 메소드는 여러 값을 전달하더라도 첫 번째 값만 출력한다.
- DOM 객체를 다룰 때
const myDOM = document.body;

console.log(myDOM);
console.dir(myDOM);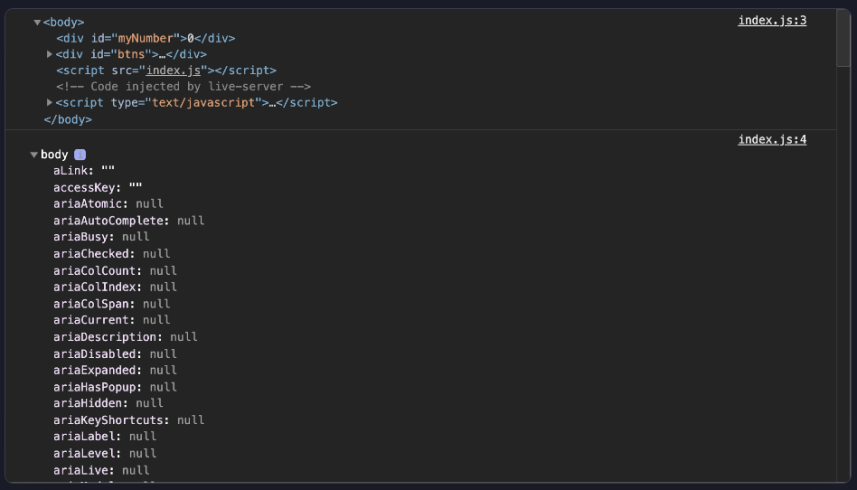
가장 큰 차이는 DOM 객체를 다룰 때 나타난다. 값에 좀 더 중점을 둔 log 메소드는 대상을 HTML 형태로 출력하고, 객체의 속성에 좀 더 중점을 둔 dir 메소드는 대상을 객체 형태로 출력한다.
즉 콘솔에서 값 자체를 확인하고 싶다면 log 메소드, 객체의 속성들을 살펴보고 싶다면 dir 메소드를 활용하면 좋을 것 같다.
3. DOM 트리
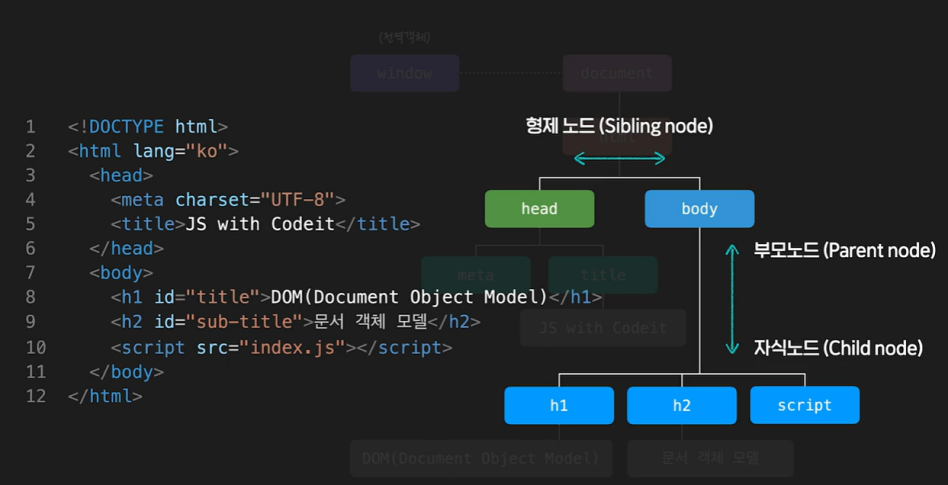
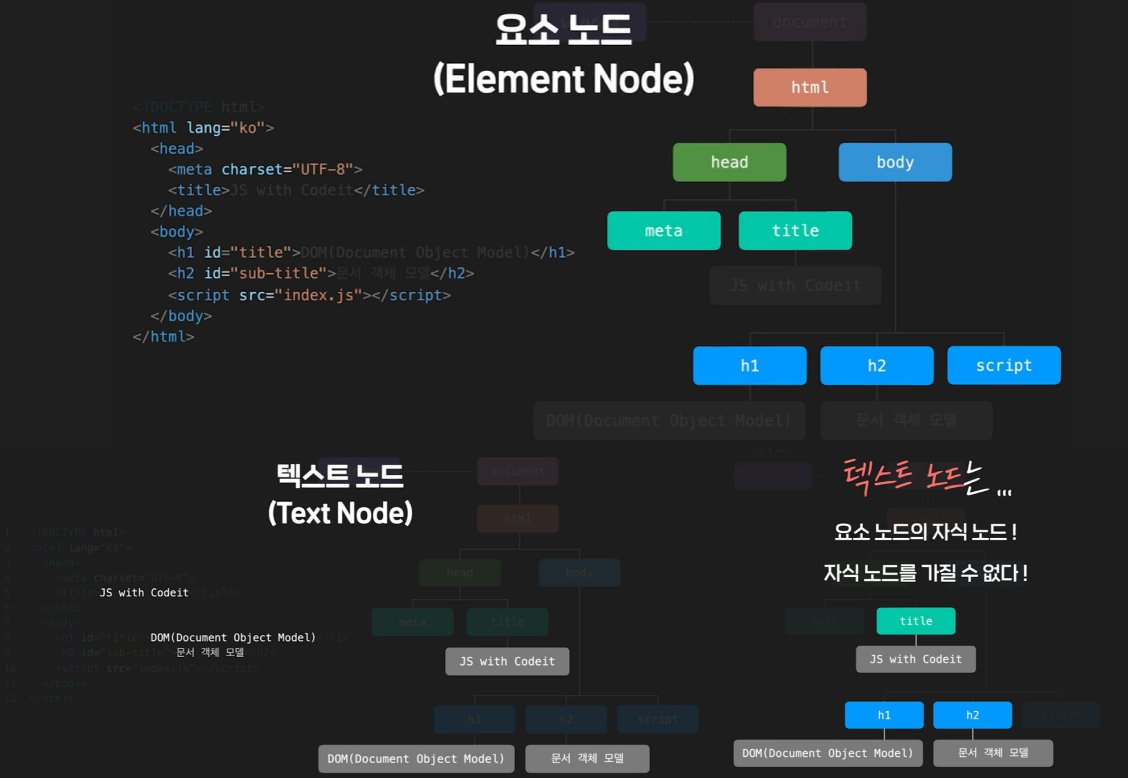
// DOM 트리 여행하기
const myTag = document.querySelector('#content');

console.log(myTag);

// 자식 요소 노드
console.log(myTag.children[1]);
console.log(myTag.firstElementChild); // 자식들 중 첫번째 요소
console.log(myTag.lastElementChild); // 자식들 중 마지막 요소

// 부모 요소 노드
console.log(myTag.parentElement);

// 형제 요소 노드
console.log(myTag.previousElementSibling); // 이전 형제 노드
console.log(myTag.nextElementSibling); // 다음 형제 노드
(1) 요소 노드에 대한 이동 프로퍼티
| 프로퍼티 | 유형 | 결과 |
|---|---|---|
| element.children | 자식 요소 노드 | element의 자식 요소 모음(HTMLCollection) |
| element.firstElementChild | 자식 요소 노드 | element의 첫 번째 자식 요소 하나 |
| element.lastElementChild | 자식 요소 노드 | element의 마지막 자식 요소 하나 |
| element.parentElement | 부모 요소 노드 | element의 부모 요소 하나 |
| element.previousElementSibling | 형제 요소 노드 | element의 이전(previous) 혹은 좌측(left)에 있는 요소 하나 |
| element.nextElementSiblign | 형제 요소 노드 | element의 다음(next) 혹은 우측(right)에 있는 요소 하나 |
(2) 모든 노드에 대한 이동 프로퍼티
| 프로퍼티 | 유형 | 겨로가 |
|---|---|---|
| node.childNodes | 자식 노드 | node의 자식 노드 모음(NodeList) |
| node.firstChild | 자식 노드 | node의 첫 번째 자식 노드 하나 |
| node.lastChild | 자식 노드 | node의 마지막 자식 노드 하나 |
| node.parentNode | 부모 노드 | node의 부모 요소 하나 |
| node.previousSibling | 형제 노드 | node의 이전(previous) 혹은 좌측(left)에 있는 노드 하나 |
| node.nextSibling | 형제 노드 | node의 다음(next) 혹은 우측(right)에 있는 노드 하나 |
(3) DOM 트리를 구성할 때
브라우저가 HTML 코드를 해석할 때 각 코드들은 상황에 맞게 node를 생성하고 DOM 트리를 구성하게 된다.
- HTML 태그는 요소 노드가 되고
- 문자들은 텍스트 노드
- 주석도 주석 노드로 DOM 트리에 반영된다.
<!DOCTYPE HTML>
<html>
<head>
  <title>JavaScript</title>
</head>
<body>
  I Love JavaScript
  <!-- I Love Codeit -->
</body>
</html>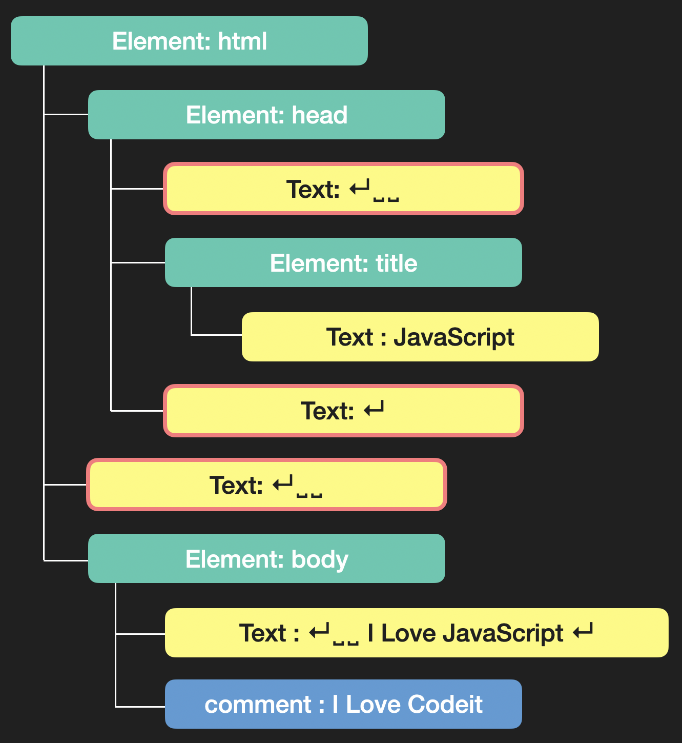
텍스트 노드 중에서 붉은 테두리가 있는 부분을 통해 알 수 있듯이 태그와 태그사이에 줄 바꿈과 들여쓰기로 인한 띄어쓰기도 텍스트 노드로 생성된 모습을 확인할 수 있다. 하지만 코드가 복잡하거나 혹은 코드의 스타일이 일정하지 않은 경우에는 이런 줄 바꿈과 들여쓰기로 인해 생성된 텍스트 노드의 존재를 파악하기가 쉽지 않다.
그래서 모든 노드가 공통으로 갖고 있는 프로퍼티를 활용한다면, 예상치 못한 텍스트 노드를 선택하게 되어 의도하지 않은 결과를 만들어 낼 가능성이 커지게 된다.
4. 요소 노드 프로퍼티
// 요소 노드 주요 프로퍼티
// DOM 프로퍼티
const myTag = document.querySelector('#list-1');

// innerHTML
console.log(myTag.innerHTML);
myTag.innerHTML = '<li>Exotic</li>'; // 수정
myTag.innerHTML += '<li>Exotic</li'; // 마지막 부분에 추가

// outerHTML (
console.log(myTag.outerHTML);
myTag.outerHTML = '<ul id="new-list"<li>Exotic</li></ul>'; // 수정

// textContext
console.log(myTag.textContent);
myTag.textContent = 'new text'; // 수정innerHTML: 요소 노드 내부의 HTML 코드를 문자열로 리턴해 준다. 내부에 있는 줄 바꿈이나 들여쓰기 등도 모두 포함된다. 요소 안의 정보를 확인할 수도 있지만, 내부의 HTML 자체를 수정할 때 좀 더 자주 활용된다. (내부에 있던 값을 완전히 새로운 값으로 교체하기 때문에 주의해서 사용해야 한다.)- '
outerHTML: 요소 노드 자체의 전체적인 HTML 코드를 문자열로 리턴해 준다. 마차가지로 내부에 있는 줄 바꿈이나 들여쓰기도 모두 포함된다. 하지만 새로운 값을 할당할 경우 요소 자체가 교체되어 버리기 때문에 주의해서 사용해야 한다. 'textContent: 요소 안의 내용들 중에서 HTML 태그 부분은 제외하고 텍스트만 가져온다. (내부에 있는 줄 바꿈이나 들여쓰기 모두 포함한다.) 새로운 값을 할당하면innerHTML과 마찬가지로 내부의 값을 완전히 새로운 값으로 교체한다. 하지만textContent는 말그대로 텍스트만 다루기 때문에, 특수문자(<li>)도 그냥 텍스트로 처리한다는 점도 알고 있어야 한다.
5. 요소 노드 추가하기
// 요소 노드 추가하기
// 요소 노드 추가하기
const tomorrow = document.querySelector('#tomorrow');

// 1. 요소 노드 만들기: document.createElement('태그이름')
const first = document.createElement('li');

// 2. 요소 노드 꾸미기: textContent, innerHTML, ...
first.textContent = '처음';

// 3. 요소 노드 추가하기: NODE.prepend, append, after, before
tomorrow.prepend(first);

const last = document.createElement('li');
last.textContent = '마지막';
tomorrow.append(last); // 제일 마지막 자식 노드로 추가

const prev = document.createElement('p');
prev.textContent = '이전';
tomorrow.before(prev); // 앞쪽에 형제 노드로 추가

const next = document.createElement('p');
next.textContent = '다음';
tomorrow.after(next); // 뒤쪽에 형제 노드로 추가
6. 노드 삭제와 이동하기
// 노드 삭제와 이동
const today = document.querySelector('#today');
const tomorrow = document.querySelector('#tomorrow');

// 노드 삭제하기: Node.remove()
tomorrow.remove();
today.children[2].remove();

// 노드 이동하기: prepend, append, before, after
today.append(tomorrow.children[1]);
tomorrow.children[1].after(today.children[1]);
tomorrow.children[2].before(today.children[1]);
tomorrow.lastElementChild.before(today.children[1]);
7. HTML 속성 다루기
// HTML 속성 (HTML attribute)
const tomorrow = document.querySelector('#tomorrow');
const item = tomorrow.firstElementChild;
const link = item.firstElementChild;

// id 속성
console.log(tomorrow);
console.log(tomorrow.id);

// class 속성
console.log(item);
console.log(item.className);

// href 속성
console.log(link);
console.log(link.href);
console.log(tomorrow.href); // undefined

// element.getAttribute('속성'): 속성에 접근하기
console.log(tomorrow.getAttribute('href'));
console.log(item.getAttribute('class'));

// element.setAttribute('속성', '값'): 속성 추가(수정)하기
tomorrow.setAttribute('class', 'list'); // 추가
link.setAttribute('href', 'https://www.crackEgg.kr'); // 수정

// element.removeAttribute('속성'): 속성 제거하기
tomorrow.removeAttribute('href');
tomorrow.removeAttribute('class');
속성으로 대소문자를 구별하지 않는 것도 알고 있으면 좋다.
8. 스타일 다루기
// 스타일 다루기
const today = document.querySelector('#today');
const tomorrow = document.querySelector('#tomorrow');

// style 프로퍼티
today.children[0].style.textDecoration = 'line-through';
today.children[0].style.backgroundColor = '#DDDDDD';
today.children[2].style.textDecoration = 'line-through';
today.children[2].style.backgroundColor = '#DDDDDD';

// element.className
today.children[1].className = 'done';

// element.classList: add, remove, toggle
const item = tomorrow.children[1];
item.classList.add('done'); // class 추가
item.classList.remove('done'); // class 제거
item.classList.toggle('done'); // class가 있으면 제거하고 없으면 추가
style 프로퍼티를 통해서 css 속성을 다룰 때 여러 단어를 이어서 만든 속성은 camel 사용법을 사용해서 작성해야 한다. style 프로퍼티를 사용하면 스타일을 태그 안에 직접적으로 값이 적용되어, 스타일 우선순위가 높아지거나 같은 스타일을 여러 태그에 적용할 때 불필요하게 코드를 많이 작성해야하는 문제가 생길 수 있다.
className 프로퍼티를 사용하면 미리 만들어놓은 값을 적용하여 스타일을 입힐 수 있다. 하지만 class 속성 전체 값이 바뀌게 된다.
classList 프로퍼티는 class 속성 값을 유사 배열로 다루게 된다. 여러 개의 class를 추가할 때는 쉼표(,)로 나열하여 작성하면 된다. toggle의 경우, 두 번째 값으로 true를 주면 추가하는 기능을 하고 false를 주면 제거하는 기능을 한다. (그렇기 때문에 여러 class 속성을 추가할 수는 없다. 하지만 많이 사용되는 기능은 아니다.)
9. 비표준 속성 다루기
<!DOCTYPE html>
<html lang="ko">
<head>
  <meta charset="UTF-8">
  <title>JS with Codeit</title>
</head>
<body>
  <p>할 일 : <b field="title"></b></p>
  <p>담당자 : <b field="manager"></b></p>
  <p>상태 : <b field="status"></b></p>
  <div>
    상태 변경:
    <button class="btn" status="대기중">대기중</button>
    <button class="btn" status="진행중">진행중</button>
    <button class="btn" status="완료">완료</button>
  </div>
  <script src="index.js"></script>
</body>
</html>
[status] {
padding: 5px 10px;
}
[status="대기중"] {
background-color: #FF6767;
color: #FFFFFF;
}
[status="진행중"] {
background-color: #5f62ff;
color: #FFFFFF;
}
[status="완료"] {
background-color: #07c456;
color: #FFFFFF;
}b 태그들의 field 속성과 button 태그들의 status 속성은 해당 태그의 표준 속성이 아니다. [속성이름]처럼 대괄호를 이용하면 대괄호 안에 있는 속성이름을 가진 태그들을 선택할 수 있고 [속성이름="값"]처럼 작성하면, 좀 더 구체적으로 속성이름에 해당 값을 가진 태그들을 선택할 수 있다. 이러한 비표준 속성은 어떤 식으로 다룰 수 있는지 알아보자.
(1) 선택자로 활용
querySelector로 태그를 선택할 때 css 선택자를 활용해서 태그를 선택하는 데에 활용할 수 있다.
const fields = document.querySelectorAll('[field]');
console.log(fields);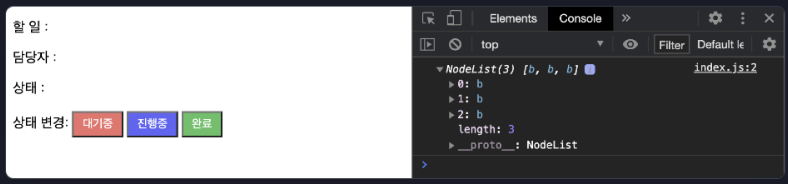
(2) 값을 표시할 태그를 구분할 때 활용
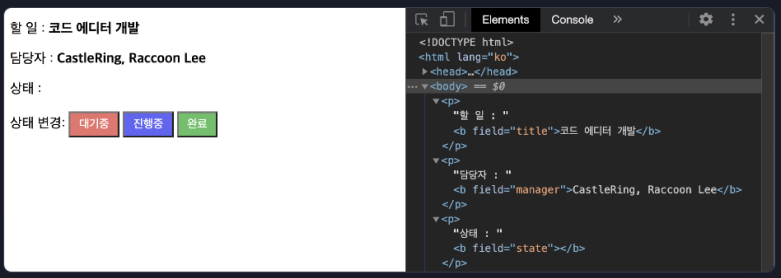
비표준 속성은 객체 형태의 데이터가 있을 때, 각 프로퍼티 값들이 들어갈 태그를 구분하는데 활용할 수 있다.
const fields = document.querySelectorAll('[field]');
const task = {
  title: '코드 에디터 개발',
  manager: 'CastleRing, Raccoon Lee',
  status: '',
};

for (let tag of fields) {
  const field = tag.getAttribute('field');
  tag.textContent = task[field];
}
(3) 스타일이나 데이터 변경에 활용
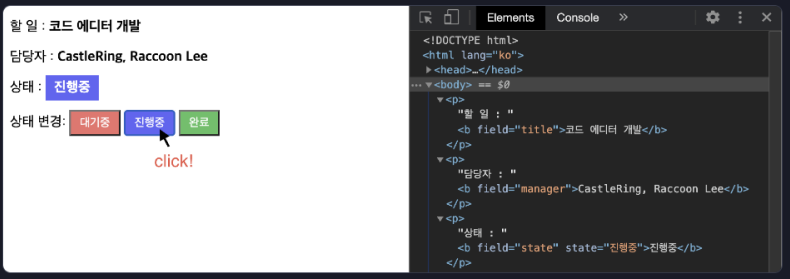
getAttribute 메소드를 활용해서 속성값을 가져오고, setAttribute 메소드를 활용햇 속성값을 설정해주는 원리로 이벤트를 통해 실시간으로 스타일을 변경하거나 데이터를 변경하는데 활용할 수 있다. 때로는 class를 다루는 것보다 setAttribute로 비표준 속성을 변경하는게 스타일을 다루기에 편리한 경우도 있다.
const fields = document.querySelectorAll('[field]');
const task = {
  title: '코드 에디터 개발',
  manager: 'CastleRing, Raccoon Lee',
  status: '',
};

for (let tag of fields) {
  const field = tag.getAttribute('field');
  tag.textContent = task[field];
}

const btns = document.querySelectorAll('.btn');
for (let btn of btns) {
  const status = btn.getAttribute('status');
  btn.onclick = function () {
    fields[2].textContent = status;
    fields[2].setAttribute('status', status);
  };
}
(4) 좀 더 안전하게, dataset 프로퍼티
다양한 방식으로 활용되는 비표준 속성에는 한 가지 문제가 있다. 만약 시간이 지나서 나중에 비표준 속성이 표준으로 등록되면 문제가 발생할 수 있다. 그래서 비표준 속성을 사용하기 위해 미리 약속된 방식이 있다. 바로 data-* 속성이다. data-로 시작하는 속성은 모두 dataset이라는 프로퍼티에 저장되어 있다. data-status라는 속성이 있다면, element.dataset.status라는 프로퍼티에 접근해서 그 값을 가져올 수 있게 되는 것이다.
<!DOCTYPE html>
<html lang="ko">
<head>
  <meta charset="UTF-8">
  <title>JS with Codeit</title>
</head>
<body>
  <p>할 일 : <b data-field="title"></b></p>
  <p>담당자 : <b data-field="manager"></b></p>
  <p>상태 : <b data-field="status"></b></p>
  <div>
    상태 변경:
    <button class="btn" data-status="대기중">대기중</button>
    <button class="btn" data-status="진행중">진행중</button>
    <button class="btn" data-status="완료">완료</button>
  </div>
  <script src="index.js"></script>
</body>
</html>
[data-status] {
padding: 5px 10px;
}
[data-status="대기중"] {
background-color: #FF6767;
color: #FFFFFF;
}
[data-status="진행중"] {
background-color: #5f62ff;
color: #FFFFFF;
}
[data-status="완료"] {
background-color: #07c456;
color: #FFFFFF;
}const fields = document.querySelectorAll('[data-field]');
const task = {
title: '코드 에디터 개발',
manager: 'CastleRing, Raccoon Lee',
status: '',
};
for (let tag of fields) {
const field = tag.dataset.field;
tag.textContent = task[field];
}
const btns = document.querySelectorAll('.btn');
for (let btn of btns) {
const status = btn.dataset.status;
btn.onclick = function () {
fields[2].textContent = status;
fields[2].dataset.status = status;
};
}