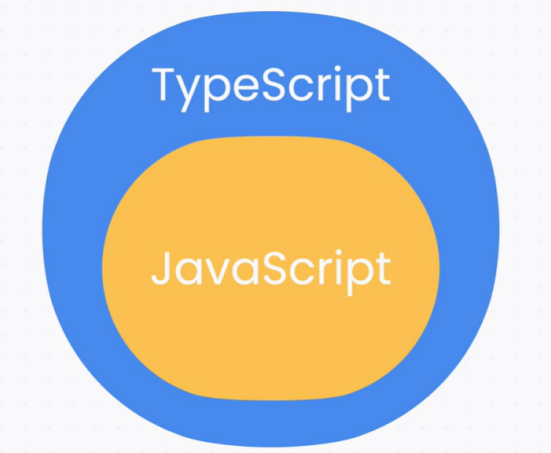
TypeScript 시작하기
1. TypeScript 프로젝트 세팅
npm init
npm install --save-dev typescript
npm tsc --init
package.json 파일에서 scripts에 "build": "tsc" 추가한다. 그리고 ts 파일 하나를 만든 후, npm run build를 입력하여 js 파일이 생성된 것을 확인할 수 있다. use strict는 조금 더 엄격한 기준으로 자바스크립트를 사용한다는 의미를 담고 있다.
node 파일명.js 명령어도 자주 사용하게 되기 때문에, scripts에 "start": "node 파일명.js"도 추가해주면, 단순히 npm start로 실행할 수 있게 된다.
2. TypeScript가 실행되는 과정
-
컴파일러 : 컴파일을 하는 프로그램을 의미한다. 컴파일이란, 한 프로그래밍에서 다른 프로그래밍 언어로 번역하는 것을 의미한다. 웹 개발에서는 트랜스파일(Transpile)이라고 한다.

-
타입스크립트 컴파일러(TSC) : 타입스크립트 코드를 자바스크립트 코드로 트랜스파일 해 주는 프로그램을 의미한다. 이 외에도 '타입 검사'를 하게 된다.
3. 타입을 정하는 법
let size = 100; // let size: number
size = 'L' // Error!

let size: number = 100; // 타입 지정
let size: number; // 바로 타입을 지정하지 않을 때
let size = 105;
4. 타입 오류 이해하기
// example1
const product = {
  id: 'c001',
  name: '라이트 윈드 브레이커',
  price: 129000,
};

// ...

product.price = '139000원'; // 오류

// ...

const salePrice = product.price * 0.9;
console.log(`할인 가격: ${salePrice}`);

// example2
let product = {
  id: 'c001',
  name: '라이트 윈드 브레이커',
  price: 129000,
  sizes: ['M', 'L', 'XL'],
};

// ...

const newProduct = {
  id: 'c002',
  name: '다크 윈드 브레이커',
  price: 139000,
  sizes: [90, 95, 100, 105, 100],
};

// ...

product = newProduct; // 오류(밖에서 안으로 오류를 해석하면 된다)
5. 기본형
let itemName: string = '안녕';
let itemPrice: number = 129000;
let membersOnly: boolean = true;
let owner: undefined = undefined;
let seller: null = null;
// undefined와 null은 서로 다른 타입이다.
6. 배열과 튜플
// 배열
const cart: string[] = [];
cart.push('c001');
cart.push('c002');

const carts: string[][] = [
  ['c001', 'c002'],
  ['c003'],
];

// 튜플
let mySize: [number, number] = [167, 28];
mySize = [167, 28, 255]; // 오류
mySize = [255]; // 오류
mySize = []; // 오류
mySize = [167, '28']; // 오류
7. 객체 타입
let product = {
  id: string;
  name: string;
  price: number;
  membersOnly?: boolean; // Optional Property
  sizes: string[];
} = {
  id: 'c001',
  name: '코드잇 블랙 후디',
  price: 129000,
  sizes: ['M', 'L', 'XL'],
}

if (product.membersOnly) {
  console.log('회원 전용 상품');
} else {
  console.log('일반 상품');
}

let field = 'field name';
let obj = {
  [field]: 'field value',
};

let stock: {
  [id: string]: number;
} = {
  c001: 3,
  c002: 2,
  c003: 0
};
8. any
const product: any = {
  id: 'c001',
  name: '블랙 후디',
  price: 129000,
  sizes: ['M', 'L', 'XL'],
};

console.log(product.reviews[2]);

// any는 되도록 사용하지 않아야 하지만 JSON으로 파싱할 때처럼 사용해야 할 때도 있다. 하지만 이 때도 되도록 자료형을 지정해주는 것도 좋다.
// 방법1
const parsedProduct: {
  name: string;
  price: number;
} = JSON.parse(
  '{ "name": "토트백", "price": 12000 }'
);

// 방법2
const parsedProduct = JSON.parse(
  '{ "name": "토트백", "price": 12000 }'
) as {
  name: string;
  price: number;
};

// 방법3 (자주 사용하는 방법은 아니다)
const parsedProduct: <{
  name: string;
  price: number;
}>JSON.parse(
  '{ "name": "토트백", "price": 12000 }'
);
9. 함수에 타입 정의하기
const mall: {
  stock: { [id: string]: number };
  cart: string[];
  addToCart: (id: string, quantity?: number) => boolean;
  addManyToCart: {...ids: string[]) => void; // 비워있음을 의미한다.
} = {
  stock: {
  	c001: 3,
  	c002: 1,
  },
  cart: [],
  addToCart,
};

function addToCart(id: string, quantity?: number) {
  if (!quantity) {
    quantity = 1;
  )

  if (stock[id] < quantity) {
    return false;
  }

  stock[id] -= quantity;
  for (let i = 0; i < quantity; i++) {
    cart.push(id);
  }

  return true;
}

function addManyToCart(...ids: string[]) {
  for (const id of ids) {
    addToCart(id);
  }
};

console.log(stock, cart);
const result1 = addToCart('c001', 1);
console.log(`결과1: ${result1}`);
console.log(stock, cart);
const result2 = addToCart('c002', 2);
console.log(`결과2: ${result2}`);
console.log(stock, cart);
10. 기본 문법 정리
(1) 배열과 튜플
배열 타입을 만들려면 타입을 적고 []를 붙인다. 만약에 배열을 만들고 싶다면 배열 타입 뒤에 []를 붙이면 된다. 튜플은 개수랑 순서가 정해져 있는 배열이다. [] 안에 순서대로 타입을 쉼표로 구분해서 쓰면 된다.
// 배열
const cart: string[] = [];
cart.push('c001');
cart.push('c002');

// 배열의 배열
const carts: string[][] = [
  ['c001', 'c002'],
  ['c003'],
];

// 튜플
let mySize: [number, number, string] = [175, 30, 'L'];
(2) 객체 타입
{} 안에다가 프로퍼티 이름을 쓰고 콜론 다음에 타입을 쓴다. 각 프로퍼티는 세미콜론으로 구분한다. 필수가 아닌 프로퍼티는 프로퍼티 이름 뒤에 물음표를 붙인다.
let product: {
  id: string;
  name: string;
  price: number;
  membersOnly?: boolean; // 필수가 아닌 프로퍼티
  sizes: string[];
} = {
  id: 'c001',
  name: '코드잇 블랙 후디',
  price: 129000,
  sizes: ['M', 'L', 'XL'],
};

if (product.membersOnly) {
  console.log('회원 전용 상품');
} else {
  console.log('일반 상품');
}
프로퍼티의 개수를 정하지 않고, 프로퍼티 값의 타입을 정하고 싶다면 아래와 같은 문법을 활용하면 된다.
let stock: { [id: string]: number } = {
  c001: 3,
  c002: 0,
  c003: 2,
};
(3) any 타입
자바스크립트를 사용할 때와 마찬가지로 자유롭게 쓸 수 있는 타입이다. 되도록이면 any 타입으로 지정하지 않는 것을 권장한다. 어쩔 수 없이 any 타입을 사용하는 경우 as 키워드를 써서 타입을 지정하거나, 콜론으로 타입을 지정할 수 있다.
const parsedProduct = JSON.parse('{ "name": "토트백", "price": 12000 }') as { name: string; price: number };

const parsedProduct: { name: string; price: number } = JSON.parse('{ "name": "토트백", "price": 12000 }');
(4) 함수 타입
리턴 타입을 지정하는 경우에는 다음과 같이 작성하면 된다.
function addToCart(id: string, quanity: number): boolean {
    if (어떤 조건) {
     return false;
  }

  return true;
}
리턴 타입을 미리 주지 않고 리턴 값으로부터 추론하게 할 수도 있다.
function addToCart(id: string, quanity: number) {
    if (어떤 조건) {
     return false;
  }

  return true;
}
함수를 값으로 사용하는 경우 화살표 함수처럼 작성하면 된다.
(id: string, quanity: number) => booleanRest 파라미터로 배열 타입을 쓴다. 값을 리턴하지 않느 ㄴ경우 리턴 타입을 void로 할 수 있다.
(...ids: string[]) => void;11. Enum(열거형)
enum Size {
  S = 'S',
  M = 'M',
  L = 'L',
  XL = 'XL',
}

let product: {
  id: string;
  name: string;
  price: number;
  membersOnly?: boolean;
  sizes: Size[];
} = {
  id: 'c001',
  name: '블랙 후디',
  price: 129000,
  sizes: [Size.M, Sime.L],
};
12. Interface
enum Size {
  S = 'S',
  M = 'M',
  L = 'L',
  XL = 'XL',
}

interface Product {
  id: string;
  name: string;
  price: number;
  membersOnly?: boolean;
}

// 상속 가능
interface ClothingProduct extends Product {
  sizes: Size[];
}

const product1: ClothingProduct = {
  id: 'c001',
  name: '블랙 후드 집업',
  price: 129000,
  membersOnly: true,
  sizes: [Size.M, Size.L],
};

const product2: Product {
  id: 'd001',
  name: '텀블러',
  price: 25000,
};

interface PrintProductFunction {
  (product: Product): void;
}

const printProduct: PrintProductFunction = (product) => {
  console.log(`${product.name}의 가격은 ${product.price}원입니다.`)
}

printProduct(product1);
printProduct(product2);
13. 리터럴 타입
let productName1 = '블랙 후드';
const productName2 = '텀블러';

let small = 95;
const large = 100;

function printSize(size: number) {
  console.log(`${size} 사이즈입니다.`);
}

printSize(small); // 오류
printSize(large); // 100
14. 타입 별칭
type Cart = string[];
type CartResultCallback = (result: boolean) => void;

const cart: Cart = [
  'c001',
  'c001',
  'c002',
];

interface User {
  username: string;
  email: string;
  cart: string[];
}

const user: User = {
  username: 'hello',
  email: 'typescript@hello.kr',
  cart,
}
15. Union 타입
enum ClothingSize {
  S = 'S',
  M = 'M',
  L = 'L',
  XL = 'XL',
}

interface Product {
  id: string;
  name: string;
  price: number;
  membersOnly?: boolean;
}

interface ClothingProduct extends Product {
  sizes: ClothingSize[];
  color: string;
}

interface ShoeProduct extends Product {
  sizes: number[];
  handmade: boolean;
}

// Union
function printSizes(product: ClothingProduct | ShoeProduct) {
  const availableSizes = product.sizes.join(', ');
  console.log(`구매 가능한 사이즈는 다음과 같습니다: ${availableSizes}`);

  if ('color' in product) {
    console.log(`색상: ${product.color}`);
  )

  if ('handmade' in product) {
    console.log(
      product.handmade
      	? '이 상품은 장인이 직접 만듭니다.'
      	: '이 상품은 공장에서 만들어졌습니다.'
    );
  }
}

const product1: ClothingProduct = {
  id: 'c001',
  name: '코드잇 블랙 후드 집업',
  price: 129000,
  membersOnly: true,
  sizes: [ClothingSize.M, ClothingSize.L],
  color: 'black',
};

const product2: ShoeProduct = {
  id: 's001',
  name: '코드잇 스니커즈',
  price: 69000,
  membersOnly: false,
  sizes: [220, 230, 240, 260, 280],
  handmade: false,
};

printSizes(product1);
printSizes(product2);
16. Intersection 타입
interface Id {
  id: string;
}

interface Timestamp {
  createdAt: Date;
  updatedAt: Date;
}

type Product = Id & {
  name: string;
  price: number;
  membersOnly?: boolean;
}

type User = Id & Timestamp & {
  username: string;
  email: string;
}

type Review = Id & Timestamp & {
  productId: string;
  userId: string;
  content: string;
}

const product: Product = {
  id: 'c001',
  name: '코드잇 블랙 후드티',
  price: 129000,
}

const user: User = {
  id: 'user0001',
  username: 'codeit',
  email: 'typescript@codeit.kr',
  createdAt: new Date(),
  updatedAt: new Date(),
}

const review: Review = {
  id: 'review001',
  userId: user.id,
  productId: product.id,
  content: '아주 좋음',
  createdAt: new Date(),
  updatedAt: new Date(),
}
17. Intersection하면 합쳐지는 이유
(1) Structural Subtyping
타입스크립트에서 타입은 Structural Subtyping이라는 규칙을 따른다. 쉽게 말해 구조가 같으면 같은 타입이라고 판단하는 것이다. 예를 들어 a라는 프로퍼티를 갖는 타입 A가 있다고 하고, 이 타입의 a 프로퍼티를 출력하는 printA()라는 함수가 있다고 가정하자. 이 함수를 아래와 같이 { a: 'codeit' }, { a: 'codeit', b: 42 }, { a: 'codeit', b: 42, c: true }라는 객체로 실행해도 모두 올바른 타입이다. 세 객체 모두에 a라는 프로퍼티가 있기 때문에 타입 A라고 판단하는 것이다. 이런 걸 Structural Subtyping, Structural Type System이라고 부른다.
interface A {
  a: string;
}

interface B {
  b: number;
}

function printA(arg: A) {
  console.log(arg.a);
}

const x = { a: 'codeit' };
const y = { b: 42 };
const z = { a: 'codeit', b: 42 };
const w = { a: 'codeit', b: 42, c: true };

printA(x);
printA(y); // 잘못된 타입
printA(z);
printA(w);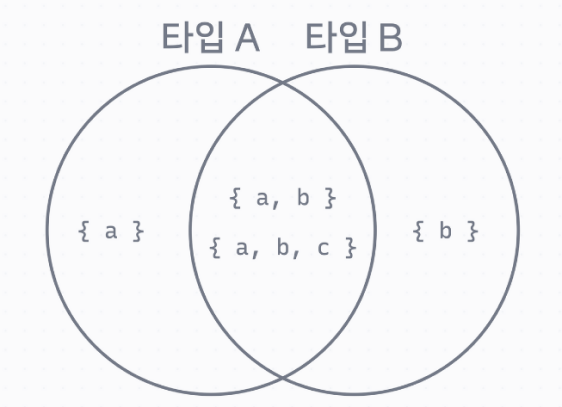
(2) Union 타입 살펴보기
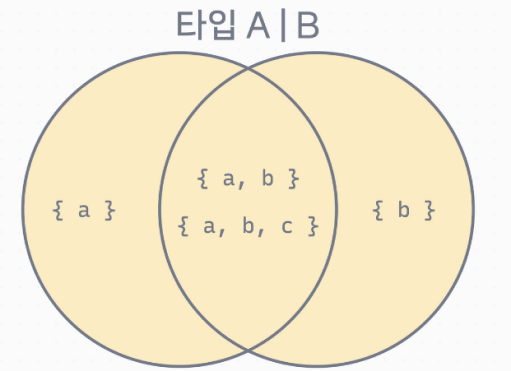
코드를 확인해 봐도 pirntAUnionB()라는 함수에 모두 타입 오류 없이 사용할 수 있다는 것을 알 수 있다. 참고로 함수 안에서 if문으로 in 키워드를 사용해서 해당하는 프로퍼티가 존재하는지 확인해 봤는데, 이런 식으로 타입의 범위를 좁힐 수도 있다. 타입스크립트에서는 이런 걸 Type Narrowing이라고 표현한다.
interface A {
  a: string;
}

interface B {
  b: number;
}

function printAUnionB(arg: A | B) {
  // 여기서는 타입 A | B

    if ('a' in arg) {
    // 여기 안에서는 타입 A
    console.log(arg.a);
  }

    if ('b' in arg) {
    // 여기 안에서는 타입 B
    console.log(arg.b); // VS Code에서 arg에 마우스를 호버해 보세요.
  }
}

const x = { a: 'codeit' };
const y = { b: 42 };
const z = { a: 'codeit', b: 42 };
const w = { a: 'codeit', b: 42, c: true };

printAUnionB(x);
printAUnionB(y);
printAUnionB(z);
printAUnionB(w);
(3) Intersection 타입 살펴보기
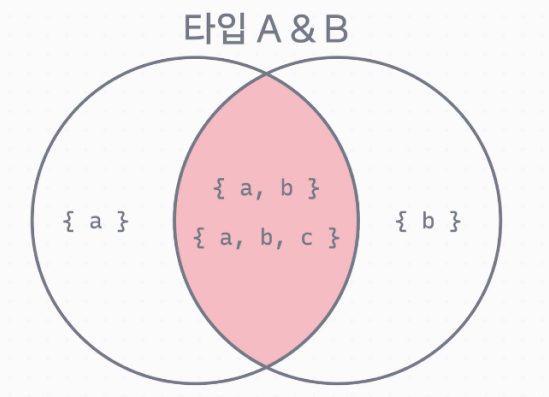
interface A {
  a: string;
}

interface B {
  b: number;
}

function printAIntersectionB(arg: A & B) {
  console.log(arg.a);
  console.log(arg.b);
}

const x = { a: 'codeit' };
const y = { b: 42 };
const z = { a: 'codeit', b: 42 };
const w = { a: 'codeit', b: 42, c: true };

printAIntersectionB(x); // 타입 오류
printAIntersectionB(y); // 타입 오류
printAIntersectionB(z);
printAIntersectionB(w);
(4) 정리
간단하게 A | B라고 하면 "A 타입이거나 B 타입이다", A & B라고 하면 "A 타입이랑 B 타입을 합친 것이다"라고 생각하면 대부분의 경우 문제없이 사용할 수 있다.
18. keyof와 typeof 연산자
interface Product {
  id: string;
  name: string;
  price: number;
  salePrice: number; // 추가
  membersOnly?: boolean;
}

// type ProductProperty = keyof Product;

const productTableKeys: (keyof Product)[] = ['name', 'price', 'salePrices', 'membersOnly'];

const product: Product = {
  id: 'c001',
  name: '블랙 후드 집업',
  price: 129000,
  salePrice: 90000,
  membersOnly: true,
};

for (let key of productTableKeys) {
  console.log(`${key} | ${product[key]}`);
}
19. 타입 별칭은 언제 쓰면 좋을까
(1) Enum과 타입 별칭
1. Enum을 사용하는 경우 (권장)
enum UserType {
  Admin = 'admin',
  User = 'user',
  Guest = 'guest',
}

const role = UserType.Admin;
console.log(role === UserType.Guest);
2. 타입 별칭과 Union을 사용한 경우
type UserType = 'admin' | 'user' | 'guest'

const role: UserType = 'admin';
console.log(role === 'guest');
3. JavaScript로 트랜스파일링 했을 때
"use strict";
var UserType;
(function (UserType) {
    UserType["Admin"] = "admin";
    UserType["User"] = "user";
    UserType["Guest"] = "guest";
})(UserType || (UserType = {}));
const role = UserType.Admin;
console.log(role === UserType.Guest);
Enum은 별도의 자바스크립트 객체를 만들어서 그 객체를 사용한다. UserType은 자바스크립트에서 아래와 같은 객체인 것이다.
{ Admin: 'admin', User: 'user', Guest: 'guest' }예를 들어 가능한 UserType 값들을 모두 활용해서 어떤 동작을 구현하고 싶다면 Enum을 써서 Object.keys()라는 함수를 사용해 볼 수 있다.
console.log(Object.keys(UserType)); // ['Admin', 'User', 'Guest']반면에 타입 별칭은 타입스크립트에서만 의미 있는 코드이다. 그래서 Enum과 달리 자바스크립트로 트랜스파일 했을 때 추가로 객체 같은 걸 만들지 않고 단순히 값만 사용하는 코드가 만들어진다.
"use strict";
const role = 'admin';
console.log(role === 'guest');
4. 어떤 걸 써야 할까
대부분의 경우 Enum 또는 타입 별칭을 모두 사용할 수 있다. 하지만 되도록 Enum의 목적에 맞는 경우라면 Enum 문법을 사용하는 걸 권장한다.
(2) Interface와 타입 별칭
1. Interface를 사용한 경우 (권장)
interface Entity {
  id: string;
  createdAt: Date;
  updatedAt: Date;
}

interface User extends Entity {
  username: string;
  email: string;
}
2. 타입 별칭을 사용한 경우
type Entity = {
  id: string;
  createdAt: Date;
  updatedAt: Date;
}

type User = Entity & {
  username: string;
  email: string;
}
Inteface의 상속과 Intersection의 가장 큰 차이점은 Intersection은 두 가지 이상의 타입을 한 번에 합칠 수 있다는 것이다. 이것도 Interface로 아주 불가능하지는 않다.
interface Entity {
  id: string;
}

interface TimestampEntity extends Entity {
  createdAt: Date;
  updatedAt: Date;
}

interface User extends TimestampEntity {
  username: string;
  email: string;
}
type Id = {
id: string;
}
type Entity = {
createdAt: Date;
updatedAt: Date;
}
type User = Id & Entity & {
username: string;
email: string;
}3. 어떤 걸 써야 할까
대부분의 경우 Inteface 또는 타입 별칭을 모두 사용할 수 있다. 하지만 되도록 Inteface의 목적에 맞는 경우라면 Enum 문법을 사용하는 걸 권장한다.
(3) 타입 별칭은 언제 쓰면 좋을까
타입 별칭은 타입에 '이름'을 정하는 문법이다. 복잡한 타입을 만들고, 그 타입을 여러 곳에서 활용할 때 사용하면 된다. 예를 들어 아래와 같이 복잡한 타입을 만들고 여러 고셍서 재활용할 수 있다.
type Point = [number, number];
type SearchQuery = string | string[];
type Result = SuccessResult | FailedResult;
type Coupon =
  | PromotionCoupon
  | EmployeeCoupon
  | WelcomCoupon
  | RewardCoupon
  ;
20. 타입들 문법 정리
(1) 리터럴 타입
특정한 숫자나 문자열 같이 변수의 값을 타입으로 하는 타입이다. 각 리터럴 타입들은 string이나 number 같은 더 큰 타입에 포함된다.
const name = 'hello'; // 'hello' 이라는 리터럴 타입
const rank = 1; // 1 이라는 리터럴 타입
(2) 타입 별칭
복잡한 타입에 이름을 붙이고 재사용하고 싶을 때 사용한다.
type Point = [number, number];
type SearchQuery = string | string[];
type Result = SuccessResult | FailedResult;
type Coupon =
  | PromotionCoupon
  | EmployeeCoupon
  | WelcomCoupon
  | RewardCoupon
  ;
(3) Union
A 이거나 또는 B인 경우를 타입으로 만들고 싶을 때
ClothingProduct | ShoeProduct(4) Intersection
A와 B의 성질을 모두 갖는 타입을 만들고 싶을 때
interface Entity {
  id: string;
  createdAt: Date;
  updatedAt: Date;
}

type Product = Entity & {
  name: string;
  price: number;
  membersOnly?: boolean;
}
하지만 보통 이럴 때는 interface와 상속을 사용하는걸 권장한다.
interface Entity {
  id: string;
  createdAt: Date;
  updatedAt: Date;
}

interface Product extends Entity {
  name: string;
  price: number;
  membersOnly?: boolean;
}
(4) keyof 연산자
객체 타입에서 프로퍼티 이름들을 모아서 Union한 타입으로 만들고 싶을 때 사용한다.
interface Product {
  id: string;
  name: string;
  price: number;
  membersOnly?: boolean;
}

type ProductProperty = keyof Product; // 'id' | 'name' | 'price' | 'membersOnly';
(5) typeof 연산자
자바스크립트 코드에서 사용하면 결괏값이 문자열이지만, 타입스크립트 코드에서 쓸 때는 결과 값은 타입스크립트의 타입이다.
const product: Product = {
  id: 'c001',
  name: '블랙 후드 집업',
  price: 129000,
  salePrice: 98000,
  membersOnly: true,
};

console.log(typeof product); // 문자열 'object'

const product2: typeof product = { // 타입스크립트의 Product 타입
  id: 'g001',
  name: '텀블러',
  price: 25000,
  salePrice: 19000,
  membersOnly: false,
};
21. 제네릭
const shoeSizes: number[] = [230, 250, 280];
shoeSizes.map((num) => {

});

const clothingSizes: string[] = ['M', 'L', 'XL'];
clothingSizes.map((names) => {

});

function printArray<T>(items: T[]) {
  for (const item of items) {
    console.log(item);
  }
}

printArray(shoeSizes);
printArray(clothingSizes);
22. 알아두면 유용한 제네릭 타입들
(1) JavaScript 기능들
1. querySelector() 함수
기본적으로 어떤 DOM 노드가 리턴될지 모르기 때문에 HTMLElement라는 일반적인 타입으로 정의된다. 하지만 타입을 확신할 수 있는 경우에는 아래 코드처럼 직접 제네릭 타입을 정의해 주면 된다.
const elem = document.querySelector<HTMLInputElement>('input.username');2. Map
key와 value를 갖는 자료구조이다. 타입 파라미터로 key와 value의 타입을 정의하고 사용할 수 있다.
const productMap = new Map<string, Product>();
productMap.set(product1.id, product1);
productMap.set(product2.id, product2);
3. Set
배열과 비슷하지만 중복된 요소를 추가할 수 없는, 수학에서 집합에 해당하는 자료구조이다. 타입 파라미터로 요소의 타입을 정의하고 사용할 수 있다.
const productSet = new Set<Product>();
productSet.add(product1);
productSet.add(product2);
(2) 유용한 타입들
1. key와 value 정하기: Record
객체에 key와 value 타입을 정해놓고 싶을 때 사용한다. Map과 비슷하지만 차이점은 순수한 객체에 타입만 추가한다는 점이다.
const productMap: Record<string, Product> = {}
productMap['c001'] = product1;
productMap['c002'] = product2;
2. 객체 프로퍼티 고르기: Pick
interface Product {
  id: string;
  name: string;
  price: number;
  membersOnly?: boolean;
}

type ProductInfo = Pick<Product, 'name' | 'price'>;Pick으로 만든 타입은 아래와 같다. name 프로퍼티와 price 프로퍼티만 골라서 타입을 만들었다.
type ProductInfo = {
    name: string;
    price: number;
}
3. 객체의 프로퍼티 생략하기: Omit
interface Product {
  id: string;
  name: string;
  price: number;
  membersOnly?: boolean;
}

type ProductInfo = Omit<Product, 'id' | 'membersOnly'>;Omit으로 만든 타입은 아래와 같다. id와 membersOnly를 제외하고 타입을 만들었다.
type ProductInfo = {
    name: string;
    price: number;
}
4. Union 제거하기: Exclude
Union을 사용해서 PromotionCoupon 또는 EmployeeCoupon 또는 WelcomeCoupon 또는 RewardCoupon인 타입을 Coupon이라고 했다. 여기서 EmployCoupon에 해당하는 것만 제거를 하고 싶을 때 Exclude를 사용할 수 있다.
type Coupon =
  | PromotionCoupon
  | EmployeeCoupon
  | WelcomCoupon
  | RewardCoupon
  ;

type InternalCoupon = EmployeeCoupon;
type PublicCoupon = Exclude<Coupon, InternalCoupon>;
// type PublicCoupon = PromotionCoupon | WelcomCoupon | RewardCoupon
5. 함수 파라미터 타입 가져오기: Parameters
함수 파라미터들의 타입을 함수의 타입을 통해 정의할 수 있다. 만약 함수의 타입이 아니라, 선언된 함수라면 typeof 연산자로 함수의 타입으로 만들어서 사용하면 된다.
function addToCart(id: string, quantity: number = 1): boolean {
  // ...
  return true;
}

type AddToCartParameters = Parameters<typeof addToCart>;
// type AddToCartParameters = [id: string, quantity: number | undefined]
6. 함수 리턴 타입 가져오기: ReturnType
Parameters와 마찬가지로 함수의 리턴 타입을 가져온다.
function addToCart(id: string, quantity: number = 1): boolean {
  // ...
  return true;
}

type AddToCartResult = ReturnType<typeof addToCart>;
// type AddToCartResult = boolean
22. 자주 사용하는 옵션
앞에서 프로젝트를 만들 때 tsc --init 명령어로 tsconfig.json 파일을 생성했다. 이 파일에서 사용할 수 있는 여러 옵션들에 대해 자세히 살펴보도록 하겠다.
{
  "compilerOptions": {
    "target": "es2016",                                  /* Set the JavaScript language version for emitted JavaScript and include compatible library declarations. */
    "module": "commonjs",                                /* Specify what module code is generated. */
    "esModuleInterop": true,                             /* Emit additional JavaScript to ease support for importing CommonJS modules. This enables 'allowSyntheticDefaultImports' for type compatibility. */
    "forceConsistentCasingInFileNames": true,            /* Ensure that casing is correct in imports. */
    "strict": true,                                      /* Enable all strict type-checking options. */
    "skipLibCheck": true                                 /* Skip type checking all .d.ts files. */
  }
}compilerOptions에서 사용할 수 있는 옵션 중에서 중요한 것들에 대해 살펴보도록 하겠다.
(1) target : 어떤 ECMAScript 버전으로 변환할지
타입스크립트 코드는 빌드해서 자바스크립트로 변환한다. 이때 변환할 자바스크립트의 버전을 정할 수 있는데, 만약에 프로젝트가 과거 자바스크립트 표준만 지원하는 브라우저까지 지원해야 한다면, 여기서 오래된 버전을 설정할 수 있다. 2023년 기준으로 tsconfig.json을 생성했을 때, 기본적으로 ES7(ES2016)으로 변환하도록 되어있다.
코드를 실행할 브라우저나 Node.js 환경에 따라 선택하면 되는데, 브라우저의 경우 ES5는 거의 모든 브라우저에서 지원하고, ES6는 인터넷 익스플로러를 제외하면 대부분의 브라우저에서 지원한다. Node.js의 경우 v14 이후 버전을 쓰고 있다면 ES5, ES6을 대부분 지원한다. 잘 모르겠다면 일단은 ES6로 설정해 두고 쓰는 걸 추천한다.
(2) module : 어떤 방식으로 모듈을 만들지
자바스크립트 모듈에는 크게 두 가지 방식이 있는데, ES6부터 도입된 import/export 문법을 사용하는 ESM(ECMAScript Module) 방식이 있고, Node.js 같은 데서 기본적으로 사용하는 CJS(CommonJS) 방식이 있다.
이 옵션에서는 자바스크립트 코드로 트랜스파일할 때 어떤 모듈 문법으로 변환할지 선택할 수 있다. ESM을 쓰려면 es6, es2020과 같이 es로 시작하는 값을 쓰면 되고, CJS를 쓰려면 commonjs라고 쓰면 된다. 보통 Node.js 환경에서는 CJS를 사용하고, 프론트엔드 개발을 할 때는 보통 번들러에서 모듈을 알아서 처리해 주기 때문에 ESM, CJS 상관없이 쓸 수 있다. 어떤 걸 선택할지 모르겠다면 commonjs로 설정하는 걸 추천한다.
(3) esModuleInterop : ES 모듈을 안전하게 사용
ESM 문법에서 import * as moment from 'moment라든가 import moment from 'moment'라는 문법은 다르다. 이 옵션을 false로하면 CJS로 변환했을 때 두 코드는 같은 형태의 코드 const moment = require('moment')로 변환된다. 안전하게 모듈을 사용하려면 esModuleInterop 옵션은 true로 해놓는 것을 추천한다.
(4) forceConsistentCasingInFileNames : 파일의 대소문자 구분하기
main.ts와 Main.ts는 macOS에서는 다르게 취급하고, Windows에서는 동일하게 취급한다. 어떤 환경에서 개발하더라도 반드시 대소문자구분을 명확하게 하겠다는 옵션이다. 이 옵션도 반드시 true로 해놓는 것을 추천한다.
(5) strict : 엄격한 규칙들 켜기
1. noImplicitAny
아무 타입을 직접 정의하지 않고, 타입 추론도 되지 않는 상태를 implicit any라고 하는데, 쉽게 말해 기존 자바스크립트 코드처럼 타입 없이 사용하는 걸 의미한다. 새로 시작하는 타입스크립트 프로젝트라면 반드시 켜는 걸 추천한다. 아래처럼 설정하면 strict 규칙들을 한꺼번에 설정하지만, noImplicitAny는 설정하지 않을 수도 있다.
"strict": true,
"noImplicitAny": false,
2. strictNullChecks
null이 될 가능성이 있다면, 이런 경우를 반드시 처리하도록 하는 옵션이다. 이것도 되도록이면 켜 놓는것을 추천한다. 예를 들어 아래와 같이 strict null check를 할 때 오류가 발생한다. num 변수가 null이 될 수도 있기 때문이다. 반면에 strictNullChecks가 꺼져있다면 타입 오류가 나지 않는다. 대신 실행하는 도중에 num 변수에 null 값이 들어간다면 런타임 오루가 발생할 것이다.
let num: number | null;
// ...
num -= 1;
~~~
되도록이면 strictNullChecks를 키고, 반드시 null check를 하는 걸 추천한다.
let num: number | null;
// ...
if (num !== null) {
  num -= 1;
}
(6) skipLibCheck : 설치한 패키지의 타이 검사하지 않기
node_modules 폴더에 설치된 패키지들의 타입 검사를 하지 않는 옵션이다. 패키지 개발 과정에서 대부분 타입 검사가 이뤄지기 때문에, 중복으로 하지 않아도 된다. 그래서 이 옵션을 사용하는 걸 추천한다.
(7) rootDir : 최상위 폴더
타입스크립트 컴파일러가 처리할 타입스크립트 파일들의 최상위 폴더를 정하는 옵션이다. 기본 값으로는 처리하는 파일들의 경로를 종합해서 최상위 폴더를 정한다. 만약 tsconfig.json 파일과 같은 폴더에 있는 src 폴더를 최상위 폴더로 정하고 싶다면 아래와 같이 작성하면 된다.
{
  "compilerOptions": {
    "rootDir": "src",
  }
}
(8) outDir : 자바스크립트 파일을 생성할 폴더
outDir에 지정된 폴더 안에다가 rootDir의 디렉터리 구조에 따라서 자바스크립트 파일을 만든다. 값을 지정하지 않으면 소스코드 파일과 같은 폴더에 자바스크립트 파일을 만든다.
{
  "compilerOptions": {
    "outDir": "dist",
  }
}
(9) resolveJsonModule : JSON 파일 임포트하기
.json 파일을 임포트해서 사용하고 싶다면 이 옵션을 켜야 한다.
import data from 'data.json';
// ...
(10) include와 exclude
tsc로 트랜스파일할 때 포함할 경로(include)와 포함하지 않을 경로(exclude)를 정해줄 수 있다. 배열로 경로 패턴을 적어주면 된다. **/*라는 코드는 아래의 모든 폴더, 모든 파일을 의미한다. 참고로 이런 패턴을 Glob 패턴이라고 한다.
{
  "compilerOptions": {
    "target": "es2016",                                  /* Set the JavaScript language version for emitted JavaScript and include compatible library declarations. */
    "module": "commonjs",                                /* Specify what module code is generated. */
    "esModuleInterop": true,                             /* Emit additional JavaScript to ease support for importing CommonJS modules. This enables 'allowSyntheticDefaultImports' for type compatibility. */
    "forceConsistentCasingInFileNames": true,            /* Ensure that casing is correct in imports. */
    "strict": true,                                      /* Enable all strict type-checking options. */
    "skipLibCheck": true                                 /* Skip type checking all .d.ts files. */
  }
  "include": ["src/**/*", "tests/**/*"],
  "exclude": ["bin/**/*"],
}
23. tsconfig.json 파일 불러오기
tsconfig.json 파일을 매번 설정하는 건 귀찮기도 하고, 만약에 여러 프로젝트를 개발한다면 항상 똑같은 설정을 쓰고 싶을 것이다. 이럴 때 매번 복사/붙여넣기 하는 건 유지 보수하는데 좋지 않다. 이럴 때 사용할 수 있는 옵션이 바로 extends이다. 아래와 같이 extends 옵션으로 원하는 설정 파일의 경로를 적어주면 tsconfig.json 파일을 불러올 수 있다. 추가로 옵션을 사용해서 덮어쓸 수도 있다.
{
  "extends": "<설정 파일 경로>"
}
(1) tsconfig/bases 예시
예를 들어 권장하는 tsconfig.json 설정들을 모아놓은 tsconfig/bases 리포지토리에 있는 설정 파일을 패키지로 설치한 다음, 불러와서 사용해 보도록 하겠다.
1. 패키지 설치하기
npm install --save-dev @tsconfig/recommended타입스크립트 패키지는 개발 환경에서만 사용하기 때문에, --save-dev 옵션으로 설치해야 한다.
2. extends 설정하기
tsconfig.json 파일의 맨 위에 extends 속성을 추가해 준다. 기존에 사용하던 옵션은 지워준다.
{
  "extends": "@tsconfig/recommended/tsconfig.json",
  "compilerOptions": {
  }
}
3. 옵션 덮어쓰기
bases/recommended.json 파일을 살펴보면 아래와 같은 옵션을 사용하고 있다.
{
  "compilerOptions": {
    "target": "ES2015",
    "module": "commonjs",
    "strict": true,
    "esModuleInterop": true,
    "skipLibCheck": true,
    "forceConsistentCasingInFileNames": true
  },
  "$schema": "https://json.schemastore.org/tsconfig",
  "display": "Recommended"
}target을 ES2016으로 사용하고 싶어서 이 옵션을 덮어쓰도록 하겠다.
{
  "extends": "@tsconfig/recommended/tsconfig.json",
  "compilerOptions": {
    "target": "ES2016"
  }
}
이런 식으로 extends 옵션을 사용하면 패키지로 설치한 tsconfig.json 파일을 불러올 수도 있고, 직접 만든 tsconfig.json 파일을 불러올 수도 있다.
